This Gambit guide may seem a little frivolous if you feel like you already mastered Final Fantasy 12‘s Gambit system a decade ago, but most players have trouble setting up effective Gambit chains that can be used in most situations.
Here we’re going to go over my current playthrough’s party and their Gambits to use as examples to help you make better use of your character’s available Gambits and get some effective chains set up.
I’ve played the Final Fantasy 12: International Job System version three or four times before 2017’s The Zodiac Age remaster. This is not my first rodeo with the remaster’s new Gambits, and hopefully my experience having rammed myself into FF12 so much over the years will come to some sort of use.
General Gambit Advice
There are a lot of things I could say about Gambits, but I’ll only touch on a few up here.
Some things you need for both your parties:
- Both parties need someone to steal at basically every encounter
- Both parties need someone to attack potential steal targets to keep whoever is stealing from doing it infinitely
- Both parties need to have someone with Libra up at all times to see enemy information and traps
I’ve followed these three very simple rules since the original release, through IZJS, and into The Zodiac Age. They’re good rules of thumb, and they’re easy to follow. You’ll get a good example of a Steal Gambit (and preventing stealing) in the first party, but the second party’s use of Steal basically works the same way.
I also recommend always having at least one character per party default to attacking the lowest HP enemy when it doesn’t have anything else to do, to prevent Magick and Technicks from being used on weak enemies.
Furthermore, it’s always a good idea to have one character focus their attacks on the highest max HP enemy to always have some sort of focus on the strongest enemy in a group. You’ll see both of these in the both parties below — which aren’t perfect, but they definitely get the job done.
The Magick element you have your casters use will vary from area to area, especially Black Mages and Red Battlemages. If there are enemies weak to a particular element in the area you’re in, you’re probably going to want to change your mages’ spells to the element nearby enemies are weak to. This also applies to debuff removal spells and items.
With that out of the way, let’s take a look at my current two parties and their Gambits so you can get some direct examples of an experienced player’s Gambit setups. There are some pretty neat uses of Gambits in here, so pay attention!
The Parties in Question
This version of the game is the first iteration where characters can have two job classes instead of one, so don’t judge me too harshly for my character/job combinations!
The parties I’m running this playthrough have yet to beat any but the story Espers, and have almost every Technick and Magick — aside from the last two tiers, as I’m not done hunting everything down yet. This gives a realistic portrayal of an average player’s mid-to-late game party’s Gambits.
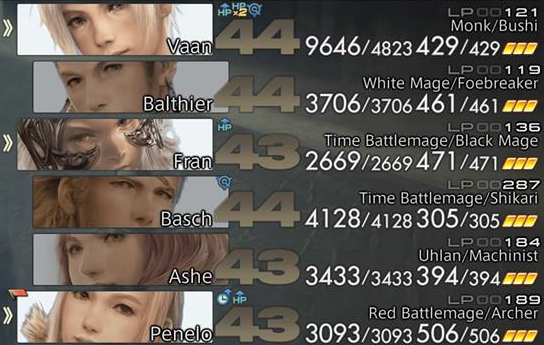
My character combinations and two parties are as follows:
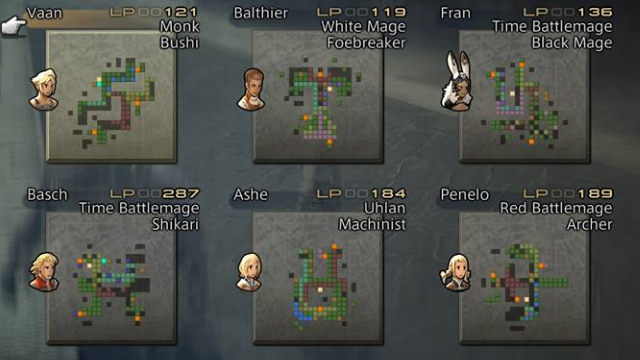
Team “Two Kids and an Irritated Rabbit”
- Vaan – Monk/Bushi
- Penelo – Red Battlemage/Archer
- Fran – Black Mage/Time Battlemage
This one has Penelo and Vaan sharing healing responsibilities for now, with Vann being switched to main healer once I’ve got the Espers for it (Monk is an amazing job).
All three are on damage duty, with Vaan using a Katana, Penelo doling out Dark Magick, and Fran on AoE/elemental duty. In 3+ enemy situations and against bosses, Vaan is the tank.
Team “The Only Relevant Characters”
- Balthier – White Mage/Foebreaker
- Basch – Time Battlemage/Shikari
- Ashe – Uhlan/Machinist
This party has Balthier almost solely on healing duty, but also using Hand-bombs to do ranged damaged (with a chance of status effects), and Basch and Ashe on pure murder duty.
Basch doles out Time Magick when necessary and Ashe some Magick when in group fighting situations, plus some useful Technicks I use manually. Basch is the tank in this party in 3+ enemy and boss situations.
So now let’s take a look at each party’s current Gambits.
Team “Two Kids and an Irritated Rabbit”
Vaan – Monk/Bushi

Vaan is this team’s hybrid healer-tank, with his healer responsibilities about to get a lot heavier with some Esper additions.
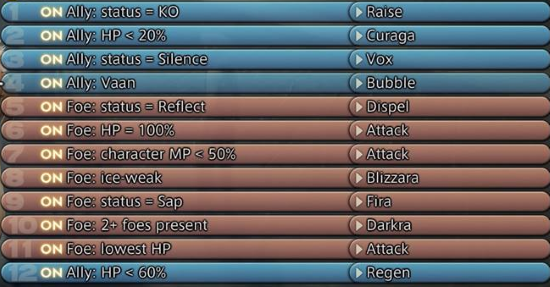
With this Gambit chain, he will revive allies with Phoenix Down (later Raise), heal at 40%, 30%, and 20% HP. Why so often? To split healing costs between MP and items, at least for now. Let’s get to the good stuff.
Foe: HP = 100% – Steal is a must-have Gambit on both of your parties. I always prefer to have it on top of any other non-healing combat actions. Enemies don’t stay at HP = 100% for long as Penelo, as you’re about to see, is set to attack enemies at 100% HP to keep Vaan from endlessly stealing.
If you see the Technick Infuse and previously thought it worthless, this board should be of notice to you. Infuse consumes the user’s MP in exchange for healing an ally for 10x the amount of MP consumed. But if the user has no MP, Infuse kills them.
To make Infuse work without the chance of killing Vaan, I’ve set up a Foe: character MP > 50% – Attack Gambit above the Infuse Gambit. This way Vaan will never use Infuse when his MP is below 50% — but he won’t use anything else below it when below 50% MP either.
Vaan is also set to Libra himself out of combat (notice the Self – Libra Gambit is below everything else) because Libra applies for an extended period of time.
In 3+ enemy situations I manually have either Penelo or Ashe cast Decoy on Vaan, as there is no way to have an ally cast a spell on another ally at a certain foe amount.
Penelo – Red Battlemage/Archer
Just to note, I kind of regret taking this class combination. I don’t particularly recommend it.
As stated above, Penelo and Vaan are currently sharing healing responsibilities in this party. Penelo has more White Magick for now, but that will change.
Like with healing White Magick, Gambits for spells that clear status effects should be above offensive Gambits. You’ll see this much better with Balthier — but either way, you’re still going to be clearing some status effects manually. Anyway, let’s get to the offensive chain.
This party’s success in harder 3+ enemy situations hinges on Fran casting Bio and Penelo casting Darkra, after which Penelo will cast Fira if Fran’s Bio inflicts Sap on an enemy. However, Penelo will rarely cast Darkra right away, as she is set as the party’s Foe: HP = 100% – Attack character to keep Vaan from repeatedly stealing.
If one has Sap on it after she’s done plinking them down, she’ll cast Fira (it uses less MP than Darkra) as per the Foe: status = Sap – Fira Gambit, which is above the Foe: 2+ foes present – Darkra Gambit. If two+ are left with no Sap, she will cast Darkra instead. If there are no enemies that fit this description, she will attack.
Penelo will cast Dispel on enemies with Reflect on before she attacks the ones at 100%, to keep Fran from accidentally killing the party — and casts Regen when not in combat because Regen lasts some time.
Notice the Foe: character MP < 50% – Attack Gambit above all of her offensive spells. This is because she is also on healing duty and because she gains MP from attacking, she will never run out of MP just blowing enemies up.
Lastly, Penelo keeps Bubble on Vaan with the Ally: Vaan – Bubble Gambit at all times as he must take the brunt of damage in this party.
Fran – Black Mage/Time Battlemage
Black Mage Gambits are usually the easiest to understand (outside of characters that mostly just attack). Often they hinge on a number of Gambits focusing on foe weaknesses (Blizzaga on ice-weak, Aero on wind-weak, etc.). However this one is a little different from the norm.
I mentioned the Sap combo in Penelo’s section, but with Fran’s right here it can seem confusing. Here’s how this goes:
- Fran will cast Bio at 3+ enemies even if her MP is below 50%
- If an enemy is inflicted with Sap from Bio, Fran will switch to attacking the target and Penelo will cast Fira on it
Due to the Foe: character MP < 50% Gambit being below Fran’s Foe 2+ and 3+ Gambits, she will cast Bio even if her MP is below 50%. Ditto on Blizzaga on 2+ enemies. Fran will not cast Blizzara on a single enemy if she is below that threshold.
Because Foe: status = Reflect – Attack is at the very top of Fran’s offensive Gambits, she will prioritize attacking enemies with Reflect instead of casting on them and potentially killing her party. Penelo’s Dispel should deal with the problem in due time.
And lastly, Fran will make sure Penelo has Haste on her.. as long as Fran doesn’t have anything else to cast beforehand.
Just to note, you don’t have to set your Poach Gambit to Foe: HP < 30 – Poach. The HP threshold for Poach Gambits should be based on your personal preference and the relative strength of the enemies in the area you’re fighting. 30% is a little generous, but setting to “HP Critical” just won’t net results often enough. This is a Gambit you need to turn off for boss fights.
Team “The Only Relevant Characters”
You know this team name is truthful. This party is very different from the previous, with one dedicated healer and two relatively tanky characters at the helm.
Basch – Time Battlemage/Shikari
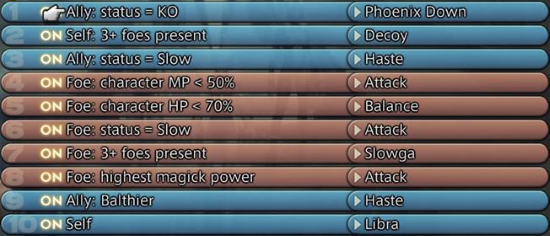
There’s a lot different here from Vaan’s Gambits — Basch is a murder machine.
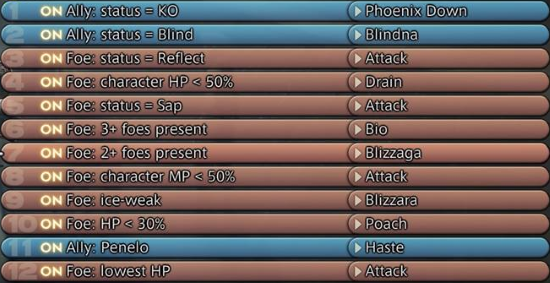
The first thing you should notice here is the Self: 3+ foes present – Decoy Gambit, which ensures Basch will be taking the brunt of enemy hate in fights against multiple enemies. This type of Gambit is not present in the previous party, as Vaan has no Green Magick at his disposal. Decoy must be cast manually in the other party.
Basch does not cast a lot of Time Magick via Gambits with this set up, as he is a Ninja Sword-wielding Shikari first and foremost — but he is set up to AoE slow via the Foe: 3+ foes present – Slowga Gambit, after which he will resort to attacking if Slow sticks.
The big thing to note here is the use of the spell Balance, which deals damage in an area equal to the amount of HP the character is missing. Basch has a massive amount of HP when paired with Balthier’s Bubble (doubles total HP), making Foe: character HP < 70% – Balance extremely powerful. However he will not cast it, nor anything else but Decoy and Haste, at below 50% MP.
You can also see Basch casts Haste on Balthier out of combat to ensure his heals and attacks come fast and furious, as well as casts Self – Libra on himself to grant additional enemy information and reveal traps.
Ashe – Uhlan/Machinist
This is another job combination I’m not too fond of, but I digress. Here we are, and we’re working with it.
This Gambit layout is pretty simple. She casts Cure at 30% Ally HP < 30% as a backup, but with Balthier at the healing helm she ends up not doing it all that often.
Uhlan specializes in stabbing things to death with its spear, but also has access to some Black Magick. That is what we’re looking at here, as well as a reaction to Basch’s Slowga, in which Ashe casts Shades of Black via the Foe: status = Slow – Shades of Black Gambit.
In addition to Basch’s casting Slowga at 3 enemies, Ashe will cast Blizzara on 3+ foes to start whittling them down at the beginning of a fight. As this party has no true tank unlike the previous, it must burst down enemies quickly and mitigate damage.
Ashe’s use of Foe: character HP = 100% – Souleater is unique from the other characters because spears do a high amount of damage in a single hit, and Souleater’s damage is based off the character’s weapon damage. It eats a chunk of her HP, which is generally slowly regained via Regen.
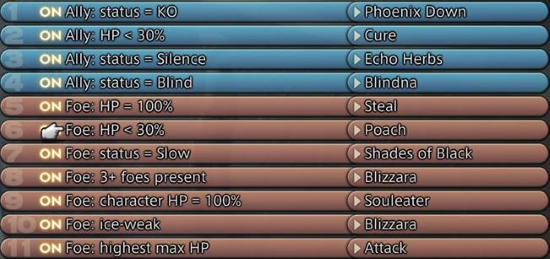
Balthier – White Mage/Foebreaker

This is a really typical White Mage Gambit setup. White Mages are the busiest job in the game, and yours will probably have a set up similar to my Balthier’s (with some variances in status ailments).
Balthier is set as this party’s Foe: HP = 100% – Attack character to offset Ashe from stealing through every encounter, which is made easier by his use of Hand-bombs from Foebreaker. It will probably be different for you.
My White Mage is the only character allowed to use Ethers on itself using the Self: MP < 20% – Ether Gambit, as a healer with no MP means a dead party. In addition, Balthier keeps Bubble up on Basch at all times (unless he’s busy healing) to ensure he has a huge HP pool.
—
That’s about all I can say about my current party’s Gambit set up and general advice on the subject. But this is certainly not the only guide I’ve written for Final Fantasy 12: The Zodiac Age! If you’re curious about the game’s job classes and their capabilities, check out my FFXII: TZA job class guide. I am currently working up a full job class combination resource, which will outline every combination’s available licenses and Espers (and their locked licenses). Expect that big boy in the coming days.
When you’re done here, check out the rest of my FF12 guides for even more sage wisdom.


Published: Jul 11, 2017 01:23 pm