Safes present one of the better ways to get titanium in Far Cry New Dawn. However, tracking them all down yourself can be a huge time sink.
Instead, this New Dawn guide will show you the location of (hopefully) every safe in the game. The following will be broken down into safes you can find while exploring in the open world, those you can find during story missions and side missions, and those you can find after liberating outposts.
For the 10 safes hidden in each of New Dawn’s prepper stashes, head over to our complete treasure hunt guide.
If we’ve overlooked a safe and it’s not on this list, let us know in the comments, and we’ll make sure it gets added.
Open-World Safe Locations
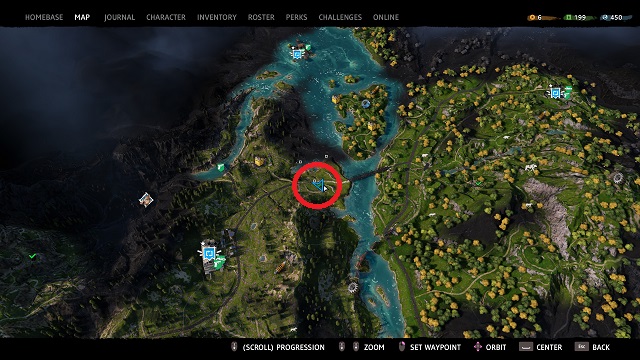
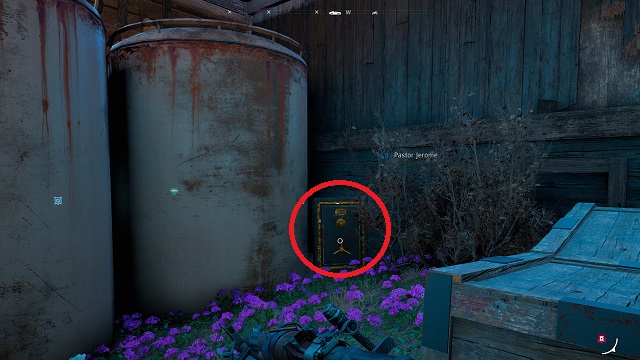
Laurel’s Shanty
Go to the area indicated in the screenshot above. On the left side of the house, look for what appears like a rusty above-ground pool surrounded by barrels. Across from that, there is a platform jutting out from the house; climb that and break open the boards blocking the attic entrance.
Climb in and open the safe for 15 titanium.
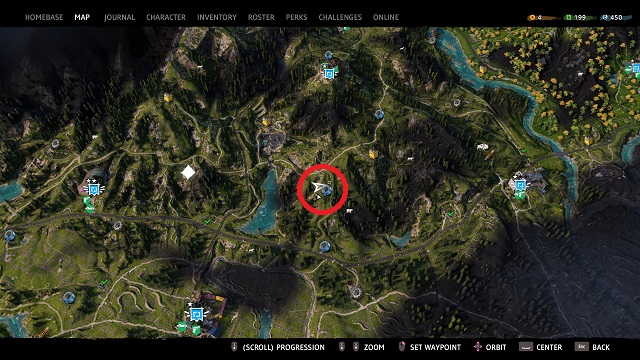
Davenport Plains
When you arrive, look for the windmill. Near it, there are two sets of tractor tires set against a rusty, fallen silo. Climb the silo and use the zipline to enter the barn.
When you land, turn around and break the boards to the left of the barn doors. Destroy the boxes inside to find the safe nestled in the back corner. Inside the safe you’ll find 19 titanium.
Doverspike’s Hill
Climb up the hill and go into the house. Make your way to the hallway, turn right, and pick the lock on the red, rusty door. When you enter, turn left. The safe is in the corner behind the door. Inside is 18 titanium.
Deadgas Crossing
Deadgas Crossing can be found roughly 586 meters east of the Broken Forge outpost. To get there, take a vehicle from Broken Forge and turn left on the road just outside the outpost.
Continue along, and Deadgas Crossing will be at the next primary intersection; it will be the gas station on your left.
Go inside the gas station and look for the safe on the right-hand wall. There is 20 titanium inside.
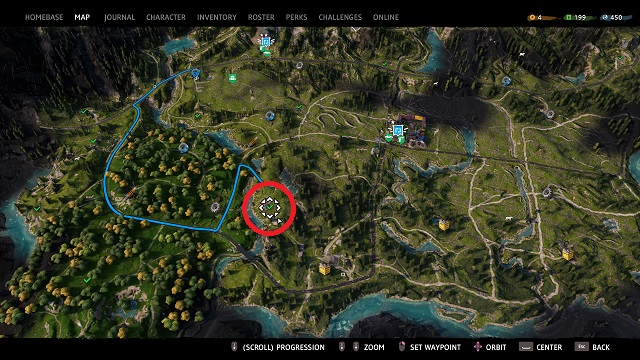
Bookworm Ridge
When you get to the location above, look for the basketball court. Next to it is a small building with a red tin roof and a beehive. Go behind the building.
The safe, as well as 17 titanium, is hidden among the boxes and pallets stacked against the wall.
Redler’s Hollow
Here, go into the large silver building. Inside, there is another smaller room filled with lockers. The safe is against the wall, and inside you’ll find 19 titanium.
Scrapfarm
When you get here, go to the back of the area, toward the large house with solar panels on its roof. In front of the house is a teal cargo container.
Jump inside the container and open the safe for 20 titanium.
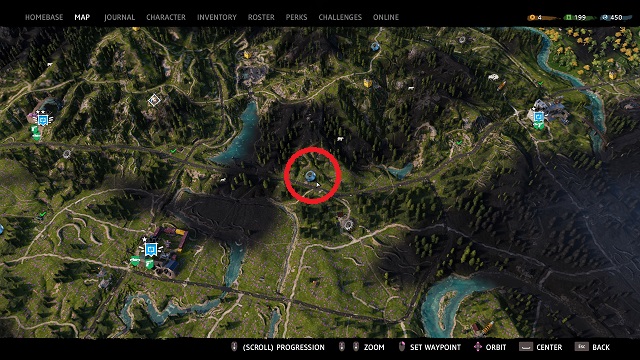
Kellet’s Howl
When you arrive at this location, look for the two pink silos. To the left, there will be a three rusted barrels sitting on three separate platforms. Look under the tallest one and find the safe, along with 20 titanium.
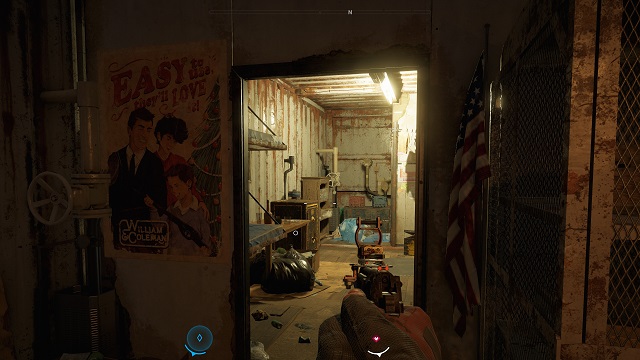
Rye & Daughter Aviation
You’ll end Jerome’s Guns for Hire mission at the Rye & Daughter Aviation flight school east of Prosperity. To find the safe, go into the hanger and locate the cage with the bloody mattress.
To the left of the mattress, you’ll find the safe. There is 20 titanium inside.
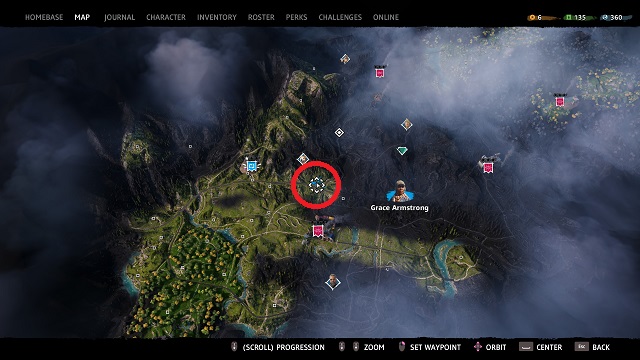
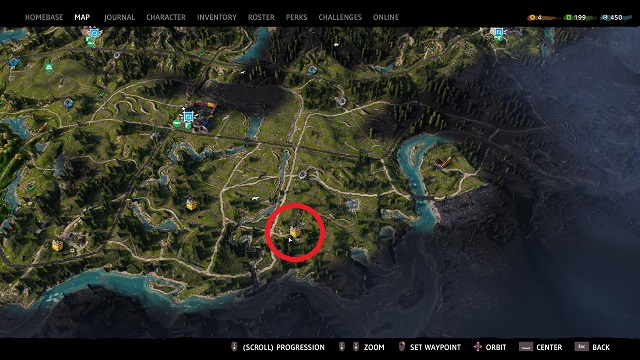
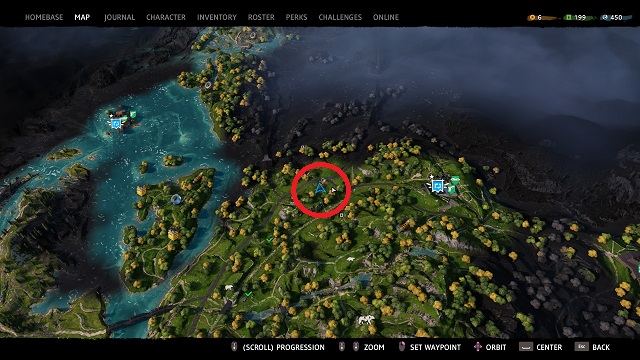
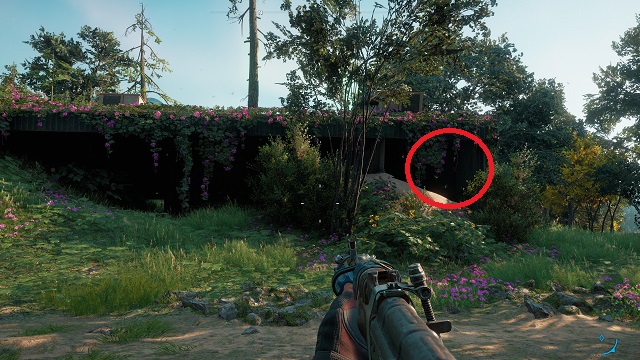
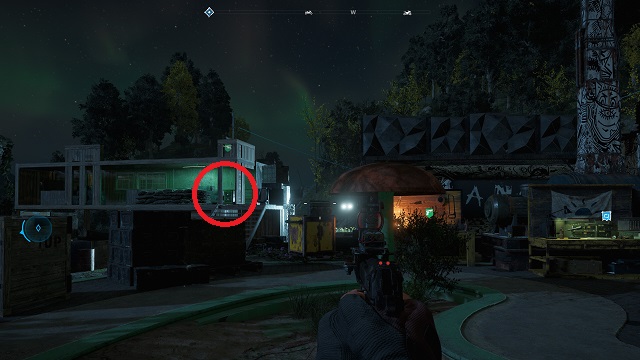
Near the Target Practice Treasure Hunt
Go to the location indicated in the screenshot above. Face toward the section of the house buried in sand. Go past the house in that direction, and into the woods behind it. Continue down the path and look for the small shack guarded by a highwayman.
Just outside the shack is a safe with 15 titanium.
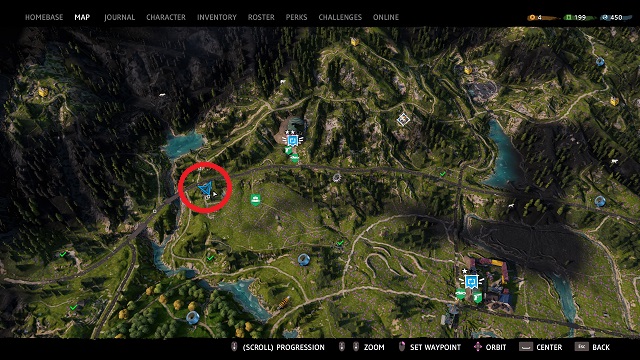
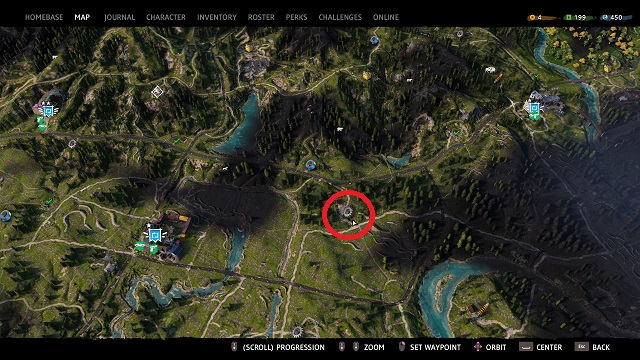
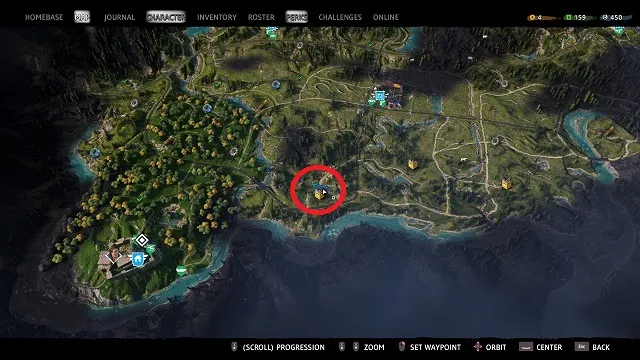
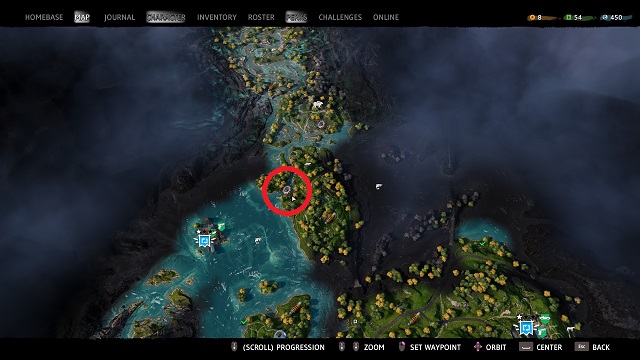
Traitor’s Bluff
Find the small shack behind the house. Inside, there is a door that leads to an underground bunker. Go inside. The safe is along the right-hand wall in the second compartment. Inside you’ll find 20 titanium.
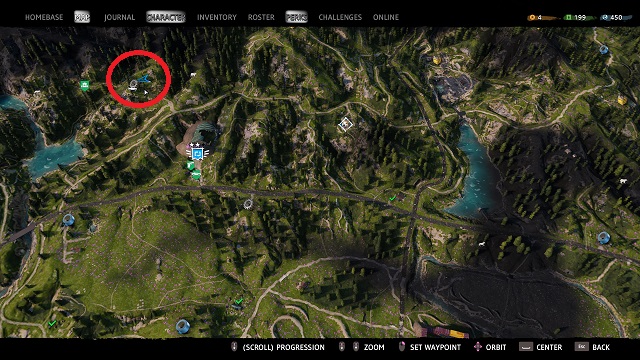
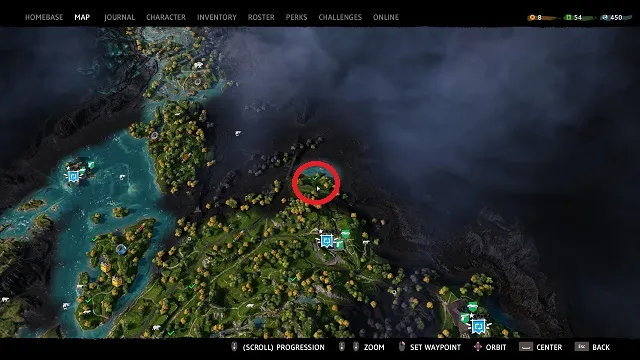
Garden View Desert
Next to the fallen, rusted silo is a small shack. Break the boards covering the entryway to find the safe and 19 titanium inside.
The Old Project

Travel across the bridge from Garden View Desert to find The Old Project. Once there, go to the left side of the house (the side facing the nearby river) and break the boards barring the window.
Jump inside and turn right. The safe is in a small room; it contains 19 titanium.
The Old Compound
Whether you travel here by water or by land, look for the half-submerged church; however, don’t go to it. Instead look along the shore just across from its front doors. The safe is halfway in the water, next to a rusty platform. Open it to get 15 titanium.
Hollyhock Corner
One side of the building in this area has an open entryway. Go inside and turn left. Pick the lock on the door in front of you, and then turn right. The safe, as well as 19 titanium, is in front of you.
Worm Shore
Along the front of the overgrown house in this area is a boarded up window. Bust the boards and climb inside. The safe is directly in front of you. Inside you’ll find 16 titanium.
Main Story Mission Safe Locations
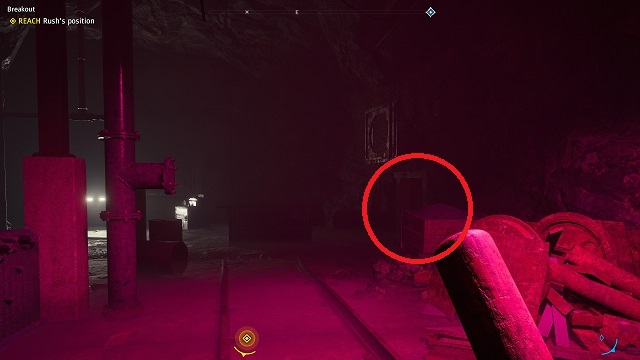
Breakout (Blacklung Mine Outside)

Before you go inside the mine to continue the mission, go to the main tunnel in the central area. It is behind the overturned minecarts and has the bright yellow sign hanging above it.
Break the boards and go inside. In the back is the safe and 17 titanium.
Breakout (Blacklung Mine Inside)
After you climb down into the mine, follow the path into the first pink room. Just before turning left toward the enemies, turn right to find a set of loose boards along the wall.
Breaking the boards will alert the enemies in the area, but you’ll find 15 titanium inside the safe. If you missed it the first time through, you can fast travel back to Blacklung Mine later in the game.
Specialist Sidemission Safe Locations
Losing Streak (Bean)
There are two safes in Bean’s mission. The first can be found in the stash in Dick’s Hole. You can’t miss it; inside is 17 titanium.
The second safe can be found after you complete Bean’s mission.
After you give the information to Bean in Bradbury Woods, look to the run-down building to your right. At the right end of the building, there is a caged area with several breakable boards on it. Break the boards and go inside to find a safe with 17 more titanium.
Adventures in Babysitting (Sharky)
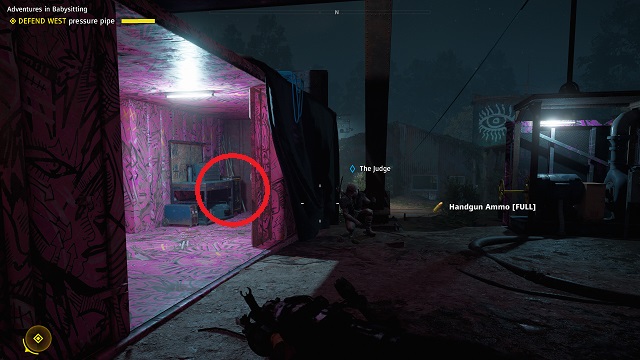
This safe is super easy to find. When you first meet Sharky in the central area, speak with him and then turn around. Go inside the hot pink boxcar and turn right. The safe is along the far wall; it contains 18 titanium.
Deep Dive (Selene)
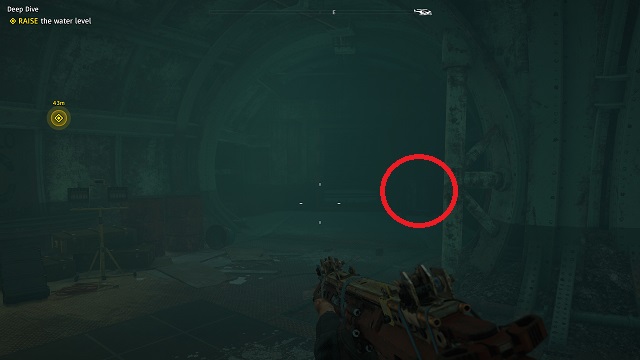
There are two safes in this side mission.
After you raise the water the first time, re-enter the silo. Turn right and kill the pack of dogs in your path. Afterward, continue down the path and turn right at the first fork. There is a safe in the far back corner with 18 titanium.
The second safe can be found after your raise the water a second time. Climb up the ladder and follow the stairway up. Continue ahead along the path and turn left before entering the first large doorway. Look left to find another safe with 16 titanium.
Outpost Safe Locations
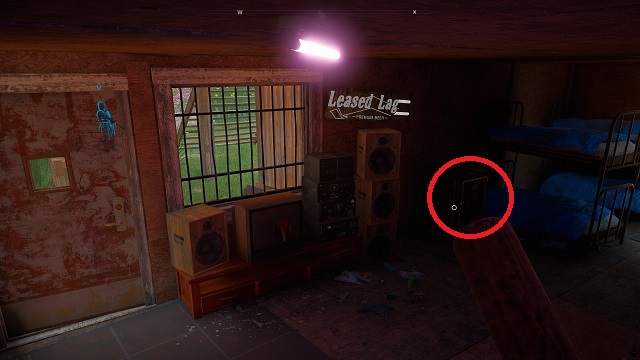
The Chop Shop

Face the workbench. Turn around and find the safe with 20 titanium along the back wall of the Leased Lag bar.
Sacred Lumber
Start with the gun workbench to your right. There is a rusted woodchipper, three body bags, and a shack with a barred window to your left.
Pick the lock on the shack’s door and open the safe inside for 20 titanium.
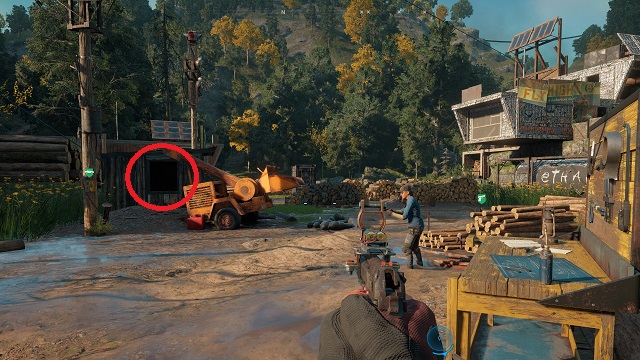
Broken Forge
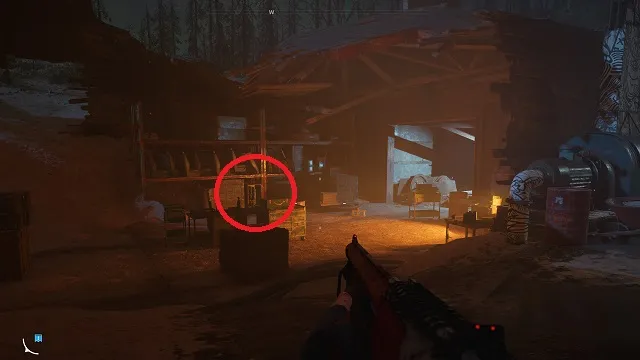
After liberating the outpost, go to the forge area to the left of the ethanol tank. Go over to the big racks at the back of the room to find the safe nestled into some crates. Pick the lock to get 15 titanium.
The Pantry
With your back to the workbench, go underneath the teal trailer with the black graffiti. Continue right. On the other side, turn left and pick the lock at the red door.
Go inside and look immediately to the left by the beds. The safe with 15 titanium is inside.
The Watering Hole
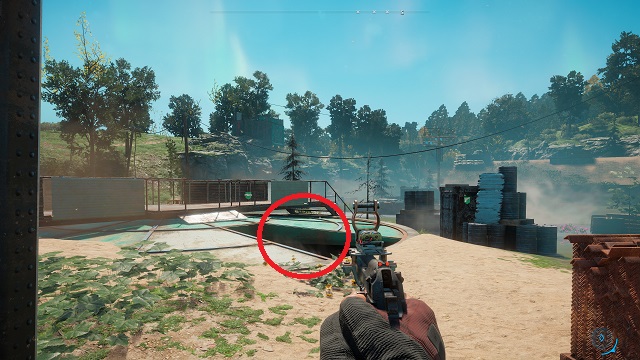
With your back to the workbench, go toward the teal reservoir in front of you. To the left of the rusty bridge that goes over it, there is an opening that goes down into the reservoir.
You’ll find the safe here, along with 20 titanium.
The Refinery
Go into the run-down refinery; enter through the opening underneath the “Bright Warden Radon Spa” sign. When you hit the first bush, turn left and go through a second bush. The safe will be nestled in the left-most corner. Crack it open to get 16 titanium.
Trailer Town
From the center of the area, go to the building with the helipad. You’ll find the safe right out on the porch. There is 17 titanium inside.
Empty Garden
With you back to the garage and the weapons workbench to your right, look to the middle of the area. There are two cages stacked on top of each other.
The top cage holds the safe and 19 titanium. Simply shoot the door off of the cage and jump up to access it.
The Island
Looking at the outpost’s scavenge table, turn right. Behind the crate in front of you is a small crawlspace. Go inside and look on the left wall just before the exit.
The safe is on the wall. Inside is 15 titanium.
Signal Point
Go to the large plywood building in the middle of the area. To the right of the front stairs and down near the bottom, you’ll find an opening. Go inside; to the left you’ll see a set of loose boards. Break them and open the safe to nab 18 titanium.
—
That’s it. Every safe in Far Cry New Dawn. As mentioned at the top of this article, if we’ve overlooked a safe, please let us know in the comments below,and we’ll make sure it gets added.
For more tips and locations guides, be sure to head over to our growing Far Cry New Dawn guides page. Be sure to check out our review of Ubisoft’s latest forway into Hope County to see why we think “it doesn’t get much better than Far Cry New Dawn.”


Published: Feb 14, 2019 02:18 am