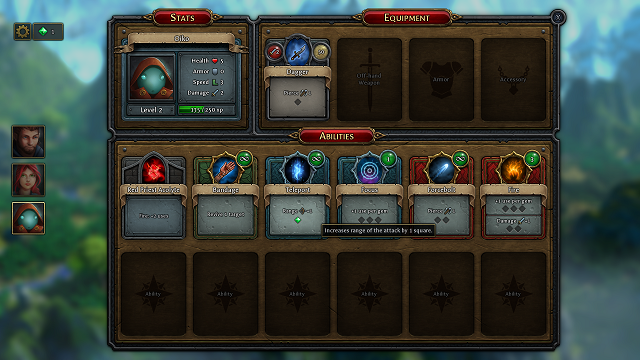
A couple of missions into Druidstone: The Secret of the Menhir Forest, you’ll unlock Steelface, the game’s merchant. He has a reasonable selection of weapons, armor, and accessories, far more than you’ll be able to afford in a single playthrough.
That’s good, though, as not all of the merchant’s items are created equal. Some weapons, armor, and accessories are more worthy of your attention.
To help you quickly sift through everything, here’s a quick buyer’s guide on what’s worth picking up at the Emporium.
Early Game Items
We’ll start with the best items to purchase in the early game. Make these a priority, and consider replaying missions you can comfortably complete if you’re short on gold. These should be enough to carry you through the first few hours until the better items become available.
Hunter’s Bow

- Cost: 120g
- Damage: 2
- Abilities: Volley, Aim (1 gem)
Right off the bat, you should buy the Hunter’s Bow. It does the same damage as the Scout’s starting bow, but it has two incredibly useful skills attached: Volley and Aim.
Volley is important because it allows you to attack multiple targets in the same turn, something I outline as invaluable in my skills guide.
Aim, on the other hand, lets you deal 4 damage in a single attack. Druidstone is littered with 3-HP enemies, so only being able to deal 2 damage per arrow can be a curse.
For 120 gold and a single power gem, the Hunter’s Bow vastly improves your Scout.
Mage Robe
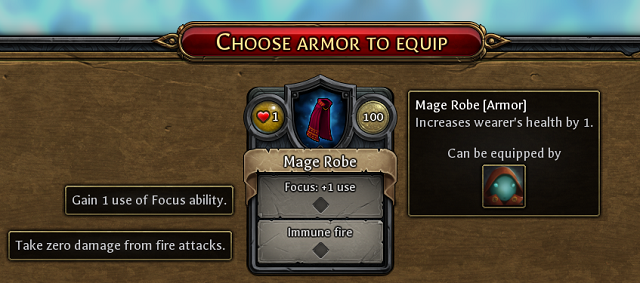
- Cost: 100g
- Health: +1
- Abilities: Focus (1 gem), Fire immunity (1 gem)
The first piece of armor you should invest in is the Mage Robe for your Acolyte.
He only starts with 5 HP, so some added protection is vital, but for a single power gem, you can give him an extra use of the Focus ability.
As with Volley, Focus is invaluable as it allows you to damage multiple targets in a single turn when used in conjunction with Forcebolt or Fire.
For only 100 gold, you’re getting a useful skill and a boost to survivability. The Wool Shirt or Twig Vest are cheaper alternatives, but it’s hard to overstate how useful Focus is.
Throwing Knives
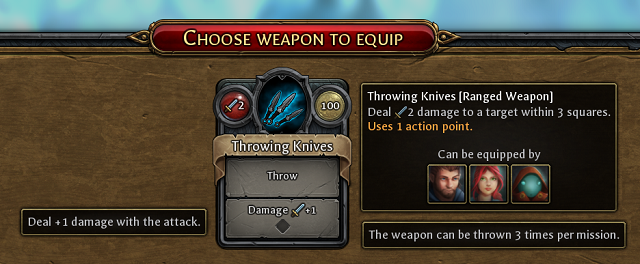
- Cost: 100g
- Damage: 3
- Abilities: Throw, +1 damage (1 gem)
The Throwing Knives make an excellent secondary weapon, particularly for the Warden.
He often struggles to make up distance if he can’t pull off a Charge attack, so giving him a ranged off-hand weapon shores up this weakness.
For 100 gold, the Throwing Knives provide useful range, and a single power gem means you’re still able to deal 3 damage per attack.
Mid-Late Game Items
Once you’re through the first few missions, you should start finding Steelface’s crates, which are scattered about select levels. Collecting these will stock his shop with new goodies that, in turn, will give you a better chance at completing the later missions.
Smoldering Crossbow
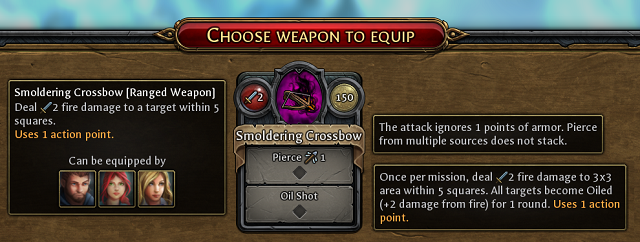
- Cost: 150g
- Damage: 2
- Abilities: Pierce (1 gem), Oil Shot (1 gem)
The Smoldering Crossbow is an excellent weapon, that can either replace the throwing knives or add some additional range and utility to another party member.
For 150g, we get the incredible Oil Shot ability, which does damage in a wide area and inflicts Oiled onto enemies.
This synergizes brilliantly with the Acolyte’s Fire spell, letting you wreak havoc on a wide area. It’s particularly useful against bosses and armored enemies.
Captain’s Claymore

- Cost: 200g
- Damage: 3
- Abilities: Execute, +1 damage (2 gems)
At 200 gold, the Captain’s Claymore is one of the pricier weapons available, but it’s definitely worth it.
If you put two power gems into it, it becomes of the only weapons capable of dealing 4 base damage without any drawbacks.
On top of this, the Execute ability can turn the tide of battle if used correctly, netting you a second attack on another target.
Robe of Blood
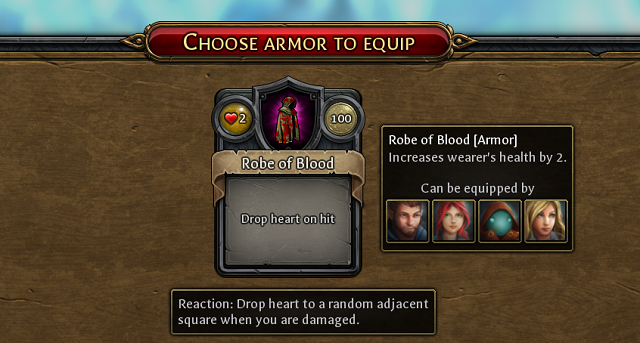
- Cost: 100g
- Health: 2
- Abilities: Drop heart on hit
The Robe of Blood offers extremely good value for money, giving 2 HP on a 100 gold armor, without any pesky downsides.
The ability also means that any hits you take are effectively reduced, as you can collect the hearts on your next turn.
Add to this the fact that any member of your party can equip it, and you’ve got a winner on all fronts.
Talisman
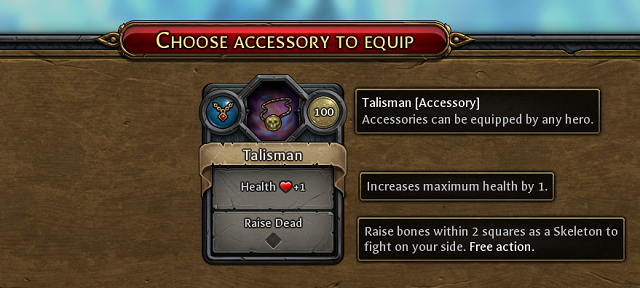
- Cost: 100g
- Health: 1
- Abilities: Raise Dead
Summoning a skeleton to help you is incredibly useful. Not only is it a free action, but it isn’t limited to a single use per mission.
This means you can constantly have an additional helper on any mission where you find piles of bones, which is a massive boon. Give it to whoever has the most mobility in your party.
You’re also getting an additional health for whoever wears it, which isn’t too shabby for a mere 100 gold.
—
That about covers the best selection of items that Steelface has to offer in Druidstone. There are other alternatives that perform slightly worse, but it’s generally worth saving up for these as they provide that little bit extra.
For more on Druidstone: The Secret of the Menhir Forest at GameSkinny, check out our review and check out our other Druidstone guides.


Published: May 14, 2019 12:29 pm