
At a glance, TemTem, the Kickstarter-backed creation collector, definitely shares a few similarities with a certain “Gotta Catch ‘Em All” pocket monster series.
But take a peek under the hood and you’ll notice the battle system doesn’t function quite like you’d expect. We’ve assembled a handy guide with the main details you need to know about how TemTem‘s battles work.
Before we begin, let’s get one potentially-confusing thing out of the way: the game is called TemTem, and the creatures you’ll tame and battle are called Temtem — note the second T is lowercase. Oh, and the plural of Temtem is also Temtem… apologies for any confusion.
Stats
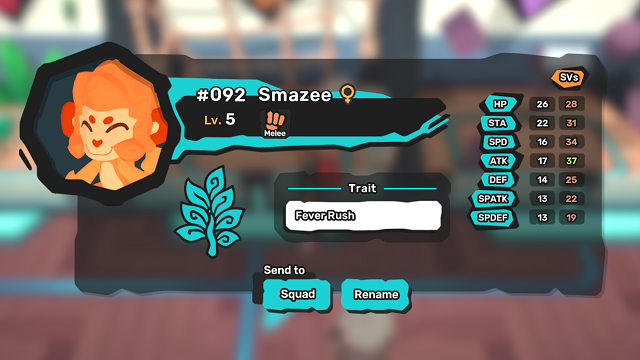
Each Temtem has 7 key stats, most of which will be instantly familiar to you if you’ve played Pokémon before.
HP stands for Hit Points, the number of points of health your Temtem has. Reach 0 HP and your Temtem can no longer battle.
ATK is short for Attack, referring specifically to the power of your Temtem’s Physical Attacks. DEF is short for Defence, which reduces the incoming damage from Physical Attacks.
SPATK is short for Special Attack, which is used to calculate damage for Special techniques. The damage from Special techniques are reduced by a defending Temtem’s SPDEF stat, or Special Defence.
SPD stands for Speed, which dictates how fast a Temtem can act in battle. Together with a technique’s Priority — which we will discuss later, in the Techniques section — this will decide the order which Temtem’s will attack in.
Stamina, or STA, is the big difference between TemTem battles and Pokémon battles. Every technique in TemTem has a Stamina cost, and every Temtem has a Stamina bar under their HP bar.
Depleting a Temtem’s Stamina bar will cause them to take Overexertion damage — similar to Struggle damage in Pokémon. Temtem will recover a small portion of their Stamina bar after each turn, and it’s fully recovered at the end of each battle.
Competitive Stats
Finally, just like Pokémon, there are some “hidden” stats that allow you min-max your creatures into competitively-tuned killing machines.
You can skip this mini-section if you aren’t interested in the nitty-gritty of stat efficiency.
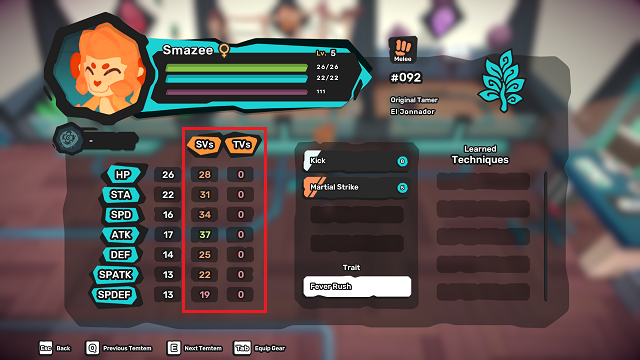
In TemTem, these are called SVs and TVs, which substitute for EVs and IVs in Pokémon. If you aren’t sure what these do, it’s worth reading up on them in-depth, but I’ll give you a quick rundown.
SVs are Set Values, determined when you hatch or catch a Temtem, with each one correlating to one of their base stats. As your Temtem level up, having higher SVs — which can be anything between 0 and 50 — will increase their overall stats.
TVs are Trained Values, which are increased by training your team up against specific Temtem. For example, if you defeat Tateru, a very common Neutral Temtem, anyone in your squad that gained experience points will also receive +2 to their Stamina TV value.
As with SVs, TVs also help to maximise specific stat values of your Temtem, but they certainly aren’t mandatory for the story content, you can basically ignore these unless you’re really keen on getting every drop of battle efficiency out of your team.
Types
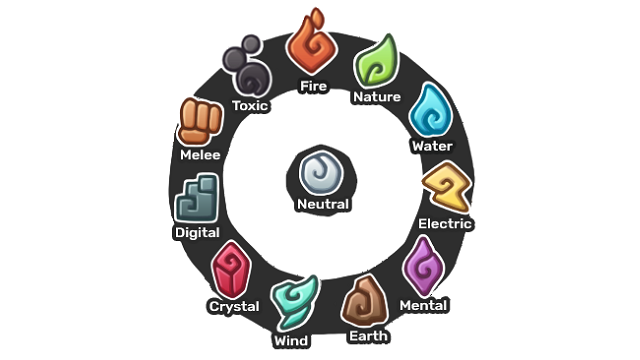
TemTem has 12 Types, which dictate the strengths and weaknesses of a Temtem and its attacks — or Techniques, as they’re referred to in-game.
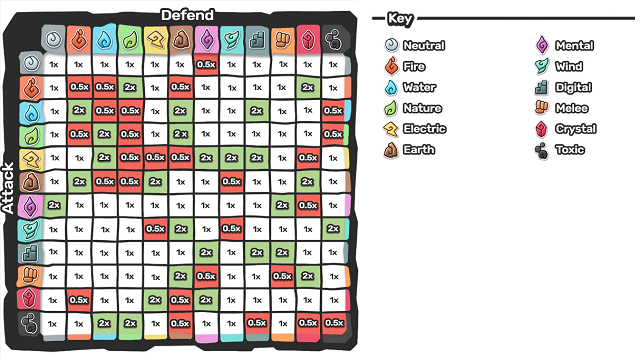
These function much the same as Types in Pokémon, though the match-ups between types may surprise you. Below is the TemTem type chart.
Notice that Neutral type is weak only to Mental type, and that Water is only 0.5x effective against Toxic. On top of brand-new types such as Digital and Crystal, TemTem has a number of these match-up differences that may trip up Pokémon veterans, so it’s well worth studying this type chart, or keeping it on hand while playing.
Just like in Pokémon, Temtem often have dual types, such as Platypet, which is Water/Toxic. This means that you have to take both types into account when assessing resistances and weaknesses.
For example, an Electric technique will deal 2x damage to Platypet, as Water is weak to Electric but Toxic has no weakness or resistance. You can think of this as 2 x 1 to get an overall weakness of 2x.
On the other hand, Water and Toxic type are both resistant to Water techniques, so a Water-type attack would deal 0.25x damage to Platypet. Think of this as 0.5 x 0.5 to get an overall resistance of 0.25x.
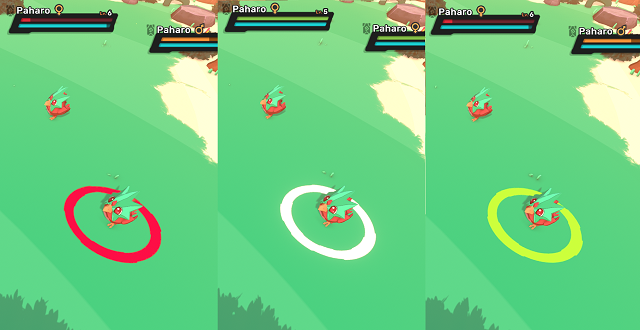
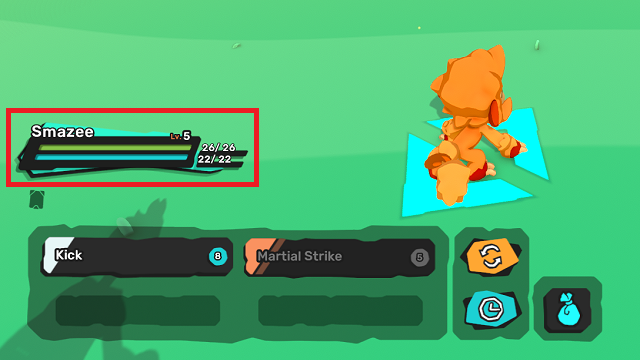
You’ll sometimes see the effectiveness of an attack reflected in the colour of the technique indicator. Above you’ll see how it changes when you’re about to use a move that will deal reduced damage, normal damage, and increased damage, respectively.
It’s worth noting that the current behaviour for this indicator appears to be that it will only change colour if you’ve used the current move on a Temtem of that species before.
This means attacks you haven’t tried will often show a white circle even if the defending Temtem will resist it, for instance – you won’t know until you try!
Techniques
A Temtem’s moves and attacks in battle are known as Techniques, which can be one of three Categories: Physical, Special, or Status.
We discussed Physical and Special techniques briefly in the Stats section, those are damaging attacks that take into account the ATK and SPATK of your Temtem. Status moves function the same as their namesake from the Pokémon series — they’re non-damaging techniques that raise or lower stats on the battlefield.
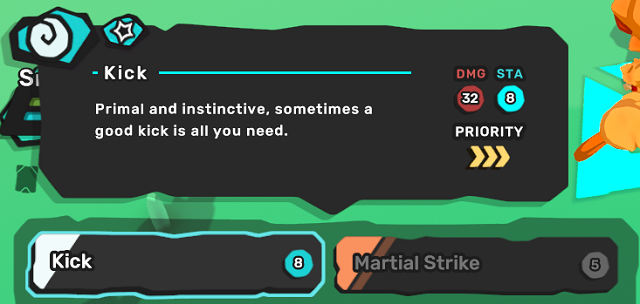
Techniques also have a Stamina Cost indicated next to the name of the move, which is how much Stamina will be taken from your Temtem after it performs the technique.
In the example above, Kick is a Physical technique that costs 8 Stamina. Beyond this, Techniques have some special attributes:
Priority
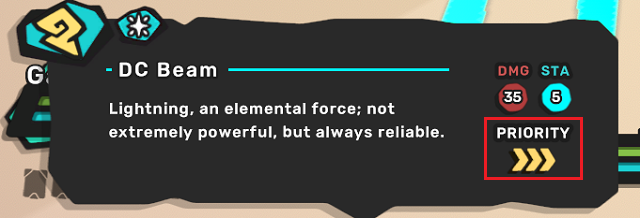
A move’s Priority dictates when it will be used in a battle turn. Unlike move priority in Pokémon, which functions in a tiered system, TemTem appears to use a multiplication of a Temtem’s Speed stat.
This means that a High Priority  technique like DC Beam will effectively times the user’s Speed by 1.5x for that attack, while a Low Priority
  technique will be used with 0.5x their Speed stat.
This is obviously subject to change and the exact effect of each priority tier is currently unknown, but it’s worth knowing that a Temtem with especially low Speed could still be out-sped when using a technique that has higher priority.
Hold

Some techniques require a certain number of turns to have passed before they can be used. This is referred to as a technique’s Hold attribute.
You can tell the Hold value of a technique by looking for the characteristic stripes behind the move’s name. In the image above, Tail Strike has one two stripes, so it has a Hold value of 2.
Held Anger has four stripes, so your Temtem will need to be in battle for four consecutive turns before that technique can be used. You can see if a move is ready when the circular Stamina icon is blue.
Hold restricts the repeated use of powerful moves every turn, and means that you’ll need to plan multiple turns ahead if you want to be the best Temtem battler in the land.
Synergy
Certain techniques will have additional Synergy effects when the partner Temtem — your other Temtem that’s in battle with the user — is of a specific Type.
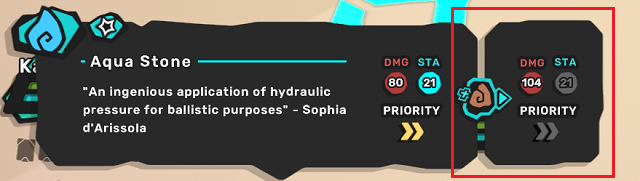
The example shown above is of Aqua Stone, which has an Earth Synergy. When used in battle with an Earth-type partner, this technique deals an extra 24 damage. Other synergies can apply a status effect or increase the Priority.
It’s a good idea to expand your technique panels by pressing RMB over them whenever you’re in battle, to see if any of your Temtem’s techniques have these additional effects, and whether they’re currently live or not.
Final Tips
Once you’ve wrapped your head around these key differences, the rest of the mechanics will slot into place. But be careful, they are still some tricky changes to the popular Pokémon formula we know and love.
For instance, experience points for feinting an opposing Temtem are given out at the end of the turn in TemTem, rather than immediately after the KO. This can seriously change the XP distribution if your own Temtem feint in the same turn, so you’ll need to adjust your tactics accordingly.
For more important changes that you should know about, we recommend checking out our TemTem vs Pokemon article so you know what you’re in for when you dive in for the first time.


Published: Jan 17, 2020 02:25 am