Growing crops, raising, animals, falling in love… there isn’t much you can’t do in My Time At Portia while re-building your workshop and restoring Portia to glory.
Of course, to craft all of those items and build that farm, you’re going to need to find a whole lot of materials. Some of them are rare drops that can only be found from specific creatures.
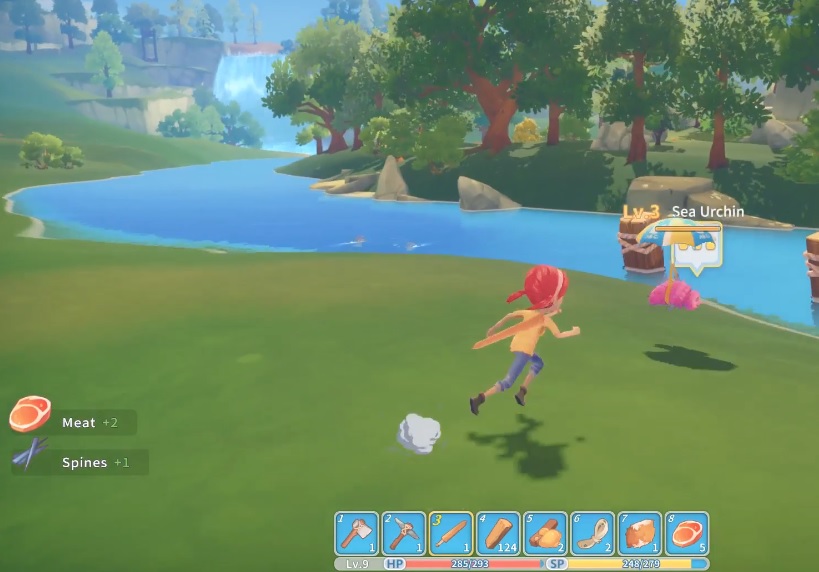
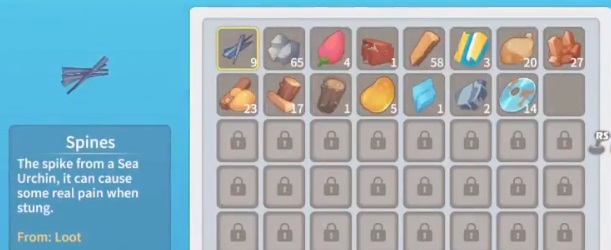
That’s the case with the elusive spine, which is most often found as a random loot drop from sea urchins.
So where the heck do you reliably find those sea urchins in the first place?
Where To Find Sea Urchins
These are two main locations for finding sea urchins quickly to harvest spines for items like the umbrella:
- Near the bridge to Amber Island
- East of Portia near the Bassanio Falls waterfall below the cliffs
In a previous Early Acces build of the game, sea urchins used to appear in parts of the Collapsed Wasteland area, but that no longer appears to be the case, so avoid that area when looking to harvest spines.
Note that the urchins spawning near the waterfall are typically higher level, between levels 6-10, which makes them more useful for harvesting spines. Lower lever urchins drop fewer spines, if any at all.
Running up and down the two areas mentioned above will eventually result in urchins spawning, but there’s a trick here to harvest them faster rather than waiting for them respawn the next day.
After wiping out all the urchins in the area, you can force them to respawn by entering and leaving a building. When you return to Amber Island or the falls, a whole new crop of urchins will be ready to battle.
Harvesting Sea Urchins For Spines
When you come across a sea urchin, they can randomly provide these four drop types:
- Fiber Cloth
- Meat
- Seaweed
- Spines
The main thing you want from sea urchins, obviously, are the spines, which are needed for commissions and to craft certain items such as the Spiked Practice Sword and Umbrella.
They are also needed for the Umbrellas Are Important mission, which requires 20 spines to complete.

Because the sea urchin spawn rate isn’t super high (if you aren’t using the building trick noted above), you might want to just straight up avoid commissions involving spines, especially after you’ve already upgraded your workshop to A Rank, when they aren’t really necessary anymore.
Using the Civil Corps
While higher level sea urchins have a greater chance of dropping loot, note that if you don’t want to go out harvesting spines from sea urchins yourself, you can commission the Civil Corps to do it for you.
The Civil Corps will net between 40-150 spines at a time for a three- to seven-day commission if you don’t need them immediately.
Keep These Things in Mind
When harvesting sea urchins, keep in mind that their speed increases when attacked, so they actually move faster during combat than when just flying around the area.
Finally, killing large numbers of sea urchins in rapid succession will cause the elite Balloon Urchin to spawn. These creatures may also spawn randomly close to the waterfall fishing spot and at the northeast side of Amber Island.
You want to avoid the Balloon Urchin at all costs, but not just because it can be extremely lethal to a low-level player. These elite versions don’t drop spines at all and are far more difficult to deal with than standard sea urchins, so they usually aren’t worth the trouble.
—
Have you found any other locations where sea urchins spawn or where you can collect spines? Let us know where you found them in the comments below and we’ll get this article updated!
Looking for some My Time At Portia mining tips and tricks instead? Check out our mining and abandoned ruins guide here.


Published: Apr 18, 2019 01:36 pm