There are 16 Hidden Missions to complete in Natural Plains, the first world of Kirby and the Forgotten Land. Each Hidden Mission rewards you with one Waddle Dee, which are required to progress through the game, both to unlock boss doors and build more in Waddle Dee Town.
If you are missing a few or just can’t nail down that tricky one, we have a step-by-step on how to complete all the Hidden Missions in Natural Plains broken down level by level. If you’re looking for the Waddle Dees not in Hidden Missions, we have a guide for that here.
Use the links below to jump to each level:
All Hidden Missions in Natural Plains’ Downtown Grassland
There are three Hidden Missions in Natural Plains’ Downtown Grasslands level.
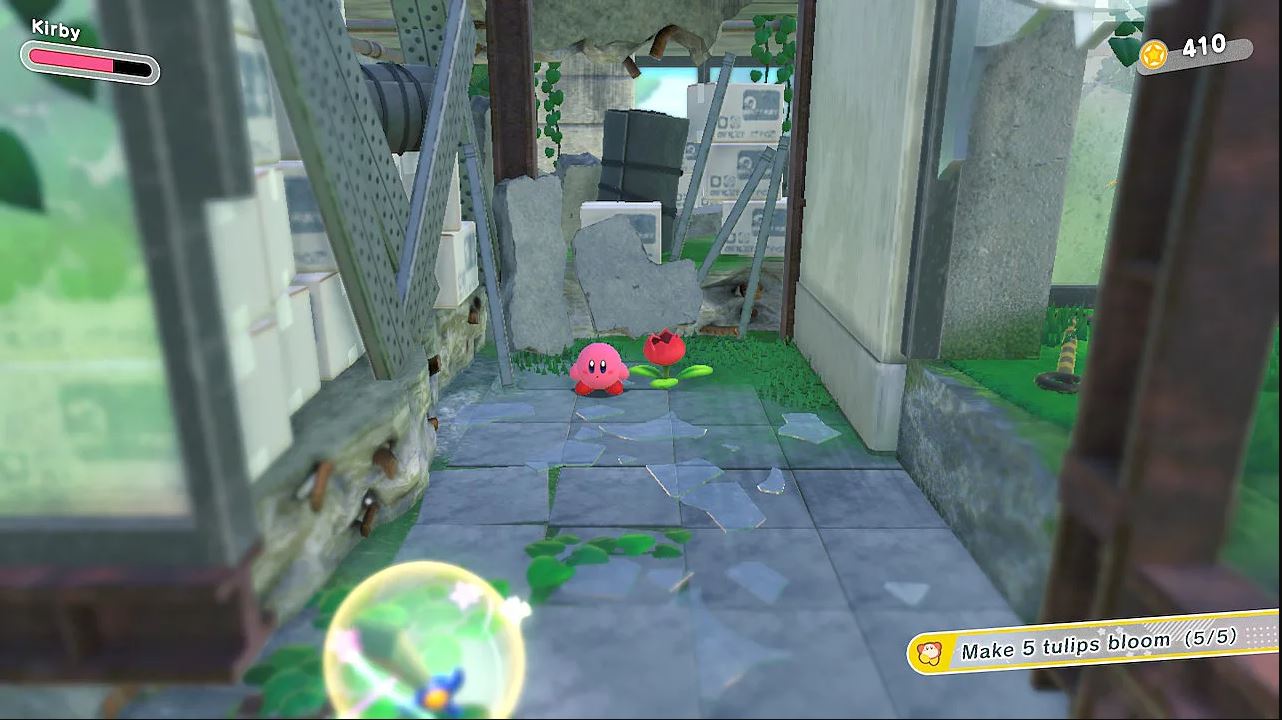
Downtown Grassland Hidden Mission 1: Make 5 Tulips Bloom
The first Hidden Mission Natural Plains requires you to make 5 tulips bloom.
- The first tulip is at the start of the stage to your left. It is a red flower on a tree stump.
- Move ahead a little bit and you’ll see a blue switch. Press it to unlock a gated cave that is hiding a cake. Go left into the cave to find a hidden path to the other side where the second tulip is hiding.
- After you first get Traffic Cone Mouth, the third tulip will be to the left of the canons shooting above a patch of weak ground.
- In the area with the Tortorner and traffic cone suspended in the air by a vine, the fourth tulip is hidden behind a tree to the right of the enemies.
- The final tulip is hiding in the next area when you climb the stairs. Wait for the bull enemy to rush out. Then go left to where it came from. you’ll find the final tulip hidden in this debris-filled hallway.
Downtown Grassland Hidden Mission 2: Break the Building’s Shutter
You can’t break the building’s shutter without using Mouthful Mode. Luckily, this is placed immediately after you are given the Vending Machine Mouth. Just to the right of where you first inhale the machine, you’ll find the shutter can be broken by shooting cans at it.
Downtown Grassland Hidden Mission 3: Ride the Spewing Water Up to the Balcony
With the Traffic Cone Mouth, Kirby can break pipes that look like they are about to burst, causing a water spew that will transport you vertically. As the traffic cone, you’ll pass underneath a pair of cannons. Hidden just beyond this, behind a tree, is a pipe that you must pound with your Cone Mouth to complete this Hidden Mission.
All Hidden Missions in Natural Plains’ Through the Tunnel
There are three Hidden Missions in Natural Plains’ Through the Tunnel level.
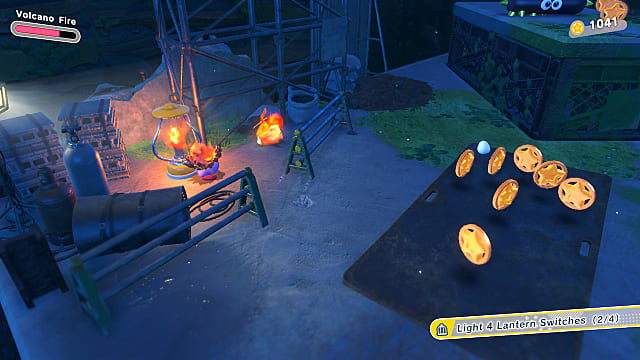
Through the Tunnel Hidden Mission 1: Light 4 Lantern Switches
- The first Lantern Switch in Through the Tunnel is in the first big room of the area. It is behind the barricade and in front of a fence, on the right-hand side before you climb the ladder. Note: Hidden Mission 2 is also in this area.
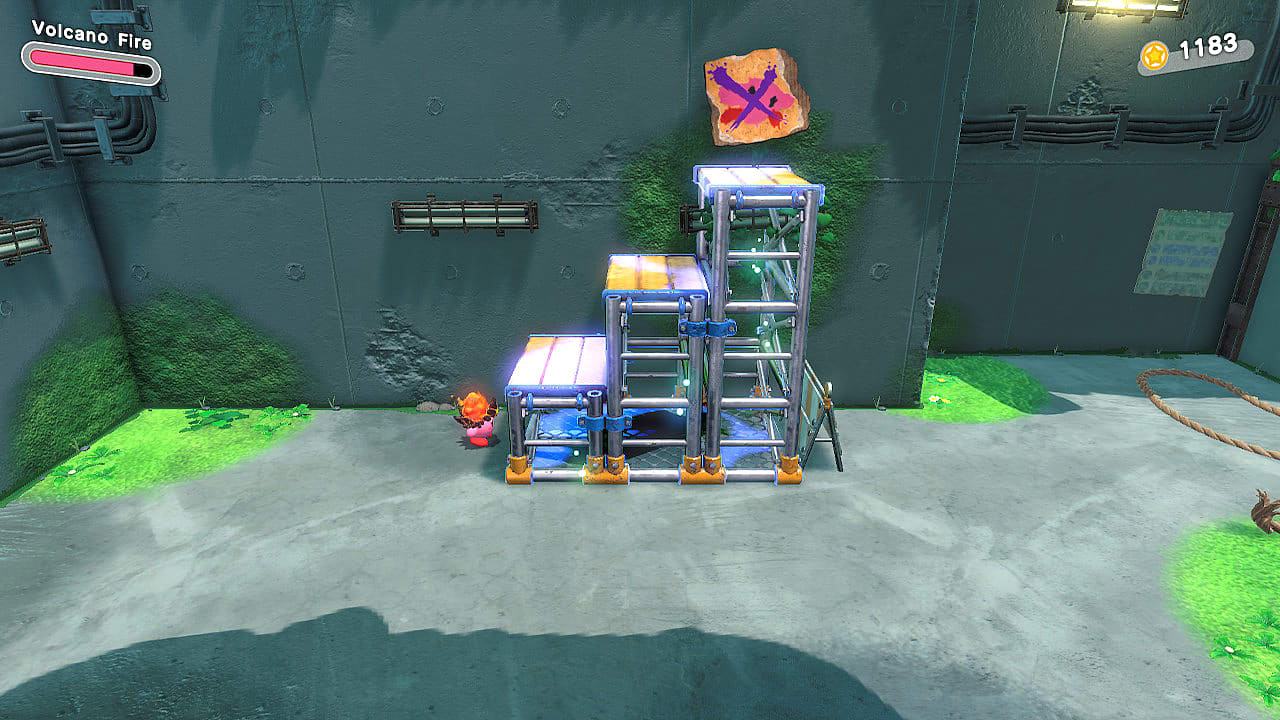
- In the next area, there is a Lantern Switch to your left near a scaffolding.
- The third Lantern Switch is near the golden door that contains a capsule. The switch is to the right, behind a barricade.
- The final Lantern Switch is dead center in the room with a bomb block atop silver crates. You can’t miss it.
Through the Tunnel Hidden Mission 2: Find the Secret Room
At the start of the level, just past the first lantern, you’ll see a dome that you can take over using Mouthful Mode. Wriggle it open to find a switch that will destroy the set of steel boxes to your left, making an entrance to the secret room.
Through the Tunnel Hidden Mission 3: Remove the Wanted Poster
Look diligently during the section of the level where you have the Stairs Copy Ability, and you’ll see a wanted poster high up on the background wall. For this Hidden Mission, you must place the stairs strategically so you can spit them out, climb, and hit the poster to remove it from the wall.
All Hidden Missions in Natural Plains’ Rocky Rollin’ Road
There are three Hidden Missions in Natural Plains’ Rocky Rollin’ Road.
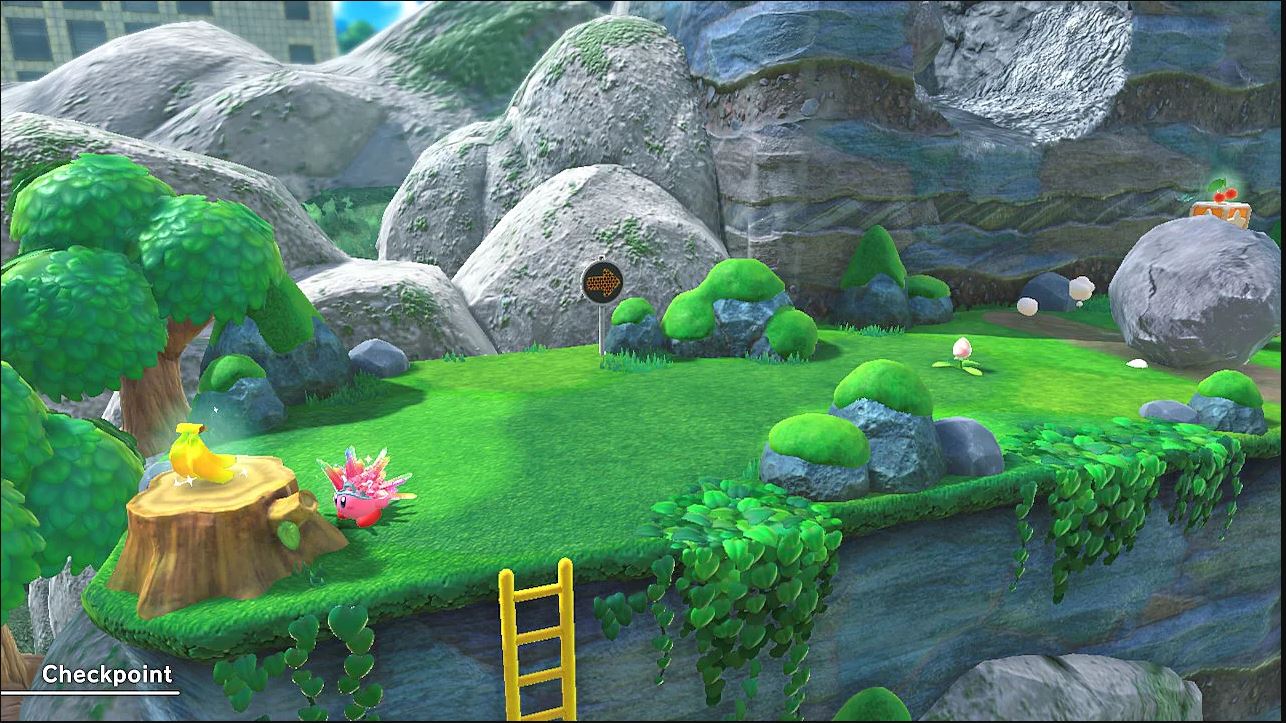
Rocky Rollin’ Road Hidden Mission 1: Eat Snacks Off 3 Tree Stumps
- At the start of the level, you’ll see a baguette on a tree stump. Eat it to begin the first Hidden Mission in Rocky Rollin’ Road.
- The next snack is a banana that can be found after climbing a ladder just a bit later in the same section of the level.
- After the Ranger enemies, you’ll see a stump with no food on it. This is a trick! Instead of falling for it, look for the shining spot next to the stump to reveal a milk carton, the final snack to wash it all down.
Rocky Rollin’ Road Hidden Mission 2: Find the Side Road While Going Uphill
After you get the Ranger Copy Ability for the first time, you climb a ladder to an uphill gauntlet where you must dodge giant boulders coming to crush Kirby.
During this section of the Hidden Mission, you’ll want to find the gap on the right between the natural rock formation and the building at the top of the uphill climb. This gap will turn into a side road that will lead you to a ladder and complete this mission. You’ll find a capsule up the ladder, inside a Dome
Rocky Rollin’ Road Hidden Mission 3: Drive Without Falling Off the Edge
When you first get the car at the end of Rocky Rollin’ Road you’ll be navigating it through a narrow platform full of enemies. It is possible to fall off, but remember that the car’s Turbo Dash is powerful and will eliminate anything in your path. Go slowly, and use the dash strategically and this Hidden Mission will be a cinch.
All Hidden Missions in Natural Plains’ Trip to Alivel Mall

There are three Hidden Missions in Natural Plains’ Trip to Alivel Mall level.
Trip to Alivel Mall Hidden Mission 1: Eat an Invincible Candy
This Hidden Mission is pretty difficult to miss. you’ll be scrolling right at the start of the level until you reach a barricade and a set of stairs pointing you upwards. To the right of the barricade is a striped candy that gives Kirby a brief moment of invincibility. Use it wisely.
Trip to Alivel Mall Hidden Mission 2: Navigate the Mall Without Getting Lost
In Trip to Alivel Mall, there are two puzzle sections you must solve to complete this Hidden Mission and find all the Waddle Dees in Natural Plains. When you see a locker, inhale it. It will reveal a hidden map showing an arrow underneath a burger.
The section ahead is a conveyor belt with three possible exits underneath food signs. Exit through the burger path, and you’ll be rewarded with a Waddle Dee and many healing items.
The second one has a similar setup, but with a twist. The first map you find behind a locker is incomplete, showing that you go left at the cake, but the section ahead has two cake signs.
To solve the puzzle, go to the right and inhale another hidden locker. It will open up a room where you find a piece of the map that tells you the correct cake sign is across from the ice cream sign. Note: There is a doughnut here needed for Hidden Mission 3.
Trip to Alivel Mall Hidden Mission 3: Eat 4 Doughnuts
- The first doughnut is at the top of the first escalator you’ll see in the level. It is on the table with some star coins.
- Doughnut number two can be found in the room with the square conveyor with the spikey hole in the center. Go to the sparkling spot in the bottom right of the screen to make the doughnut appear.
- The third donut can be found by successfully solving the second map puzzle in the previous section. It is on a table in the room you gain access to.
- The final donut for this Hidden Mission is found on the very last screen. Instead of heading to the final Waddle Dee cage, go to your right to discover a hidden ladder. Climb it and you’ll find a cute rooftop cafe where the last doughnut will be waiting for you.
All Hidden Missions in Natural Plains’ The Brawl at the Mall
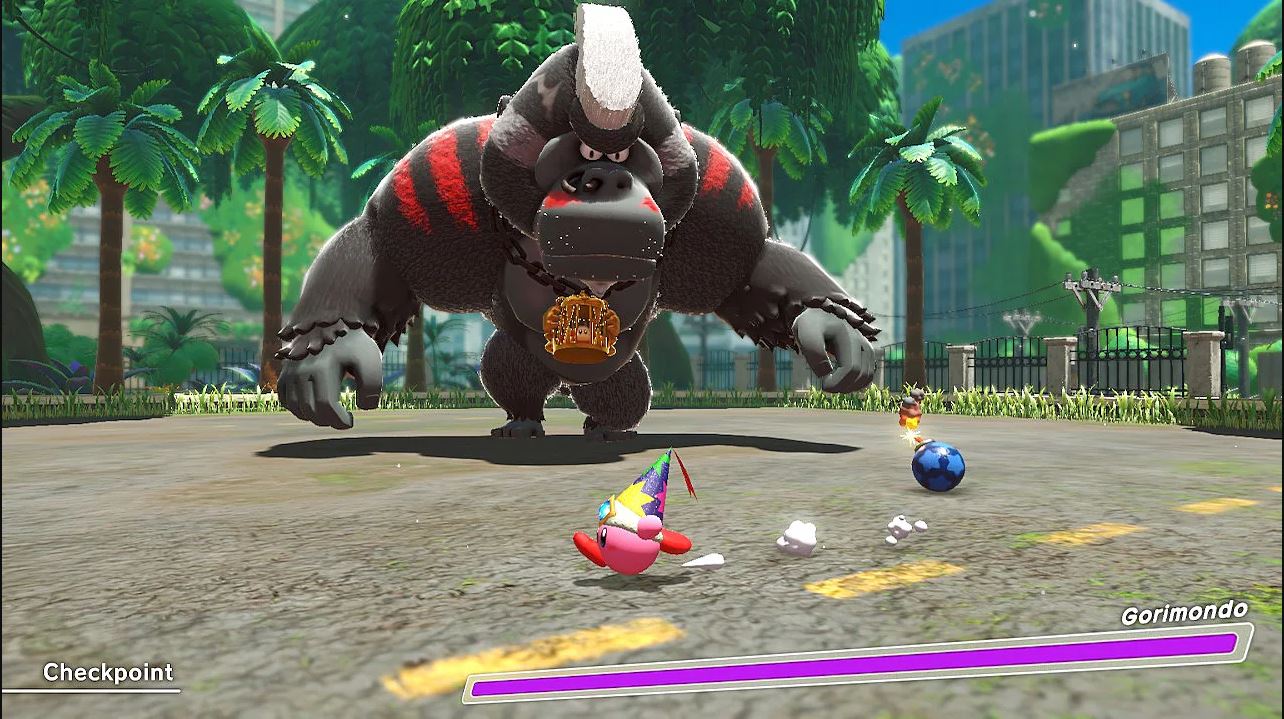
There are no Hidden Waddle Dees in Natural Plains’ The Brawl at the Mall level, but there are four Hidden Missions instead of the typical three. All of these Hidden Mission are completed by fighting the boss in different ways. They are all pretty self-explanatory and are as follows:
- Slide through Gorimondo’s Legs.
- Defeat Gorimondo with the Sword ability.
- Clear The Brawl at the Mall within 2:00 minutes.
- Clear The Brawl at the Mall without taking any damage.
The first Hidden Mission can be done easily by walking up to Gorimondo and pressing the guard button followed by the A button to slide.
For the other three Hidden Missions, we recommend coming back later when you’ve upgraded your Copy Abilities. The Meta Knight Sword will make quick work of Gorimondo, letting you easily get the second and third missions knocked out. Later upgrades for the bomb ability make that an excellent tool for completing the fight without having to get in range to take damage.
And those are all of the Hidden Missions in Natural Plains in Kirby and the Forgotten Land. If you need more help unlocking Hidden Missions or just want to see if you’ve missed anything so far, check out our other Kirby and the Forgotten Land guides.


Published: Mar 30, 2022 06:36 pm