Like Resident Evil: Revelations 2 before it, the 2019 Resident Evil 2 remake has its own built-in set of quasi-achievements, which it calls Records. There are 87 of them in total, many of which are locked or unexplained when you first start the game.
When you complete a Record, the game doesn’t fully track it until the next time you open the Records screen, available from the pause menu in-game, or under Bonuses in the main menu.
Most of the Records in the game, when achieved, unlock entries in the Gallery, such as concept art (see below) or character models. A handful also unlock bonus weapons, character costumes, and extra gameplay modes.

You don’t officially complete a Record until you open the Records screen or finish a scenario, at which point the game pops up a notification and gives you any rewards that might be attached to the Record. This does work retroactively; for example, if you complete a Record that awards a bonus weapon, you can reload old saves and the new weapon will suddenly be available in the nearest item box.
Finishing the 86 other Records in the game unlocks the last one, Raccoon City Native, which is also the Platinum Trophy on the PlayStation 4 version.
Records that are also trophies or achievements are marked with an asterisk(*).
Read Part 1 of this Records guide for story mode, gameplay, and rank Records.
Combat Records
Notably, all combat-focused Records can be accomplished as easily in the Survivor bonus modes as in the main game. Some are even a little easier; for example, Flan can get Human Power Plant very easily, despite not being human.
Don’t Need No Stinkin’ Gun*
Kill any enemy with a knife. This is probably easiest to do by stabbing a downed zombie, but there are a couple of enemies who are surprisingly easy to take down with a good stabbing frenzy, most notably Lickers.
Eat This!*
Counterattack when grabbed with a grenade or knife.
Handy with a Handgun
Kill 10 enemies with a handgun.
Matter of Splatter
Kill 10 enemies with a shotgun.
You Die… Over There!
Kill 5 enemies with the grenade launcher.
Trigger Happy
Kill 10 enemies with a submachine gun.
This is easiest to do with weaker enemies like dogs or the little G-Spawns that the sewer mutants will throw at you. The SMG, under ordinary circumstances, is a lot better at dismemberment than raw damage.
Human Power Plant
Kill 5 enemies with the Spark Shot. This is found in the Sewer Storage Room in Claire’s campaign, and it comes standard in Flan’s loadout when you play Tofu Survivor.
Bring Marshmallows!
Kill 5 enemies with the Chemical Flamethrower. This is found in the Sewer Storage Room in Leon’s campaign.
Got a Problem, Punk?
Kill 5 enemies with a Magnum.
Master Tactician
Kill 10 enemies with grenades and/or knives.
Two Birds, One Stone
Kill two enemies at once with a single bullet or shotgun blast. The “bullet” in question will likely be Leon’s Magnum, as it can penetrate through multiple targets.
This is probably easiest to do in The 4th Survivor bonus mode, especially in zombie-choked areas like the secret area behind the Workers’ Break Room.
A Shocking End
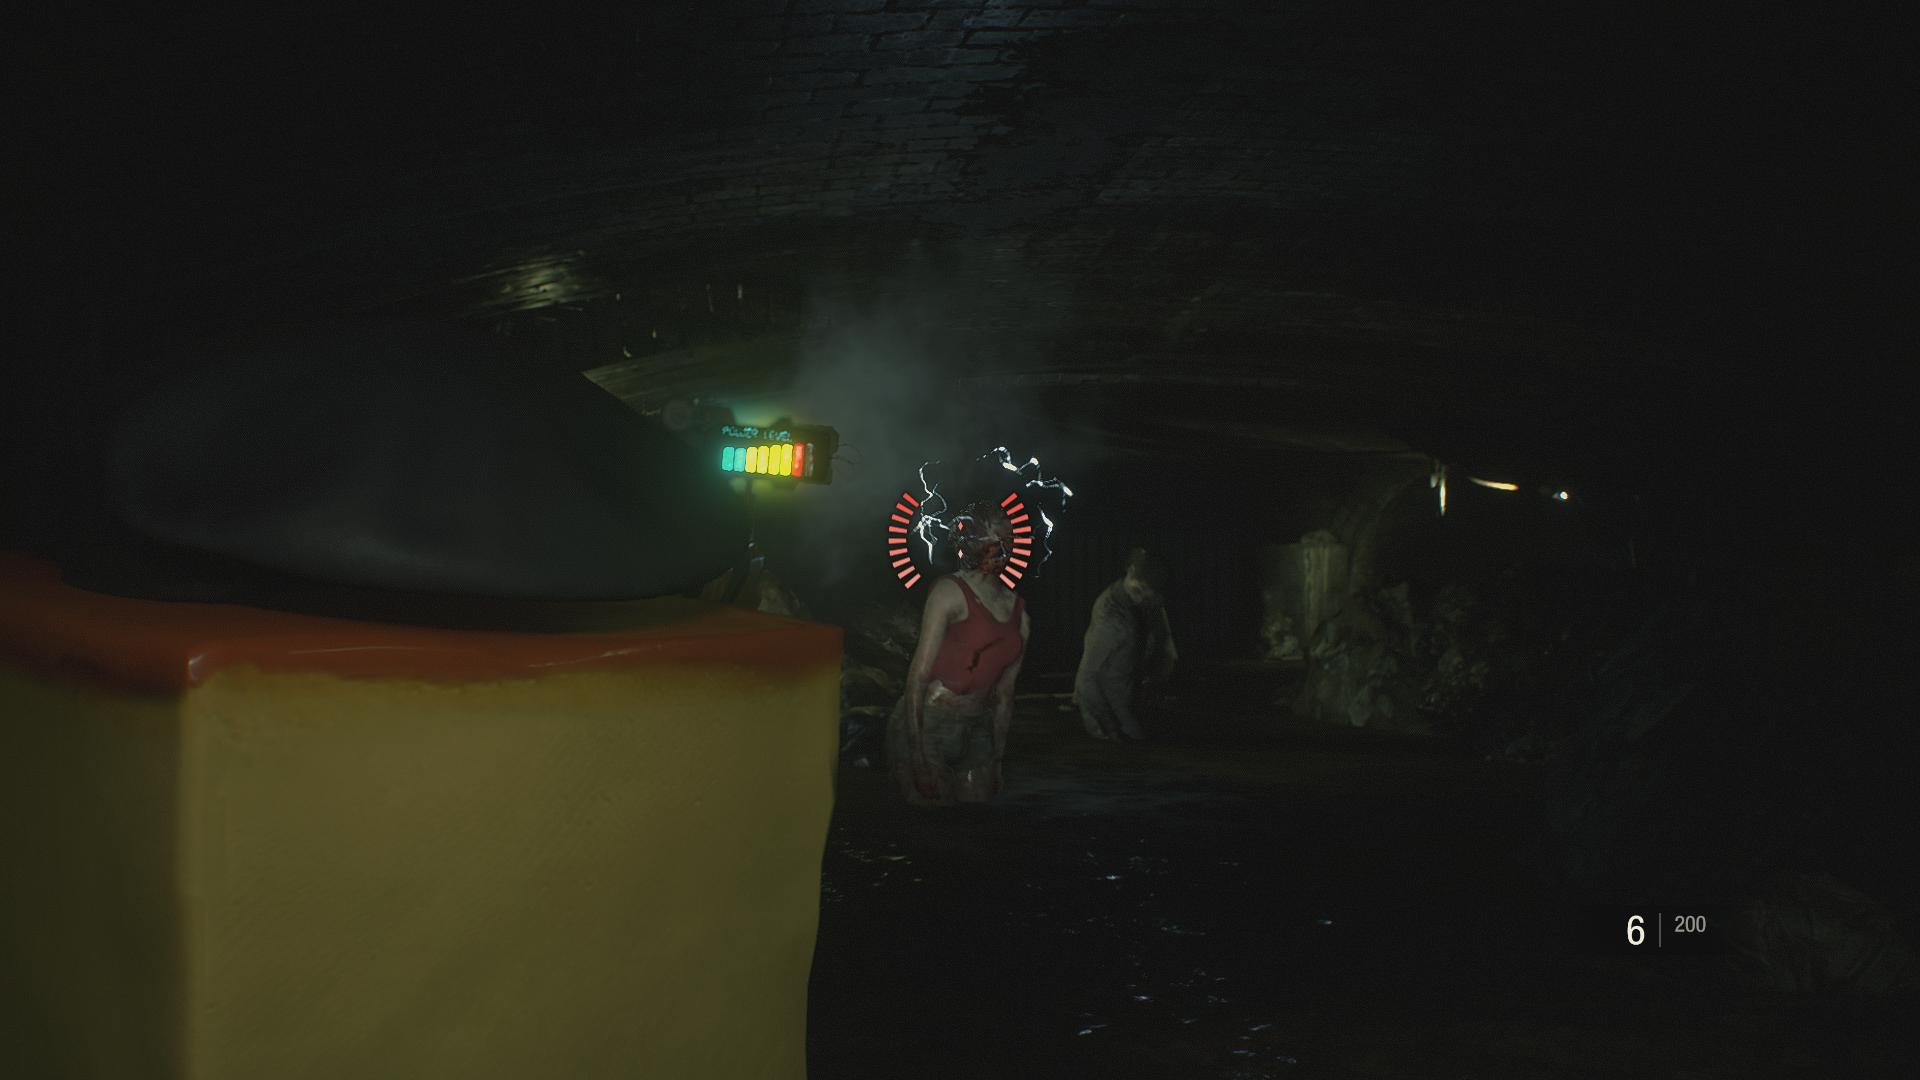
Hit an enemy with the Spark Shot and keep aiming at it until the needles overload. It takes a few seconds, but it’s also a really good way to deal with the big G-mutants in the sewers.
Bon Appetit
After landing a successful counterattack on a dog, zombie, or Licker with a frag or flash grenade, it ends up lodged in the enemy’s mouth. If you simply wait, it’ll go off on its own for minimal effect. However, you can manually detonate it by shooting it, which causes a bigger explosion and accomplishes this Record.
Zombie Roundup*
Kill at least three zombies with a single frag grenade. I’ve found this is easiest to do on the stairs leading down to the waterway from the Treatment Control Room, as you can pitch a frag grenade down the steps and, with a little luck, kill the two zombies waiting there, plus the “sleeping” zombie nearby.
Another good option is right after the final boss fight in Leon’s scenario. When the lift reaches the bottom of the complex, four zombies will burst through a door at you, all of which have very low health. If you have even one frag grenade on you, this Record’s a cinch.
But A Torso
Shoot off a single zombie’s arms and legs. You can still get this Record by brutalizing a zombie that’s already dead, so it can be accomplished easily on any difficulty.
A Doff of the Cap
Shoot a hat off of five zombies’ heads. This can include policeman’s caps, which means you’ll probably get this by accident before you’ve left the RPD. If not, the sewer zombies who are still wearing hard hats will get you the rest of the way there.
Like Skeet Shooting*
Shoot a dog or Licker out of the air as it leaps at you.
This is one of those achievements that’s easy to do by accident, but trying to do it on purpose will just frustrate you, like parrying arrows with your knife in RE5. I got it in 4th Survivor by trying to kill the dog pack in the Flow Control Room with Hunk’s MP5.
Keep Their Heads Ringin’*
Drop a flash grenade on an unaware Licker. Do not get anywhere near it afterward, as it lashes out in random directions for a few seconds while it’s deaf.
Hats Off!*
Knock off Mr. X’s fedora with a successful headshot. You can do this with any weapon, but be aware that it usually gets him angry.
Take a Breather
If you manage to land several consecutive headshots on Mr. X or blow him up with a frag grenade, he drops to one knee and is stunned for about 40 seconds. This usually isn’t worth the ammo, but you can take advantage of it for this Record and an opportunity to get some distance.
Hate to Burst Your Bulb
Ivy zombies have a number of lighter-colored green bulbs on their bodies. Shooting those bulbs makes them explode, stunning the Ivy for a second. If you pop them all, the Ivy drops to the floor.
This requires precise aiming, ideally with a handgun with a laser sight like the one Claire finds in the RPD’s parking garage, and it is easiest to do on Assisted difficulty.
It’s low-key one of the trickier records in the game, however, as it requires you to only hit the bulbs.
Right in the Eyeball
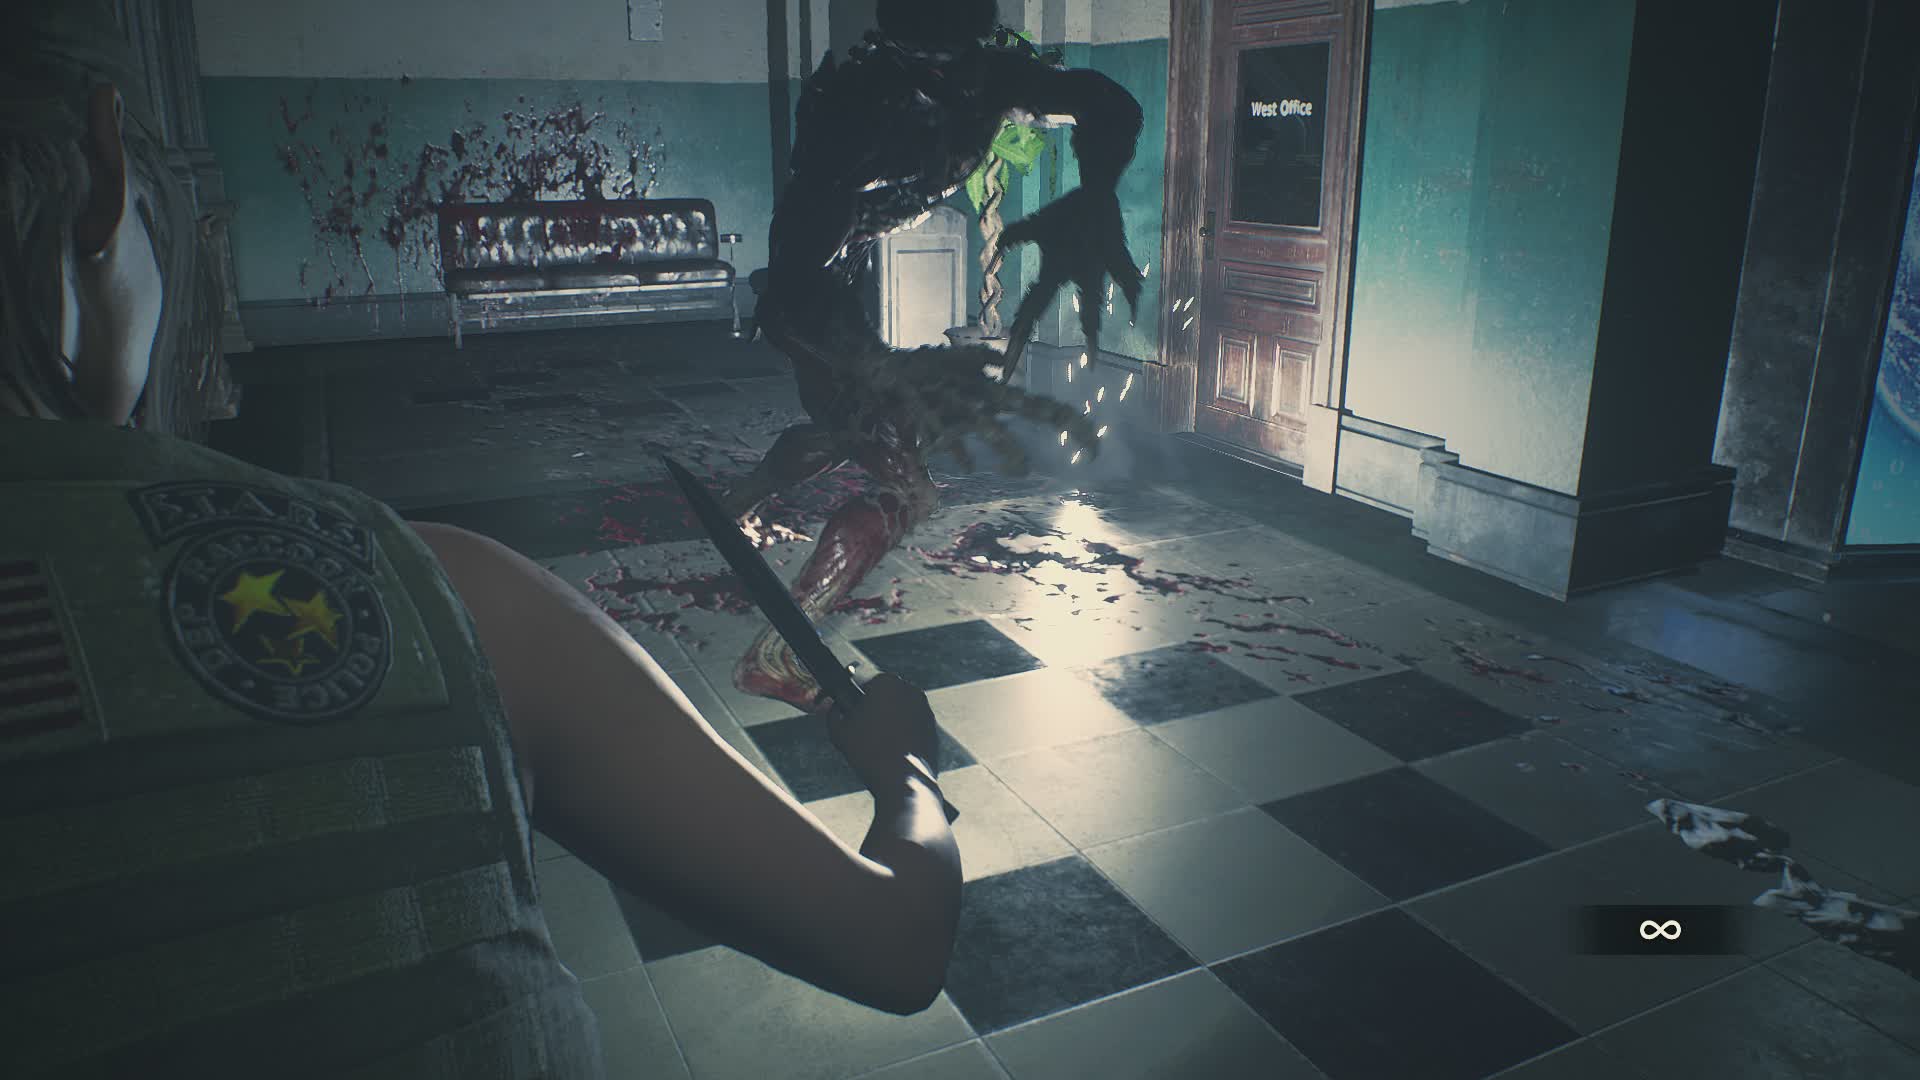
During your first fight against the G-Type, in the maintenance room, use a knife to hit the giant eyeball on his arm.
If he manages to grab you and you break free by counterattacking with a knife, it counts for this record.

Gotcha!*
Inflict enough damage on the G-Type during your second fight with it, at the end of the sewers section, that a single hit from the crane is enough to end the encounter.
This is tricky, particularly on Standard or higher difficulty. What can help is that any damage you inflict on the G during the run-up to the crane platform does still count toward its total health pool, so you can shoot its arm in the power room, drop a grenade in its face when it tears the door open, and put a round or two in it while you’re running from it.
Put that Down!
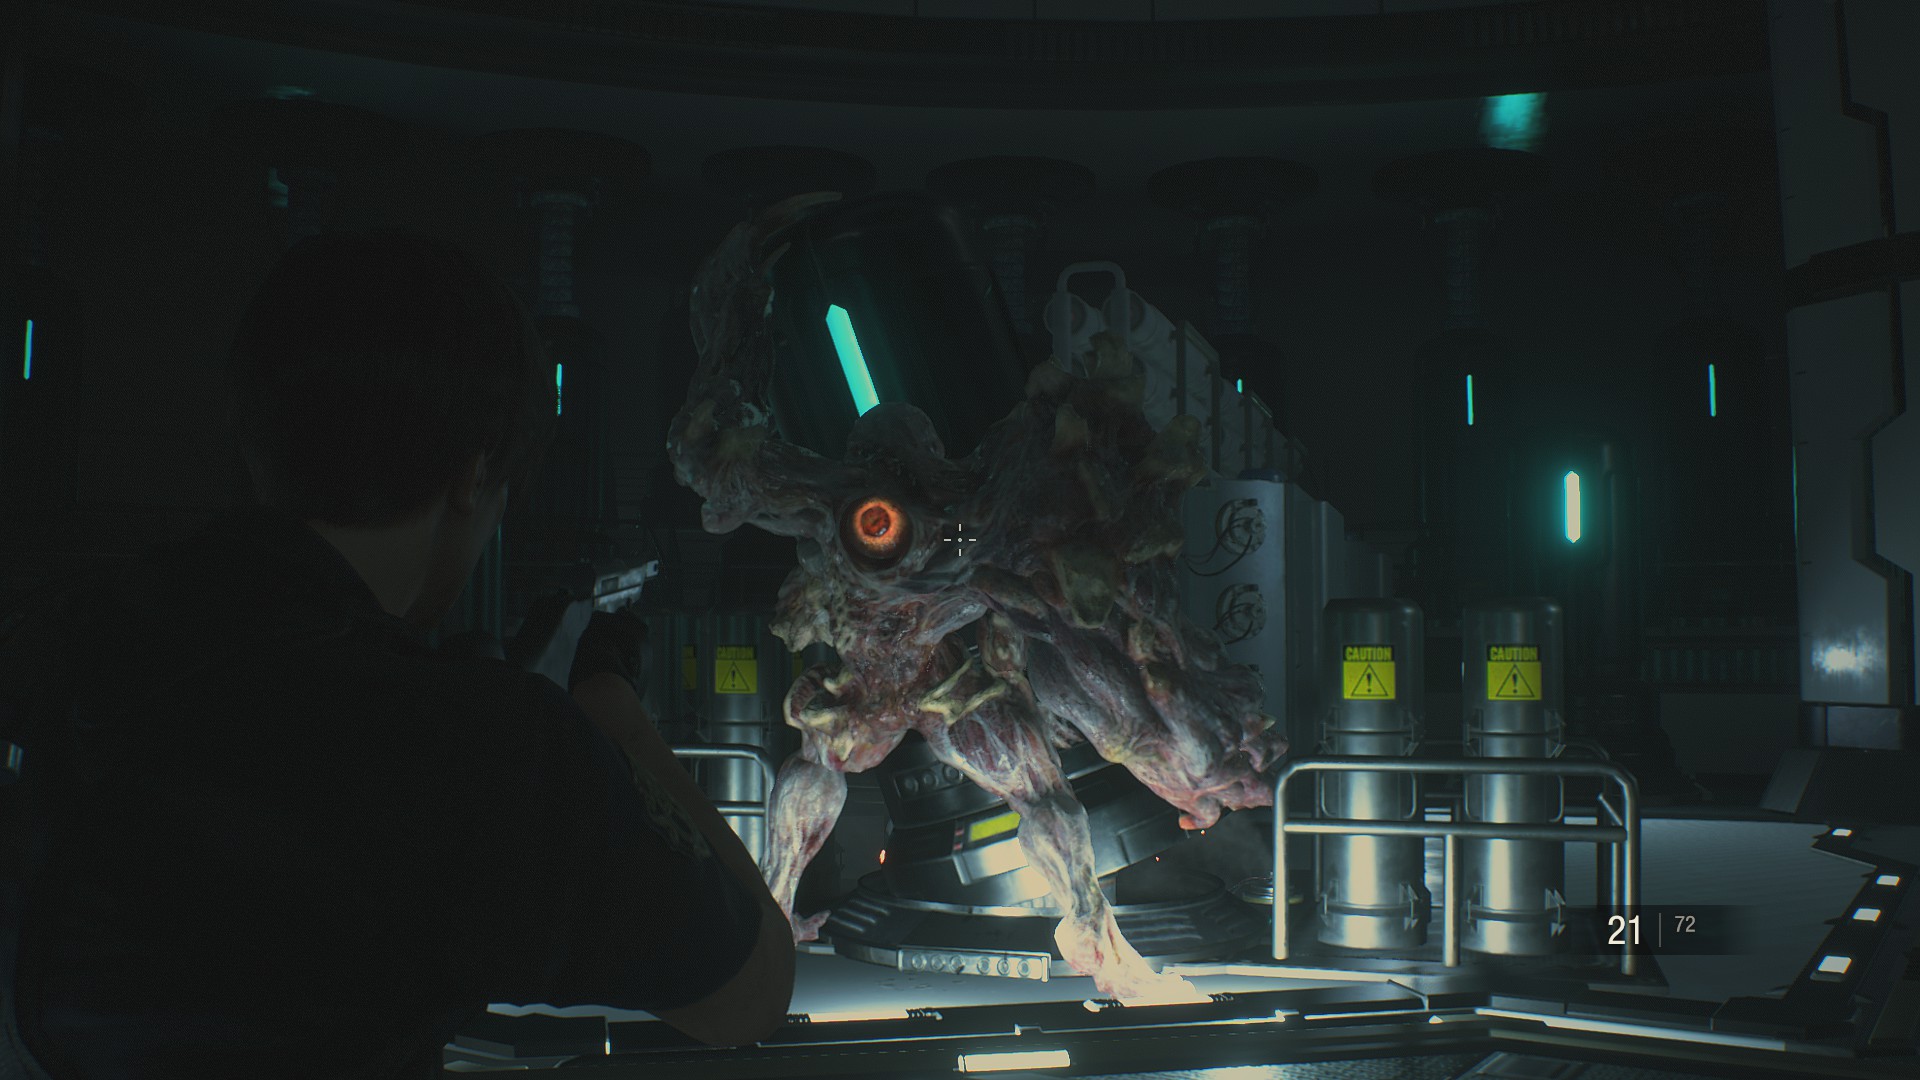
During your fight with the G-Type in the bioreactor room, he occasionally breaks off to pick up and throw fuel canisters at you. Doing so exposes an eyeball between his shoulder blades.
If you target and destroy it while he’s holding the canister, he’ll drop it and become stunned, which also completes this record.
You Belong on the Ground
In Claire’s final fight against the G-Type, when he runs off to cling to the wall of the elevator shaft, shoot him down with the minigun before he can leap at you.
Maxed Out
In Leon’s fight against the Super Tyrant, it has a move where it pauses and spreads its arms, which is the tell that it’s setting up for its instant-kill charge attack. Keep it from charging by shooting it in the heart on its chest with a couple of rounds from any weapon.
With Time to Spare*
As Claire, defeat the final G mutation with four minutes or more left on the self-destruct countdown.
The trick is that the G only really takes damage when you hit his eyes, so simply hosing lead into him with the minigun doesn’t do much. Focus your attacks on the cluster of eyes in his center, and don’t shoot at all unless you have a clear line of fire on them.
If he’s been reduced to crawling along the floor at you, you’ve officially won the fight; he’ll expire on his own after about 30 seconds. This is mostly about maximizing your damage while you have the opportunity, rather than randomly blazing away at him.
In the Blink of an Eye*
As Leon, defeat the Super Tyrant with five minutes or more left on the self-destruct countdown.
The Super Tyrant is actually a timed encounter. If you’re still alive after three minutes and thirty seconds, Ada automatically throws you the rocket launcher, one shot from which ends the fight. Any damage you inflict on the Tyrant in the meantime takes time off that clock, but in surprisingly small increments.
At best, you’re probably always going to be stuck fighting the Super Tyrant for at least 90 seconds.
With that in mind, getting this record is mostly about how fast you navigate the section leading up to it. Leon doesn’t have to wait for Sherry, so he has a slight speed advantage here, but knowing the map and avoiding what fights you can make a big difference.
The Super Tyrant can also be stunned with flash and frag grenades, and you can manipulate it to only use its easy-to-dodge leap attack by constantly staying as far away as possible.
Alternatively, if you manage to get an S+ rank on Hardcore difficulty as Leon and unlock the infinite rocket launcher, one shot from it will automatically destroy the Super Tyrant as soon as the fight starts.
Collectibles Records
Vermin Extermination*
Destroy a Mr. Raccoon statue.
Endangered Species
Destroy 10 Mr. Raccoons.
Complete Vermin Extermination*
Destroy all 15 Mr. Raccoons.
We’ve actually got a well-written and thoughtful guide specifically for Mr. Raccoon statues. I think you should use that.
Treasure Hunter*
Develop the “Hiding Places” film in the Workroom in the sewers, as discussed in yet another handy guide on this site, and use it to find two hidden item stashes in the RPD.
Hip to Add Squares*
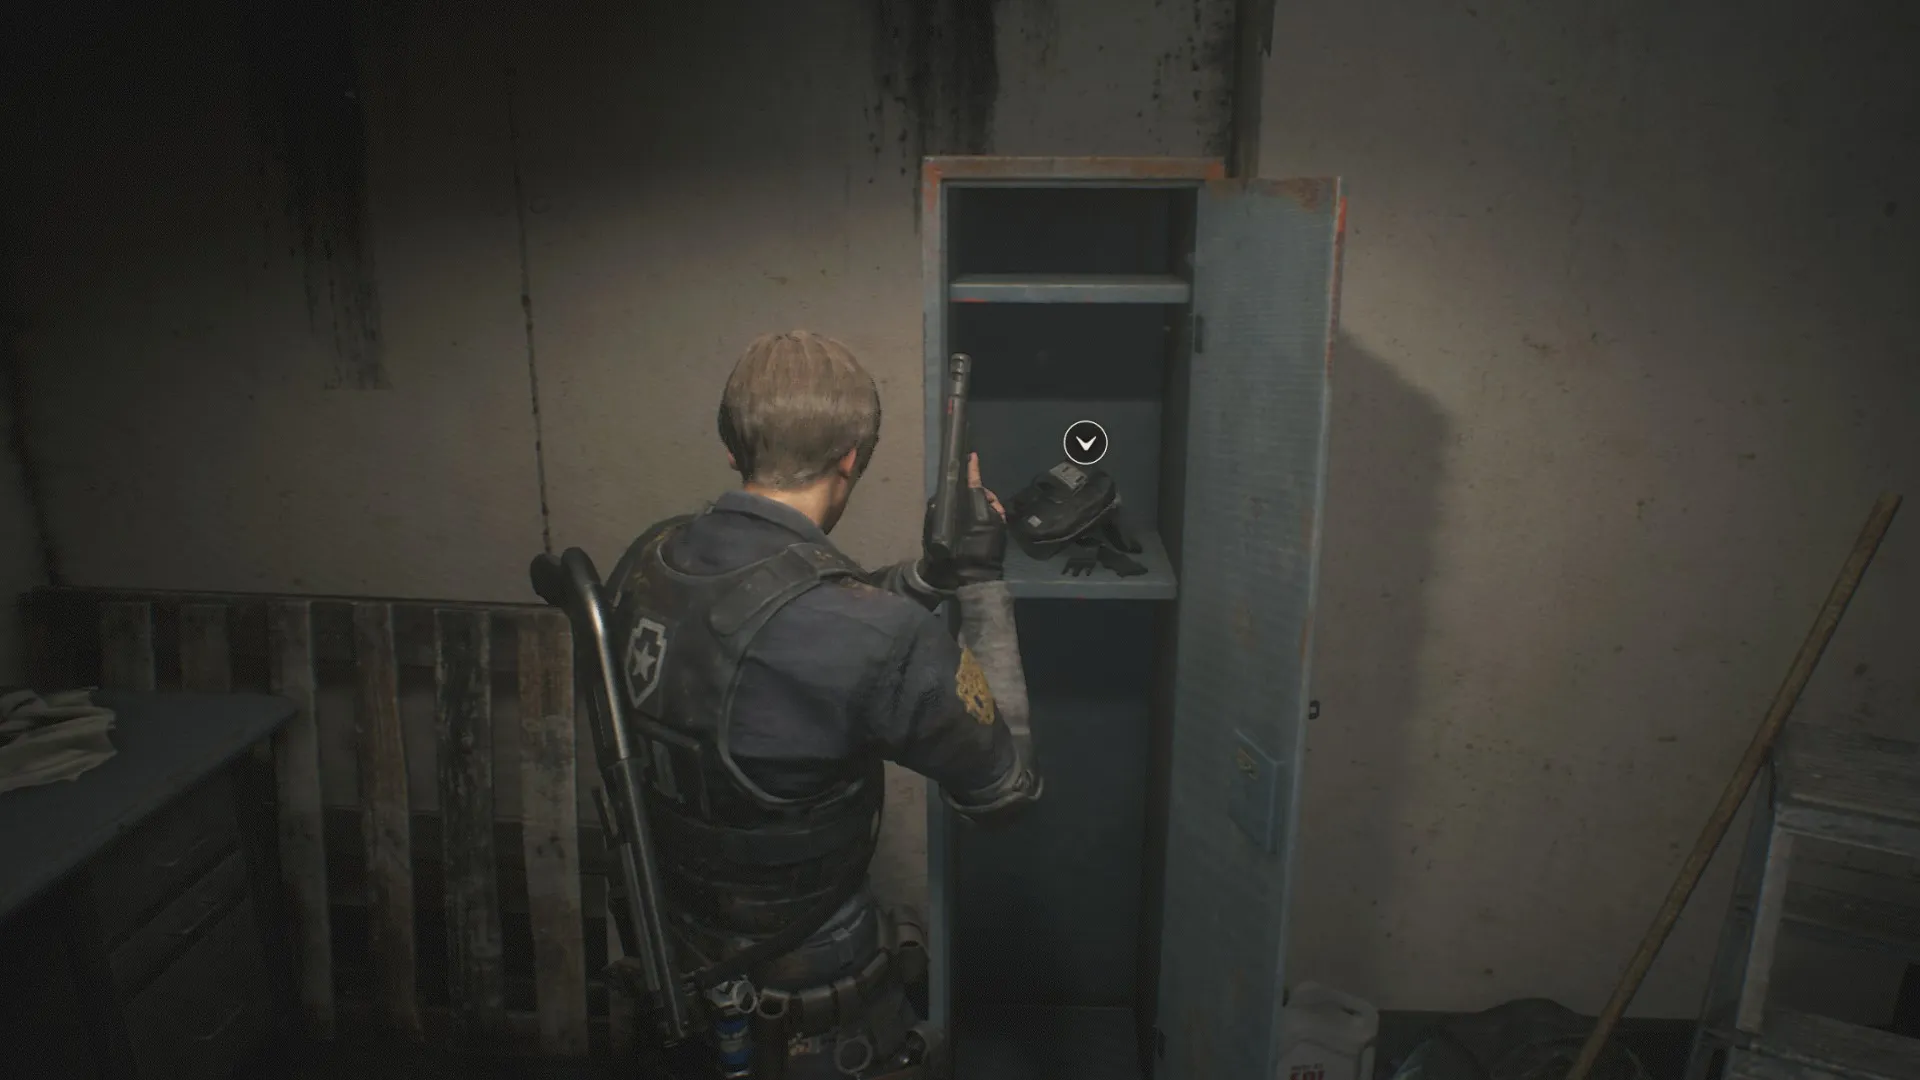
Find a Hip Pouch.
A Waist of Space*
Find all the Hip Pouches in the game and max out your inventory.
This Record is only possible on Assisted or Standard difficulties, as the easier-to-find Hip Pouches are replaced by ink ribbons in Hardcore mode.
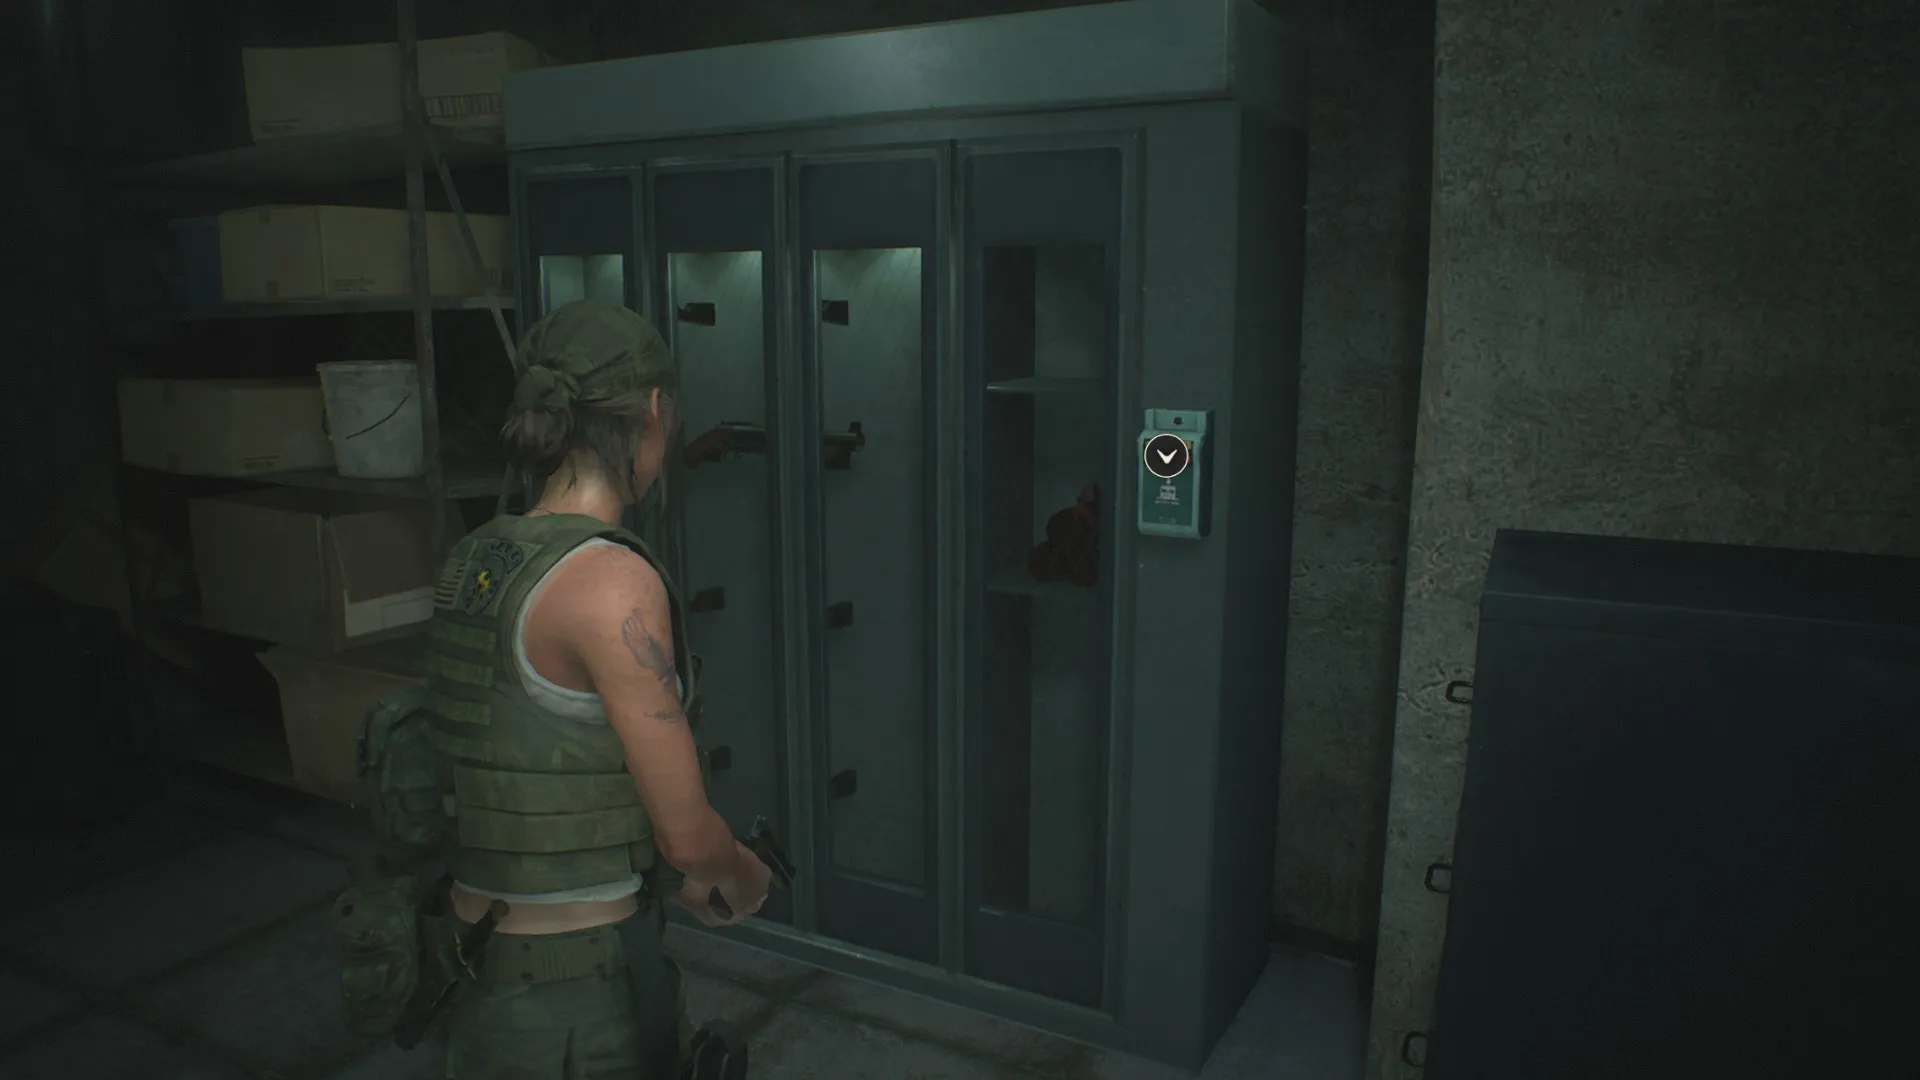
Hip Pouches can always be found in locker 203 in the RPD’s Secure Storage Room; inside the safe under the captain’s desk in the RPD’s West Office; and inside one of the pods in the Nap Room in the lab, once you restore power with the signal modulator.
On Assisted and Standard difficulties, on either a first or second run, you can find a Hip Pouch in a locker in the maintenance area safe room after your first fight with the G-Type and on a bench in the Workroom in the sewer.
On a first run, there’s also a Hip Pouch on a table in the West Storage Room on the RPD’s third floor, by the C4 charge. However, on a second run, that Pouch gets moved to the RPD’s front desk.
Gun Fanatic
Collect all 6 weapons in Leon’s game.
Gun Enthusiast
Collect all 7 weapons in Claire’s game.
Both characters can find several weapons in the same places throughout their scenarios, and gain access to them in the same ways. In either case, your starting weapon automatically counts towards the totals here.
- The shotgun or grenade launcher is in the Secure Storage Room on the RPD’s first floor, which is unlocked via the weapons locker keycard found in the Art Room on the second.
- The SMG or Magnum is in the STARS Office’s Armory, which is locked by the nearby PC. To find the USB security dongle that opens it, you need the Red Jewel and the Ornate Box (in the Interrogation Room on a first run, and the Men’s Locker Room on the second). Once you have it open, examine the STARS Badge to find the switch on the back, and plug it into the PC in the Armory. (Whew!)
- The Spark Shot or flamethrower is in the Supplies Storage Room in the sewers, and it requires both the king and queen plugs to access. It’s not hard to find, but the real trick is remembering to have enough spare inventory space that you can bring both plugs and your new gun with you when you leave.
In Claire’s game, you’ll find the minigun in the same office where you start up the train platform.
In Leon’s, you’ll be thrown the rocket launcher if you survive long enough during the final battle with the Tyrant.
In both characters’ second runs, they can find a new, exclusive weapon by visiting the storeroom under the RPD’s entrance. Claire receives a single-action .45 revolver, while Leon gets a .45 pistol. In other words, to complete this Record, you need to at least begin both characters’ second run.
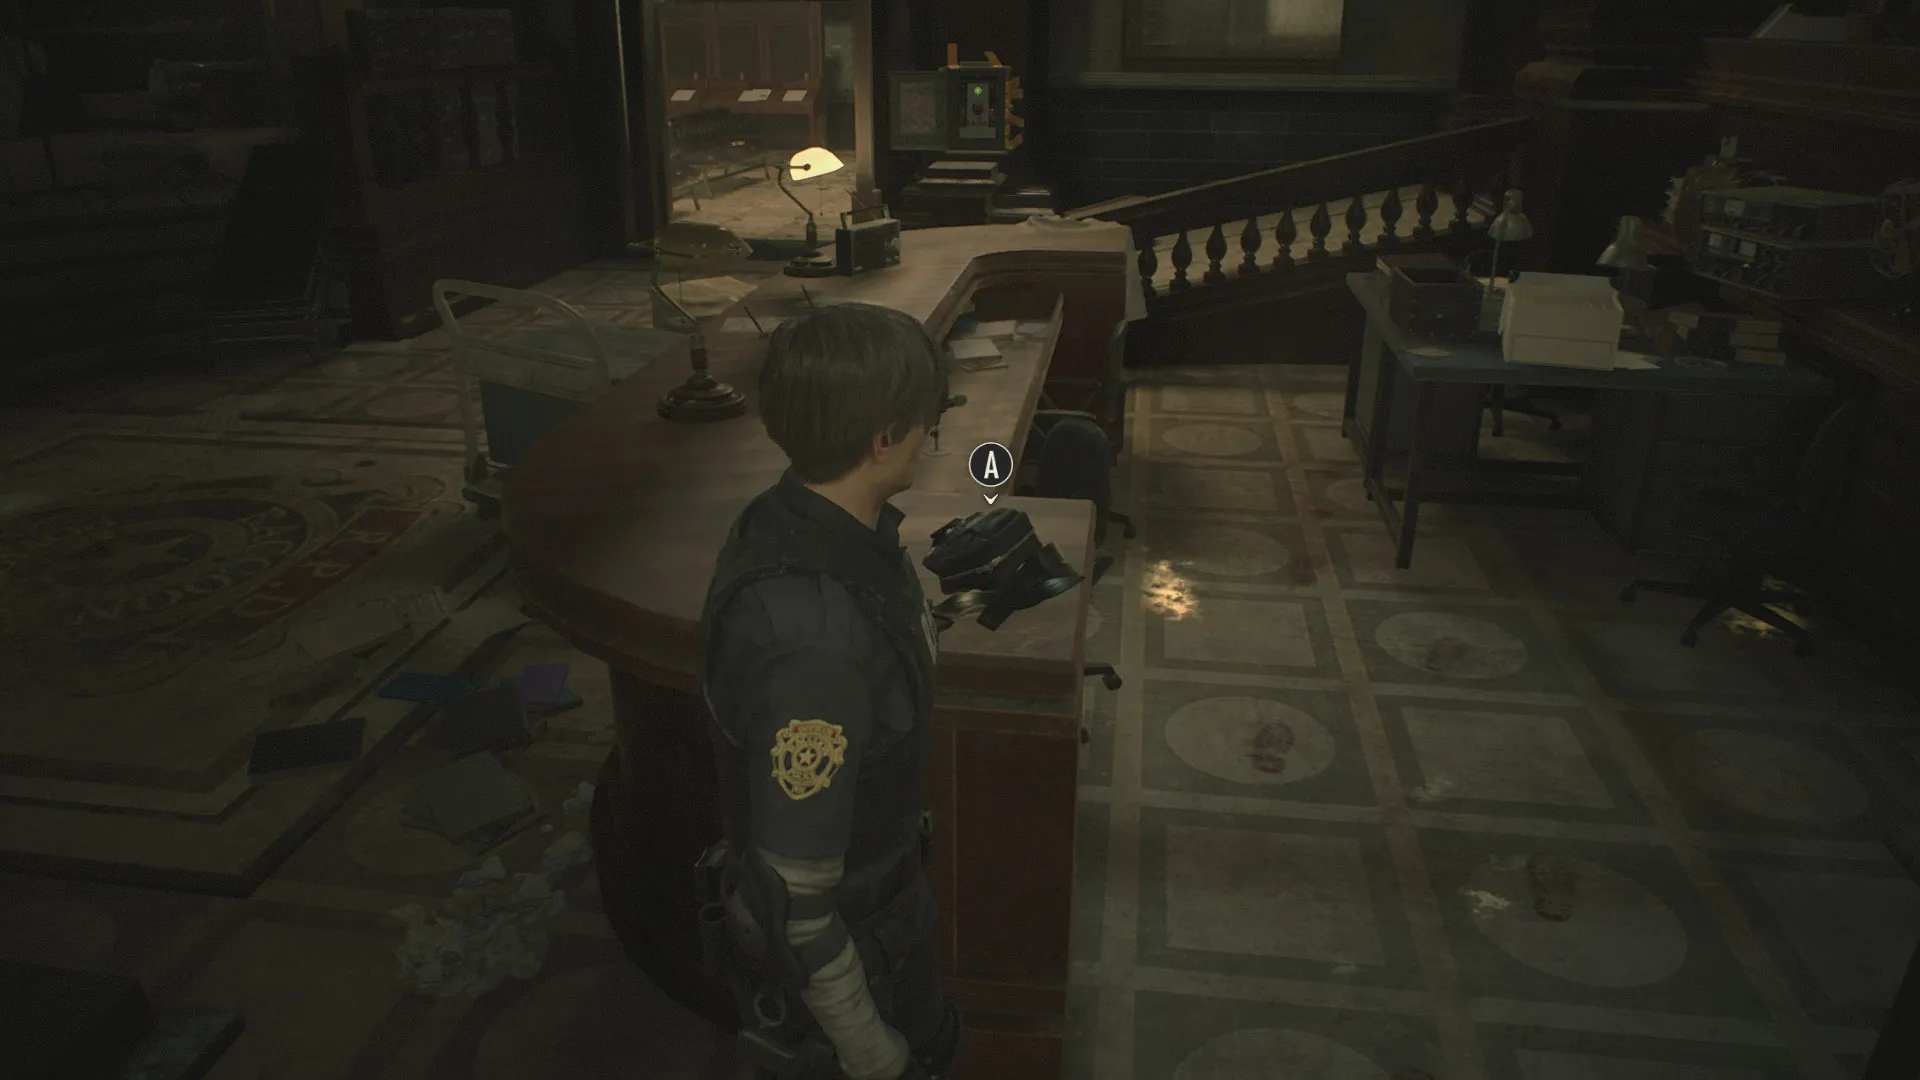
Finally, Claire can get a semiautomatic handgun with a laser sight — her old Browning Hi-Power from the 1998 RE2, in fact — in the RPD’s parking garage. Go to the firing range and get the broken car key out of the yellow lunchbox near the entrance.
Examine it to find the lock switch for the car, and press that button while you’re standing in the parking garage.
Packed Pockets
Collect all 8 custom parts in Leon’s game.
Packed Backpack
Collect all 7 custom parts in Claire’s game.
Both Leon and Claire can find six of their weapon mods in the same locations:
- Inside Leon’s desk in the RPD’s West Office.
- In the safe in the Waiting Room on the RPD’s 2nd
- In the safe in the Flow Control Room in the sewers.
- Inside the STARS storage box at the bottom of the stairs underneath the goddess statue.
- In the bottom left drawer of Wesker’s desk in the STARS Office, but only after you’ve developed the “Hiding Places” roll of film from the Workers’ Break Room in the sewers.
- In the left-hand locker in the lab’s Nap Room.
Claire can find a custom part for the grenade launcher in the Elevator Control Room in the RPD’s basement, next to Chief Irons’s private lift.
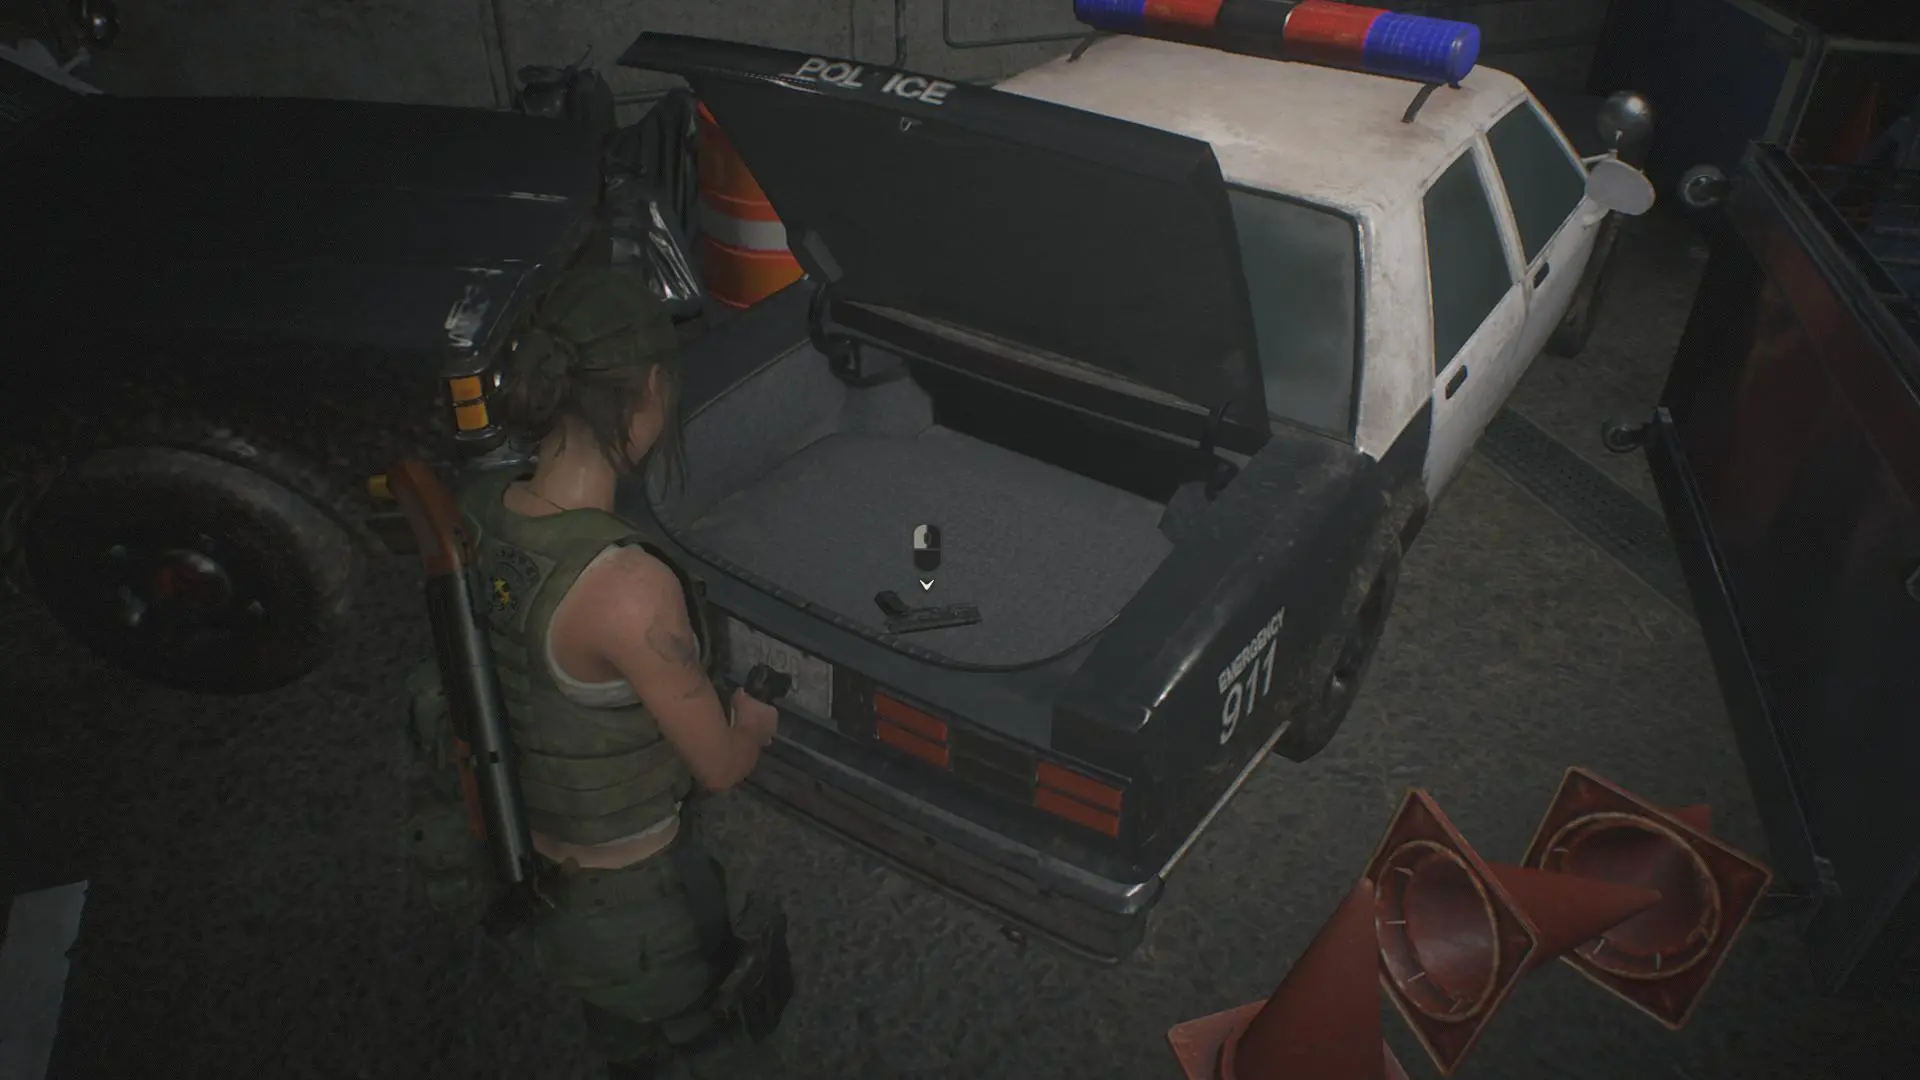
Leon can find a custom part for the shotgun on the shelves near the entrance of Robert Kendo’s gunshop, and a custom part for the Matilda handgun by opening the trunk of the wrecked police car in the parking garage. (Claire finds a semiautomatic handgun there instead.)
Dark Times, Dark Room
Find and develop all 5 rolls of film.
Lore Explorer*
Read all 58 files in the game, as per our guide on the subject.
Master of Unlocking*
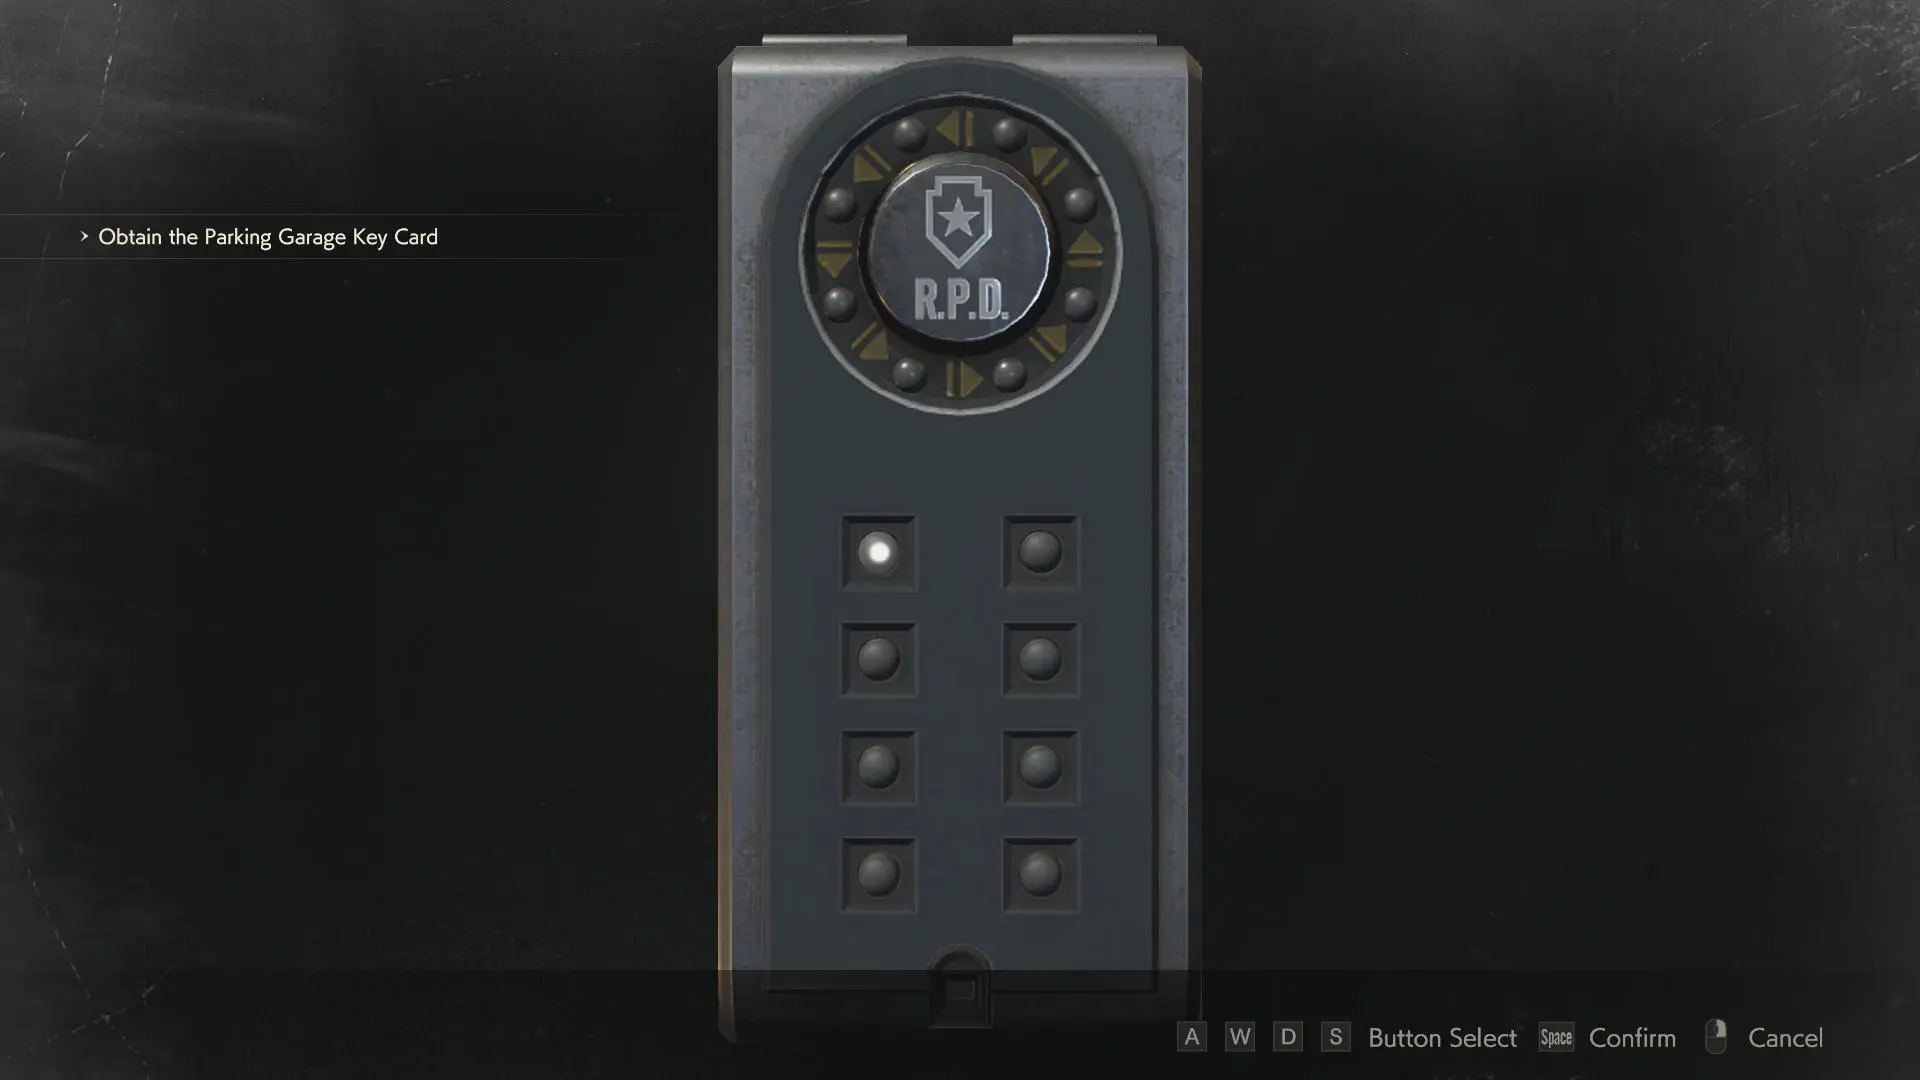
Open all of the safes and combination locks in the game.
There are three old-fashioned safes strewn throughout RE2, as well as five code locks, each of which takes a three-letter “password.” The safes’ combinations can all be found in various files, while the solutions to the code locks are a little trickier. The combinations do not change between scenarios or runs.
Below, you can find each necessary safe or locker’s location, where you go to find the solution, and underneath, if necessary, the actual solution.
Safe #1, RPD West Office: Read the Internal Memo file behind Wesker’s desk in the STARS Office.
Solution: L9, R15, L7
Safe #2, RPD Waiting Room, second Floor: Read the Confiscation Report file in the RPD’s Observation Room.
Solution: L6, R2, L11
Safe #3, Treatment Pool Room: Read the Delivery Receipt file on the table at the end of the Cable Car Platform. (Or check the left side of the safe.)
Solution: L2, R12, L8
Code Lock #1 & #2, RPD West Office: Read the Rookie’s First Assignment file on Leon’s closed desk, then check the six nearby desks for their owners’ name plates.
Solutions: NED, MRG
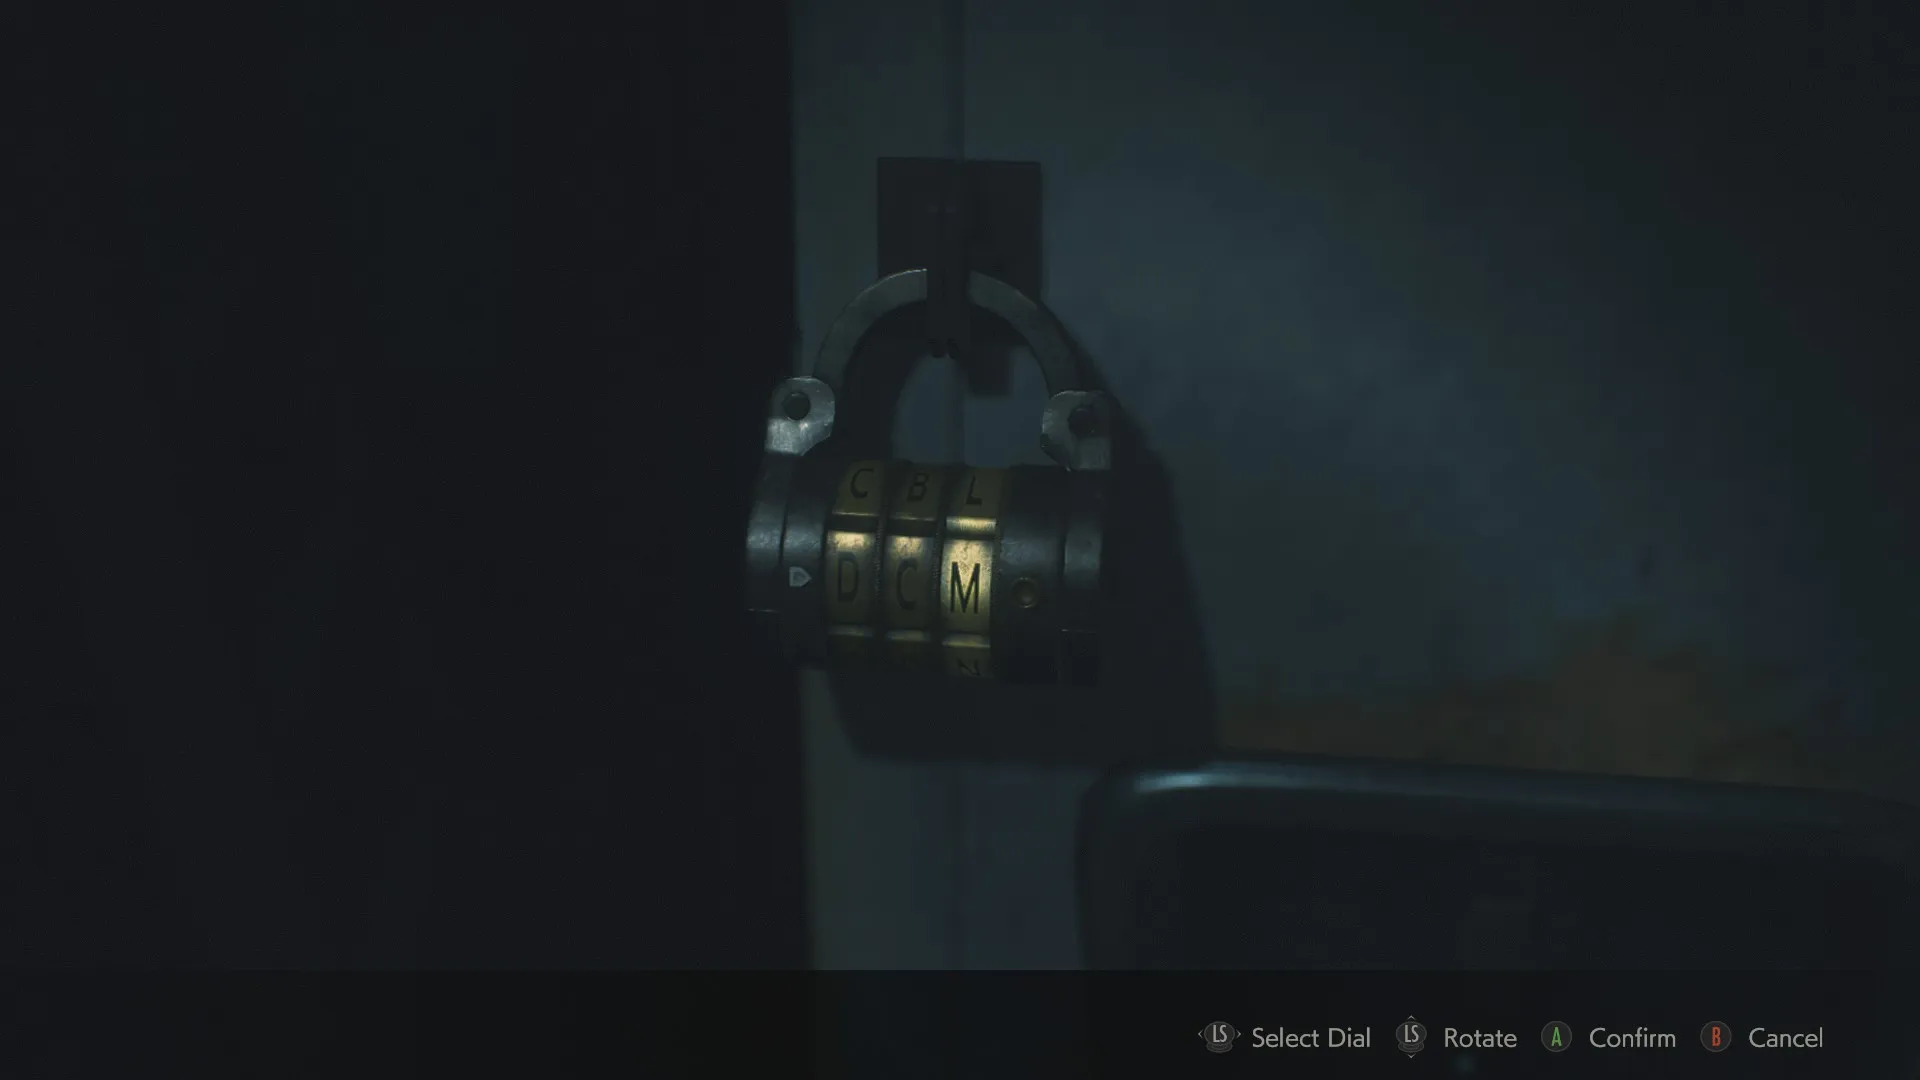
Code Lock #3, RPD West Wing, third floor: Develop the roll of film found behind the check-in desk at the Firing Range in the RPD’s basement.
Solution: DCM
Code Lock #4, RPD Men’s Locker Room, second floor: Written on a whiteboard in the side office north of the Records Room on the first floor.
Solution: CAP
Code Lock #5, Sewers Control Room: Check the Jazz Festival Flyer in the Workers’ Break Room for clues.
Solution: SZF
Puzzle Records
A Vault-Like Mind*
Open a Portable Safe. You can find your first one early in a first run in the men’s locker room on the second floor of the RPD. One is always in the Linen Room near the STARS Office, accessible only once you have the diamond key from the Morgue, but on a second run, the other Safe is moved to the Interrogation Room on the first floor.
The solutions to Portable Safes are randomized every time, but each button corresponds to a light on the safe. All you have to do is hit the buttons in the right order to light them all up in sequence, which takes a bit of trial and error.
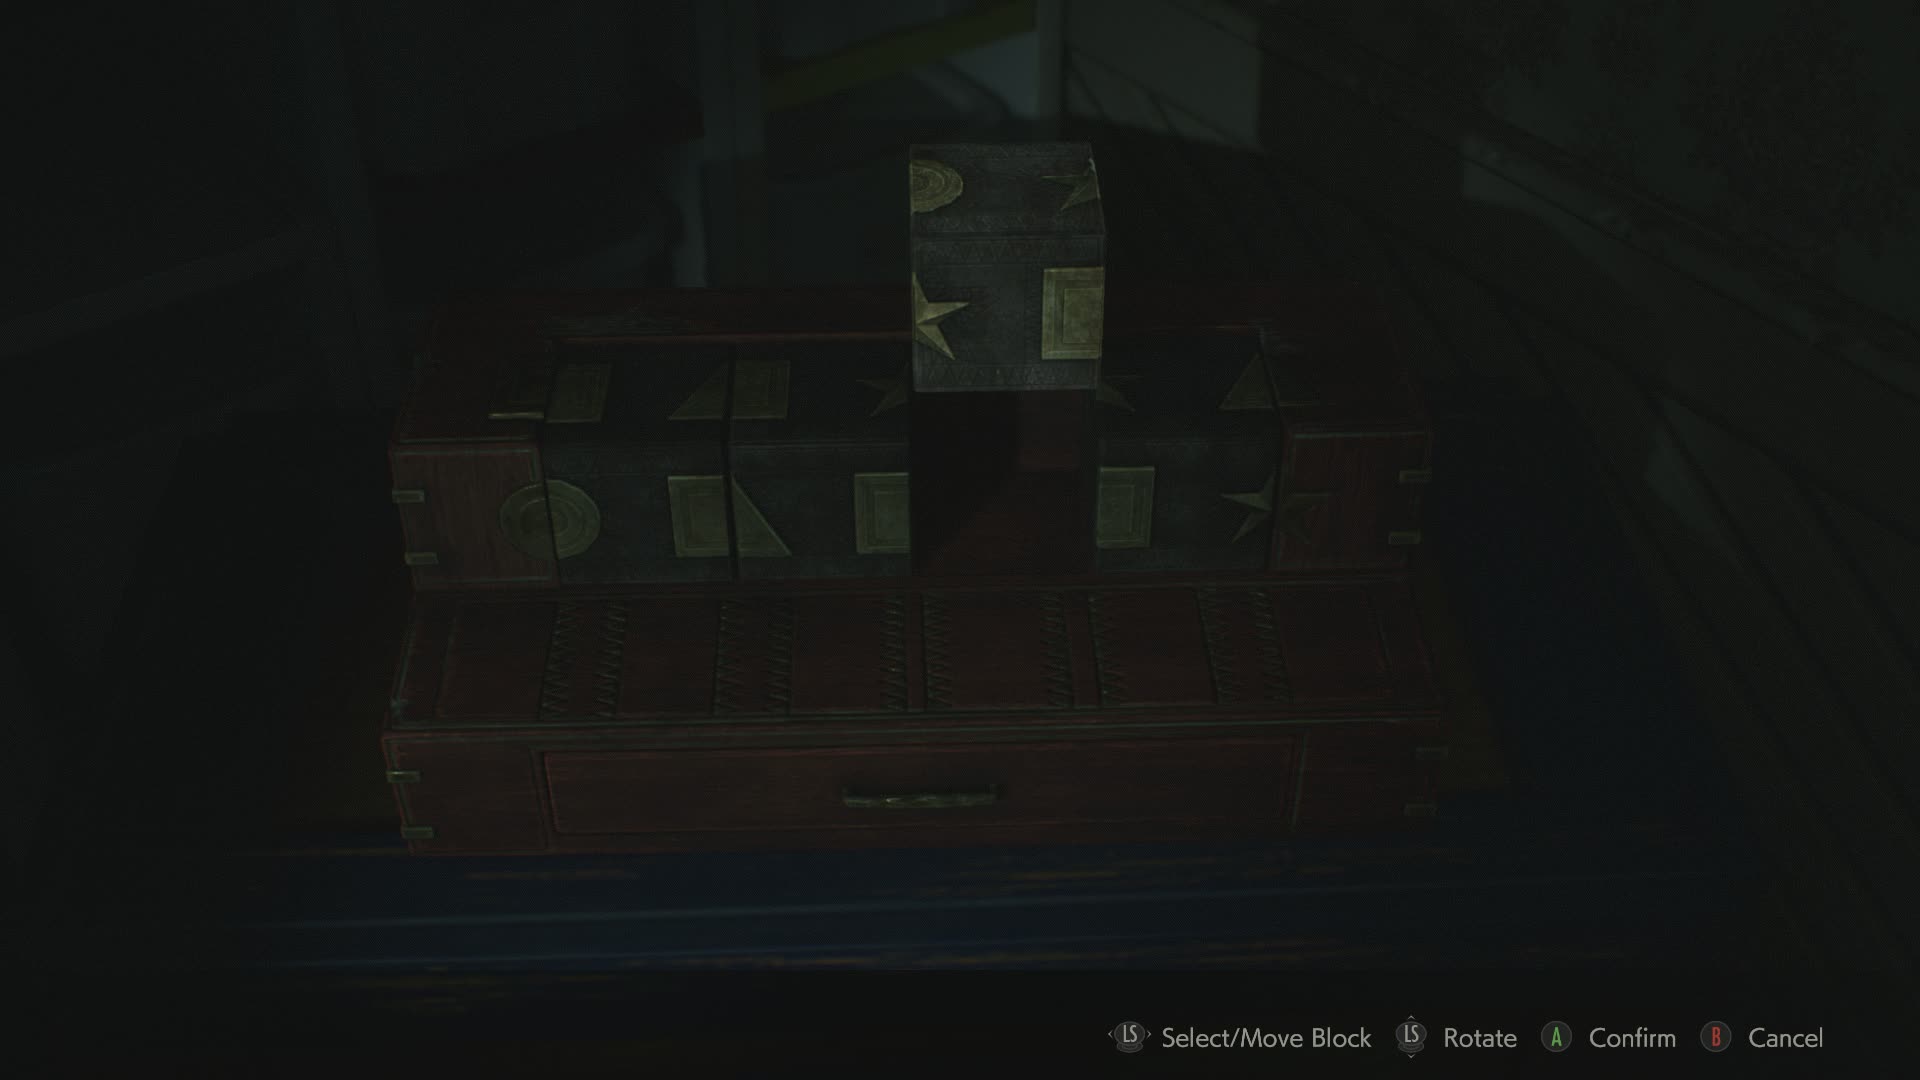
Young Escapee*
In Claire’s game, when you play as Sherry, escape from the Bedroom within 60 seconds. You’ll want to do this on Assisted or Standard because you can revert to the autosave right at the start of this section if you blow it.
The question here is how quickly you can solve the block puzzle and get the Scissors. Fortunately, once you know the shortcut, it’s not as hard as it sounds.
Turn around immediately, grab the doll, examine it in your inventory, and turn it around to find the Block inside. Take it to the puzzle in the corner of the room, where it automatically gets installed in the fourth slot. Now, take the first block and move it two spots over, to the third position.
From here, just spin the blocks until the symbols match, grab the Scissors, and use them on the cardboard that’s blocking the wall.
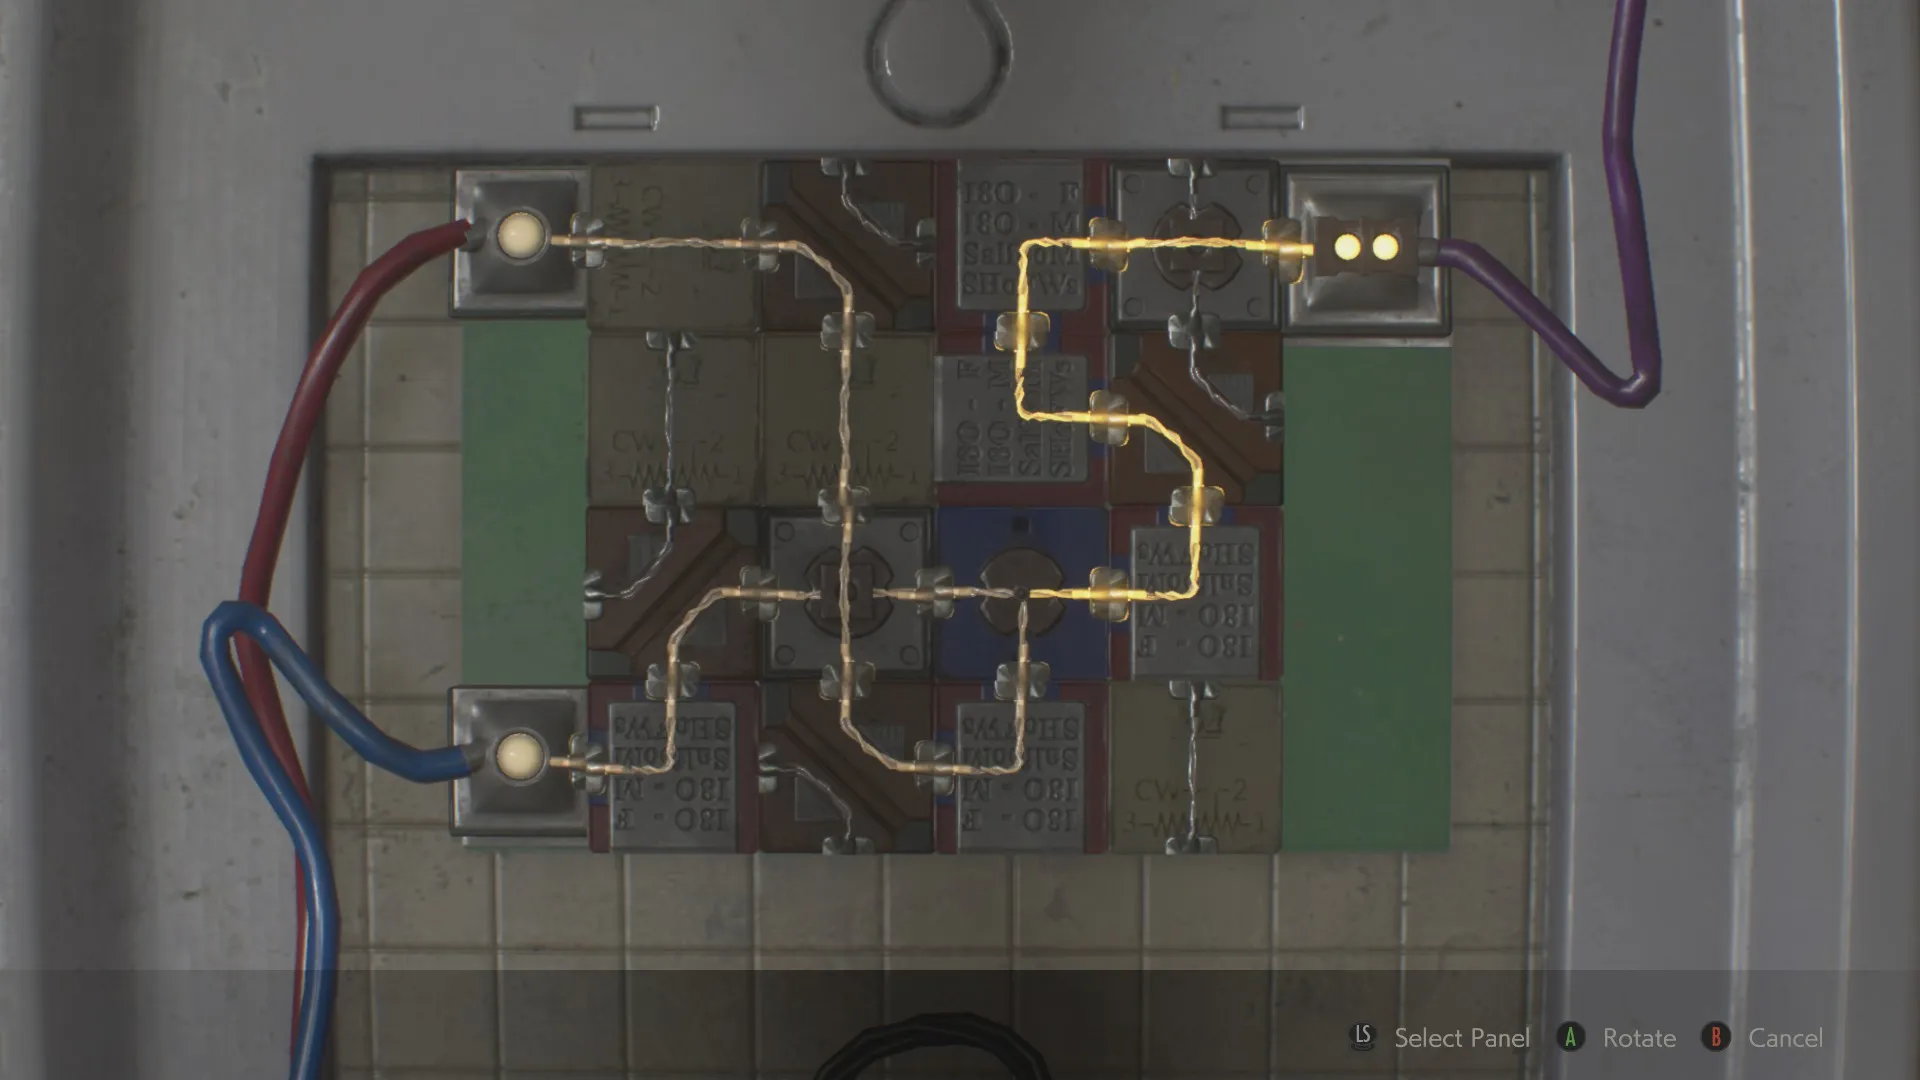
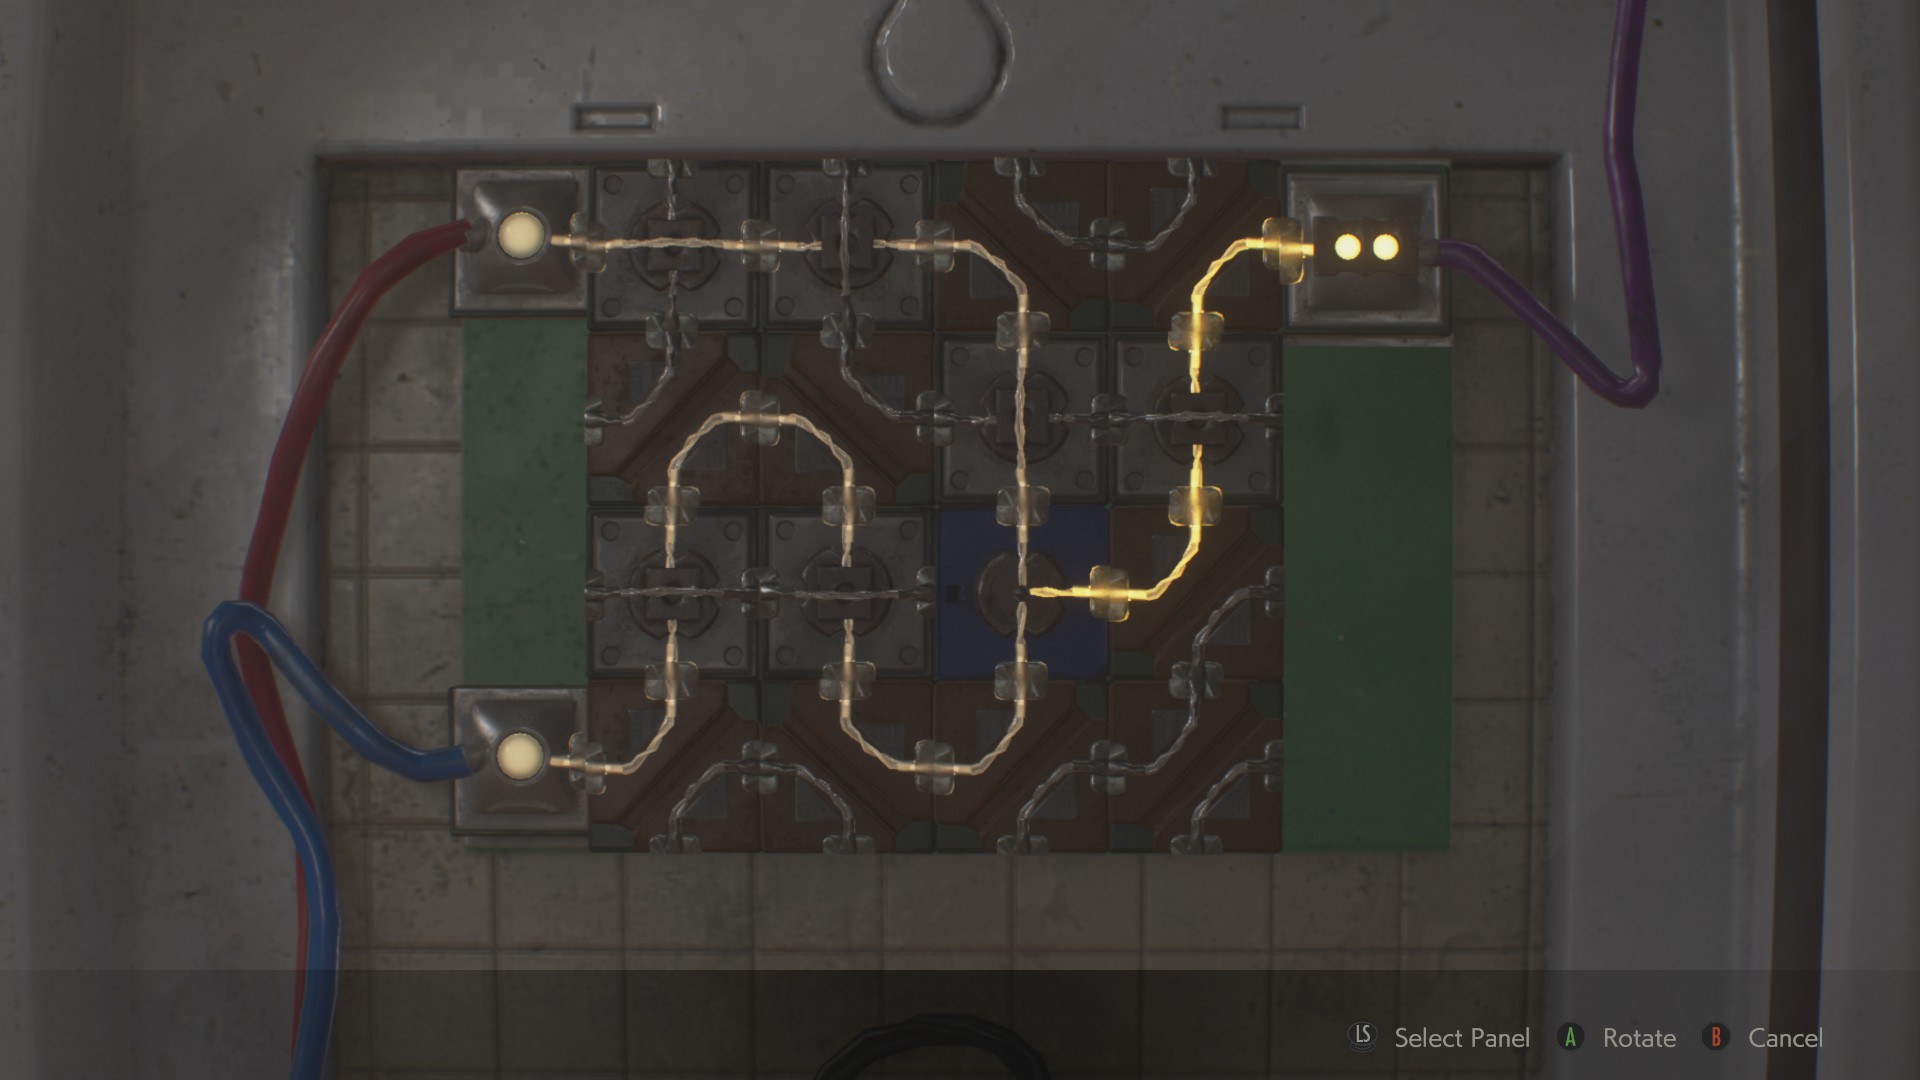
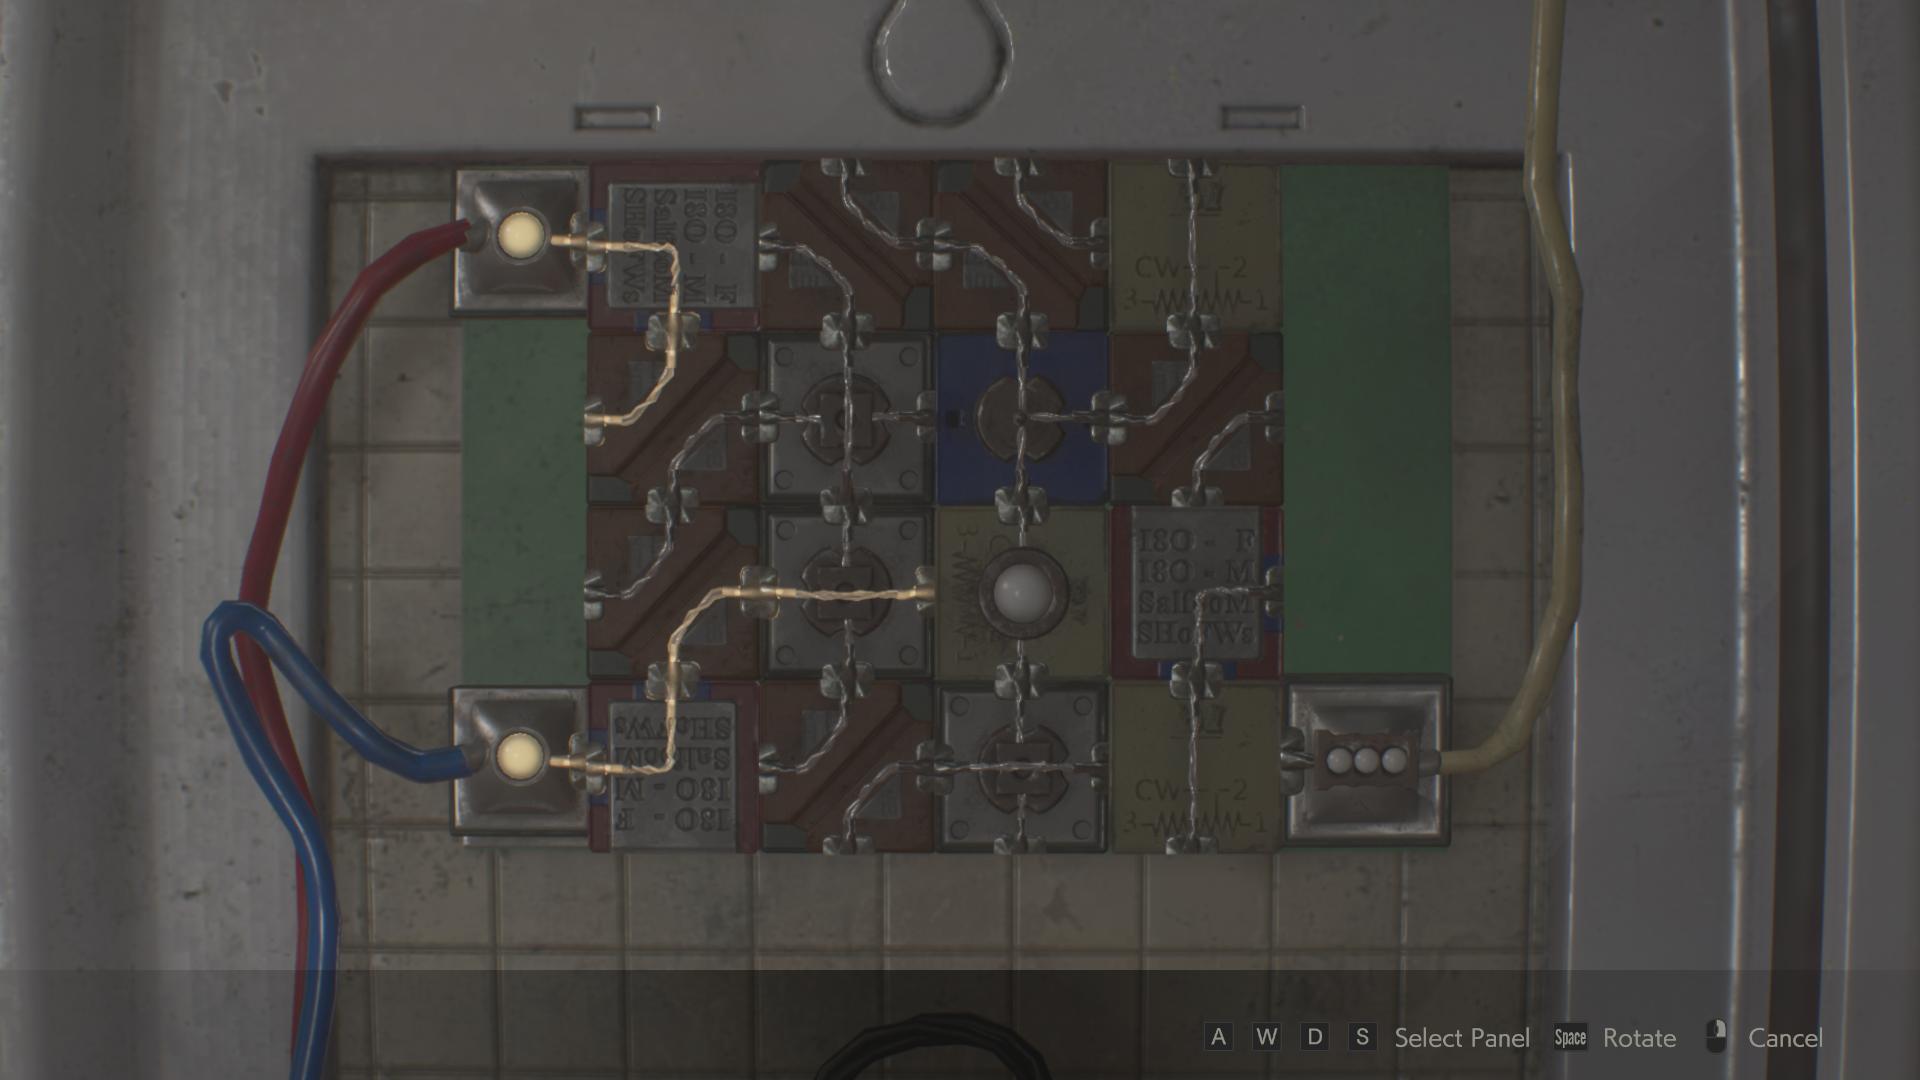
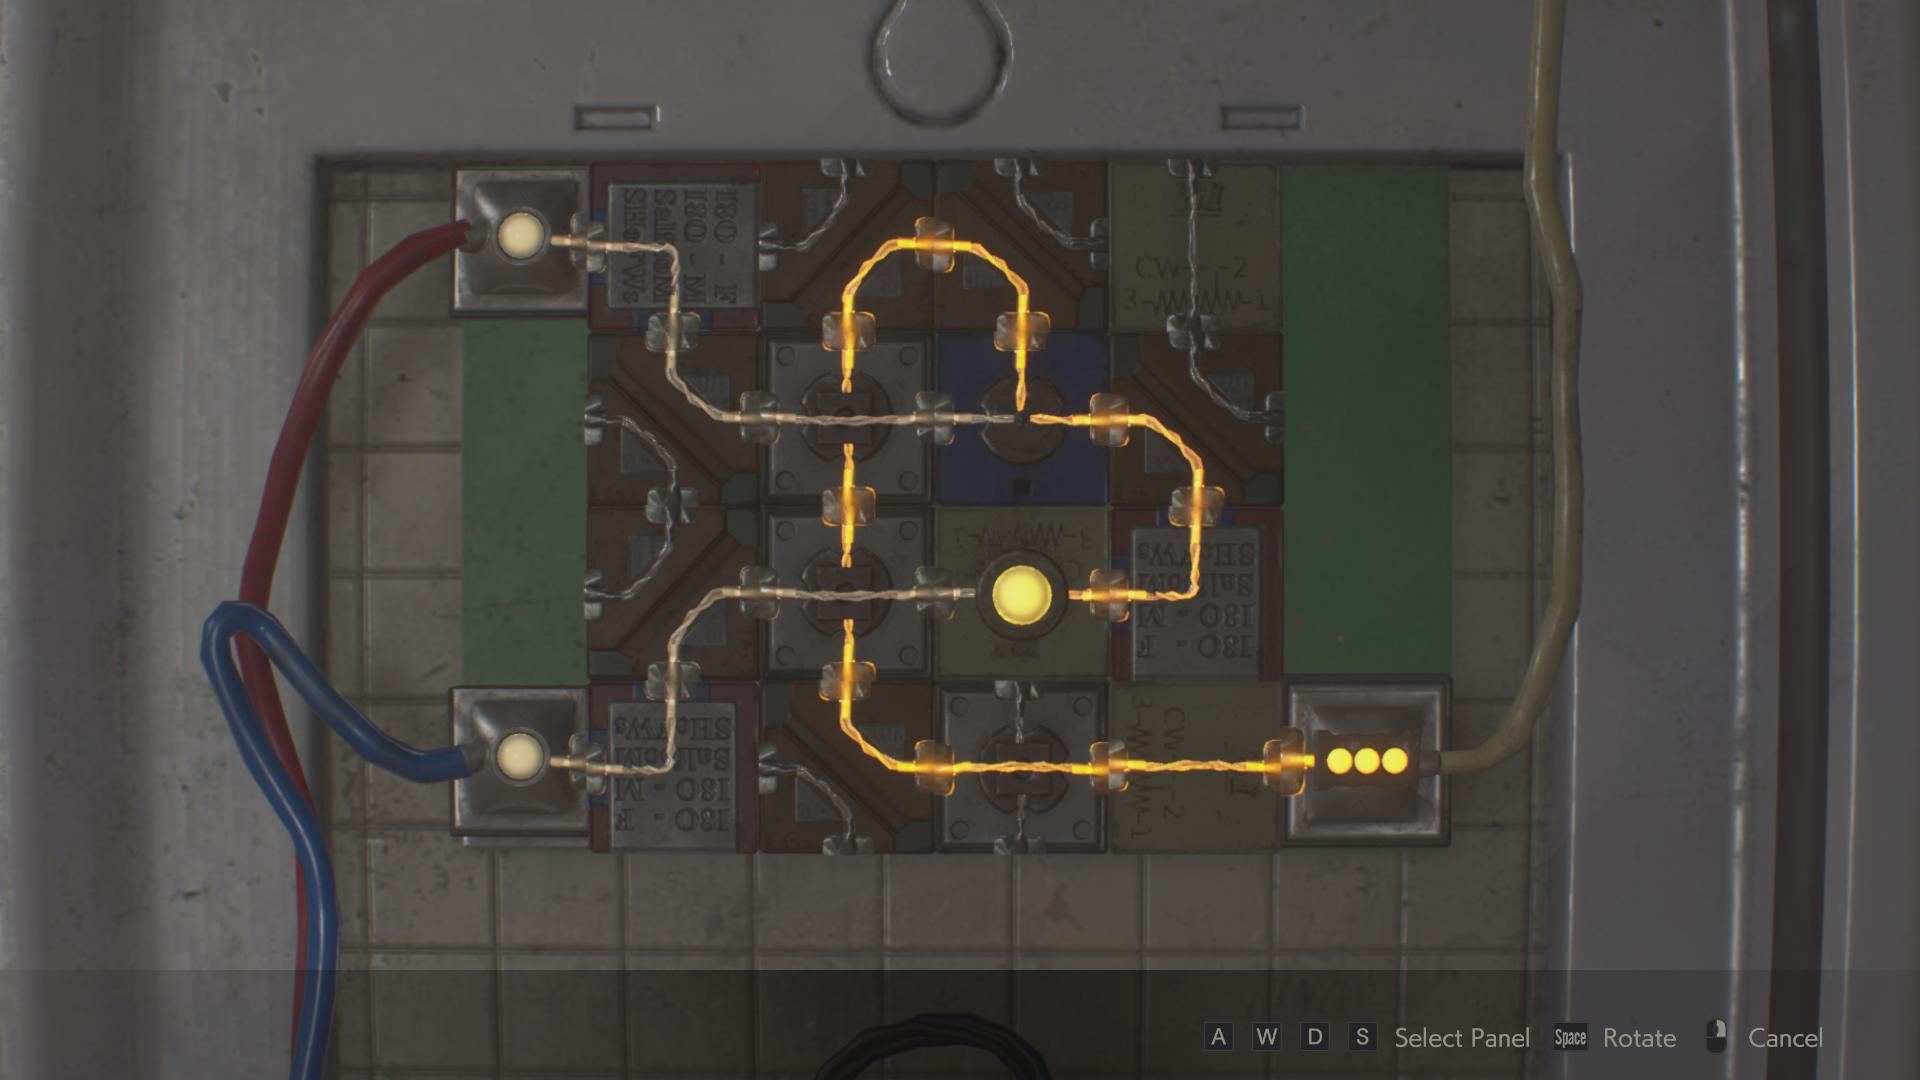
Circuit Breaker
In Leon’s first run, rewire the panel on Ben’s cell door and open it within 13 moves.
The easiest way to show the solutions here, and on the three subsequent similar Records, is simply to display an image of how the puzzle looks when it’s been successfully completed. Keep this nearby when you play the game, on scratch paper or your phone, and use it to guide your moves. For each of the power panel puzzles, getting the Record requires that you make no wrong moves at all.
When you install the two Power Parts in this panel, it initially looks like this.
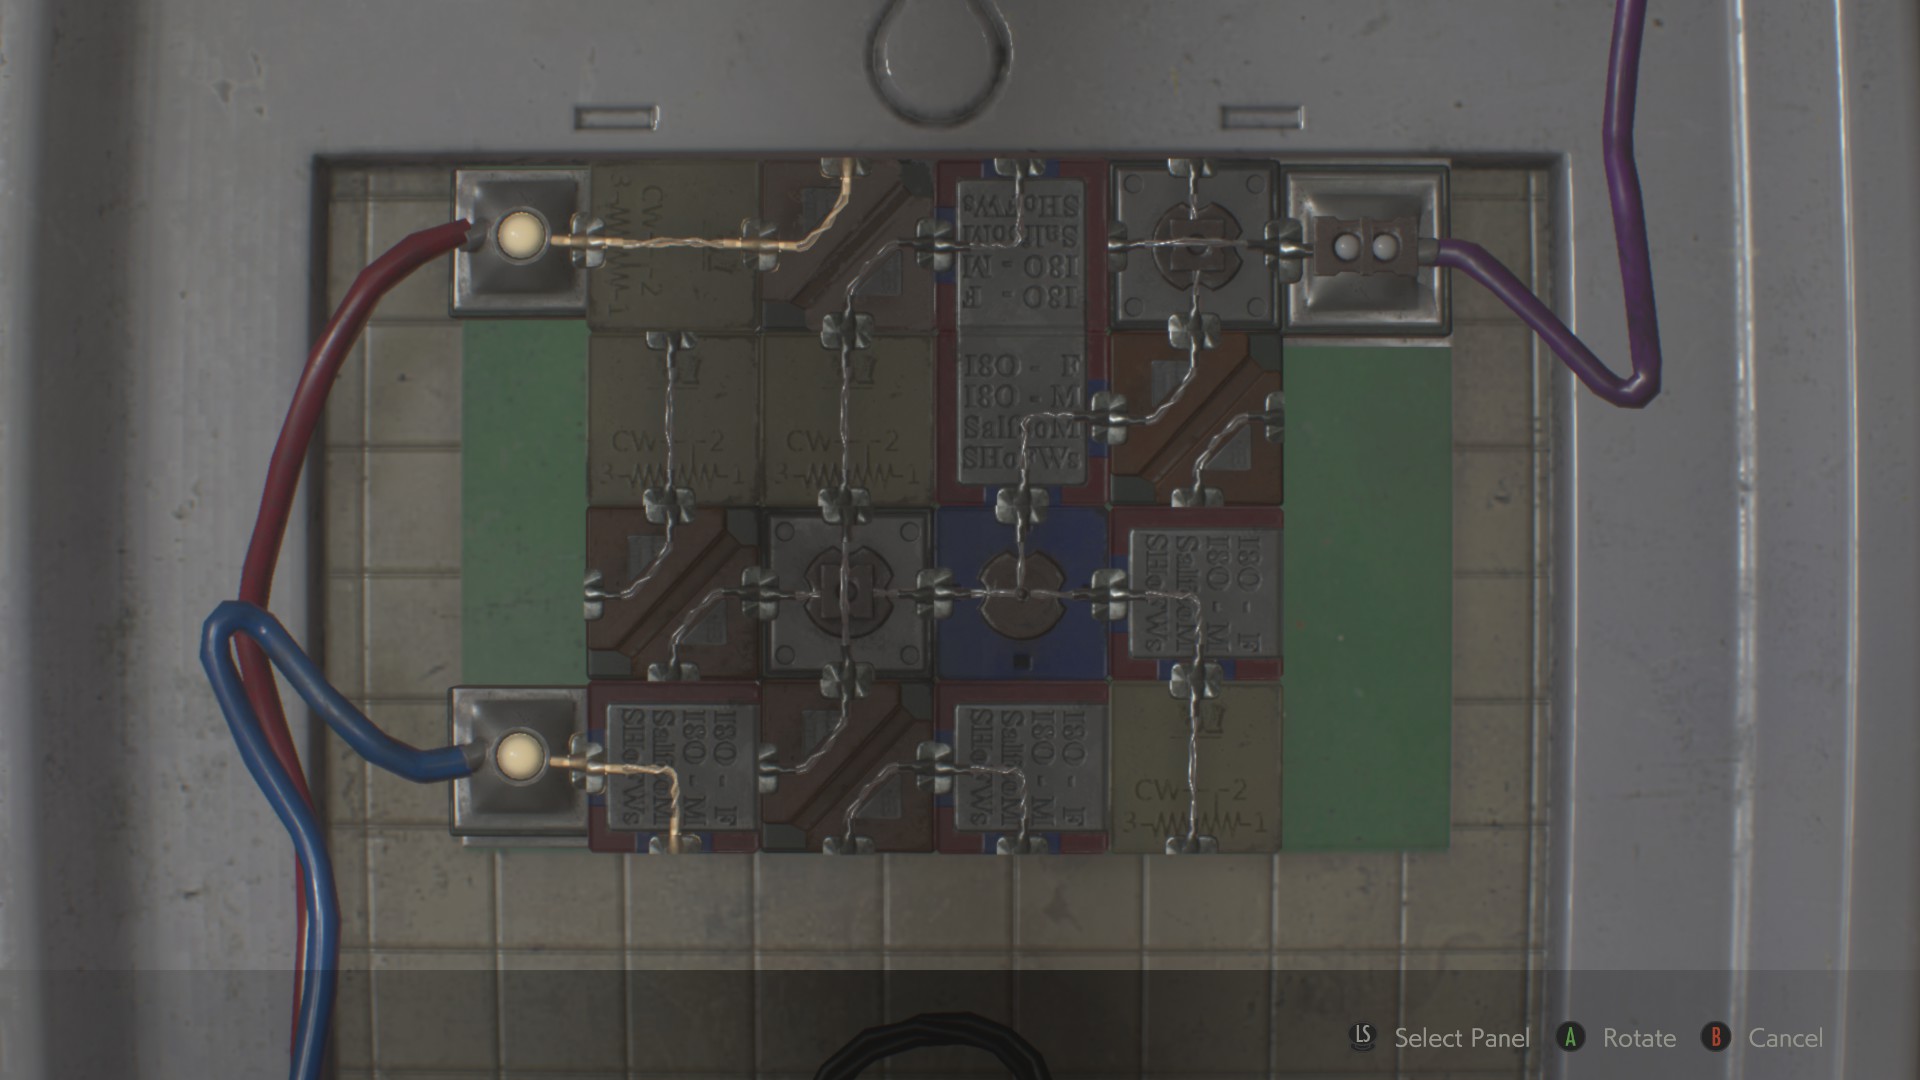
You want it to look like this.
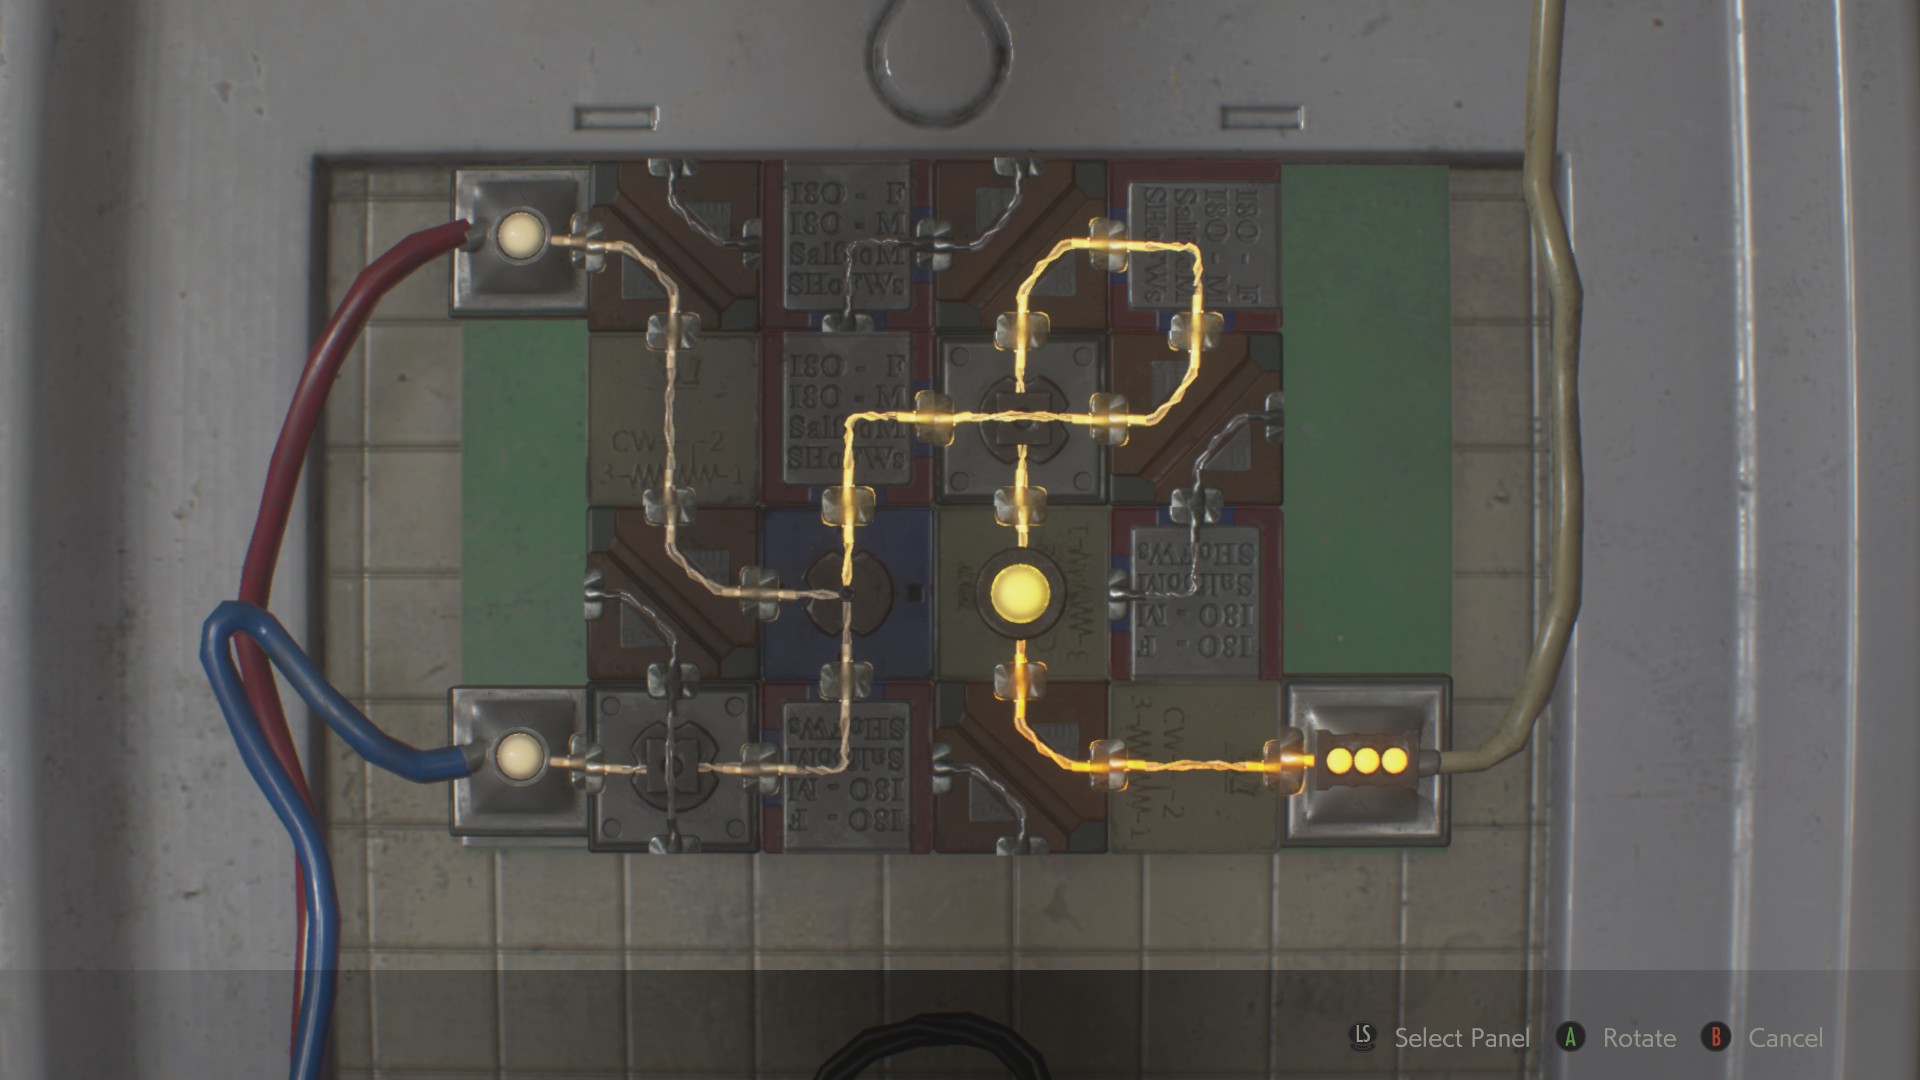
Hardly Any Resistance
In Leon’s second run, rewire the panel on Ben’s cell door and open it within 8 moves.
As above, you start off like this:
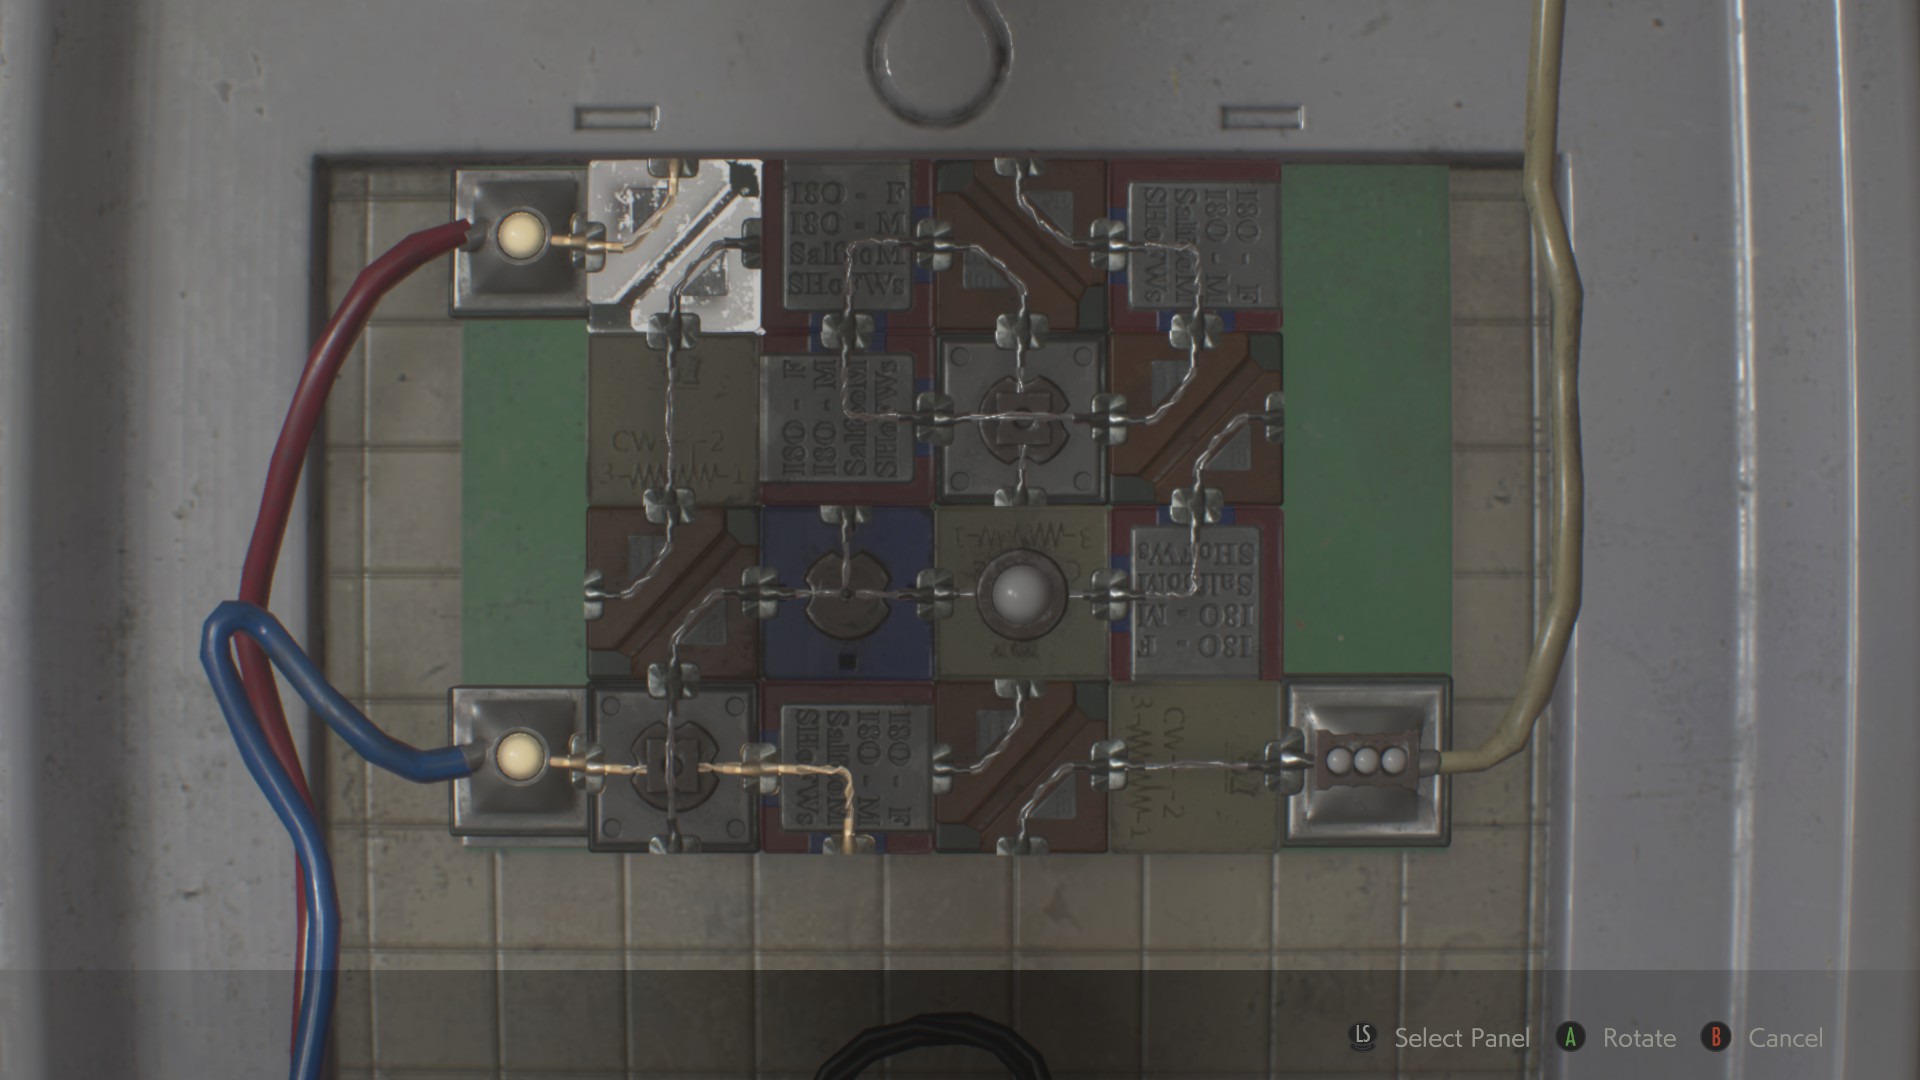
And you want to get it like this:
Voltage Virtuoso
In Claire’s first run, rewire the door panel in the Private Observation Room within seven moves.
This is the hardest of the four power panel Records, because it’s the most difficult to eyeball. The trick is basically to not overthink it.
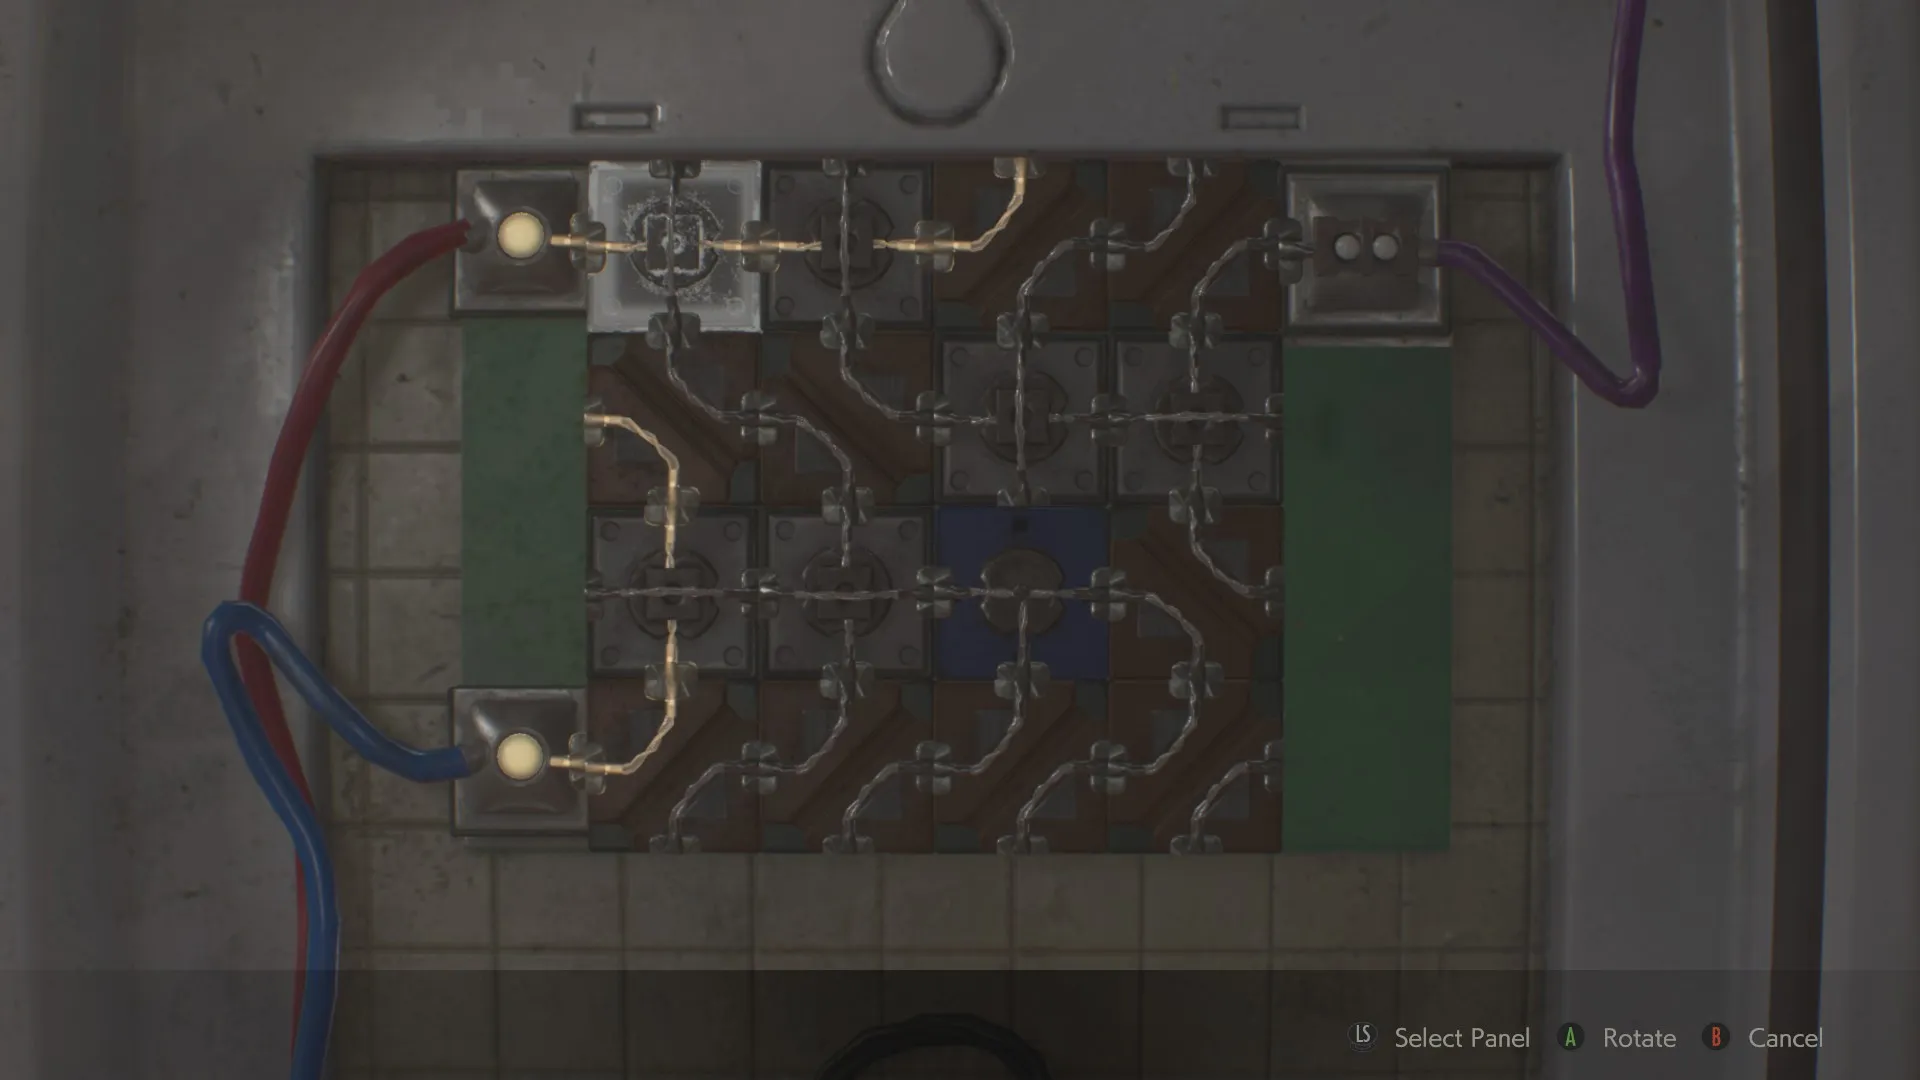
It starts off looking like this.
To solve it, you’ll get it to look like this.
Assuming it’s a grid, with A through D on the top going right, and 1 through 4 on the left going down: hit C3, A1, B4, and D3, before spinning the blue T-shaped block at C3 until the puzzle completes.
A Jewel Amongst Joules
In Claire’s second run, rewire the door panel in the Private Observation Room within 11 moves.
You start like this:
…and you want to end up like this.
Chemist
On either character’s 1st Run, fill the herbicide cartridge in the Drug Testing Lab in eight moves.

This is basically the old puzzle about how to precisely fill up a five-gallon jug by using two three-gallon jugs. It’s easier than it looks, but easy to mess up, especially if you want this Record.
Push the buttons in this order: center, left, right, center, left, right, center, left.
Genius Chemist
On either character’s second run, fill the herbicide cartridge in the Drug Testing Lab in 9 moves.
Push the buttons in this order: right, middle, left, right, middle, left, right, middle, left.
—
This wraps up all of the Records in the 2019 Resident Evil 2, as well as all of the achievements in the base game. You’ll need to get two more from the free Ghost Survivors DLC to call it 100% complete, but in the meantime, at least you’ve gotten your money’s worth out of the game.
To find more tips and guides, head over to our Resident Evil 2 guides page.


Published: Feb 15, 2019 03:34 am