Nornir Chests are just one of many different chest types to collect in God of War on the PS4 and PC. Most contain hacksilver, while others will contain runes. Nornir Chests, however, contain upgrades for Kratos, such as health and rage boosts. You’ll want to take advantage of these upgrades, but their boons are locked behind rune puzzles.
To unlock Nornir Chests in God of War, you’ll need to solve the puzzles guarding them by breaking the three seals locking them. Some runes will be easy to find, while others will take some ingenuity to destroy. This guide will show you how to find each Nornir Chest, as well as where to find each and every rune-covered seal.
Jump to a specific location by clicking the links below:
- Wildwoods
- River Pass + Witch’s Cave
- Foothills
- Alfheim
- The Mountain
- Lake of Nine
- Fafnir’s Storeroom
- Helheim
- Tyr’s Temple
- Veithurgard
- Konunsgard
All God of War Nornir Chest Locations and Rune Puzzle Solutions
Wildwoods: 1 Nornir Chest
Nornir Chest #1: After Your First Battle (Health Upgrade)
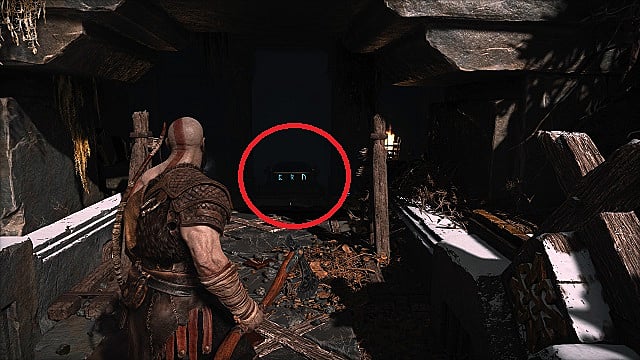
Once you’ve defeated your first set of Draugr in the Wildwoods, head straight ahead. Go past the life stone on the ground and toward the blocked passage in front of you. Break through the wood to find this Nornir chest.
- Seal 1: As you walk into the alcove, the first rune seal is immediately to your right — on the other side of the stairs. Throw your ax to break it.
- Seal 2: The second rune is to the right of the Nornir Chest, sitting against the wall.
- Seal 3: The third rune is on the left-hand side of the room in a stone sarcophagus.
River Pass and Witch’s Cave: 5 Nornir Chests
Nornir Chest #1 After the Revenant (Health Upgrade)
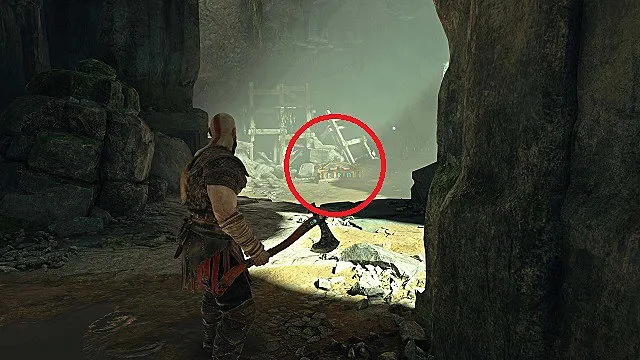
Just like with the first artifact in this area, it will take you a while to get to the first Nornir Chest in the River Pass. After you fight the Revenant, who will come after the Heavy Draugr, climb up to the second story and turn right. You’ll see the chest among some debris straight ahead.
Note: If you turn left instead of right, you’ll find a shrine.
- Seal 1: In the top right-hand corner when facing the Nornir Chest.
- Seal 2: Turn around and look upward. To the left of the bridge in the distance (not the one closest to you) and past the chain, you’ll see a second rune.
- Seal 3: Lower the bridge closest to you and go across. Once you cross over, stop and look up and left. The third rune seal is in an alcove there.
Nornir Chest #2: After the Spiked Ceiling Puzzle (Rage Upgrade)
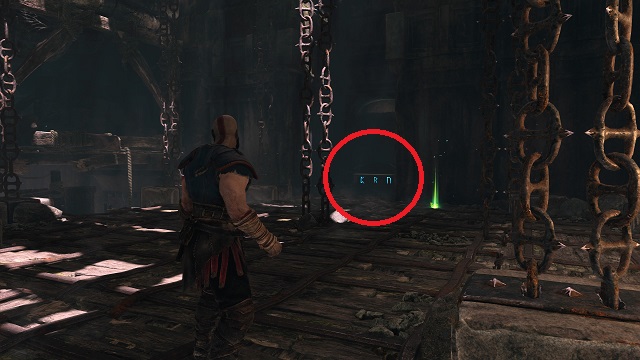
After completing the spiked ceiling puzzle (and after Atreus joins you on the other side), turn around and climb on the spike contraption. Look right and find the Nornir Chest.
- Seal 1: Turn around from the Nornir Chest and see the rune seal on a rock.
- Seal 2: From 1, turn left and look up.
- Seal 3: This one is a bit tricky. From 2, look left again and see the blue wisps of the seal behind a beam. Raise the platform you’re on to get a good angle from which to throw your ax.
Nornir Chest #3: After the Sand Puzzle and Troll Fight (Health Upgrade)

Once you’ve completed the sand puzzle, you’ll go through a cavern and fight a troll on the other side. Defeat them and look to the left of the area. At the edge, you’ll find this Nornir Chest. The seals here are bells, and you must ring them in quick succession to open it.
- Bell 1: Just above the chest.
- Bell 2: Look left and up. This bell is right behind you on the cliff overlooking the waterfall.
- Bell 3: From the Nornir Chest, go right and through the giant’s bones. Straight ahead, across the area, the third bell sits atop a rock.
- The easiest method is to hit the bells in this order: 3,1,2. You’ll only have a few seconds to strike each bell. You’ll get an Idunn Apple for your troubles.
Nornir Chest #4: In the Witch’s Cave (Cannot Reach on First Visit)
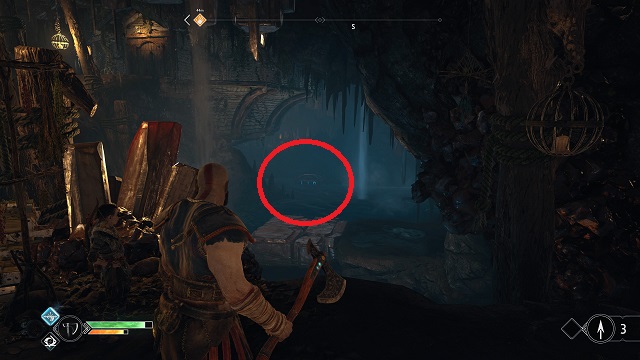
This Nornir Chest can be found in the witch’s cave after you beat the nightmares. From the bridge, turn around and look toward the back of the area (toward the witch’s house). Down below, you’ll see the chest in the water.
You can’t get this Nornir Chest yet, though. You can revisit when Atreus can build bridges.
Nornir Chest #5: Exiting the Cave Through the Well (Cannot Reach on First Visit)
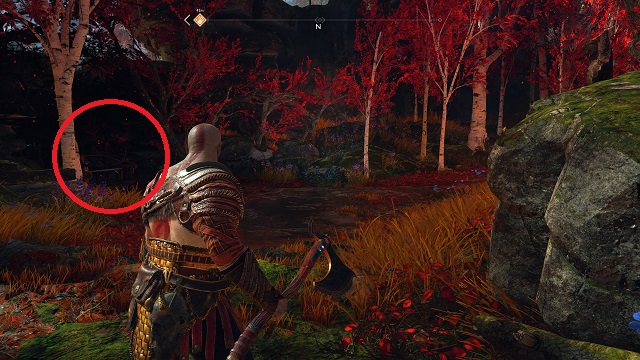
Since you’ll also need Atreus to get you across the water in the cave, you won’t be able to exit through the well the first time you visit this area. But once you can reach the Nornir Chest, you’ll need the Winds of Hel to open it. We’ll update this guide with a screenshot and steps when we access this area.
Foothills: 1 Nornir Chest
Nornir Chest #1: After Meeting Sindri

Eventually, you’ll meet Brok’s brother, Sindri. After speaking with him, leave his camp and go straight ahead. Enemies will spawn and a protracted conflict will ensue. Once you’ve defeated all of the enemies, head up the hill and go right. In the back of the area, you’ll find this Nornir chest.
To open it, you’ll need to align each of three turnable poles to the runes on the chest. It does matter which poles show which runes since each pole doesn’t have all of the runes carved into them. Here’s what you need to do:
- Pole 1: Directly to the left of the Nornir Chest. This one should be turned to the “squiggly” symbol.
- Pole 2: Turn around and go back down the hill. Turn left, and you’ll see this pole nestled in the cliff just above eye level. This one should be turned to the “P” symbol.
- Pole 3: Turn right and follow the path around to the fallen tree. This pole will be mostly obscured by the poisonous fog. Throw your ax at the fog pole to reveal the rune. This one should be turned to the backward “B” symbol.
Alfheim: 4 Nornir Chests
Nornir Chest #1: Light Elf Sanctuary (Health Upgrade)
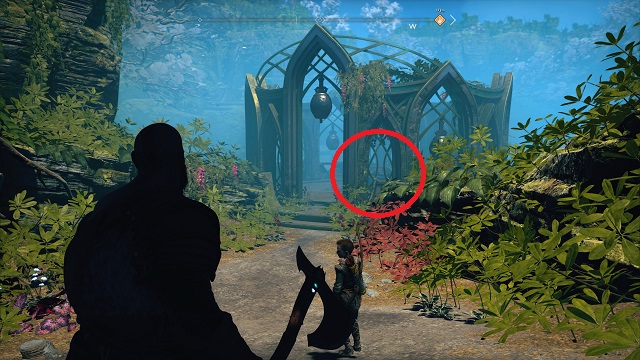
After defeating the enemies on the beach at Light Elf Sanctuary, follow the path until it forks. Take a left and you’ll come to the area pictured above. The Nornir Chest is inside the shelter.
There are no runes on the bells in this area, but the sequence to open the chest is this:
- The bell above the doorway
- Turn left and ring the third bell
- Turn left and ring the sixth bell
Inside the Nornir Chest, you’ll find an Idunn Apple.
Note: If you don’t know how to get to Light Elf Sanctuary, turn right as soon as you enter the Lake of Light. Go all the way to the end. Then turn right and follow the channel around. You’ll find the shore and can dock there.
Nornir Chest #2: Ringed Temple Trench (Health Upgrade)
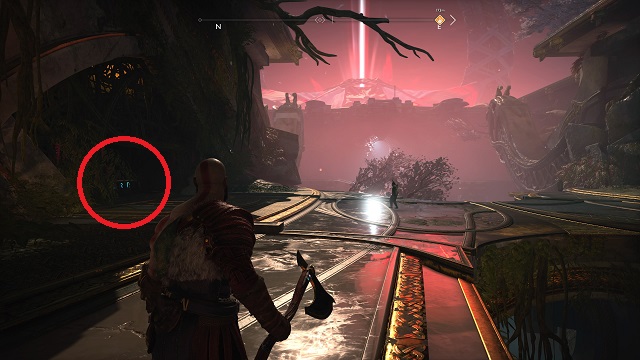
After you enter the Ringed Temple, prepare yourself for a fight against the Dark Elves. Once you’ve defeated them, continue along the trench on the left side. Eventually, you’ll come across the next Nornir Chest nestled in the wall.
Go to the right side and activate the wheel so that the middle section in front of you descends. Throw your ax to cement it into place.
- Seal 1: Drop down. Across the platform in front of you.
- Seal 2: Turn around. On the wall behind the wheel.
Now climb back up and turn the wheel all the down so that both pieces of the floor (the middle part and the part you’re standing on) descend. Throw your ax to cement it into place.
- Seal 3: Turn around. Climb up the ledge to find it nestled in the wall.
You’ll get an Idunn Apple for all your efforts.
Nornir Chest #3 Ringed Temple Sealed Doors (Rage Upgrade)
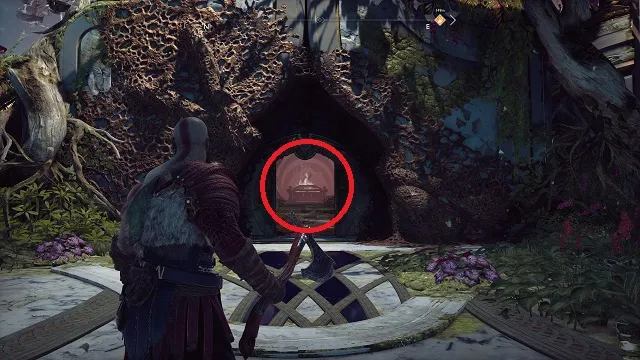
When you reach the Ringed Temple proper, the blue doors in front of you will be locked. Before continuing with the story, turn left and follow the steps downward toward a Nornir Chest. At the bottom, turn right, and you’ll see a gate with two nodes, one holding it shut and the other hanging from the ceiling behind. Throw your axe and destroy both at the same time.
Once the gate is open, you’ll need to ring three bells in quick succession.
- Bell 1: At the end of the corridor above the chest.
- Bell 2: To the left of the gate, nestled in the wall.
- Bell 3: Behind you, turned at an angle.
There’s no easy way to open this chest other than being fast. We found that the sequence 3,2,1 was most effective. Claim your Horn of Bloodmead.
Nornir Chest #4: At the Gate (Rage Upgrade)
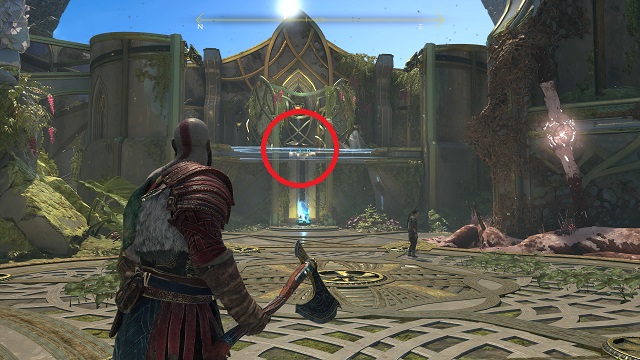
After Atreus receives the ability to build light bridges, you’ll eventually make it back to the temple’s main doors, the ones you could not near Nornir Chest 3. But don’t go through the doors just yet! Instead, turn around and place the crystal in the socket under the shelter.
Once the light bridge is created, climb to the top to find the fourth Nornir Chest. Opening this one is another test of speed and accuracy.
- Bell 1: Inside the shelter, just above the chest.
- Bell 2: Above the stairs on the right (where you climbed up).
- Bell 3: Outside the window on the opposite side of Bell 2.
A Horn of Bloodmead will be inside.
The Mountain: 2 Nornir Chests
Nornir Chest #1 Inside the Mountain (Rage Upgrade)
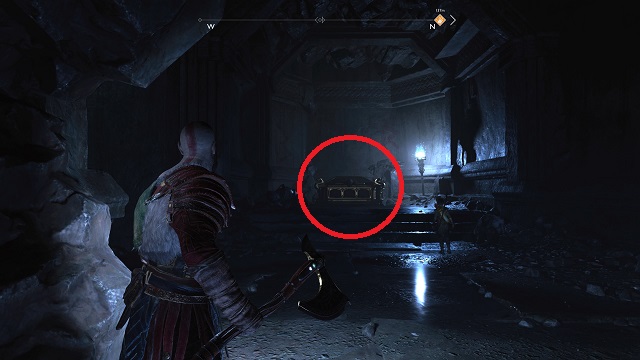
After you complete the light puzzle when you first enter the mountain (where the deer god sits on the throne), a passageway will open on the right side of the room. Go through and follow the path. After fighting the Revenant, climb up the ledge and defeat all of the Draugr.
From the ledge you originally climbed to get into this area, go left. Have Atreus create a lightbridge and go up it. You’ll find this Nornir Chest there. And like the chest in the Foothills, you’ll need to align runes on three turnable poles.
- Pole 1: At the foot of the bridge to your right. This pole should show the “R” symbol.
- Pole 2: Go to the ledge you climbed to get in this area. Look up and left to find it nestled on the cliff above. This pole should show the “B” symbol.
- Pole 3: Drop down off the ledge from Pole 2 and turn immediately right. This pole should show the “N” symbol.
You’ll be rewarded with a Horn of Bloodmead.
Nornir Chest #2: After Getting Shock Arrows, Where Hel-Walkers Worship (Health Upgrade)
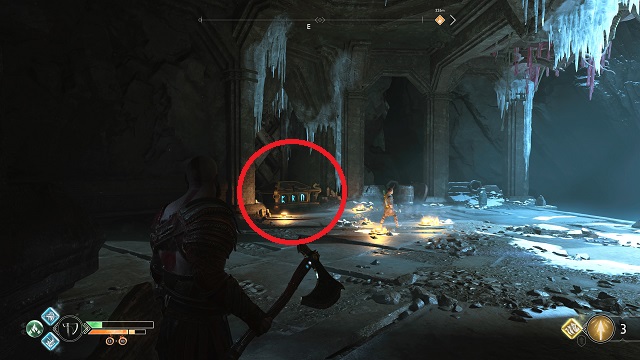
After finding Artifact 3 at the bridge and using the sap bucket there to make a new path, you’ll pass an alcove covered in sap. It won’t have a crystal to shoot.
However, move toward the Hel-Walkers worshiping ahead. You’ll they are worshiping the next Nornir Chest. Defeat them and use the sap dispenser to open the alcove that was previously locked (there is also a Shrine in the alcove).
- Seal 1: In the room with the shrine. Turn right and look up.
- Seal 2: Go back to the room with the sap dispenser and use the sap to lower the bridges. As you cross the bridge, look right. There is an opening with the Seal inside.
- Seal 3: After defeating the enemies across the bridge, use the wheel to raise the bridge to the next level. Freeze the gears next to it. Go up the bridge and look right. The Seal is along the wall.
You will receive an Idunn Apple for your efforts.
Lake of Nine: 4 Nornir Chests
Nornir Chest #1: Lookout Tower’s Spike Trap (Health Upgrade)
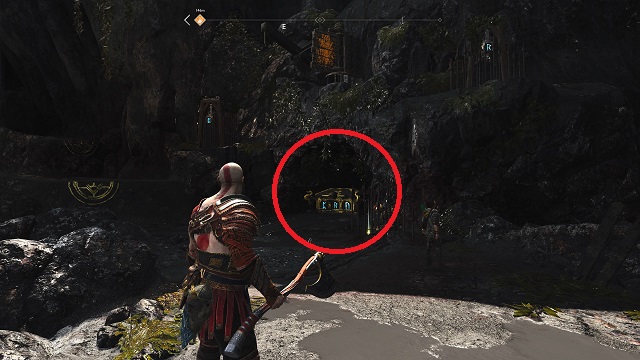
Go to the end of Tyr’s Bridge (toward the Foothills) and take a right. Drop down and head straight. After a few steps, you’ll see a Nornir Chest on your left. You’ll need to ring three bells to open this one — but they’re stuck behind three spike traps. To lower the spikes, hit the turnable pole above the chest.
- Bell 1: To the left of the turnable pole.
- Bell 2: Up and right of the Nornir Chest.
- Bell 3: Right of Bell 2.
Claim your Idunn Apple.
Nornir Chest #2: On the Shore at Forgotten Caverns (Health Upgrade)
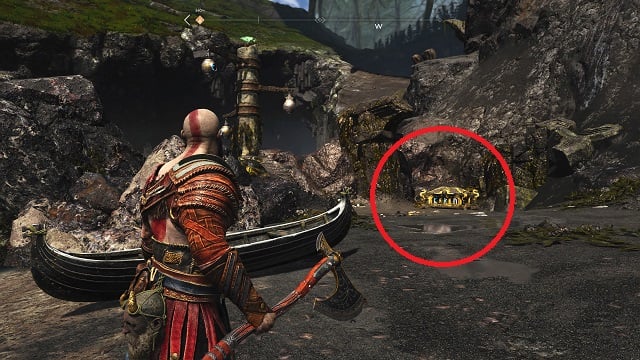
You really can’t miss this Nornir Chest. You’ll see it on the shore as soon as you dock at Forgotten Caverns. Take out the enemies first, then head to the left to find the seals. They’re all in one place this time, but the puzzle is a bit different.
The seals are on individual rotating arms. Hit one, and all of the arms will spin. Hit another, and the arms will spin faster. You only have a few seconds to hit all of them, so the best sequence is: Bottom, Middle, Top or Top, Middle, Bottom.
Hitting the middle seal second stops all of the seals from spinning. Complete the puzzle and open the Nornir Chest to get an Idunn Apple.
Nornir Chest #3: Light Elf Outpost After Water Descends Second Time
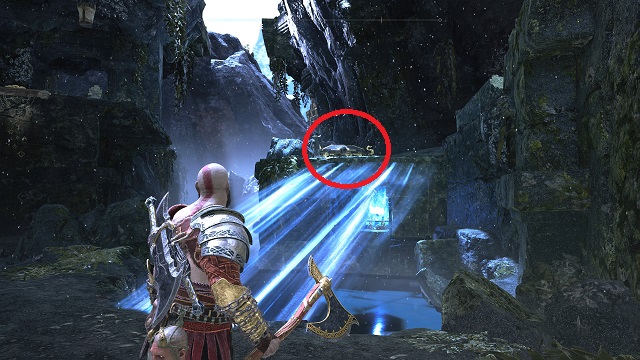
After the water in the Lake of Nine descends a second time, Light Elf Outpost will be revealed. It’s to the left of Helheim Tower — the area with the ruins in the water. There’s a Level 5 Troll on the island, as well as a handful of high-level poison enemies.
Defeat your adversaries and look to the left of the gate. Smash the boards to reveal a crystal. Create a light bridge up to the Nornir Chest.
- Seal 1: Look toward the cliff behind the Nornir Chest. The seal is at eye level on the opposite side of the ruins.
- Seal 2: From the chest, turn right. Go through the gate and stop. Turn right again and look out to the broken bridge in the water. The seal is on the column closest to you.
- Seal 3: From there, go left and down the path. Follow it all the way around — until you can either climb up the wall or down the chain. The seal will be nestled in the gate wall in front of you.
Nornir Chest #4: Cliffs of the Raven Using Winds of Hel

Another area that will be revealed after the water in the Lake of Nine descends a second time. Dock at the new landing at the Cliffs of the Raven. Make your way around the path, and you’ll eventually come to the Nornir Chest naturally. To destroy the seals, you’ll need to clear out the growth found here, as well as use the Winds of Hel to select the correct runes.
Note: To select the runes on the pillars around the area, activate each pillar with the Winds of Hel and let the runes rotate. When the rune you want appears, remove the Winds of Hel from the node to another node. That final step will lock the rune into place, ultimately giving access to the Nornir Chest.
- Seal 1: To the right of the Nornir Chest up on the highest cliff. Should show the “R” symbol.
- Seal 2: To the right of the Nornir Chest, but on the same level as the Nornir Chest. Should show the sideways “N” symbol.
- Seal 3: To the left of the Nornir Chest, up on the cliff. Should show the “P” symbol.
Fafnir’s Storeroom: 1 Nornir Chest
Nornir Chest #1: The Forest Area Before the Storeroom (Rage Upgrade)
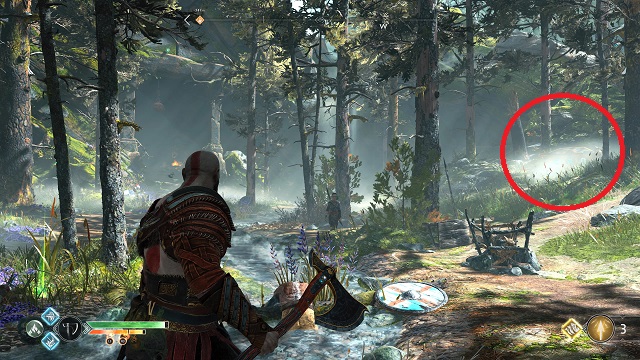
After passing Sidnir, you’ll crawl through a cliff and exit in a forest area. As you make your way up from the crawlspace, you can find a Raven perched on a branch in the stream (on the left side, before you climb the first ledge).
Continuing forward, you’ll encounter Reavers. Defeat them and look to the right side of the area for the Nornir Chest. The seals for this chest are once again bells.
- Bell 1: Directly above the Nornir Chest.
- Bell 2: Up and to the right of the chest.
- Bell 3: Above the waterfall at the far end of the area.
The reward for opening this Nornir Chest is a Horn of Bloodmead.
Helheim: 1 Nornir Chest
Nornir Chest #1: After You Get the “Round 2” Trophy (Rage Upgrade)
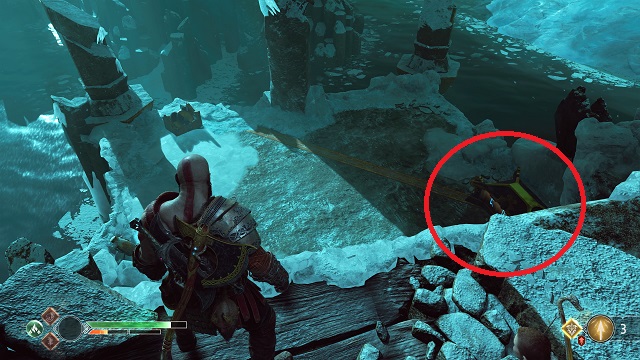
When you return to Helheim, go straight ahead and look down. This chest is below on the right-hand side of the screen. You can’t get this one quite yet, but follow the story path for a few more minutes, and you’ll be able to nab it.
Eventually, you’ll come to a ship. But instead of boarding it and continuing your journey, follow the path. You’ll end up at the Nornir Chest.
- Seal 1: There’s a giant block to the right of the Nornir Chest. Move it halfway out and then step into the gap to the left. The back of the block will be open and the seal will be inside.
- Seal 2: Move the block all the way out. This seal is behind the block.
- Seal 3: Climb the block after moving it completely out. Look to the right of the chest. The seal is on the pillar in the water.
Tyr’s Temple: 1 Nornir Chest
Nornir Chest #1: Behind the Spiked Traps in Tyr’s Vault (Symbol of Bounty)
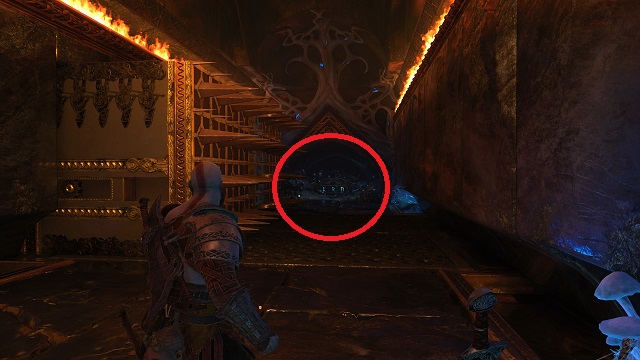
As you move through the story, you’ll come to Tyr’s Vault. The security here is intense and stands in your way. The main hall has three concentric rings that require you to use Hel’s Wind to get past. Each time opens a new area of challenges.
When you use Hel’s Wind on the second ring, you’ll open two doors. The one on your right will have a Nornir Chest, which is pretty hard to miss.
- Seal 1: In the room with the wheel. Turn around from the wheel to find it nestled in the wall behind you.
- Seal 2: Go into the room with the spiked traps coming down from the ceiling. Look on the right arm of the first trap.
- Seal 3: Go to the Nornir Chest and turn around. The seal is in a small hole at the bottom of the first spiked contraption.
Veithurgard: 1 Nornir Chest
Nornir Chest #1: To the Left of the Dragon on a Cliff
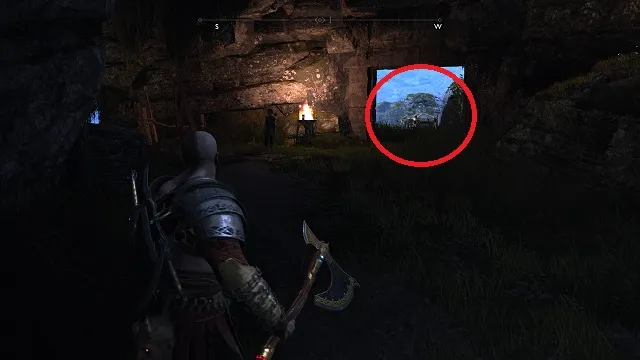
Go to the dragon tether and turn left. Continue up the path past the bridge and through the Stonehenge-like worship area. Turn right, up the steps, and right again. Climb up the small ledge and the Veithurgard Nornir Chest will be straight ahead on the cliff.
- Seal 1: As you approach the Nornir Chest, turn right as you get to the doorway. The seal will be in the wall.
- Seal 2: Continue past the Nornir Chest until you get to the small bridge. Turn right and the seal is nestled in the rocks.
- Seal 3: Continue from the last seal and turn right when the path branches. Go to the end of the path, which overlooks the water. The last seal is out in the rocks.
Konunsgard: 1 Nornir Chest
Nornir Chest #1: After Collecting the Mythic Items
The Nornir Chest at Konunsgard is by far the most intensive Nornir Chest to find in all of God of War. It requires that you complete all of the Dwarven side quests presented to you by Brok and Sindri. Then(!), you’ll still have to go through the entire area before getting to it.
However, after you’ve acquired the three mythic items you’re tasked with retrieving, you’ll come across a balcony on your path back. The Nornir Chest will be there. To activate the seals, you’ll need the Winds of Hel and quick reflexes.
- Activate the blank rune with the Winds of Hel
- Remove the winds when the rune is still blank to activate it
- Spin the other bell with the Winds of Hel
- Hit the stationary bell
- Throw the ax to hit the other two bells
Performing all of those steps should open the Nornir Chest for you. Finish the quest and get the Like Oil and Water trophy for completing all of Brok and Sindri’s side quests.
Related guides:
- All Hidden Valkyrie Locations
- How to Get Smoldering Embers
- Best Light & Heavy Runic Attacks
- How to Get the Frozen Flame
- What is Anchor of Fog? Answered
- Where to Find Every Chaos Flame
- Where to Find Every God of War Dragon
And that’s how you find all of the Nornir Chests and solve their rune puzzles in God of War. There are tons more collectibles to find along your journey. From artifacts to shrines and Odin’s Ravens, make sure to check out our other God of War guides while you’re here.



Published: Apr 20, 2018 12:54 am