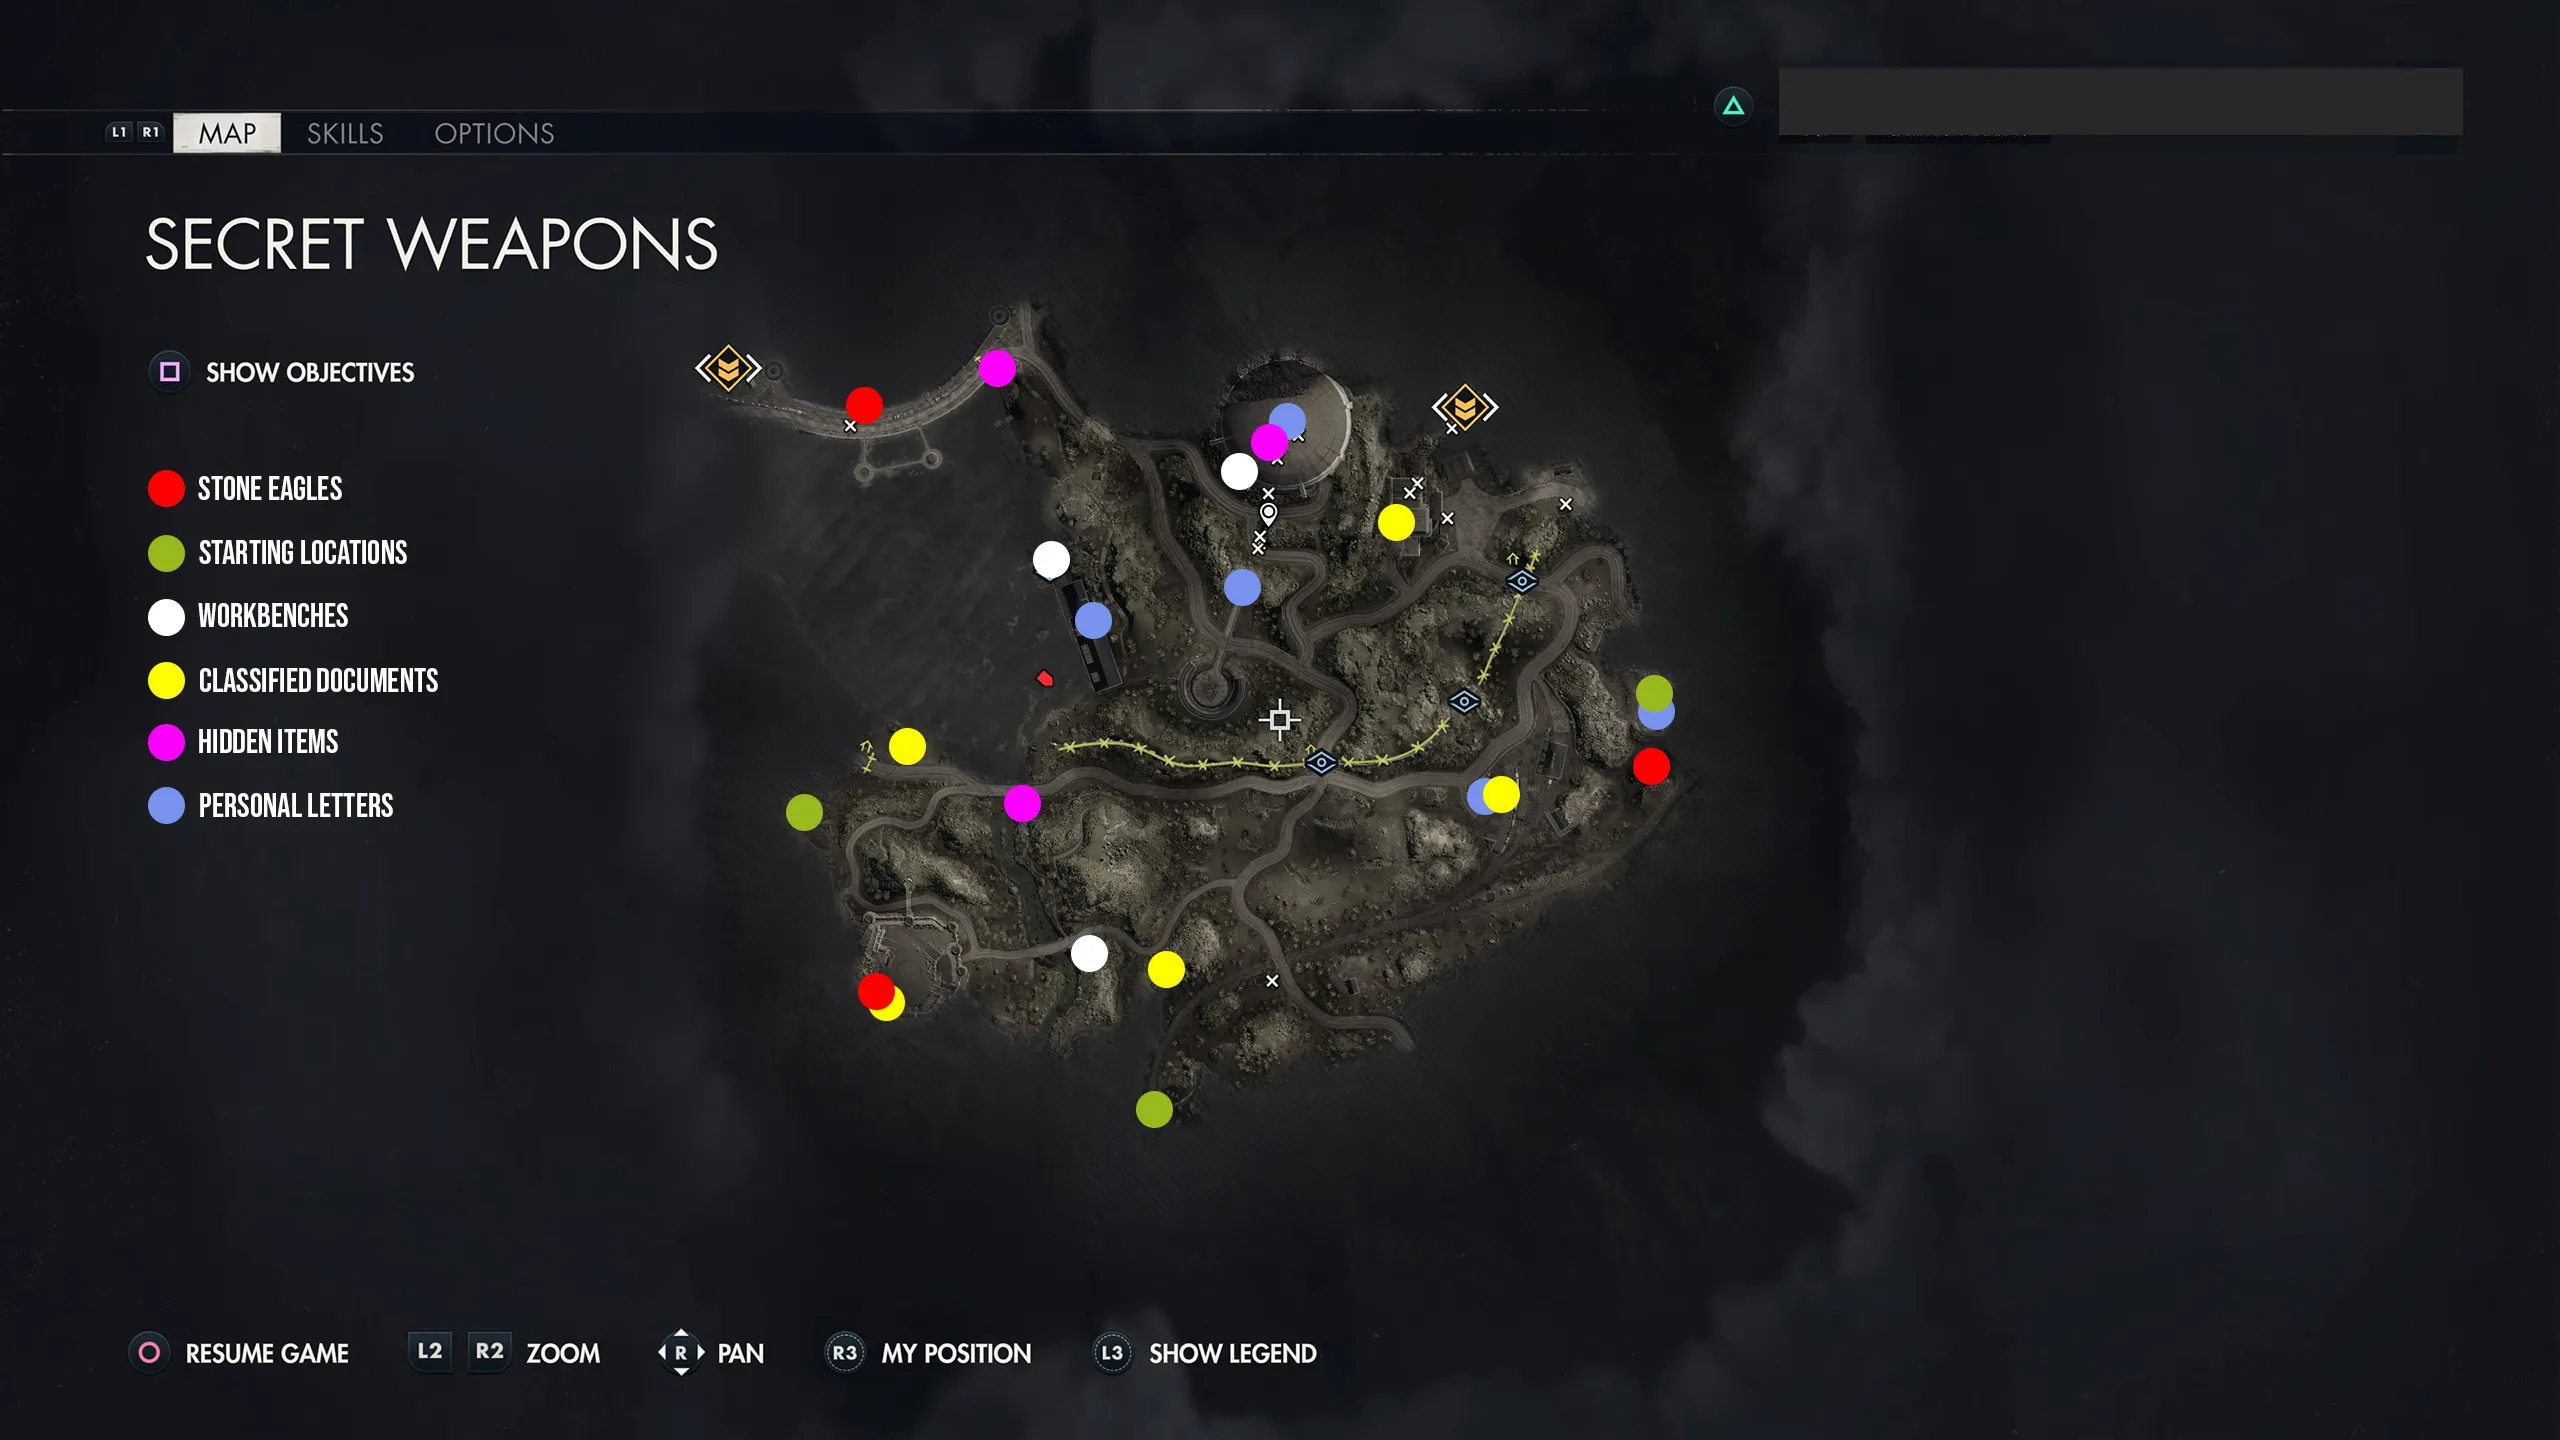
Sniper Elite 5‘s Secret Weapons level has 19 different collectibles to discover, with the usual suspects of stone eagles, personal letters, classified documents, and hidden items rounding out the list. There are also three workbenches and two starting locations to unlock in Mission 7.
In a similar fashion to our guides for Mission 3: Spy Academy and Mission 5: Festung Guernsey, we’ll be covering the collectibles found in the bottom portion of the map first, moving west to east, before moving up to the top half, moving east to west, to help minimize backtracking. of course, you can take any route you wish! If you’re keen, you can also go ahead and get the kill challenge for Dr. Jungers, as well.
Secret Weapons Collectibles and Starting Locations
Intruder Sighted (Classified Document 1)

Start the mission from the Facility Overlook starting location, and go forward and down the hill. There is a shack up on the hill straight ahead of you (north/northeast) across the railroad track. A soldier will drive up on a motorcycle. Kill and search them for this intel. This can also be retrieved from the sniper at the lake-side camp north of the castle.
Pistol Workbench
Continue forward to the road, and take it left (west). Just before the bridge, there is a dirt path that veers off to the left, then continues left to go over the waterfall, and splits right to go under the bridge. Go right and down. At the bottom, turn left immediately to find a cave entrance and a barricade hiding a resistance stash behind it.
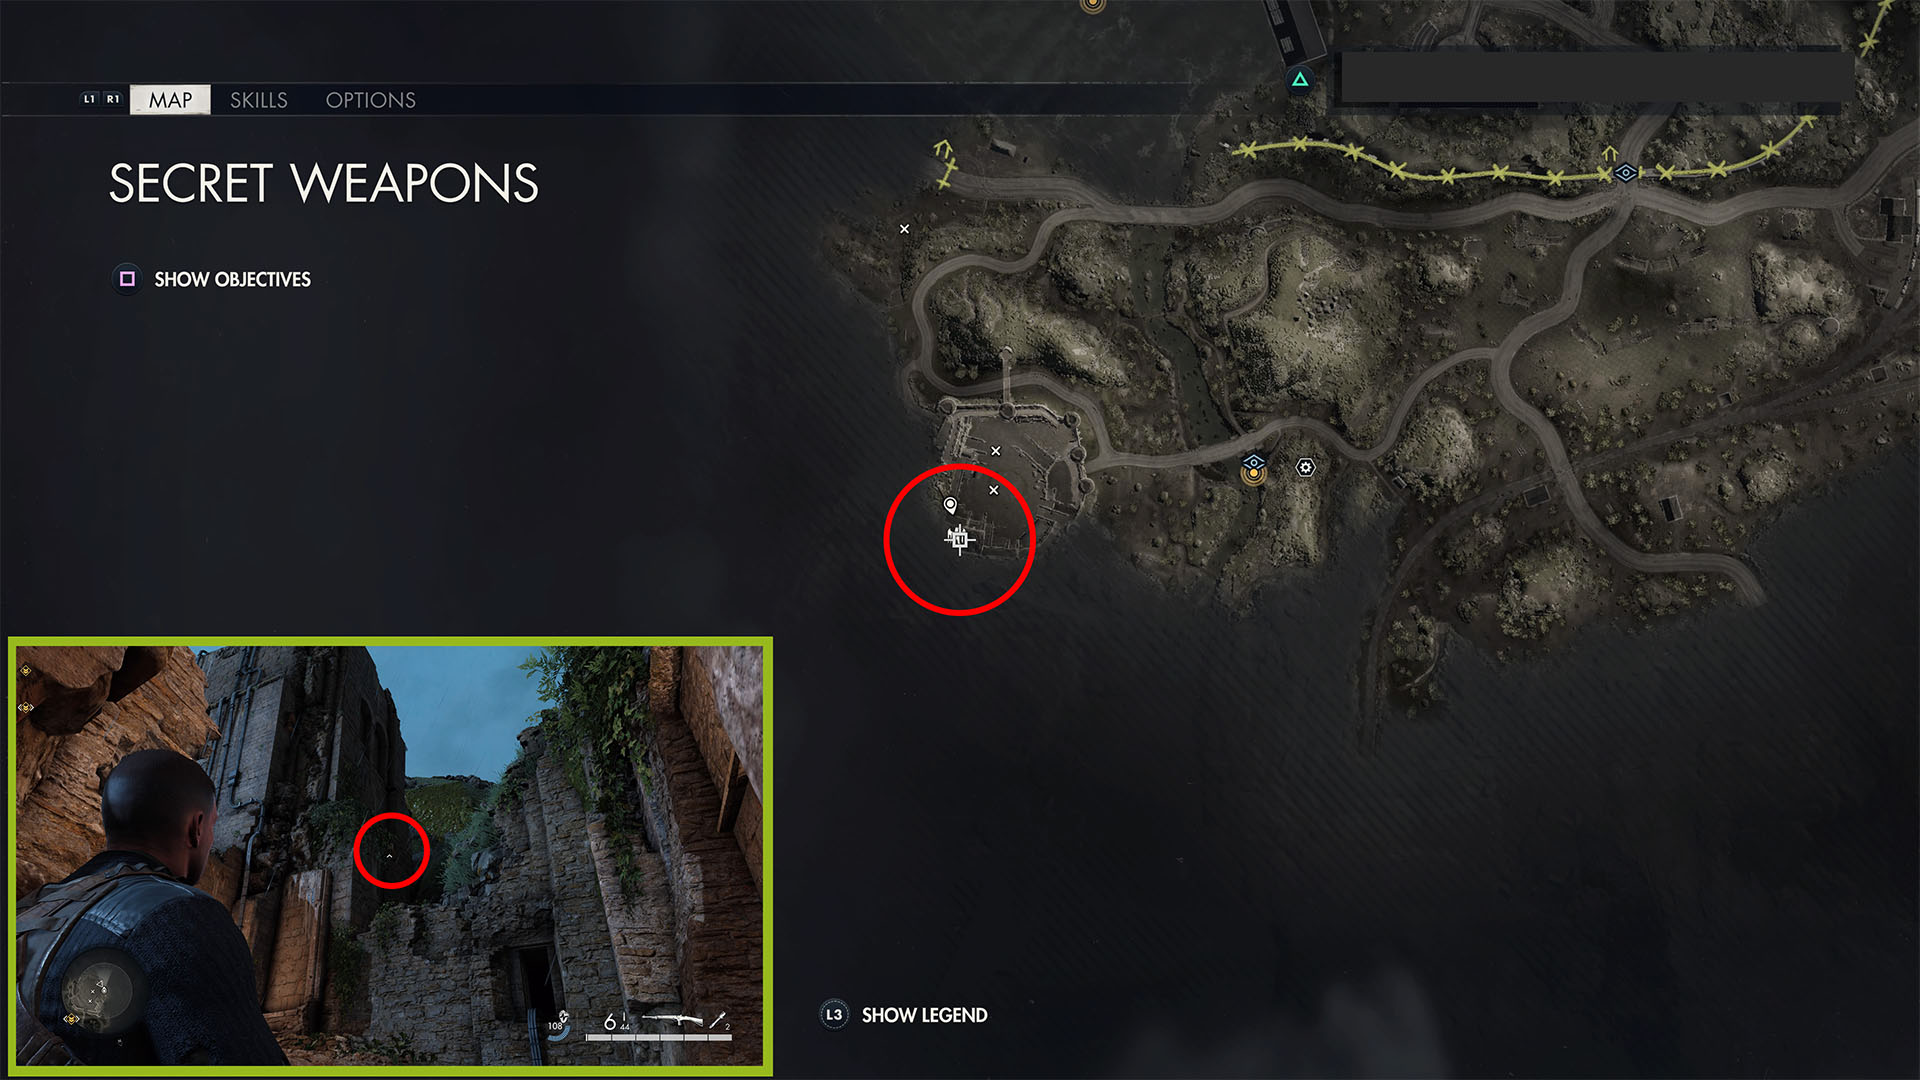
Pressurization Report (Classified Document 2)

Cross the bridge (or adjacent to it), and go to the castle beyond, in the southwestern portion of the map. Go to the top of the tower on the south/southwestern side of the castle and pick this up off the table next to the broken wall.
Stone Eagle 1
Go down one floor and exit the tower. Turn left, go through the archway with the power conduit on the ground and wall, and follow the path to the next archway. Stop there, turn around, and look up at the right (western) side of the tower. About halfway up, just behind some vines, is the stone eagle.
Lake Overlook Starting Location

Use the zipline in the northwestern tower (reach it by dropping through the floor) and light the bonfire in front of the tent when you land.
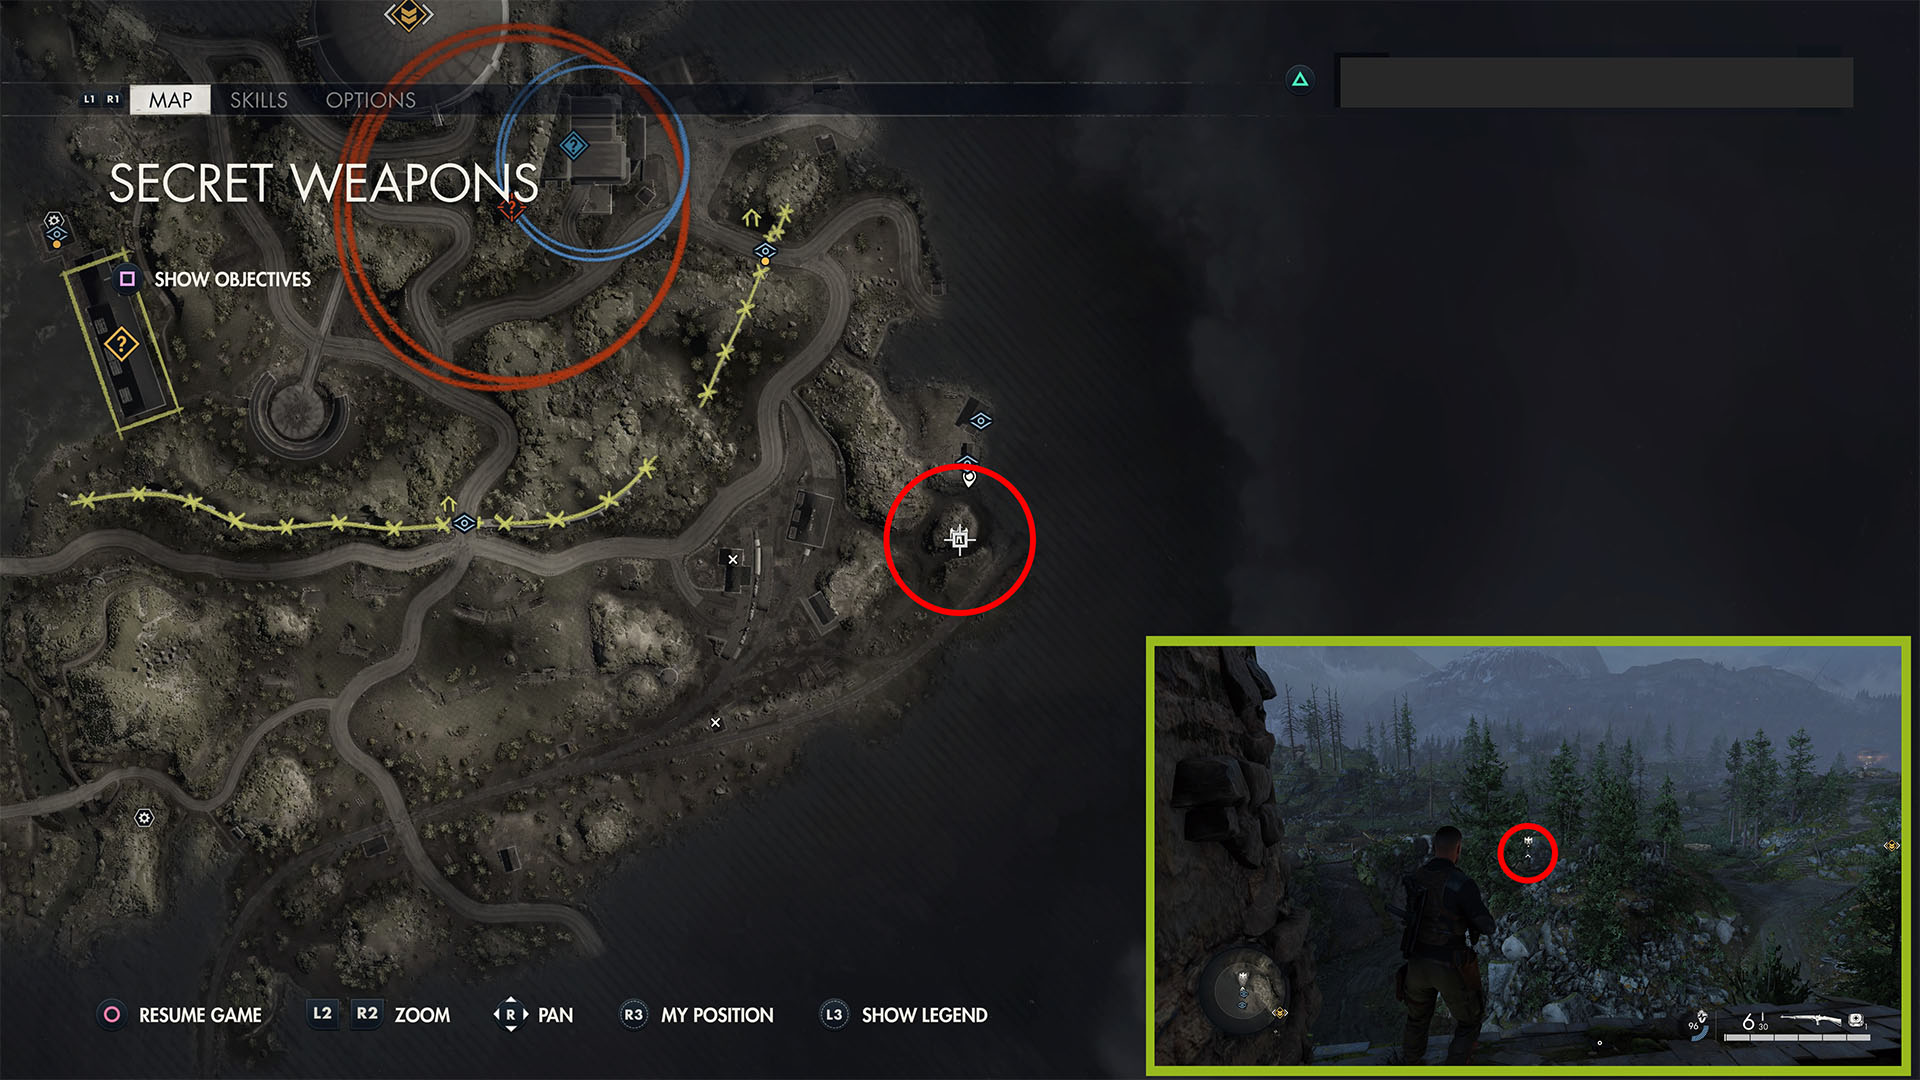
Dr. Jungers’ Schedule (Classified Document 3)
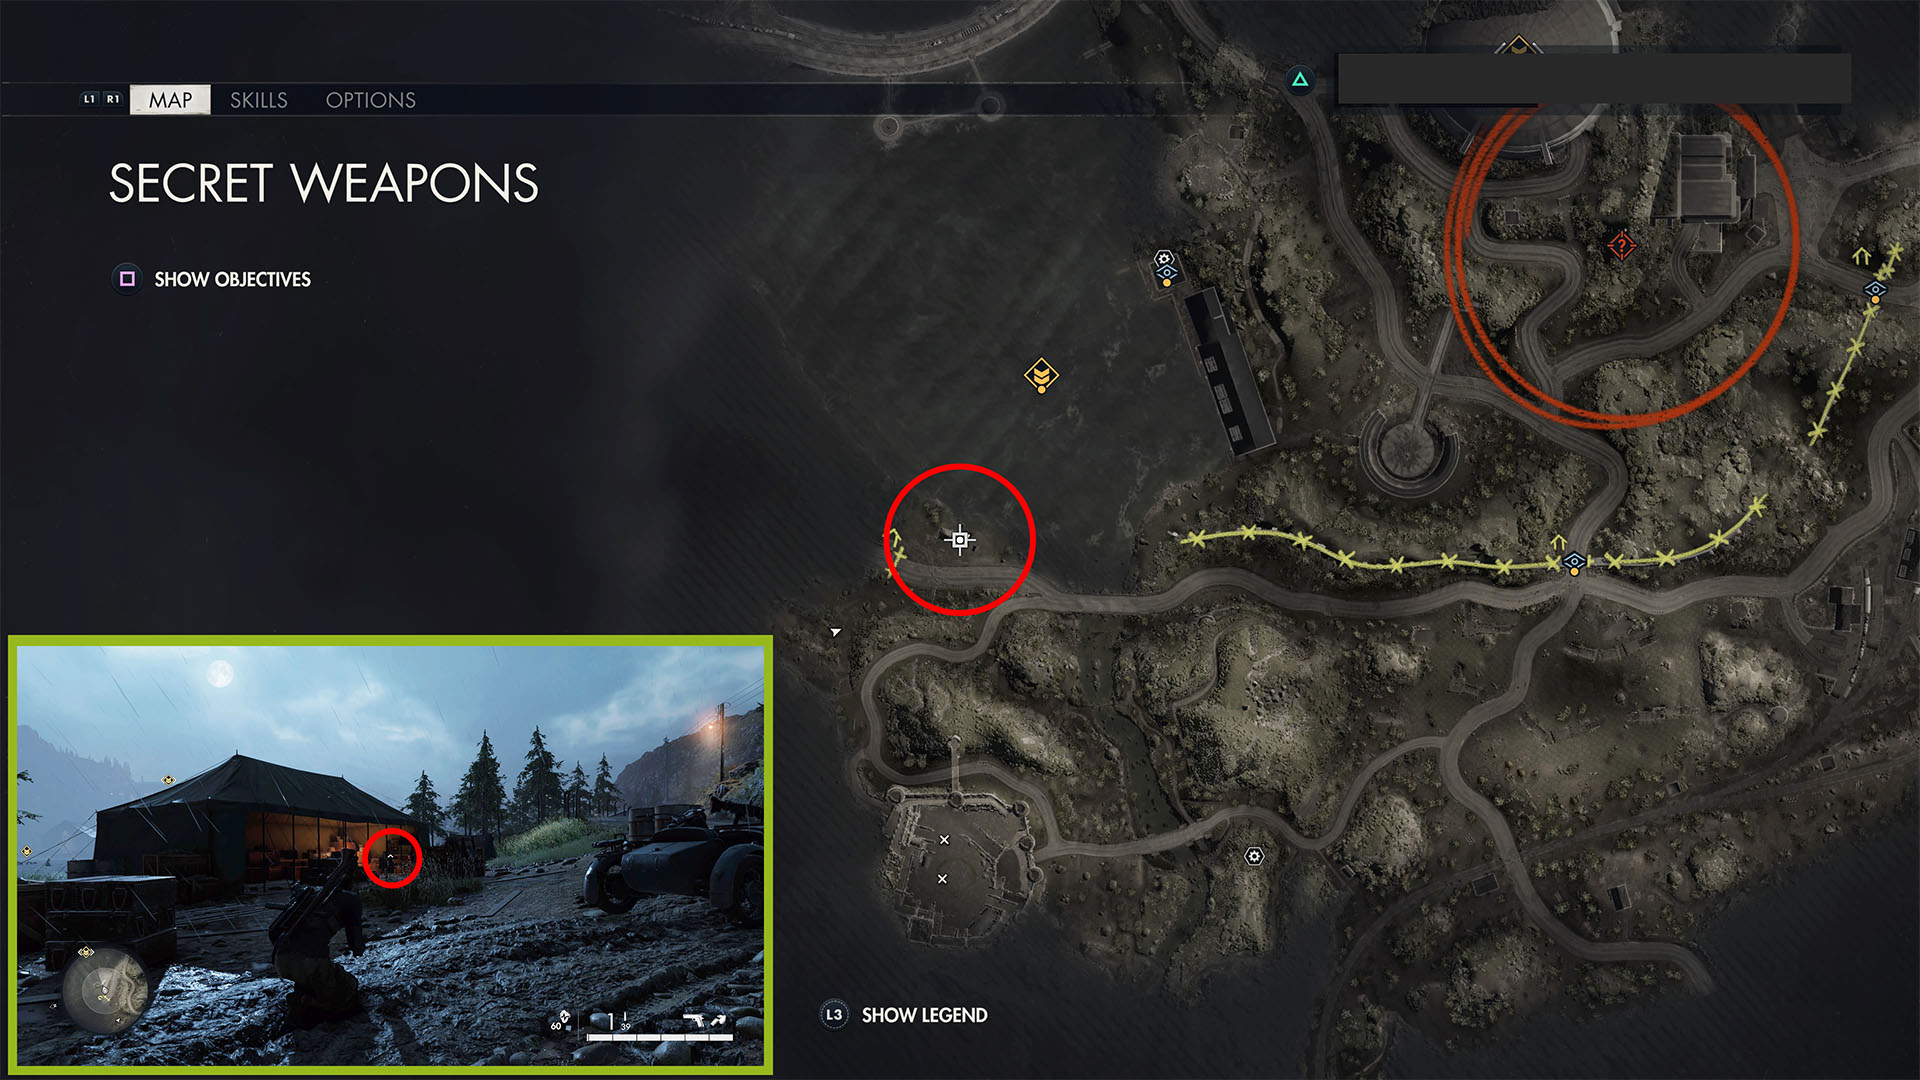
Continue down the hill toward the lake. You’ll find a lake-side encampment on the main road, just to the right (northeast) of a checkpoint. There will be an officer, a sniper, and two jaeger soldiers in or around the tent. The sniper carries the Intruder Sighted classified document.
But what you’re after is on a desk on the right side of the tent. This document can also be found at the railyard on the eastern side of the map and off of Junger himself in the Rocketry Lab/Weapons Lab.
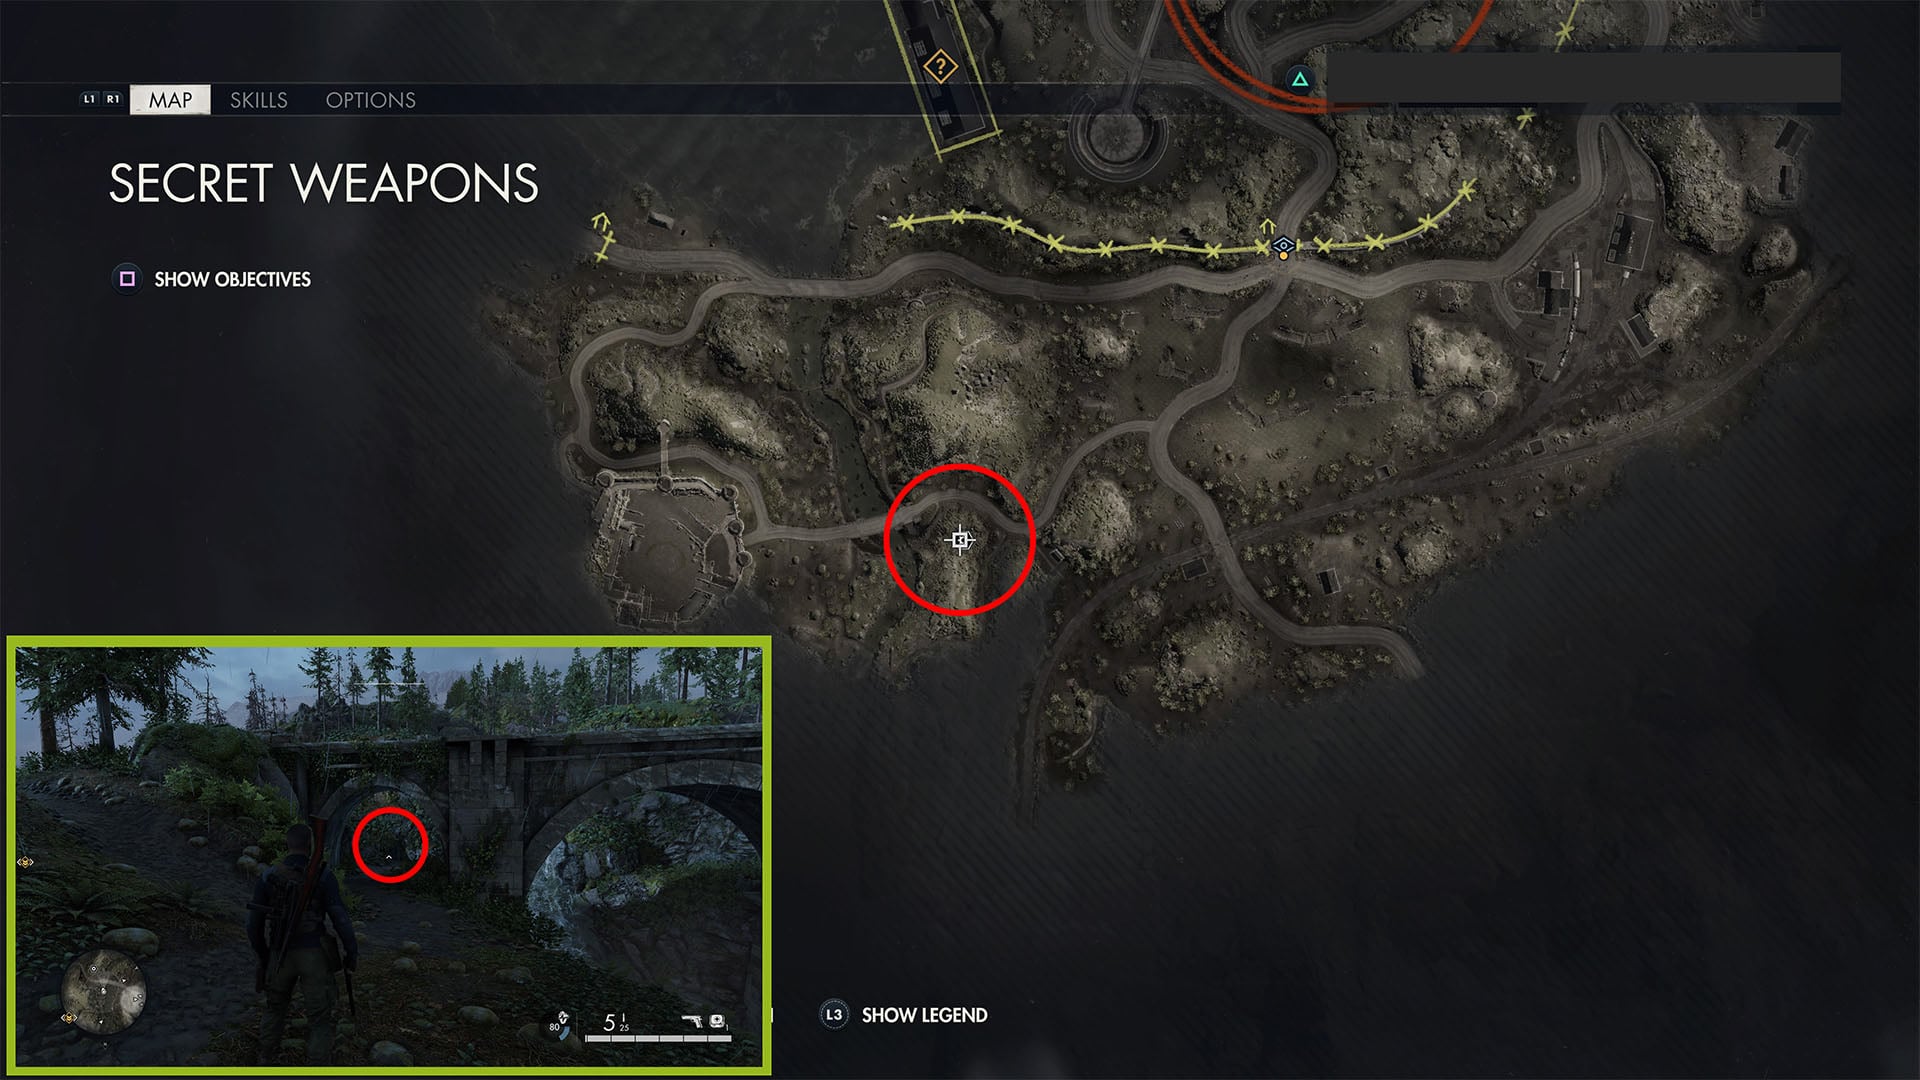
Prufstand XII Plans (Hidden Item 1)
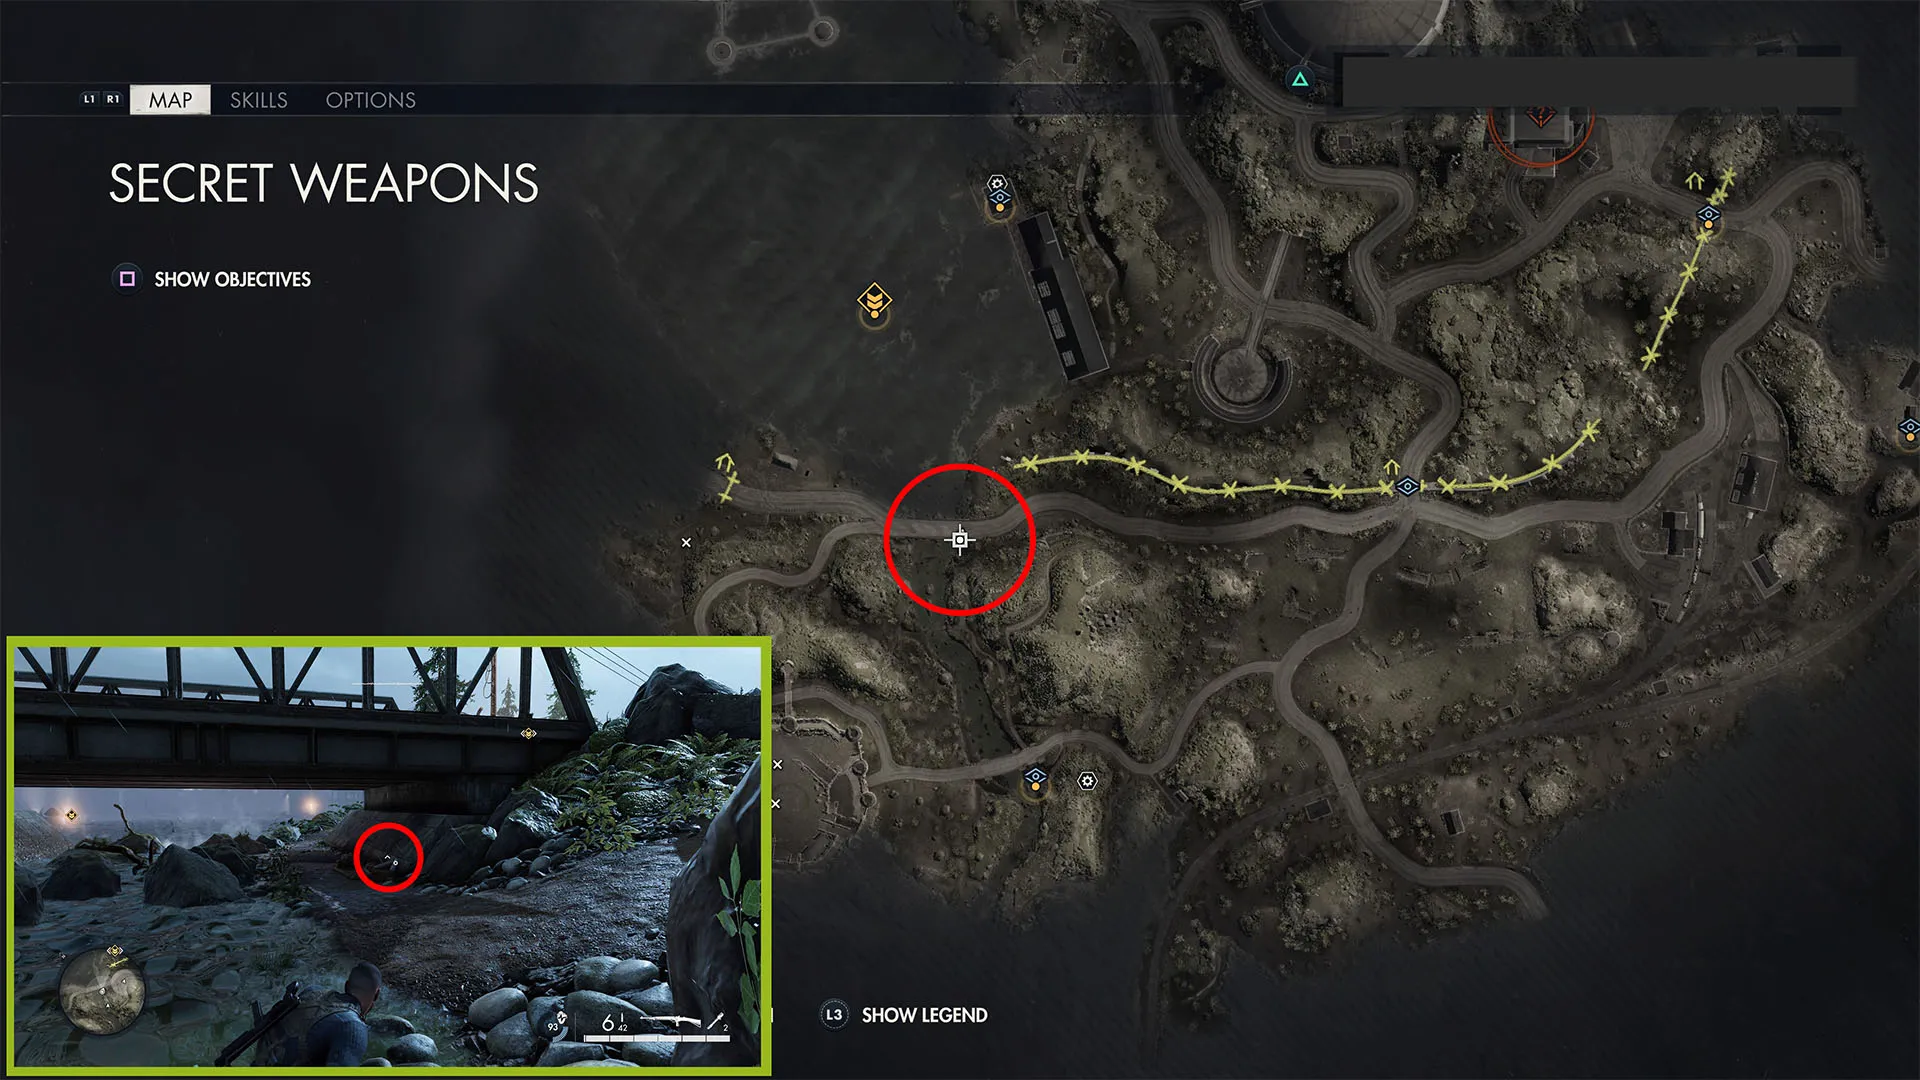
Now head east along the main road, and you’ll soon reach a bridge. Go across it and go right on the opposite side along a dirt path leading toward the waterfall. Look under the bridge here for a sleeping bag and this hidden item.
We Had a Deal (Personal Letter 1) and Inbound Deliveries (Classified Document 4)
Go into the train station near the eastern edge of the map and up to the second floor through the ticket office. Go left at the top, then left again into a room with a safe and this personal letter on a desk.
Inbound Deliveries is in the safe, and you can get the key off of the officer in the train station. Inbound delivery can also be retrieved from the Brownshirt engineer working on the locomotive at the train garage.
Abandoned House Starting Location
Cross over the railyard to the east, going behind the train garage. Follow the muddy path left to the Abandoned House up on the hill. Climb up the pipe next to the generator in the front.
At the top, turn right for stone eagle 2 (below), then turn left to climb around to the backside of the house. Drop down on the balcony and open the door to secure this starting location. Grab I’m Done (personal letter 2) here as well, detailed below.
Stone Eagle 2
Climb to the second story of the Abandoned House and turn right instead of left to continue climbing around. Look down, at the eastern (left) side of the hill in the middle of the pathway below the house to find the stone eagle hiding amongst the rocks.
I’m Done (Personal Letter 2)
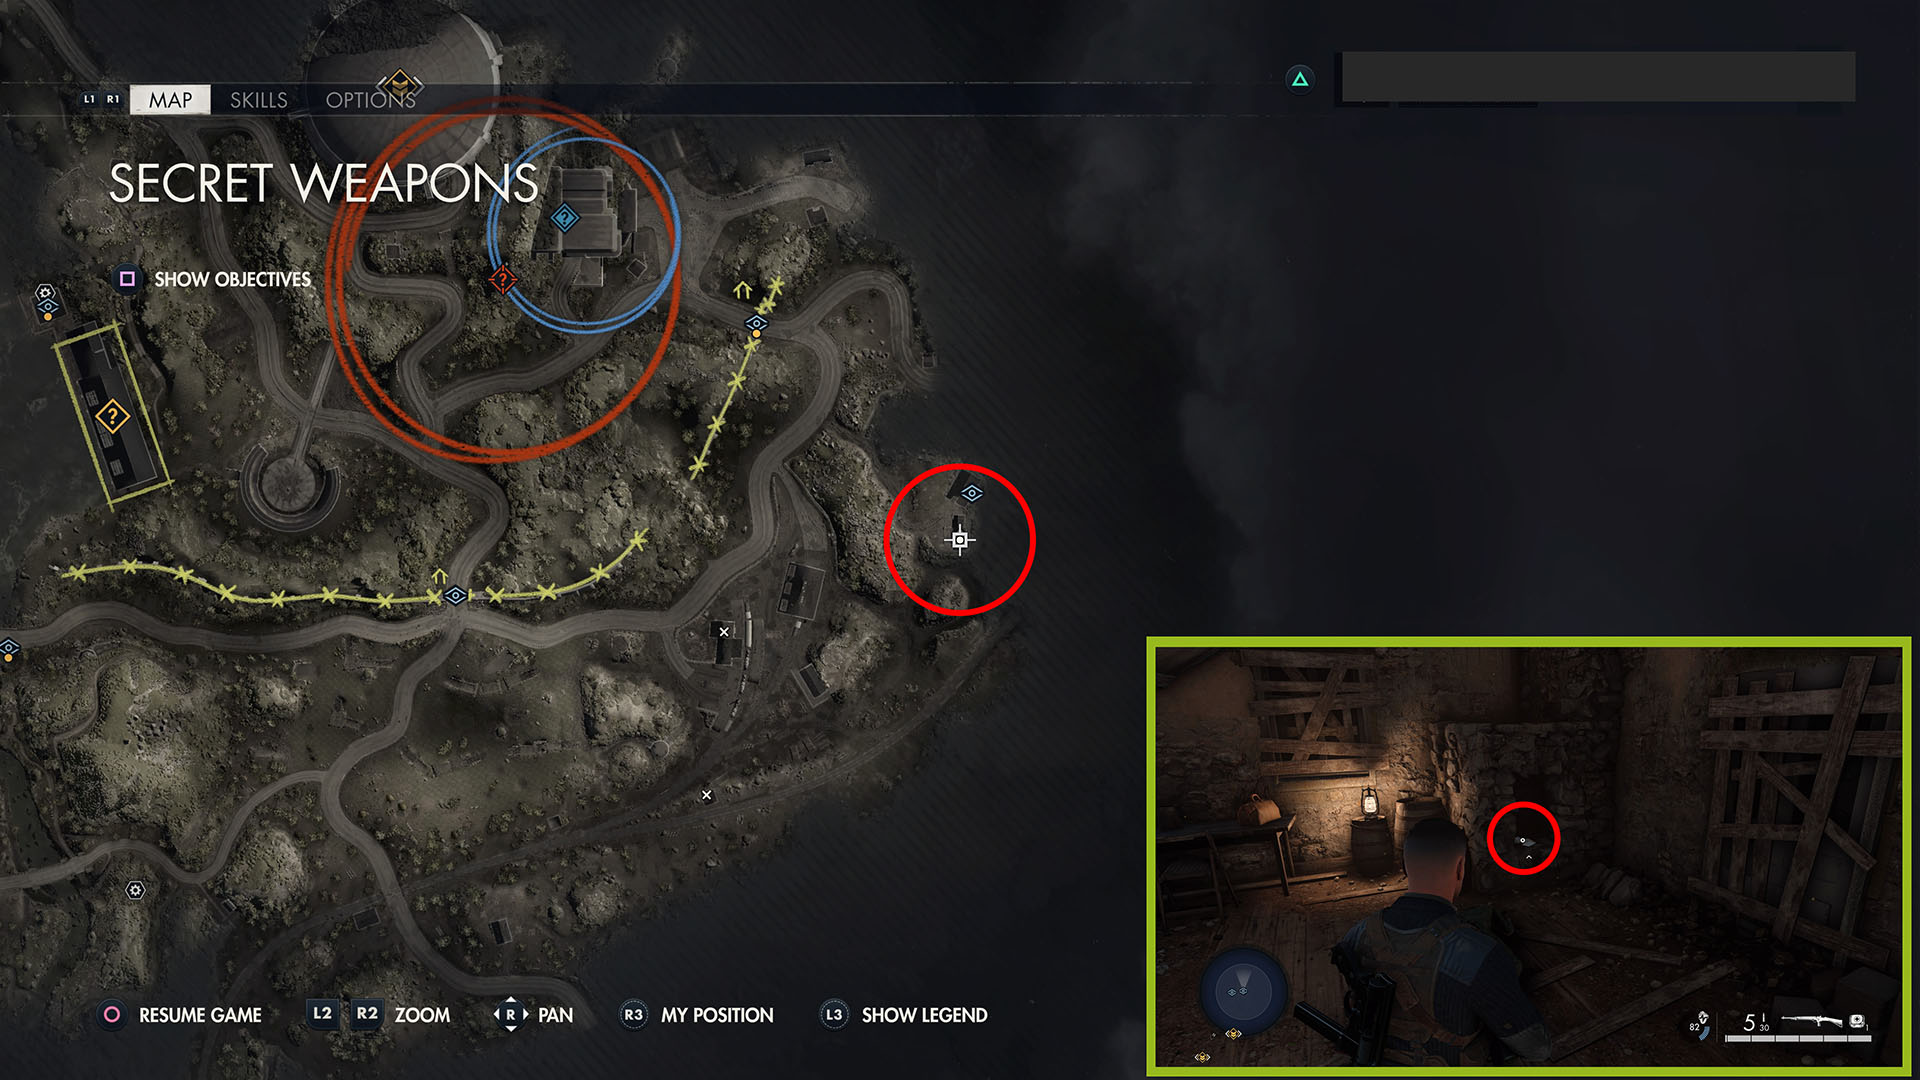
Open the door off of the balcony at the Abandoned House and go downstairs. Check the fireplace near the dead body.
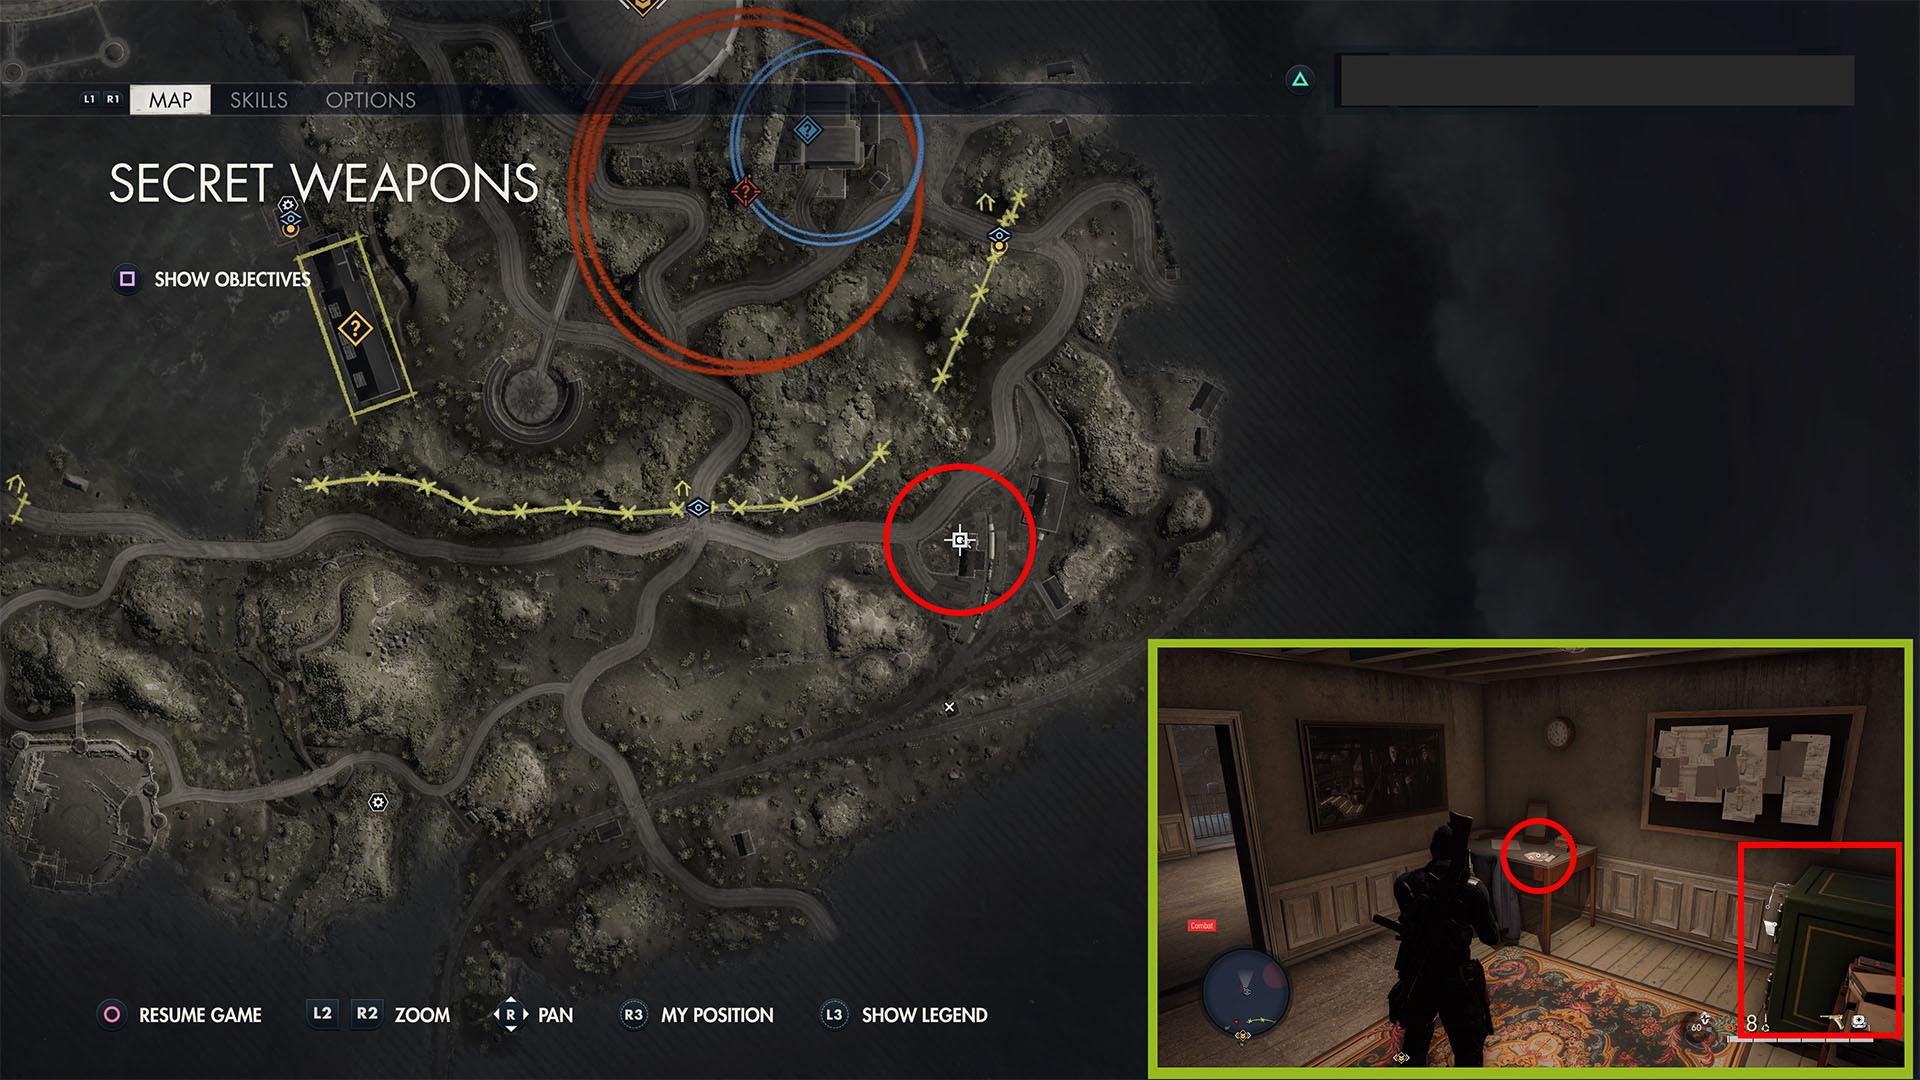
A-4B Logistical Issues (Classified Document 5)
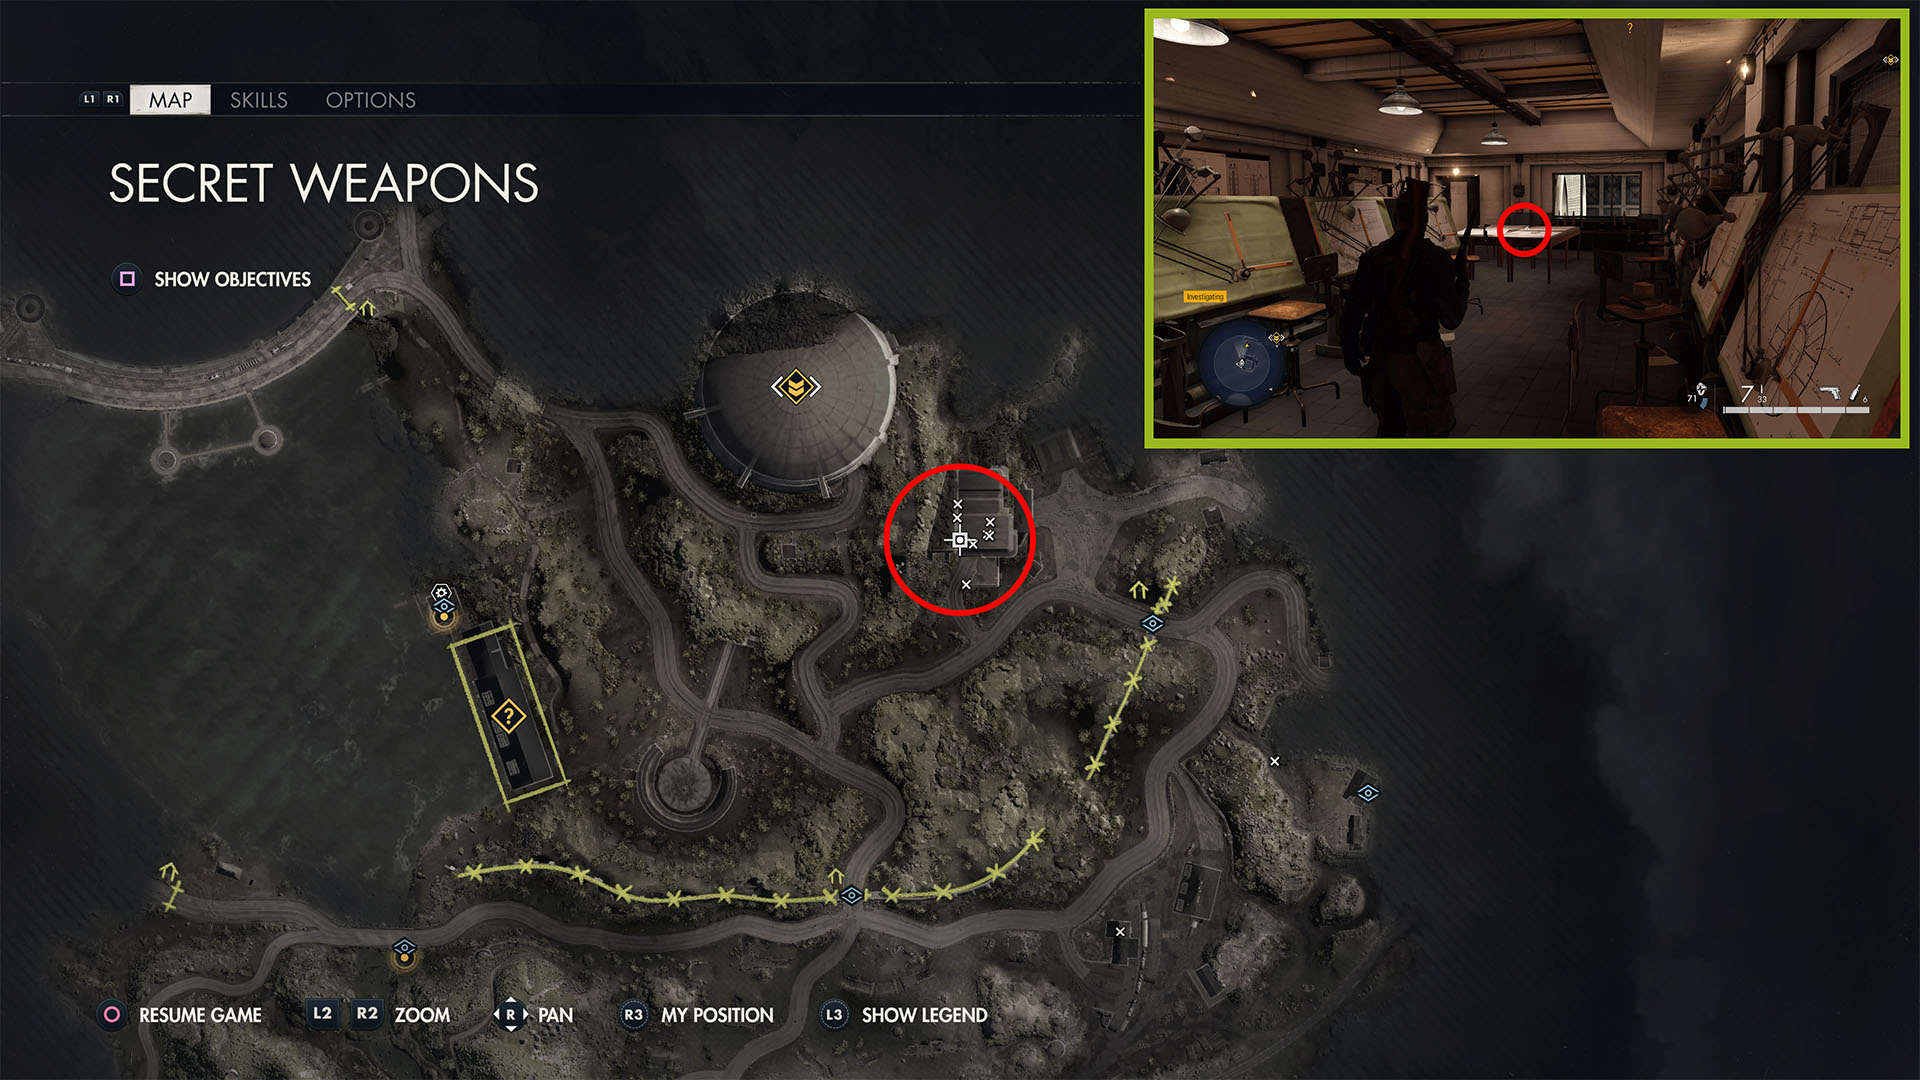
Now head northwest to the Weapons Lab (where Christian Jungers is, just southeast of The Dome). Go to the second floor above the munitions garage to find the planning/engineering room. This is part of the secondary objective and on the four tables pushed together on the far side of the room.
Thinking Outside the Box (Personal Letter 3)
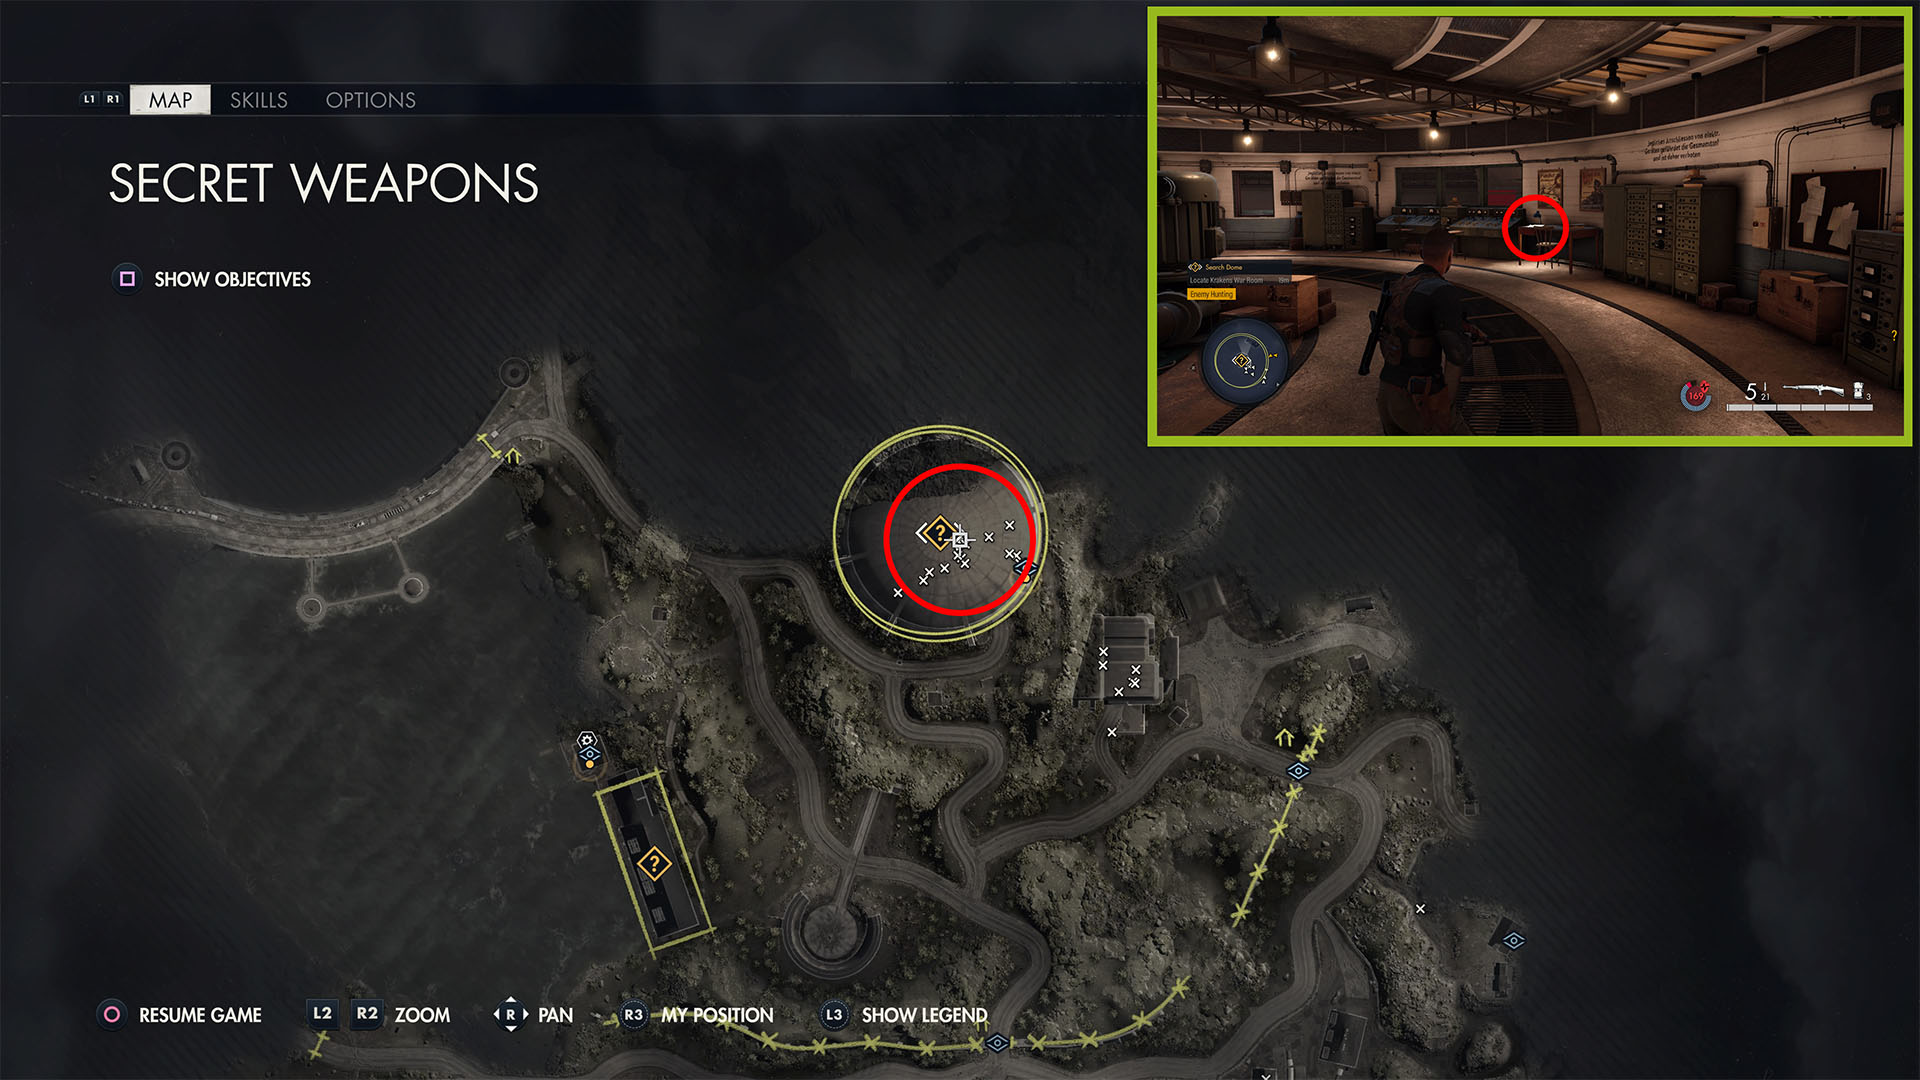
Complete the objective in the Dome’s War Room and climb the central structure (where the V2 rocket was) by way of the blue stairwell on the southern side. At the top, turn right to find this on a desk under two framed propaganda posters.
Peenemunde Lab ID (Hidden Item 2)
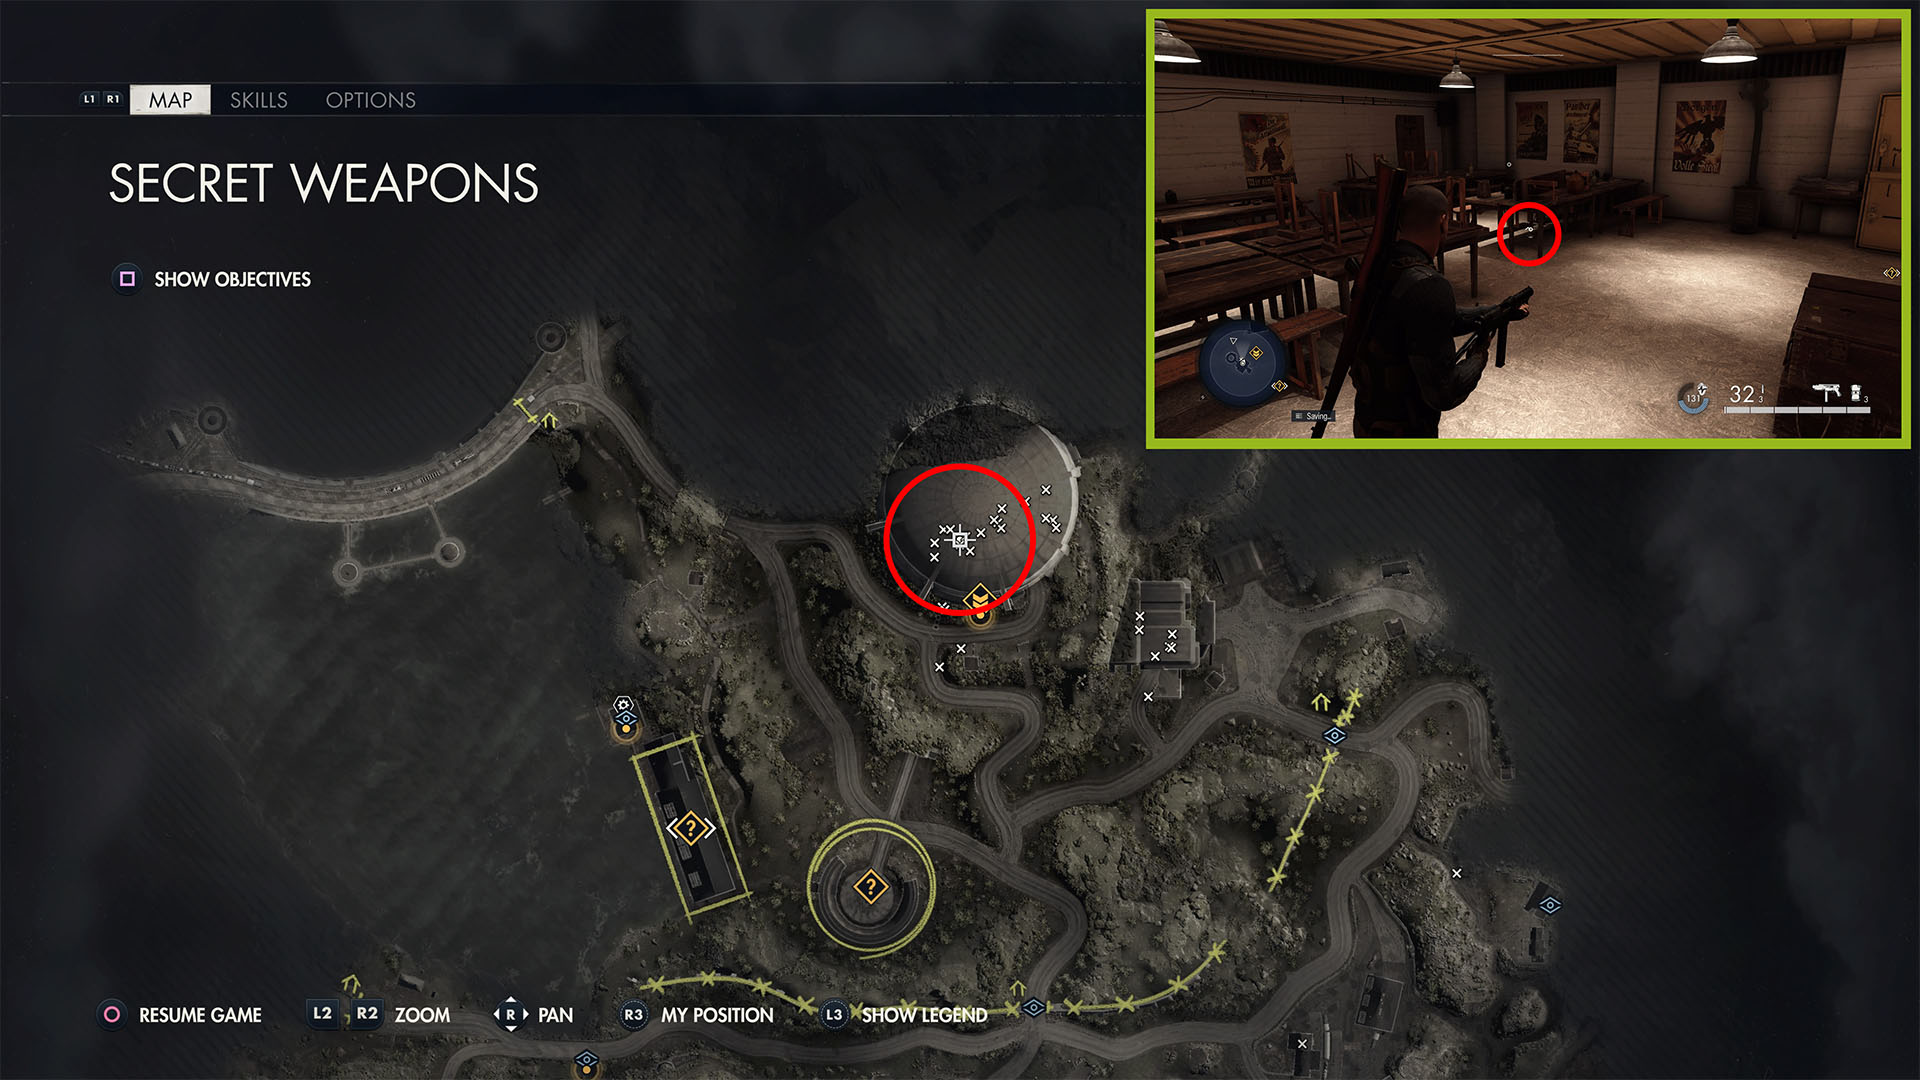
Descend the stairwell from the letter above, and double back at the bottom to find an opening in the central leading down. Go through the first door on the right with a Waffenkammer sign above it. You’ll enter a narrow hallway with crates stacked on the right side. Go down it and through the first door on the left into a small mess hall to find this underneath a table against the far wall.
SMG Workbench
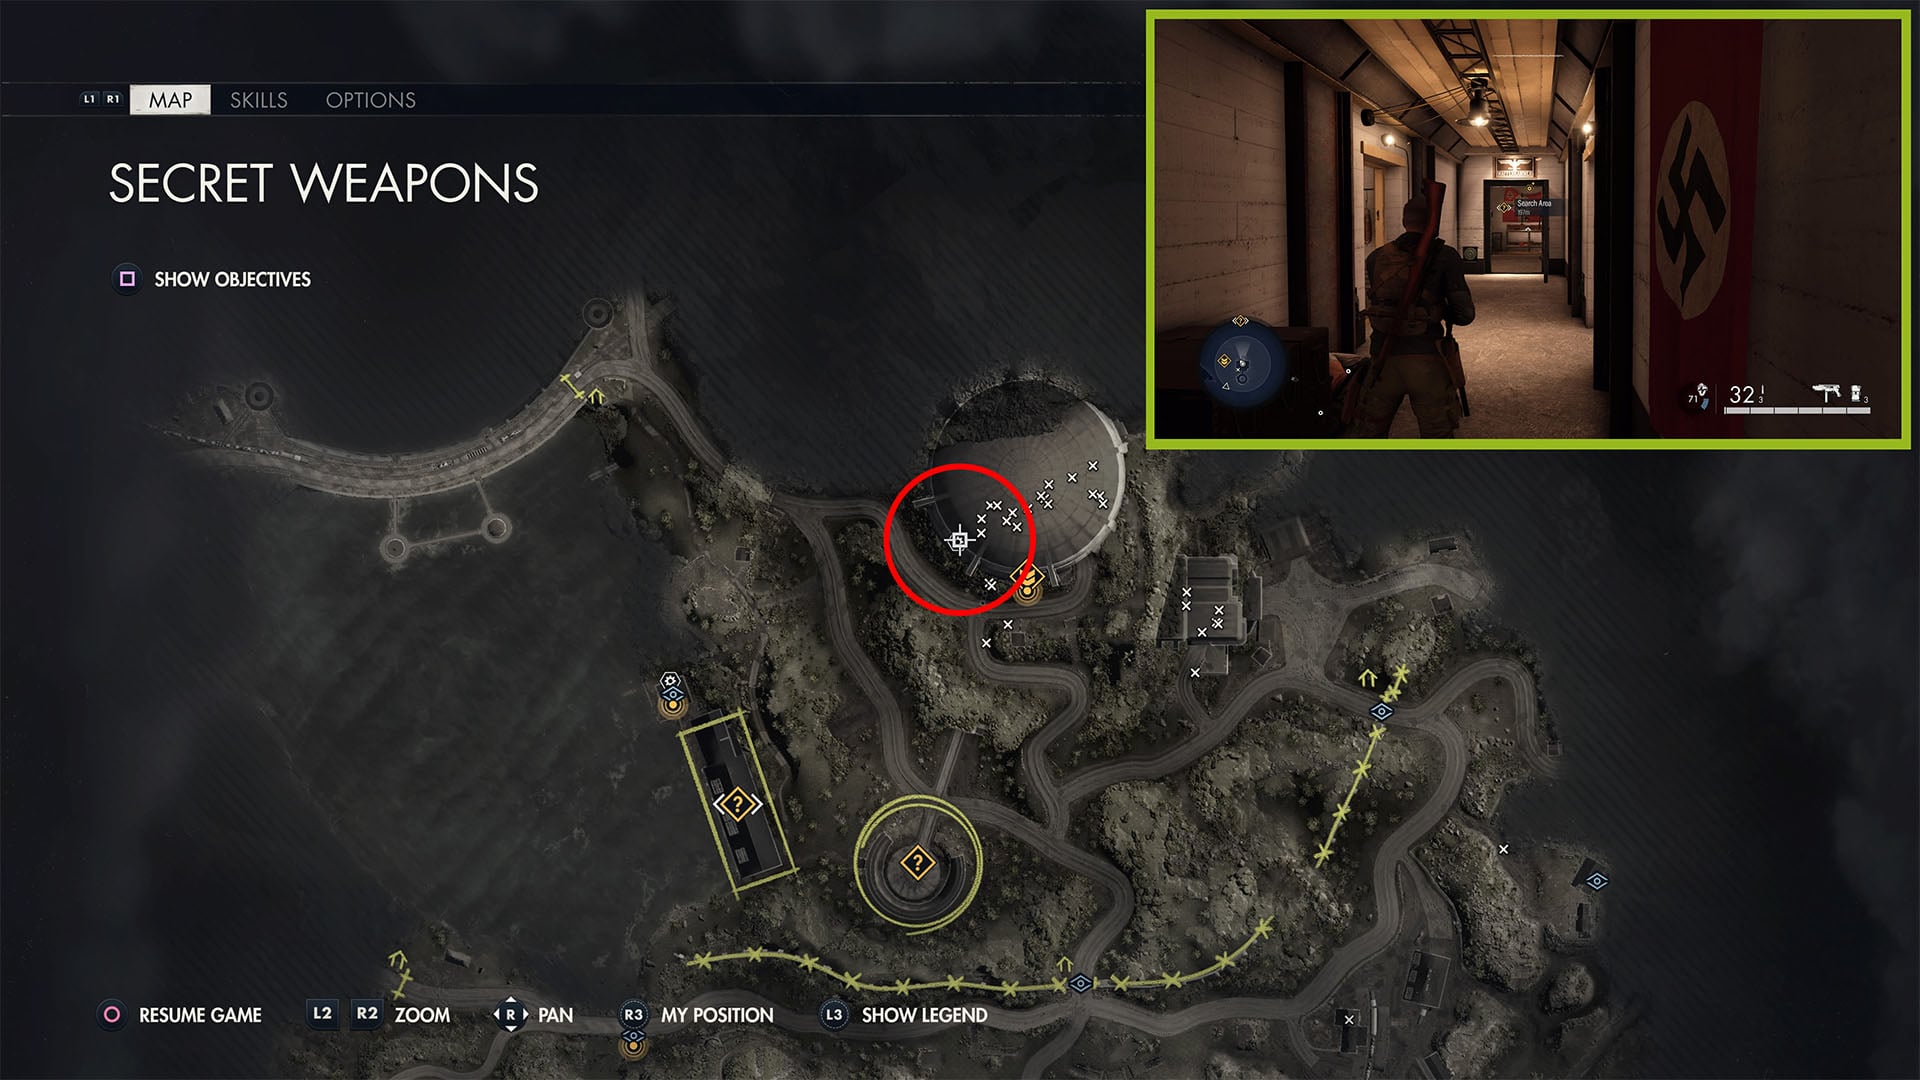
Go back out into the hall and go to the very end. Unlock the door to reveal a small armory with this workbench.
The V2’s are Obsolete! (Personal Letter 4)
Complete the objective down in the V2 Assembly and Refueling area. Leave the control room, and go toward the southern end of the area. Climb the ladder across from the alarm and the horizontal V2. Go to the end of the catwalk and left through the doorway.
Follow the path up. Exit the door, and you’ll see a V2 launchpad in front of you. Climb the ladder to your left, open the door to another control room at the top, and grab this personal letter off of a chair to the right.
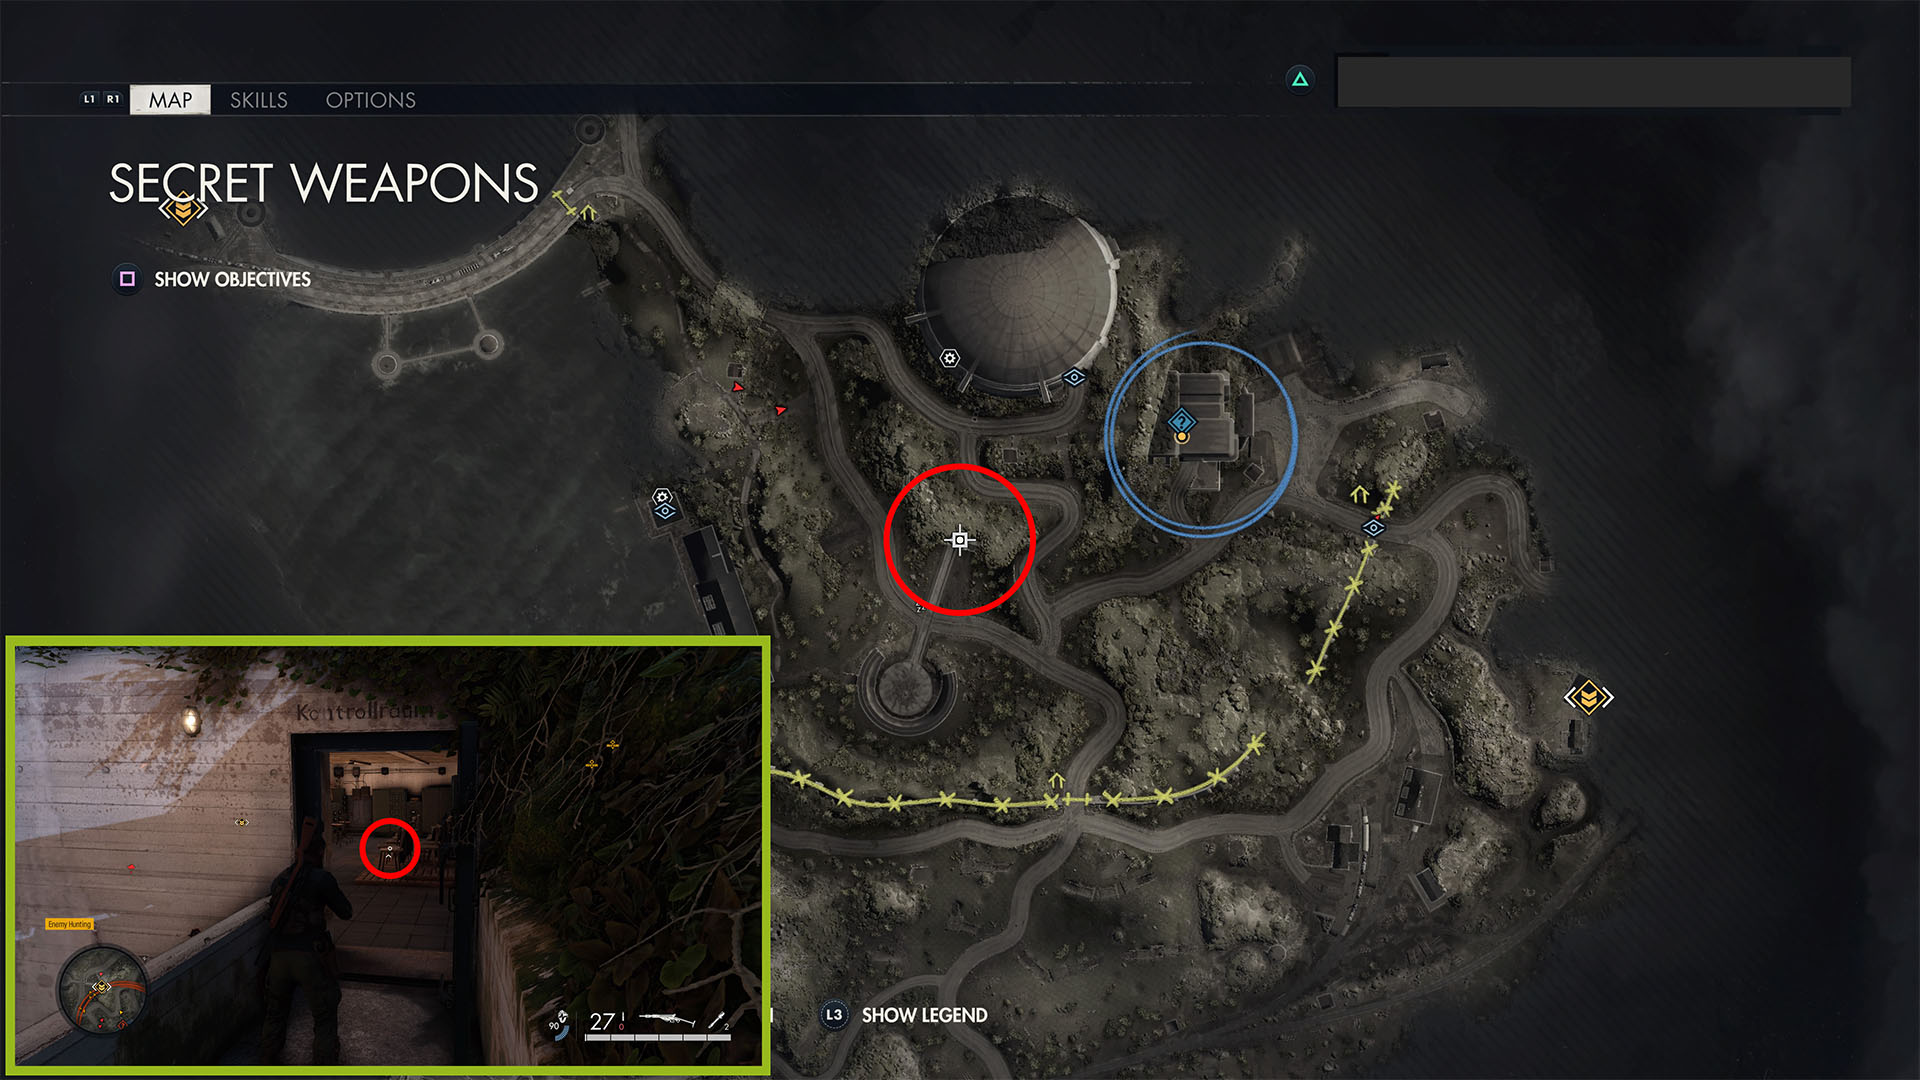
I Can’t Work Like This (Personal Letter 5)
Now head to the Lake Compound to your southwest. This personal letter is on a table by the open rocket capsule above the water, across from the yellow rocket on the trailer.
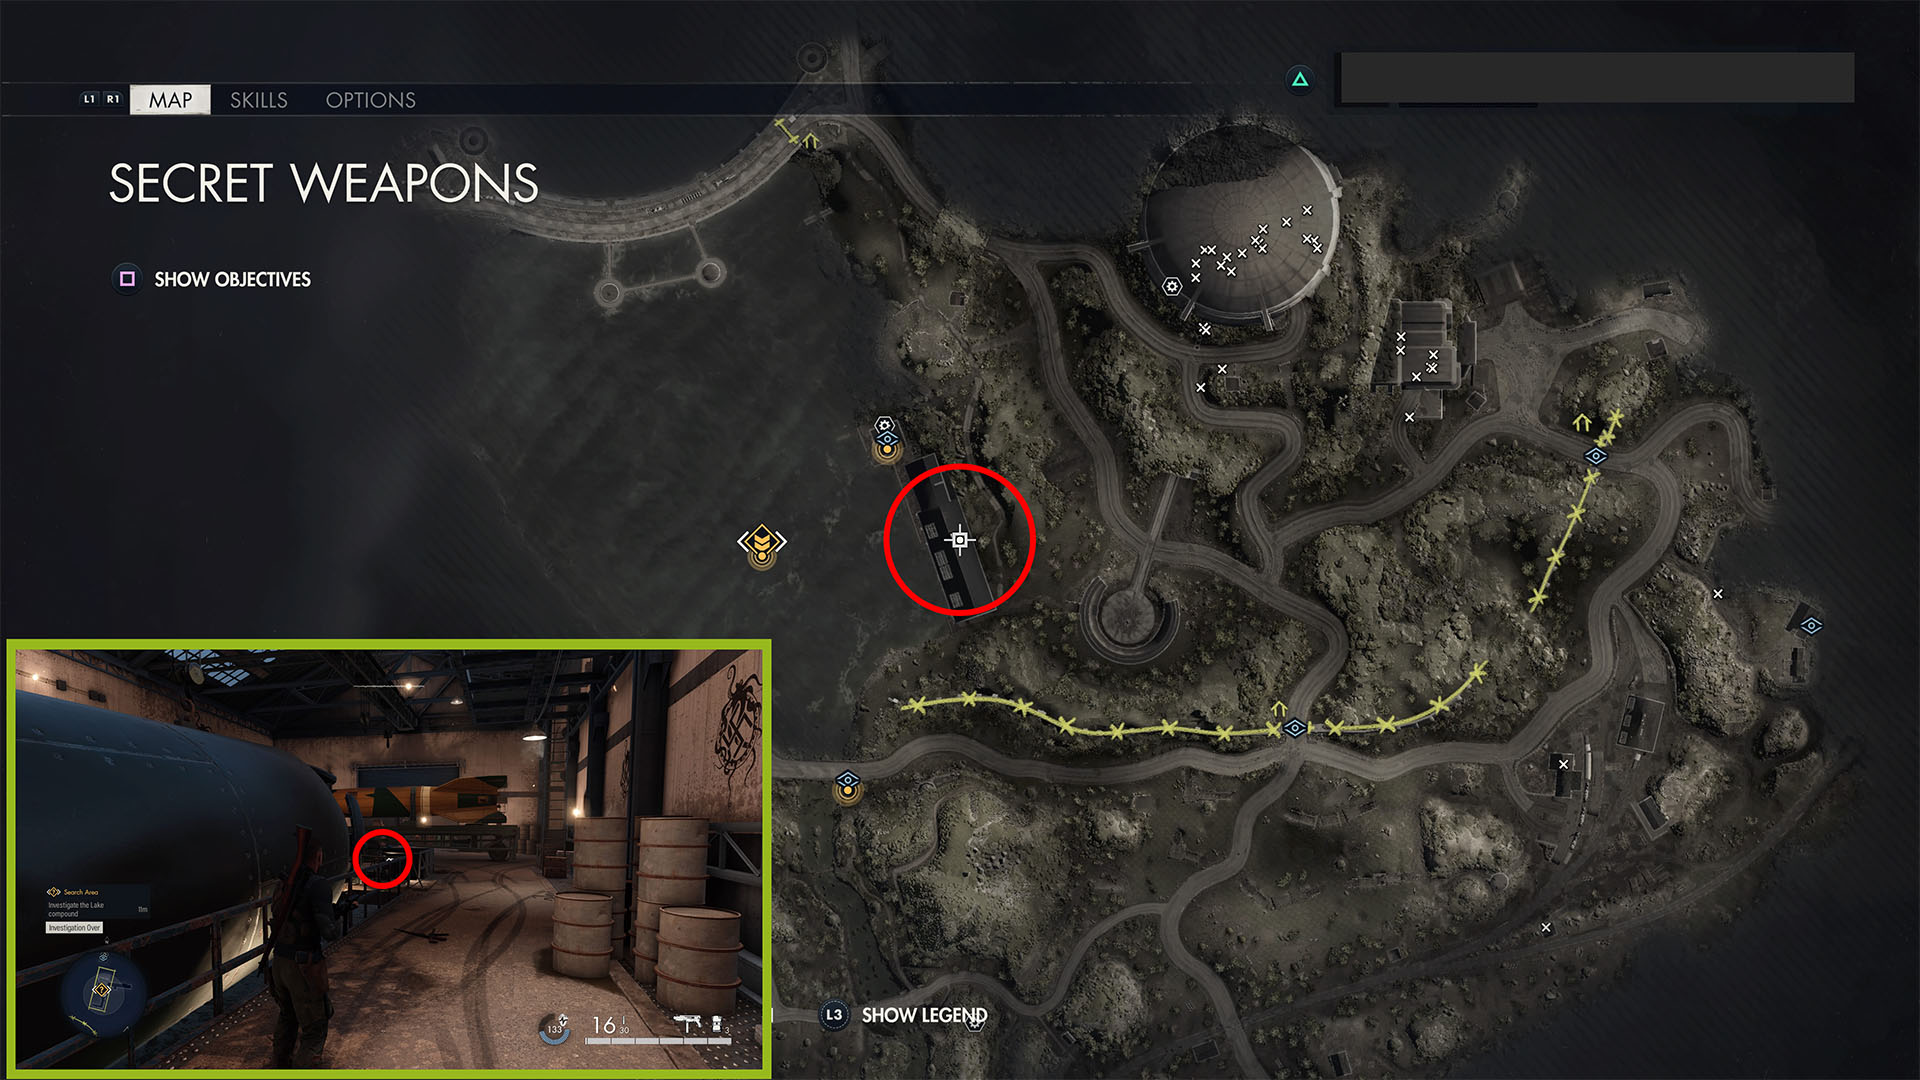
Rifle Workbench

From there, go right (north) and past the yellow rocket. Pass the control room on the right, and you’ll see an alarm and an armory in front of you. Open the door under the Waffenkammer sign to gain access to this workbench.
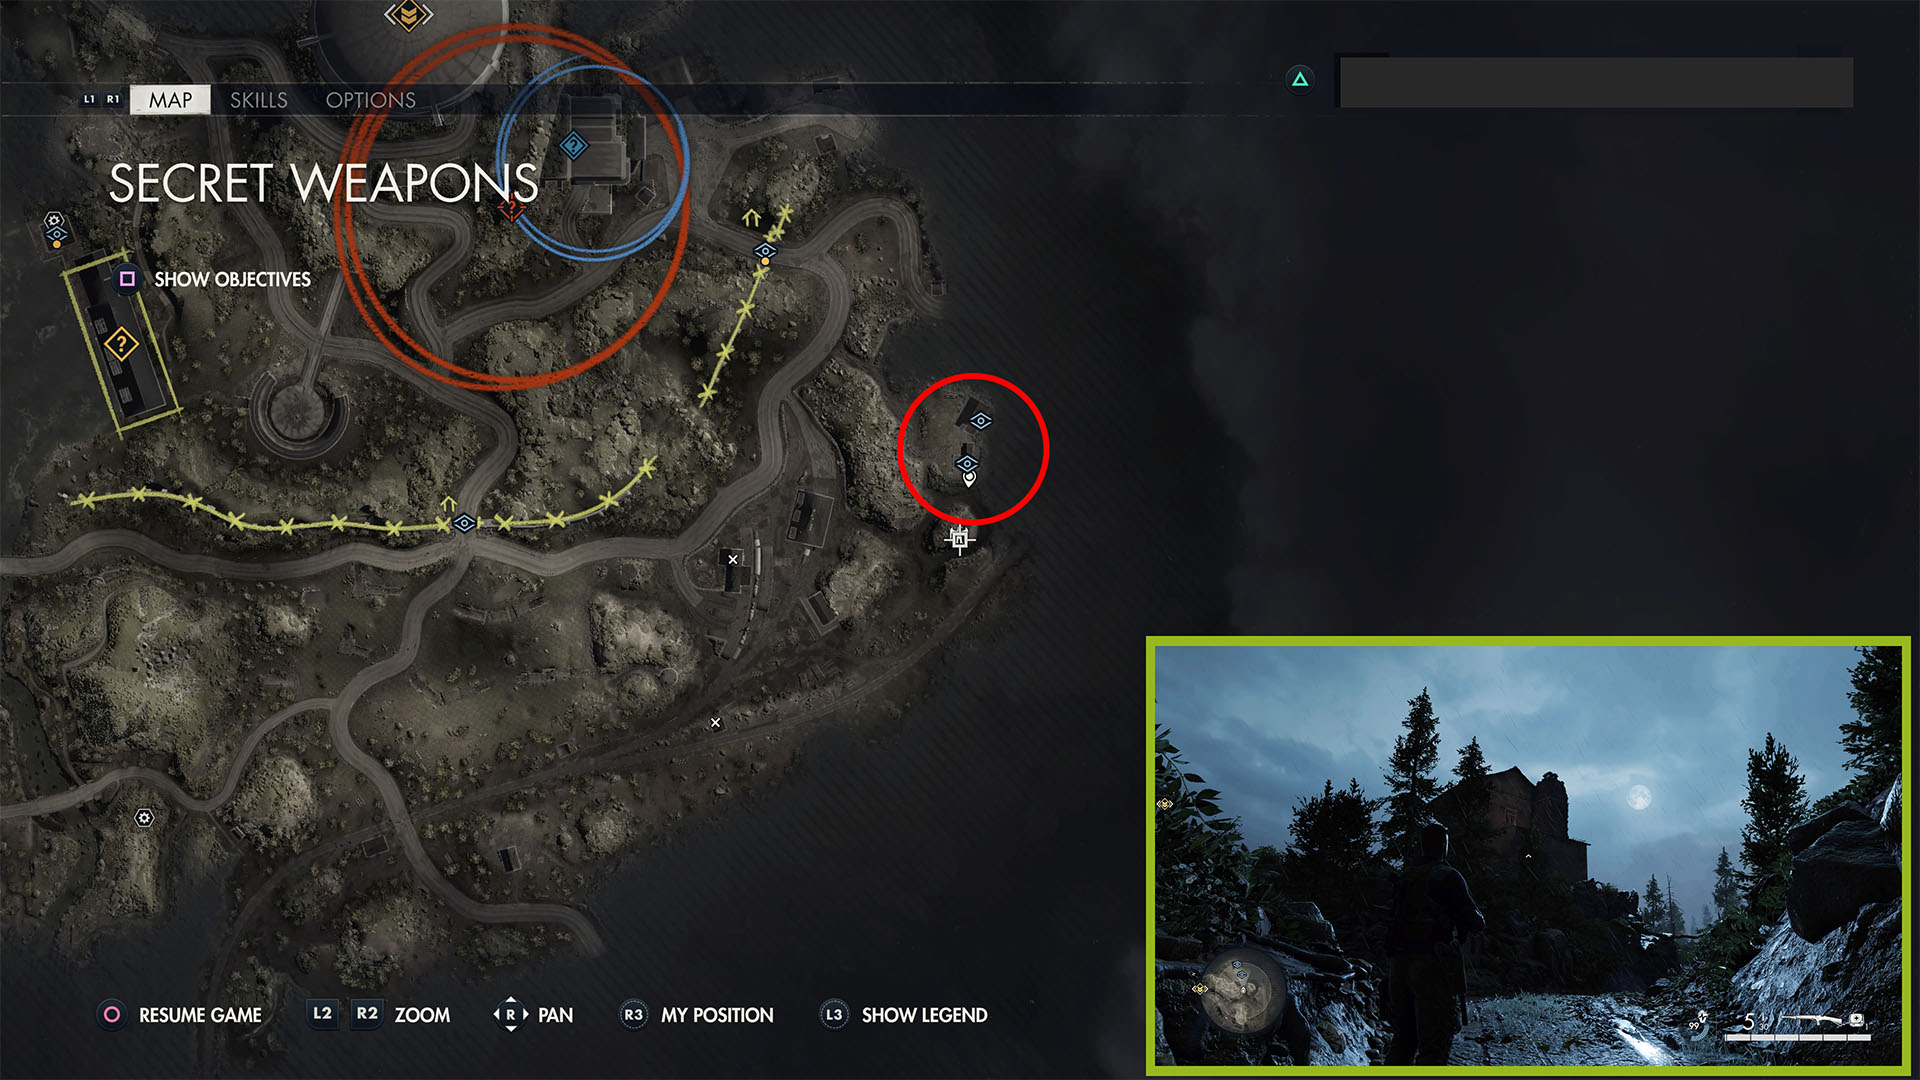
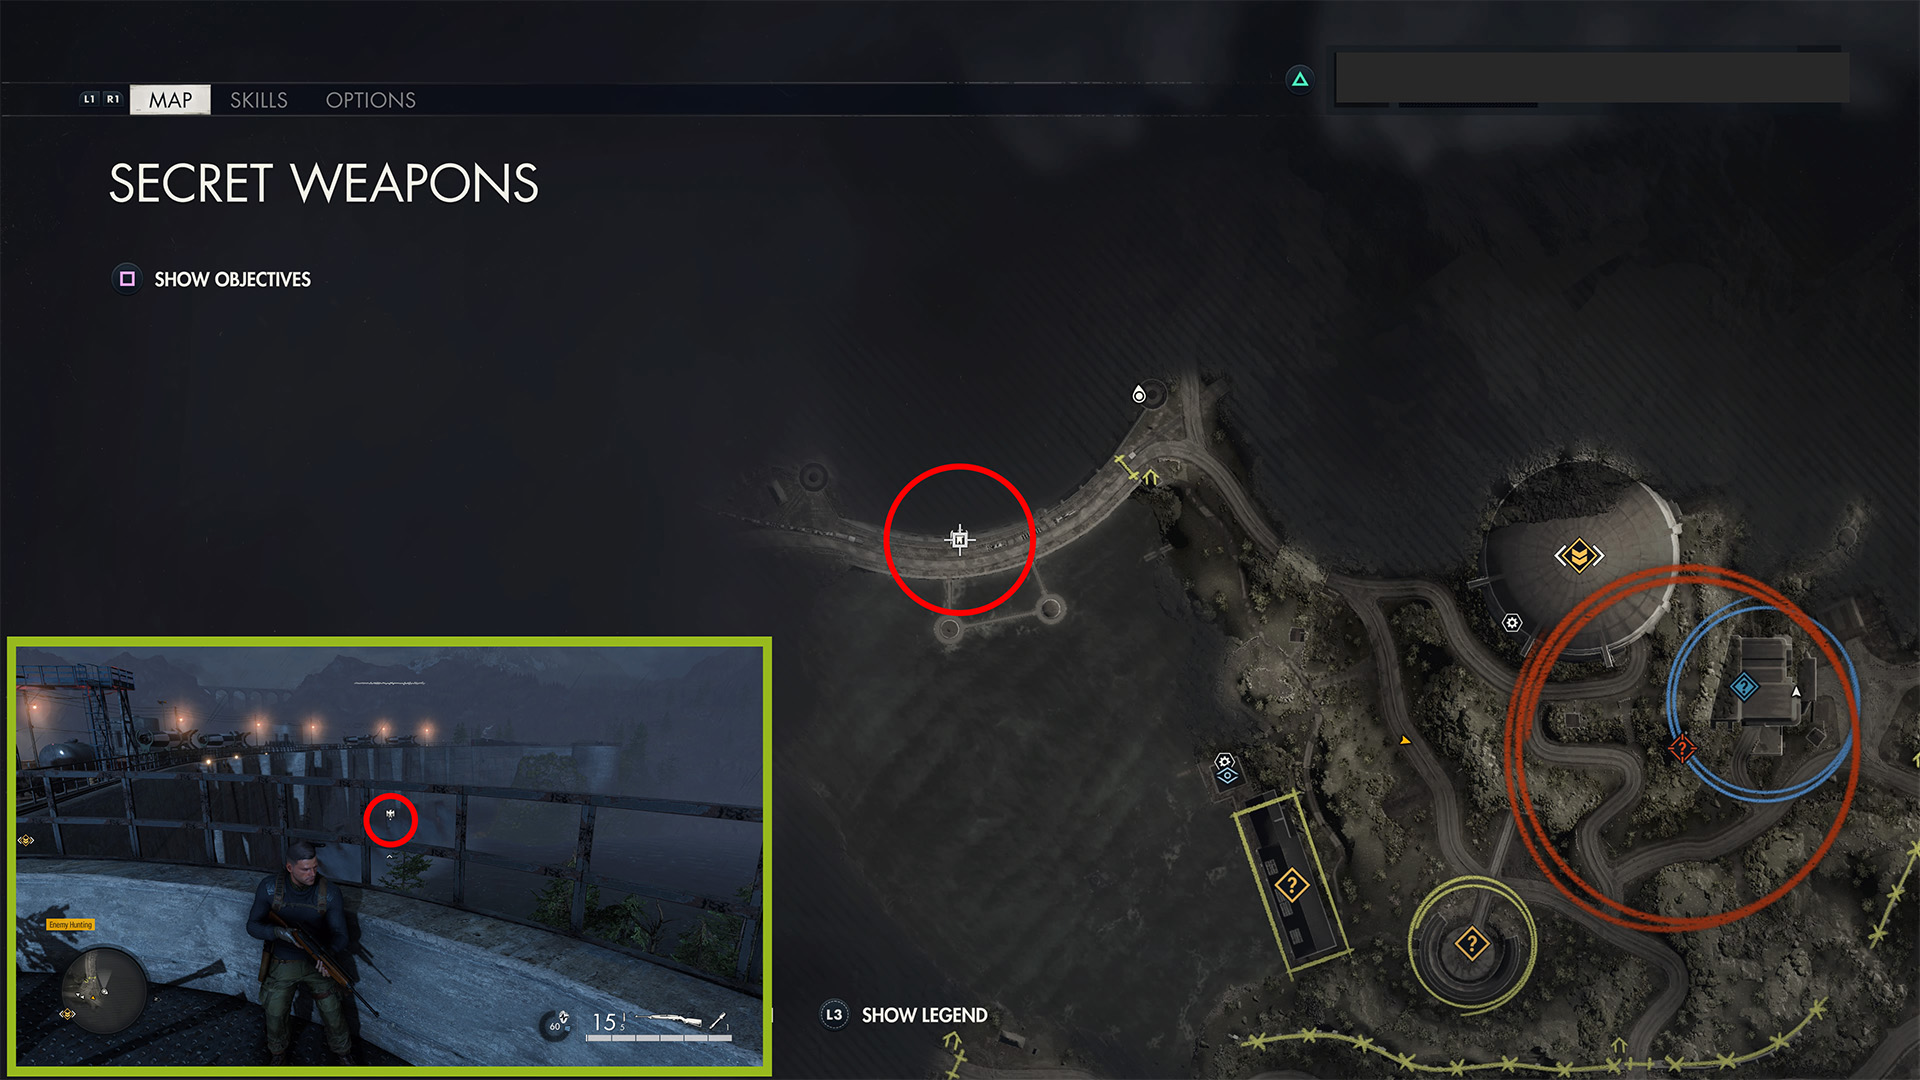
Luftwaffe Playing Cards (Hidden Item 3)

Leave the Lake Compound and head to the major bridge in the northernmost part of the map. Go inside the gatehouse at the checkpoint to find these on the table to the right with the radio equipment.
Stone Eagle 3
From the gatehouse, go slightly northeast to the AA gun on the dam wall (it’s near the northeast mission boundary). From there, look west and down at the water flowing out of the square holes in the dam. Look inside the third hole from the end (roughly under the third V2 rocket on the train above). It’s hard to see this one because of the water.
And those are all of the stone eagles, documents, hidden items, and workbenches in Sniper Elite 5‘s Secret Weapons mission. For more guides outlining all of the other collectibles in the game’s other levels (except Mission 9 because there aren’t any!), head over to our SE5 tips hub right here.


Published: May 27, 2022 04:11 pm