Originally the entire map of the Early Access build, now Fort Joy is just the opening segment of the massive Divinity: Original Sin 2 game world. While there’s plenty to do there, some new players who didn’t get in on the early version are having a hard time figuring out how to remove their source collars and escape.
All of the party’s source collars will be removed at the Seekers camp after rescuing Gareth, but there is a way to get a collar removed earlier during the Fort Joy segment. For those struggling with completing the game’s first act, below we cover several different options for leaving Fort Joy and some fun things to do along the way.
Divinity Original Sin 2 Fort Joy Escape Routes
Teleportation
On the far west beach after you reach the Fort Joy ghetto (north of the cookstation and the area where you meet the talking crab Septa the Insufferable) you can find a trio of dangerous crocodiles. One of them has a partially digested teleportation glove in his gullet.
If you talk to the human wizard named Gawin (to the right of the Divine statue and painting of Lucian) you can get a quest to pick up the glove, or you can just walk straight to the crocodiles and grab it yourself. Either way, you’ll want the teleportation ability granted by this nifty piece of equipment.
 Crocodile location on the Fort Joy beach
The battle itself won’t be too tough — so long as you set the crocodiles on fire and avoid setting yourself on fire, since they use Fossil Strike and create oil areas all around your party. Whittling down their physical armour and using knockdown or blinding can also be helpful.
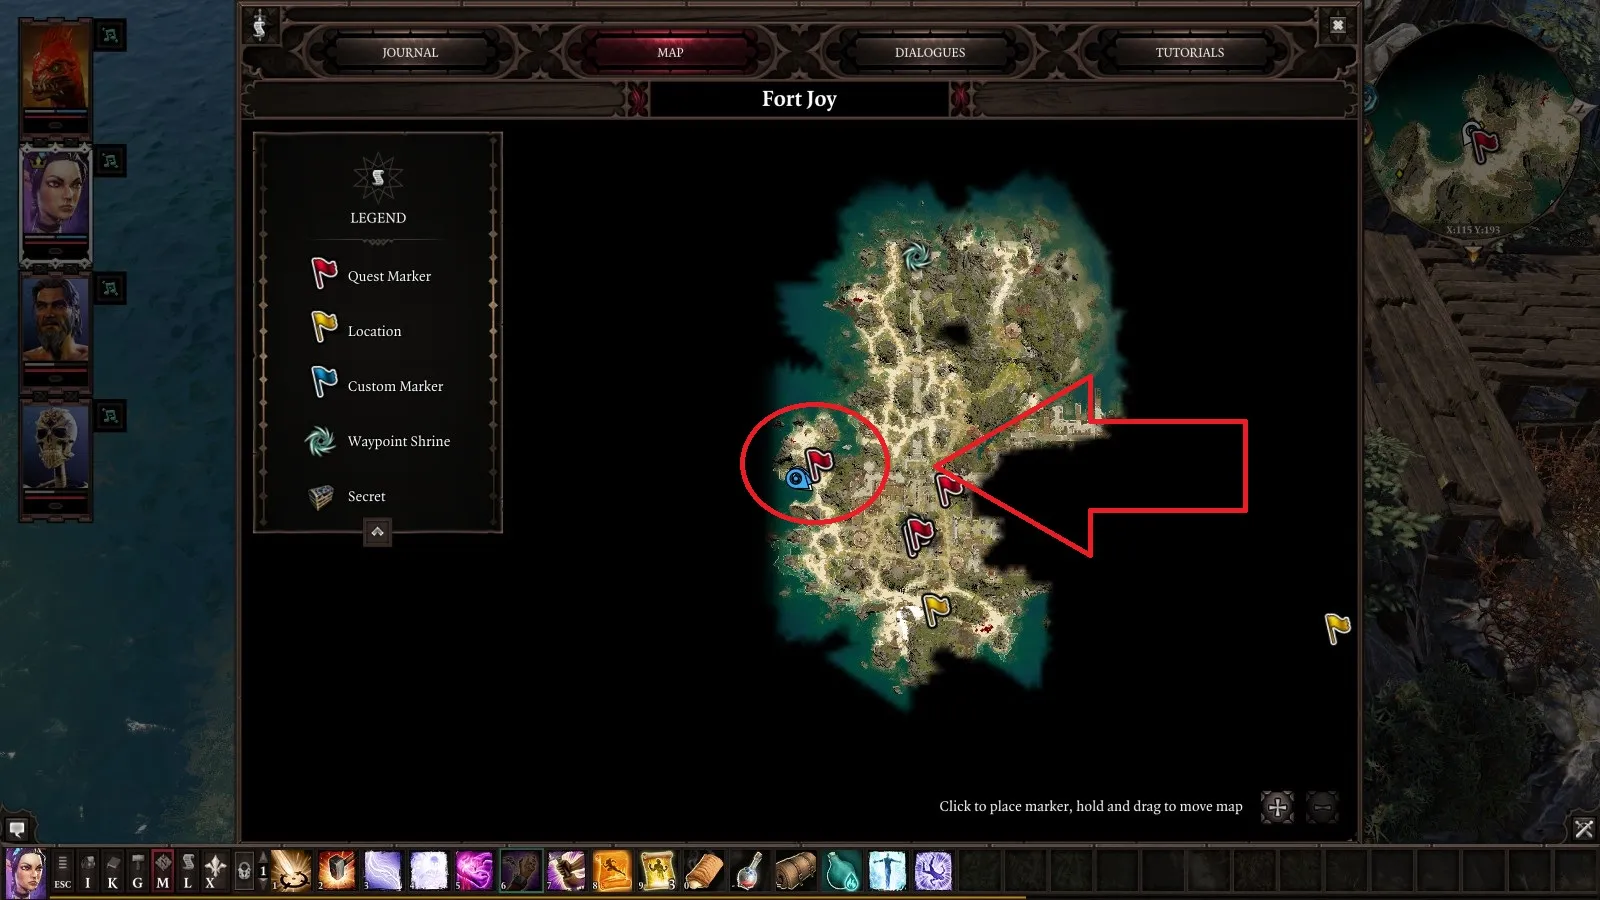
Now head over to the hidden alcove on the north-east side of the map (see the image below) and look for a spot where you can teleport down to a ledge near a tree stump. You can bring Gawin here as part of a quest for extra experience, but he’s no help in escaping since he’ll betray you and leave without actually teleporting your party anywhere.
From that lower ledge, teleport each party member across to the mossy area (don’t forget the black cat if you are trying to get the cat familiar). This is technically the “easiest” way, but it’s also pretty time-consuming since you have to wait for the teleportation cooldown for each party member.
Although you can’t use the gloves to teleport yourself, you can remove the gloves and give them to someone across the chasm through the inventory screen, then have that person teleport your main character.
From there you are pretty wide open in your options. You can try to reach the drawbridge and lower it, escape through the boat by talking to the little boy, or head into the prison and escape through the sewer after an extremely difficult battle.
Alternatively, instead of teleporting across the chasm, you can chop down the tree stump and jump down it to access the cellar, which opens up the prison escape route.
 The teleport location
Trial By Combat
This one requires a lot of tactical knowledge and a good grasp of the battlefield mechanics in Divinity: Original Sin 2. You will also need a lockpick, so either grab one, buy one, or craft one before getting started.
If you talk to the blacksmith named Nebora near the start of the Fort Joy Ghetto, she will intimate that she can remove a source collar, but only for someone who has proved themselves.
Head further into the ghetto where the crime boss Griff is hanging out near his elf captive. Just nearby there’s a hatch that leads down to an arena where fanatics battle to prove themselves. If you can beat the band of fanatics, Nebora will remove the main character’s source collar.
The fight is incredibly difficult at the beginning, though, and it’s a good bet a level 1 – 2 party is going to get wiped out. I recommend doing all the area quests first and buy as many new skill books and items as you can before heading into this fight. Make sure to also take advantage of the high ground offered by the scaffolding and pay attention to each enemy’s resistances before setting down tiles of fire, poison, or electricity.
After the collar is removed, go bug a magister and point out you don’t have a collar, which will send you to the prison. Now use your lockpick to escape and leave the Fort by any of the methods mentioned in the section above.
Kill ‘Em All
If you’re feeling particularly overpowered and homicidal, you can just kill all the magisters, force open the gates, and escape across the bridge on the other side. But I don’t recommend taking this route until you’ve acquired a bunch of equipment and skill books and leveled up a few times.
Elf/Skeleton Quest
If you head into the cave near the back side of Fort Joy and talk to Saheila you will kick off The Imprisoned Elf quest line. If you free Amyro from Griff during this quest, he can show you the secret passage to the cellar.
Alternatively, if you talk to the skeleton in the cavern, he too can lead you to the cellar if you complete the Withermoore’s Soul Jar quest line.
Bring along a lizard who can dig or grab a shovel before going here as you have to dig. From the cellar, go through the broken wall and use a lock pick. From there you’ll have to fight your way out towards sewer entrance below or the topside to get to the boat.
More Options
With all the different quest lines and methods of approaching any given problem, it’s likely there are even more escape routes.
In many cases no matter how you try to escape, you will end fighting through the prison. If you come across the magister Delorus, try to keep him alive so you can get a password that lets you bypass a battle onto the boat.
Have you found any other ways to remove the collar or escape Fort Joy? Let us know in the comments!
If you’re looking for more tips on this huge fantasy game, be sure to check out our full list of Divinity: Original Sin 2 guides to get the most out of your roleplay:
- Divinity Original Sin 2: Arena Of The One Combat Guide
- Divinity Original Sin 2: Artefacts of the Tyrant Guide
- Divinity Original Sin 2: Black Cat Secrets Revealed
- Divinity Original Sin 2 Character Creation Guide
- Divinity Original Sin 2: Ultimate Build Guide
- Divinity Original Sin 2: Skill Crafting Combinations and Book Vendors
- Divinity Original Sin 2: Complete Crafting Recipes Guide


Published: Sep 19, 2017 06:30 pm