
City Builders have so much going on that it can be hard to jump into one and create a successful metropolis. The newest from Colossal Order is no different. If you’re wondering where to start, here are 10 tips for beginners in Cities Skylines 2.
10 Pieces of Advice for Getting Started in Cities Skylines 2
1. Pay Attention to Map Choice
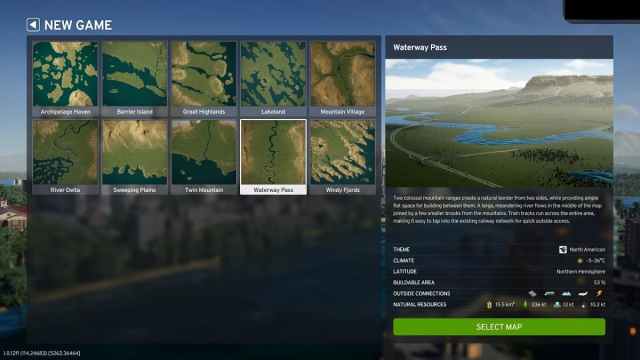
Before starting a city, you get to choose from 10 maps, and some are harder to work with than others, presenting different topographical challenges. Further, some have more resources than others, while some have more pre-built connections than others.
Each map gives you information about the climate, available resources, and the types of pre-built connections in the info panels just above the green “Select Map” button. All of these are important factors that impact how you plan and build your city. I like to think of them as pseudo difficulty settings because things like weather can impact leisure activities for Cims.
You can also see how much of the map is buildable — or how much space you can use for development. You can always use the game’s terraforming tools to make more buildable space, but when you’re starting out, I find it best not to worry about that.
Waterway Pass and Lakeland have the most buildable area in Cities: Skylines 2, and they also have moderate climates. Not only that, but they have high amounts of natural resources available for harvesting. Overall, this makes them the best map options for your first city.
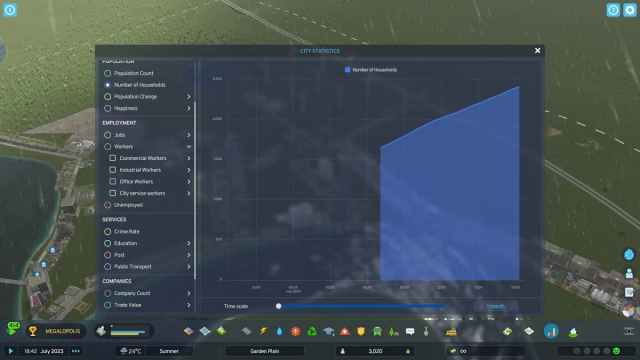
2. Use Info Views

Info Views is the “I” icon in the top left of your screen; you can also access this menu by pressing “I.” Here, you can see statistics about every element of your city. I use it mostly for electricity and water needs, but you’ll find more information like pollution, traffic, happiness, wealth, and every aspect that goes into running a successful city.
When you’re building and upgrading your city, Info Views is your best friend since you can use the information to optimize placement and production. As you add more, you’ll get more and more information to help you expand and upgrade.
3. Plan City Expansions Ahead of Time
This ties in with not overbuilding. When you’re ready to add new zones, prepare by planning out a road network and keeping an eye on your power and water supply.
I like to plan out city blocks with roads first while paused. This allows you to build nice grids and designs before plopping down zones (roads have power lines and water lines attached to them). It also puts your infrastructure in place for the impending neighborhood or set of shops. Pausing the game keeps you from spending on infrastructure while you decide where to put your homes, shops, and industries.
Next, place some of your zones and service buildings (while still paused). Unpause the game, and let things grow — then repeat the process. Remember: you don’t want too many, if any, unused roads just sitting on your map. So do this slowly.
Since you also need to consider water and sewage services, access to healthcare, death care, education, transportation, and everything that lets your city run properly, these small bursts of expansion are ideal.
Planning ahead means that you build up money and improve infrastructure before you add more zones so that you don’t get complaints about backed-up sewers, no electricity, or no water access.
4. Avoid Overbuilding
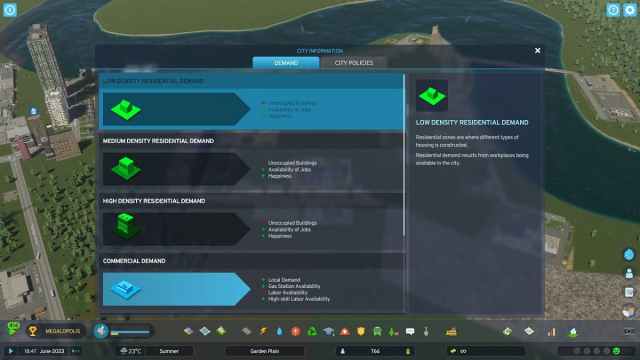
I know it’s really tempting to build plenty of zones at the start of a new city, especially industrial and residential. However, it’s better to start with a small zone set for each type and let them grow. Wait for your buildings to build, your population to funnel into those areas, and the demand to increase again before you add more.
Zoning too many areas at once can overwhelm your plumbing and electricity systems. And that leads to unhappy citizens and possibly more expenses you can’t afford immediately. Adding infrastructure can get expensive, and expanding too quickly is a surefire way to not make money in CS2. That’s in addition to the upkeep costs of your infrastructure. Luckily, we don’t have to worry about deathwaves as we do in Cities: Skylines.
To mitigate all of this, I suggest being a block-builder in your early hours of Cities: Skylines 2. This means building streets in rectangles and blocks, and place zones inside of those. You can also zone homes and businesses to specifically size them differently, which can diversify business types and residential homes. Smaller homes are more affordable for Cims, too.
I like to build in 2×3 blocks (2 up and 3 wide) and 3×3 blocks initially, packing as many Cims into a low density residential neighborhood as possible. Next, intersperse some commercial at both ends of the neighborhood and give them good (close) access to a commercial hub. This can satisfy both Cims and businesses and keep you from getting the not enough customers message.
5. Manage Traffic
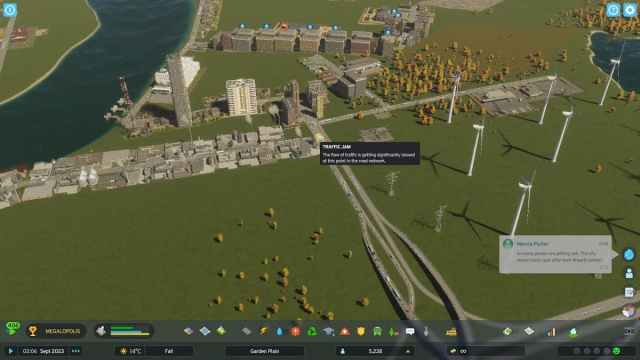
Dealing with roads can be confusing in Cities Skylines 2. No matter how you build them, it always seems like there’s congestion somewhere — or an accident or complete traffic jam. While traffic is a whole guide, here are some tips I have:
- Build four-lane arteries through your city early to withstand increasing traffic. These are good to and from industrial zones.
- Don’t build directly on four-lane roads when possible.
- Zone on two-lane roads that run beside or off of four-lane roads.
- Use roundabouts for congested areas.
- Put red lights and stop signs to control traffic flow at major intersections.
- Have multiple roads/highways leading into and out of your city.
Later on, you’ll also want to consider adding parking lots when you unlock them with Development Points to increase comfort and keep (some) Cims from parking on roads and taking up lanes. Overall, managing traffic helps reduce accidents, traffic jams, and deaths, and it keeps your industries running smoothly because they can export goods properly.
6. Be Aware of Pollution
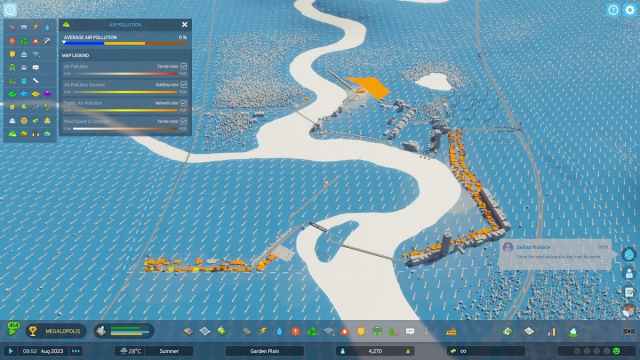
Pollution affects the health and happiness of citizens and makes some resources unusable. Never place a sewage outlet upstream of a water pumping station! It will contaminate your drinking supply. It can also pollute groundwater. Here’s how to connect sewer pipes properly, since they can be a pain.
Minimizing pollution from the start, then, is a good idea. As you build, keep an eye on your info panels for air, ground, water, and noise pollution. You can access these by pressing “I” or clicking the “I” in the top left, then choosing one of the four options at the bottom of the menu.
Here are a few tips I have for managing these types of pollution:
- Use Wind Turbines, which are available immediately, instead of coal power when possible. You may run into electricity bottlenecks, so here’s how to fix them.
- Place Industrial areas and buildings that produce air pollution downwind from residential areas.
- Place schools, mass transport stations, major highways, and medium to large commercial zones away from low density residential buildings to reduce noise pollution. Medium density and high density don’t mind the noise.
- Use Districts and District Policies to limit air pollution and noise pollution by implementing Heavy Traffic Bans and Combustion Engine Bans.
7. Use Development Points Liberally

As you build your city, you earn experience for doing just about everything, whether that be laying roads or increasing your population. As you gain XP, you’ll unlock new Milestones and Development Points. You can use these to unlock new buildings and services. These will pop up on the screen when you achieve them.
To see more details about Milestones and Development Points, go into the Progressions menu by clicking the number in the yellow number in the circle to the left of the Zone Demand bars at the bottom of the screen. You can also press “P.” Go to the Development tab to see a list of icons on the left side that denote categories like Roads, Communications, and Education.
Development Points give you access to extra buildings that improve your city. You can buy new placeables like parks and colleges or gain access to mass transportation options like airports and subways. For example, I like to put points in the Electricity tab to get the Solar Power Plant. This gives me more green energy options to keep pollution low.
The Education tab is also a great investment. Education drives demand for medium and high density residential zones. Higher education also helps with efficiency in Office Zones, and decreases the amount of waste generated by your Cims.
8. Manage Your Budget
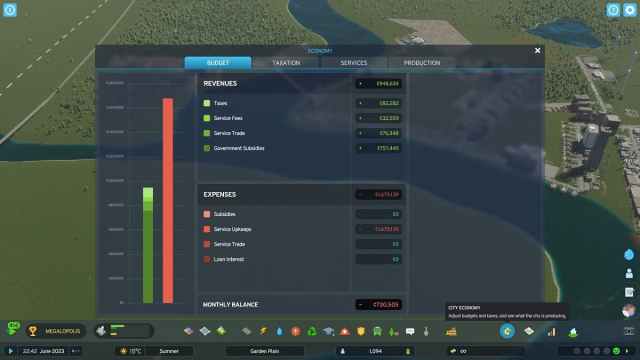
Budgeting is probably the hardest aspect of Cities: Skylines 2 to deal with, and that’s definitely why I use Infinite Money mode when I’m writing guides (but don’t if you want to pop achievements). It’s far too easy to use up all the money you start with if you’re not keeping track of where your money is going.
Keep an eye on your city economy page by clicking the money and cent icon in the bottom right of the screen or pressing “Z.” Here, you can see everything from taxes and service fees to service upkeep and loan interest rates. You’ll be in the red for a while, so don’t worry too much, but as you increase your population, you’ll creep up toward the green.
If you’re having trouble, consider increasing your taxes for a time to increase revenue. This will can make Cims angry and/or force them to leave the city, but it can be a good way to get some extra cash flow quickly. You can change tax rates by industry type and education level in the taxation menu. Click the dropdowns in each category for more options.
If your city is poor, you’ll receive government subsidies. This goes a long way to helping you build from a small burg to a bustling metropolis. Subsidies will decrease as you get more educated people in your city.
Related: How to Export Water in Cities: Skylines 2
9. Set Districts and Policies
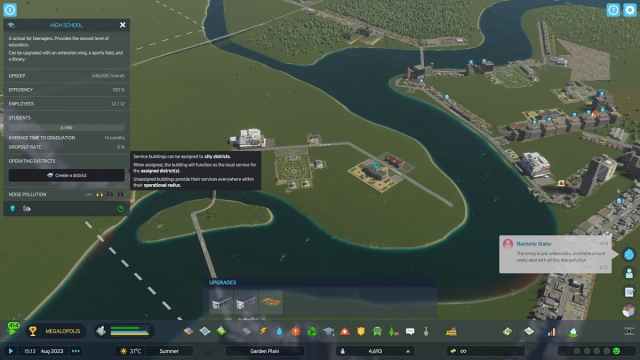
Public service buildings like schools and hospitals have the option to create an operating district. Once a district is created, you can assign other public service buildings to that district. This can help with traffic by localizing which school citizens go to or which police stations help each location.
But it also gives you the chance to set policies for your districts. This is where you can implement Heavy Traffic Bans and Combustible Engine Bans, along with other policies like Gated Communities to increase the well-being of citizens in that district.
You’ll get access to districts at Milestone 4: Grand Village. You can make as many as you like as large or as small as you like. There’s no limit to them beyond how you want your city to operate. I like to place Heavy Traffic bans in neighborhoods parallel to main four-lane arteries so trucks don’t take shortcuts through.
10. Upgrade Wisely
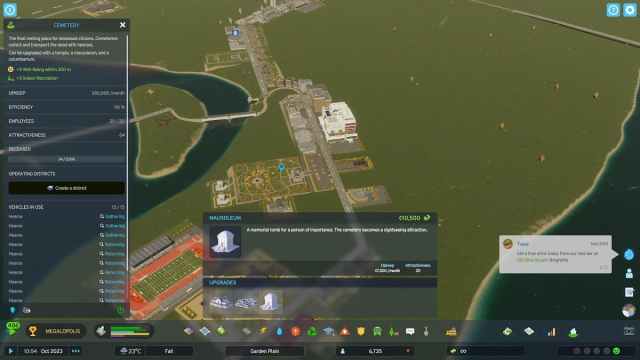
Finally, upgrades are tempting when you place buildings, but they can ruin your budget if you purchase too many early on. Upgrading increases the monthly upkeep cost of the building or structure you improved. As such, implementing too many can easily put revenues into a deficit as your city is still growing and just starting out with revenue options. You might not even be exporting goods or services yet since you have to meet the city’s demand for those resources first.
When you select a building, you see how much an upgrade to that building adds in monthly upkeep costs. This isn’t to say that you can’t get early upgrades at all. Just pay attention when you’re choosing them so that you don’t add too much of a burden on your budget when you might not get a high return on your investment through upgrades.
And those are 10 Tips for Beginners in Cities Skylines 2. This game has you continually learning, and even after I put in dozens of hours, I find something new every time I launch it. From here, check out our CS2 guide hub for more topics like how to get more high density demand or how to turn on developer mode.


Published: Nov 9, 2023 05:14 pm