Every area in Shadow Of The Tomb Raider is packed to the gills with secrets and puzzles, and the Serpent sections of the Hidden City are no exception.
The final Head Of The Serpent area oddly only has a single collectible, but it also features a truly obnoxious puzzle.
Haven’t been able to figure out the fire pillar puzzle yet? Read on for a full breakdown of how to get through the Head Of The Serpent!
Be sure to check out our other guides at the bottom of this page.
Head Of The Serpent Collectibles/Puzzle Guide
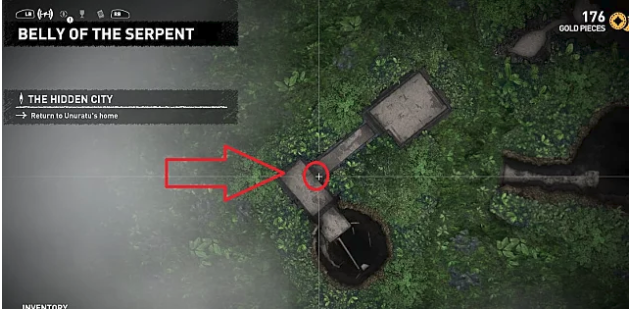
Accessing this area is particularly annoying, as the entrance has none of the usual hallmarks of an accessible opening. It doesn’t glow when using survival instincts, it doesn’t have any white markings, and it appears to be a dead end that can’t be interacted with in any way.
After climbing up the Belly Of The Serpent, Lara will see a cultist throw a body down the well, then turn around and close off the door so she can’t go anywhere. From the closed stone door, turn right and walk directly into the dead end.
You have to be in the middle of the cul-de-sac and walk forward into an area that just looks like a solid wall to initiate the cut scene where Lara crawls through the wedged section of dead bodies.
After stealth killing the cultist from behind, examine the body on the slab, then look for a section of wall off to the right where you can use your pickaxe to break through. From there, follow the path into the Head Of The Serpent’s first fire puzzle.
This region’s one and only collectible is a mural on the right side wall across from the rope-wrapped lever. Grab the mural, then use your bow to pull down the rope lever and fill the basin with bloody oil.
Walk back to the beginning of the room and interact with the dragon head to light the oil on fire and gain access to the area’s main puzzle.

The first fire puzzle was incredibly easy, while this one is a head-scratcher and takes some serious thought. It’s also really hard to get right by chance because the grooves don’t seem to visually line up properly even when you have it solved.
Ignore the lever, pool, and fire dragon mechanism at the top of the stairs for now. Instead, run down to the bottom where your path is blocked. Use a rope arrow to attach the two pillars so that when you rotate the left pillar, the right pillar will also move.
Walk over to the left pillar and rotate it until the right pillar’s grooves look exactly like the image below. Don’t worry about what position the left pillar’s grooves are in just yet.
On the right pillar, the lower groove should go into a hole, the right grooves shouldn’t be connected to anything, and the upper grove should travel to the basin in front of the obstacle.

Now, cut the rope connecting the two pillars so that the right pillar doesn’t move anymore. Go back to the left pillar and push it until it looks exactly like the image below.
Some of the grooves won’t lineup and go nowhere, but the top most groove of the triple section should lineup with the upper grove of the right pillar. Due to how the grooves look on the ground, it may not seem like they are fully connected, but if you follow the image below you’ll have it how it needs to be attached.
This lineup gives you a clear path for the oil to travel from the basin to the flammable obstacle.

Go back up the stairs and use your bow to pull down the rope lever that fills the basin with bloody oil. Run over to the other side and interact with the dragon statue to light the whole thing on fire and break the obstacle.
With that out of the way, you can finally get the artifact you’ve been searching for in the tombs of the Hidden City. Be prepared for an obnoxious chase sequence right after this that you’ll probably have to reload four or five times due to missing the timing with this game’s wonky controls.

Need help finding any other collectibles or completing the game’s challenge tombs? Check out our full list of a Shadow Of The Tomb Raider guides here!
Related Content:
- Shadow of the Tomb Raider Review
- Best Skills Guide
- Crypt Locations Guide
- Peruvian Jungle Collectibles Guide
- Complete Cozumel Collectibles Guide
- Trial Of The Eagle Collectibles Guide


Published: Sep 10, 2018 03:00 pm