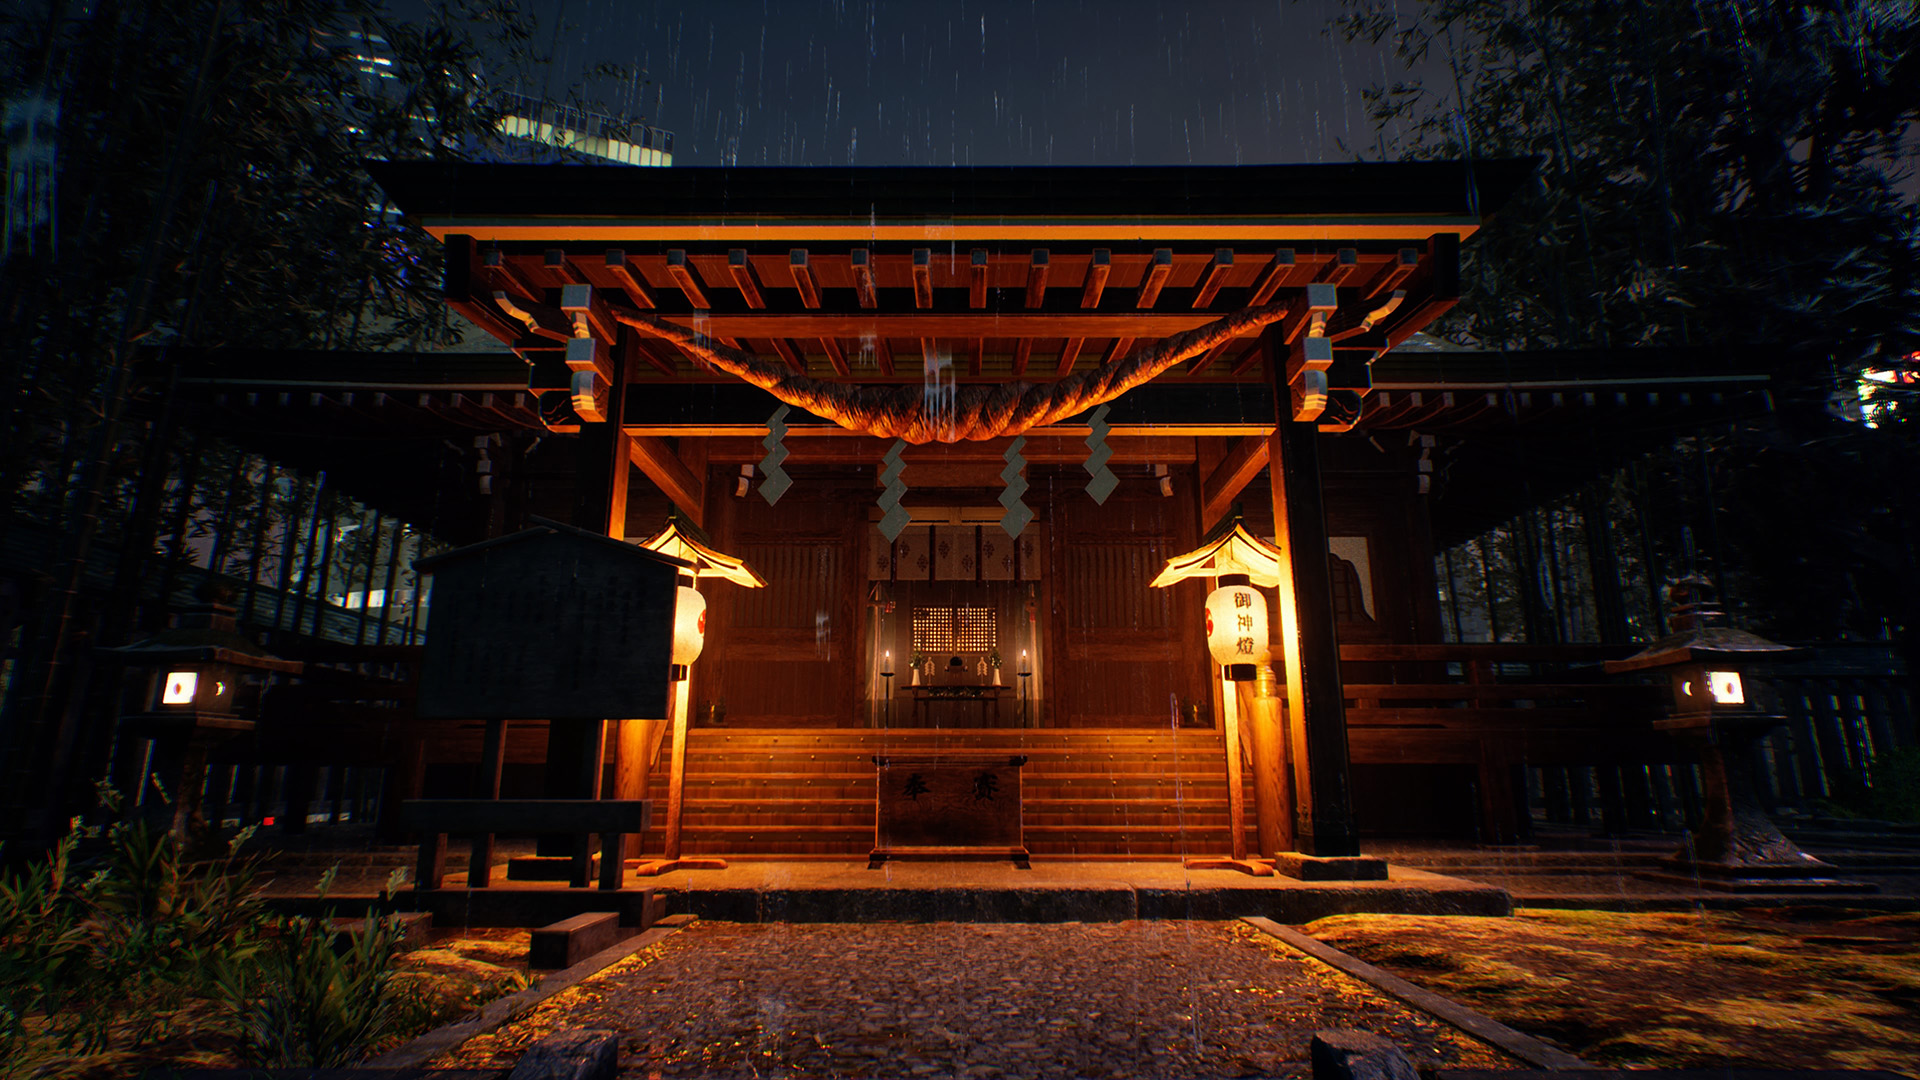
Torii Gates are an essential part of exploration and progression in Ghostwire: Tokyo. Cleansing them removes the fog barring you from various subregions, giving you access to new locations, hidden collectibles, trapped spirits, and important Prayer Beads. Some Shrine locations are marked on the larger world map very early in the game, while others won’t appear until you get further through the story.
There are 29 Torii Gates to cleanse in Ghostwire: Tokyo. Depending on the size of the Shrine, you may have to cleanse multiple smaller gates spread across a larger area or just one in a small space. Many of these Torii Gate locations reward you with Prayer Beads, valuable items that buff specific abilities or items, such as boosting fire-elemental attacks or the attack power of your bow.
What’s more, there are often collectibles at Torii Gates themselves, not just the surrounding area made accessible by removing the fog. The first several Torii Gates give you items like Katashiro and powers such as Fire Weaving.
Many Torii Gates also have Relics hidden in their Shrines or on the immediate grounds, while Torii Gates have Voice Logs lying about or some of KK’s Investigation Notes hidden around.
And while Torii Gates do not keep a log of all collectibles in their territory, you can keep track of the number of Jizo Statues, Investigation Notes, Tanuki, and Magatama you’ve already found. You can also see how many spirits you’ve transferred in a particular area, as well. Finally, Torii Gates give you access to fast travel in Ghostwire: Tokyo. Simply hover over their icons on the map to find this information and the prompts for fast travel.
Last but perhaps not least, you’ll also receive two trophies or achievements for cleansing Torii Gates: Opening a Path for cleansing your first Torii Gate and Liberator for cleansing all Torii Gates.
Where to Find All Torii Gates & Shrines in Ghostwire: Tokyo
Akisawa Torii Gate Shrine
- Reward: Katashiro.
This is the first Torii Gate Shrine you’ll cleanse in Ghostwire: Tokyo. It’s part of the Chapter 2 mission, Clearing the Fog. It’s 102 meters south/southwest of Shibuya Central Hospital, to the right of the El Dorados Hotel.
Namita Shrine
- Reward: Katashiro.
Namita is the second Torii Gate Shrine you’ll cleanse, and it’s found 152 meters south of Akisawa. It’s on top of a beige apartment building when you first learn how to grapple onto Tengu. It’s part of the Chapter 2 mission, A Maze of Death. You can get this a little bit earlier, but you must come here on your way to Shiroyama.
Shiroyama Shrine
- Reward: Fire Weaving.
Shiroyama Shrine will be the first large Torii Gate complex you cleanse, with gates guarded by enemies spread across a large area. This is also the first Torii Gate where you’ll find an Offering Box and Omikuji.
Offering Boxes allow you to donate money for various wishes, such as finding more Jizo Statues or Tanuki. Omikuji give you random buffs for a small fee. Both are related to other trophies and achievements.
Shiroyama is a Landmark of its own and can be found 130 meters southeast of Namita Shrine, across the street diagonally southeast from the Tsukinami Restricted Area.
Yashin Shrine
- Reward: Water Weaving.
Yashin Torii Gate Shrine can be found during Chapter 2, A Maze of Death, as well. It is 126 meters northeast of Shiroyama, found at the bottom of a block-wide and block-long construction zone. As with the others so far, it is part of the critical path and required to push back the fog to move forward.
You’ll arrive in the area on the top floor of the construction zone; simply follow the scaffolding down to the very bottom, where you’ll find the Shrine in a rock wall between two tall support walls.
Kuo Shrine
- Reward: Stun Talisman.
Kuo Shrine is found 150 meters southeast of Yashin in the Shibuya Kagerie Retail Complex. You’ll come to this Torii Gate during Chapter 2’s The Buried Life mission, when you’re tasked with climbing to the top of the complex to find some tourist binoculars.
Morite Shrine
- Reward: Archery Beads.
The Morite Shrine is in a back alleyway 124 meters north/northwest of Yashin Torii Gate. It is in the city block between the 429 Landmark and the Shibuya Scramble Crossing Landmark, south of the road that connects them. Look for the smaller red Torii Gates on either side of the area to lead you to it near a Nekomata Shop.
It becomes available after looking through the Tourist Binoculars during A Maze of Death in Chapter 2.
Hirokawa Shrine
- Reward: Sleuth Beads 2.
You can see the Hirokawa Torii Gate Shrine at the very beginning of the game, but it doesn’t become available until after completing The Buried Life mission in Chapter 2. You must cleanse it as part of The Caves of Steel mission and is the first primary objective. Just follow KK’s spirit trail.
Matsumi Shrine
- Reward: Archery Beads (2).
Like the Hirokawa Shrine, you can also see Matsumi Torii Gate Shrine at the beginning of the game, but it’s locked behind the fog. It becomes available after cleansing Hirokawa Shrine and completing Chapter 2. Matsumi Shrine is on top of a beige, brick corner office building 140 meters northeast of Hirokawa. It is diagonally across from a short grey office building with Hush, Tulitobucks, and Kadami signs.
Utagawa Shopping District Torii Gate

- Reward: N/A; opens more of the map.
The Utagawa Shopping District Torii Gate will become available during Chapter 3’s Blindness mission, though you’ll first come to the area during Pillars of Light. It’s part of the critical path and impossible to miss.
Its location is 444 meters north/northwest of Kuo Shrine and 117 meters north of the Sengokuzaka Landmark.
Utagawa is a Landmark itself; the area is marked by a large red, white, and black sign at the top of a large set of descending stairs. The area narrows with shops and apartments on either side at the bottom of the stairs, with the Torii Gate separating it from an even tighter area of homes.
Yamaki Shrine
- Reward: Aqua Beads.
The Yamaki Shrine becomes available after completing the Chapter 3 mission, Blindness. This Torii Gate is part of the critical story path during the Agony mission, and its location is about 115 meters east of Apartment Building C on top of a building across the street east from the Kirigaoka Water Tower Landmark.
Kirigaoka Shrine

- Reward: Flame Beads.
Kirigaoka Shrine can be accessed after cleansing Yamaki Shrine. Kirigaoka Torii Gate is part of the critical path during the Chapter 3 mission, Agony. Its location is 102 meters northwest of Yamaki, in the north-central portion of the map.
Hitani Shrine
- Reward: Spirit Perception Beads.
The Hitani Shrine looks as though it can be accessed following the Blindness mission in Chapter 3, but it actually stays covered in fog until you cleanse Kirigaoka. This Torii Gate location is roughly 155 meters southwest of Kirigaoka, along the river that separates the northern part of the map from the central.
It is wedged between a building under construction and a cemetery; there is a Kawasemi parking lot behind it along the river.
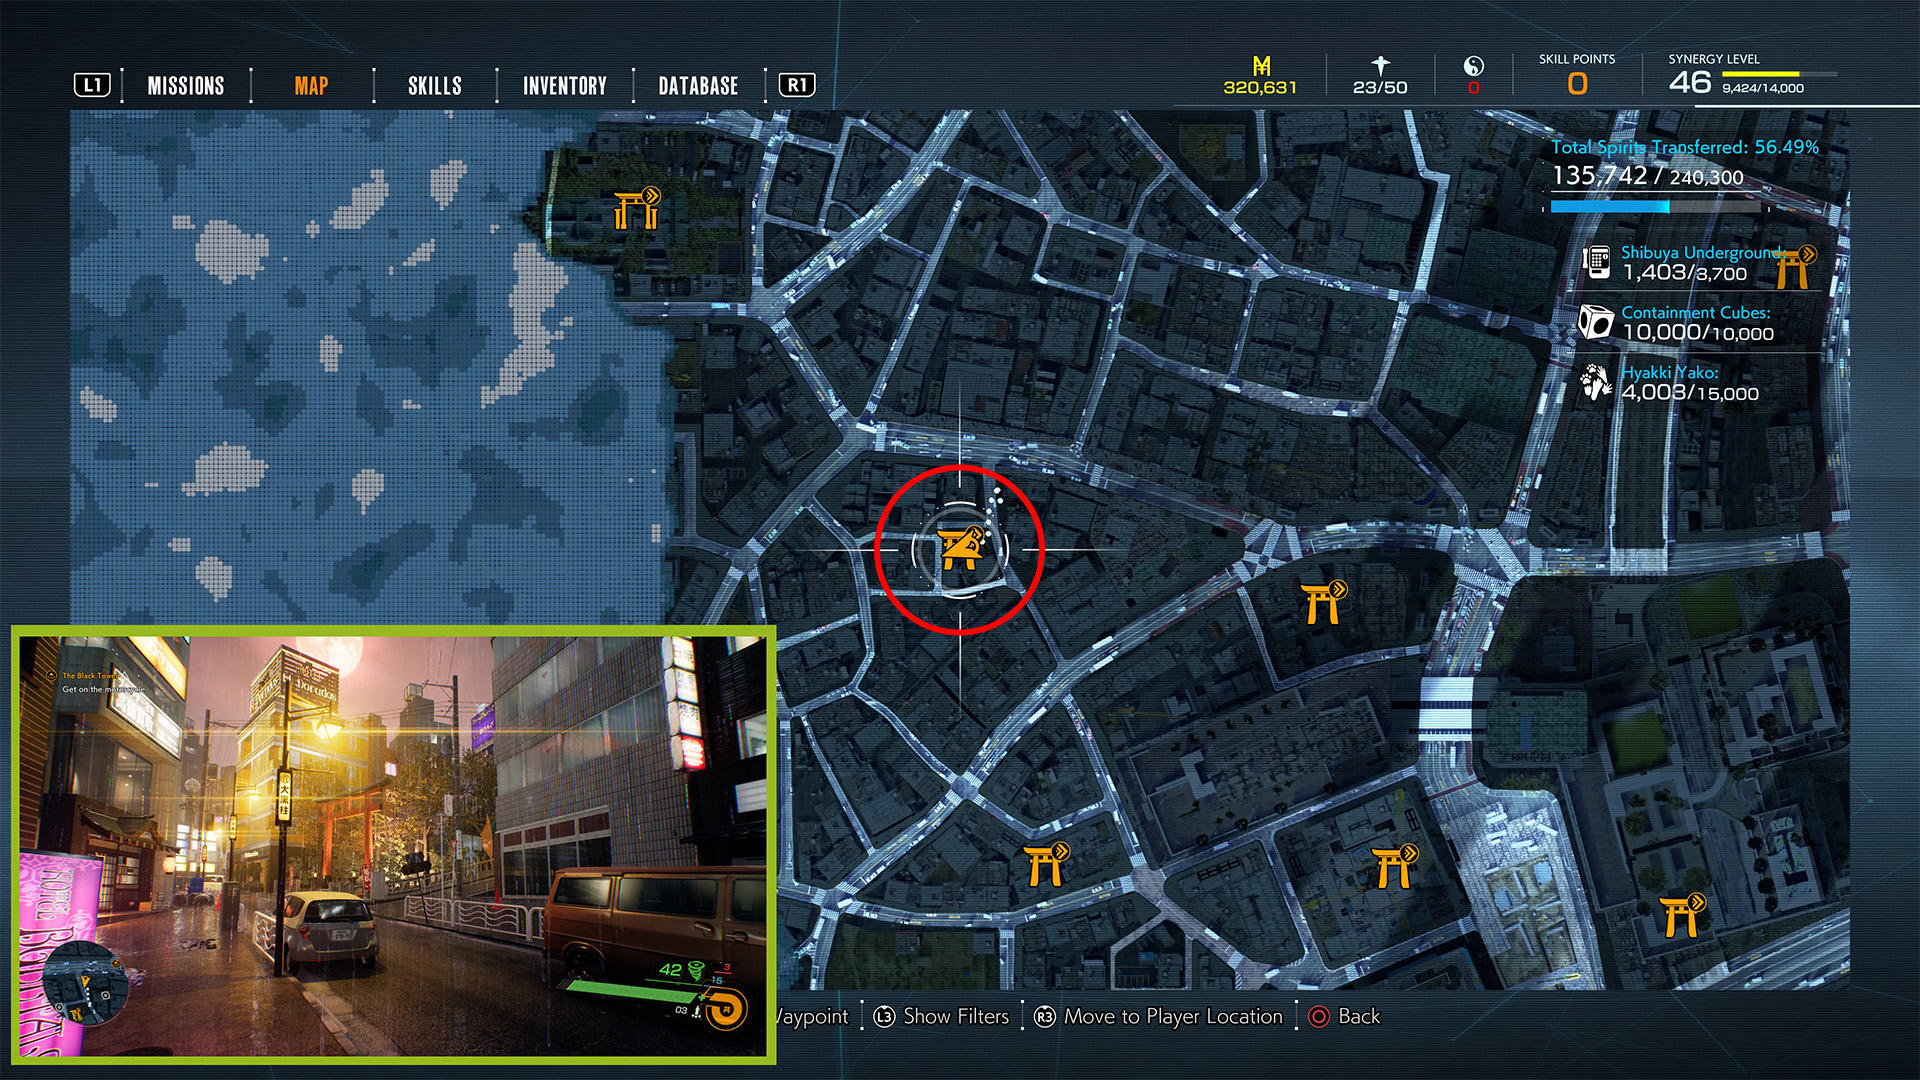
Namihara Shrine
- Reward: Archery Beads (3).
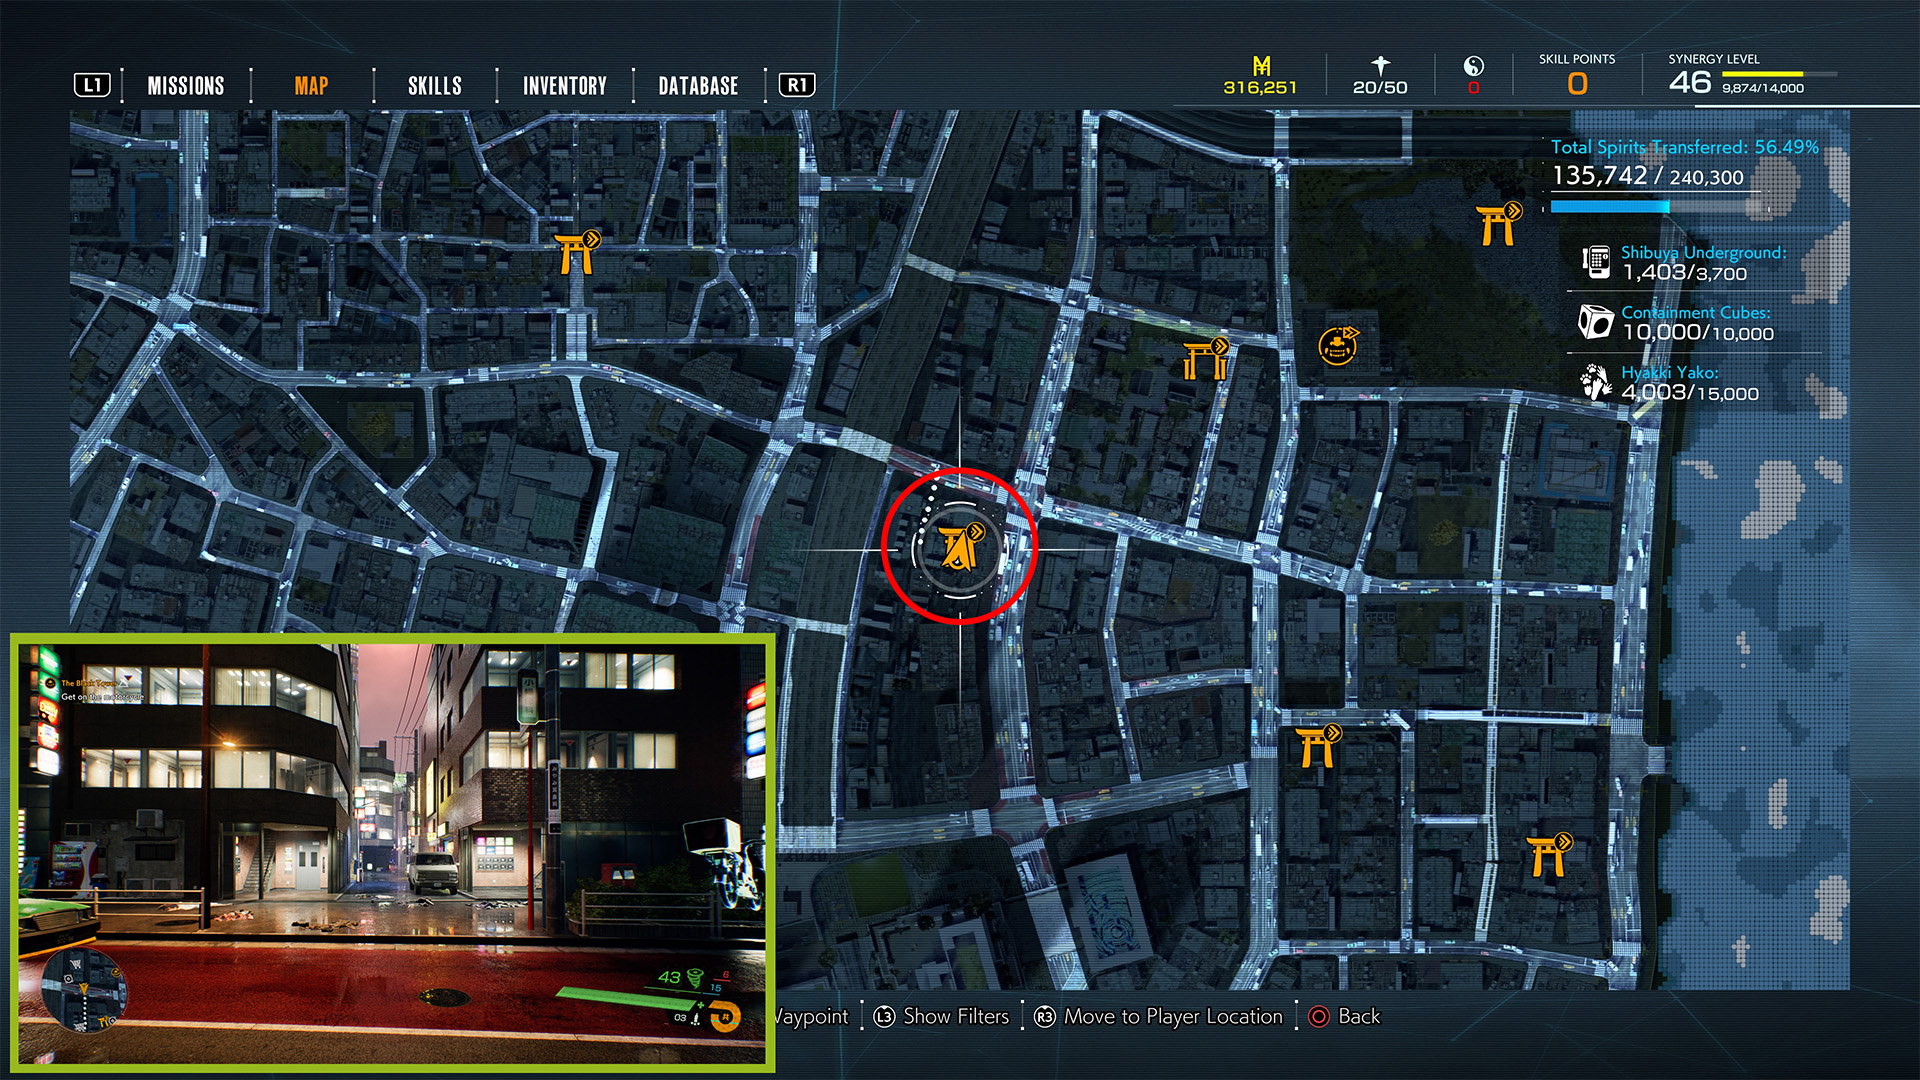
Cleansing Hitani Shrine opens a path through the fog to Namihara Shrine, roughly 230 meters northwest of Hitani. This Torii Gate location is at an intersection of a larger two-lane heading roughly north-south with a side street roughly heading east-west.
The Torii Gate itself is on the sidewalk of the larger road on the western side, Byte Print and On stores to its left. There is a payphone opposite it (east), as well as a white van and moving truck at the crosswalk. A green compact car is parked in the street.
Toyoi Shrine
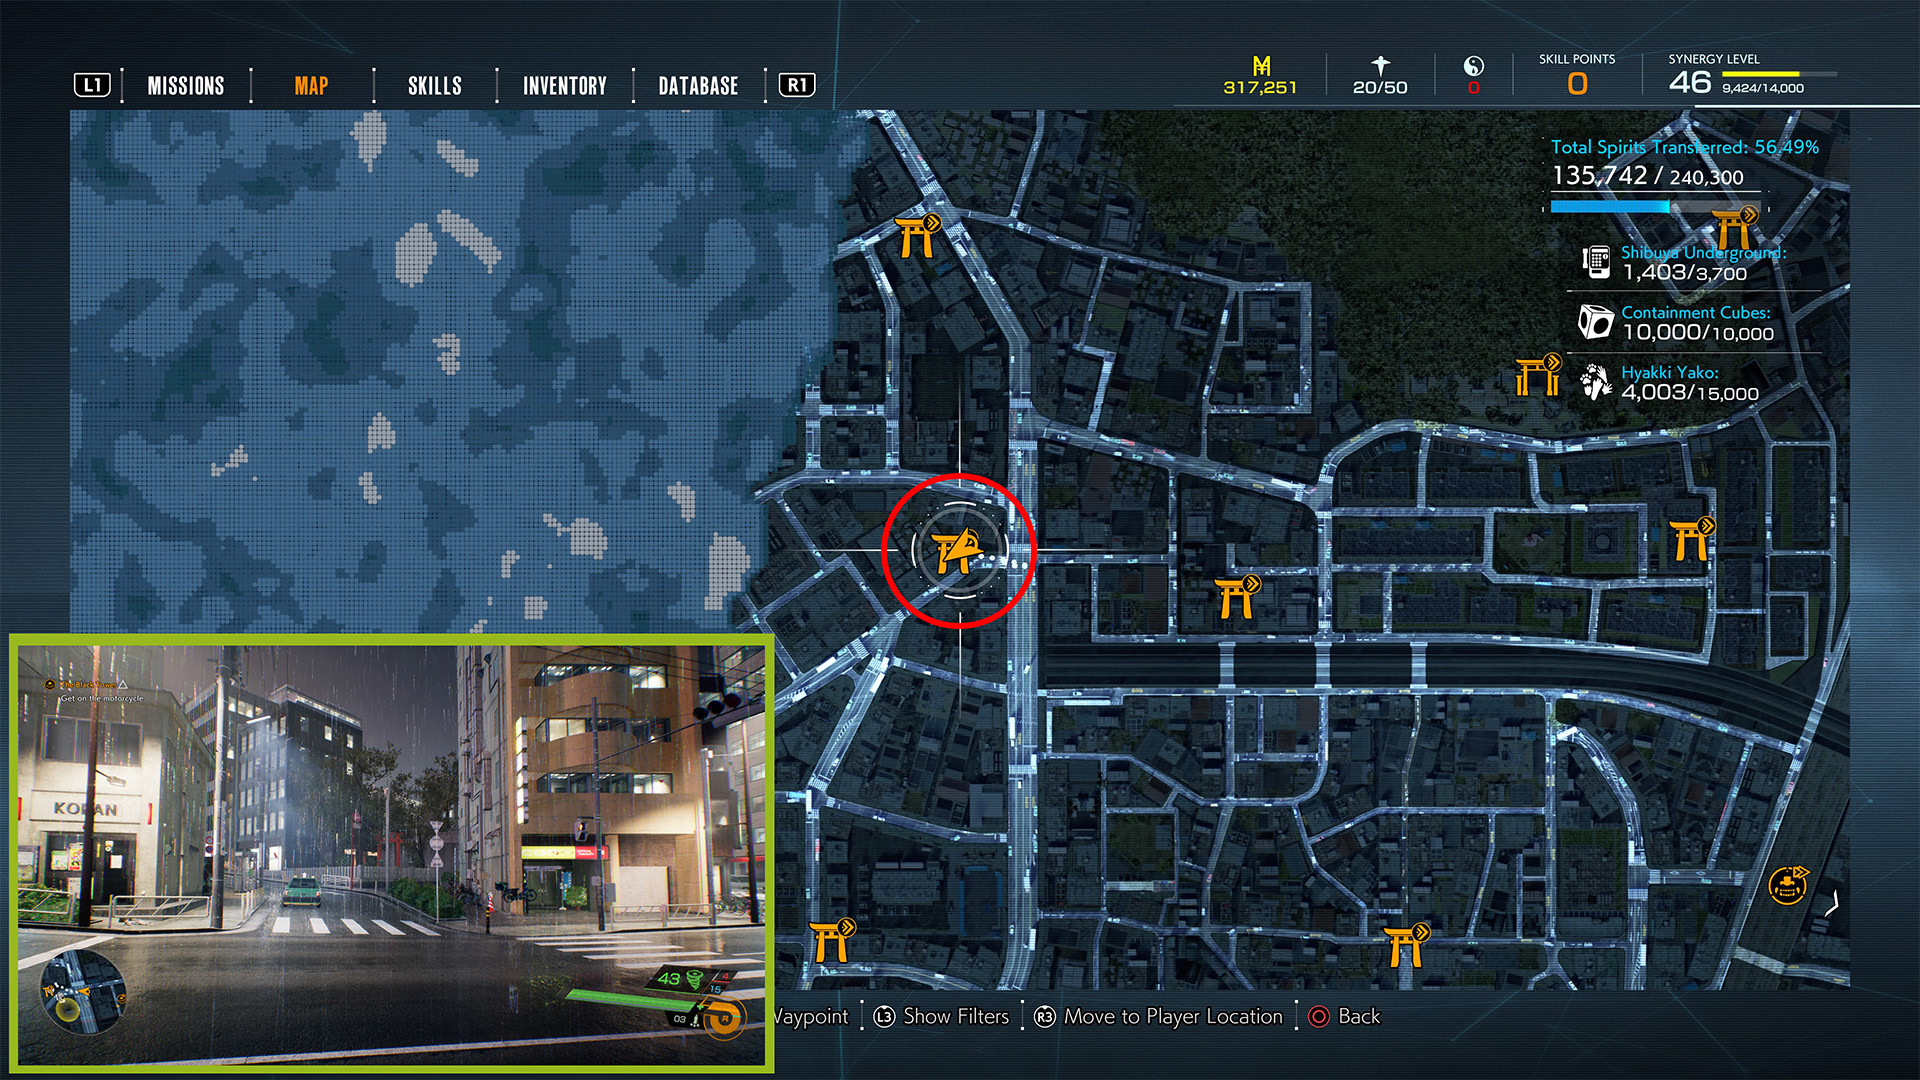
- Reward: Aqua Beads (2).
After cleansing Namihara Shrine, you can either go to Toyoi to the south or Hatsuike Shrine to the north. We chose to go south, then back north, but either way works.
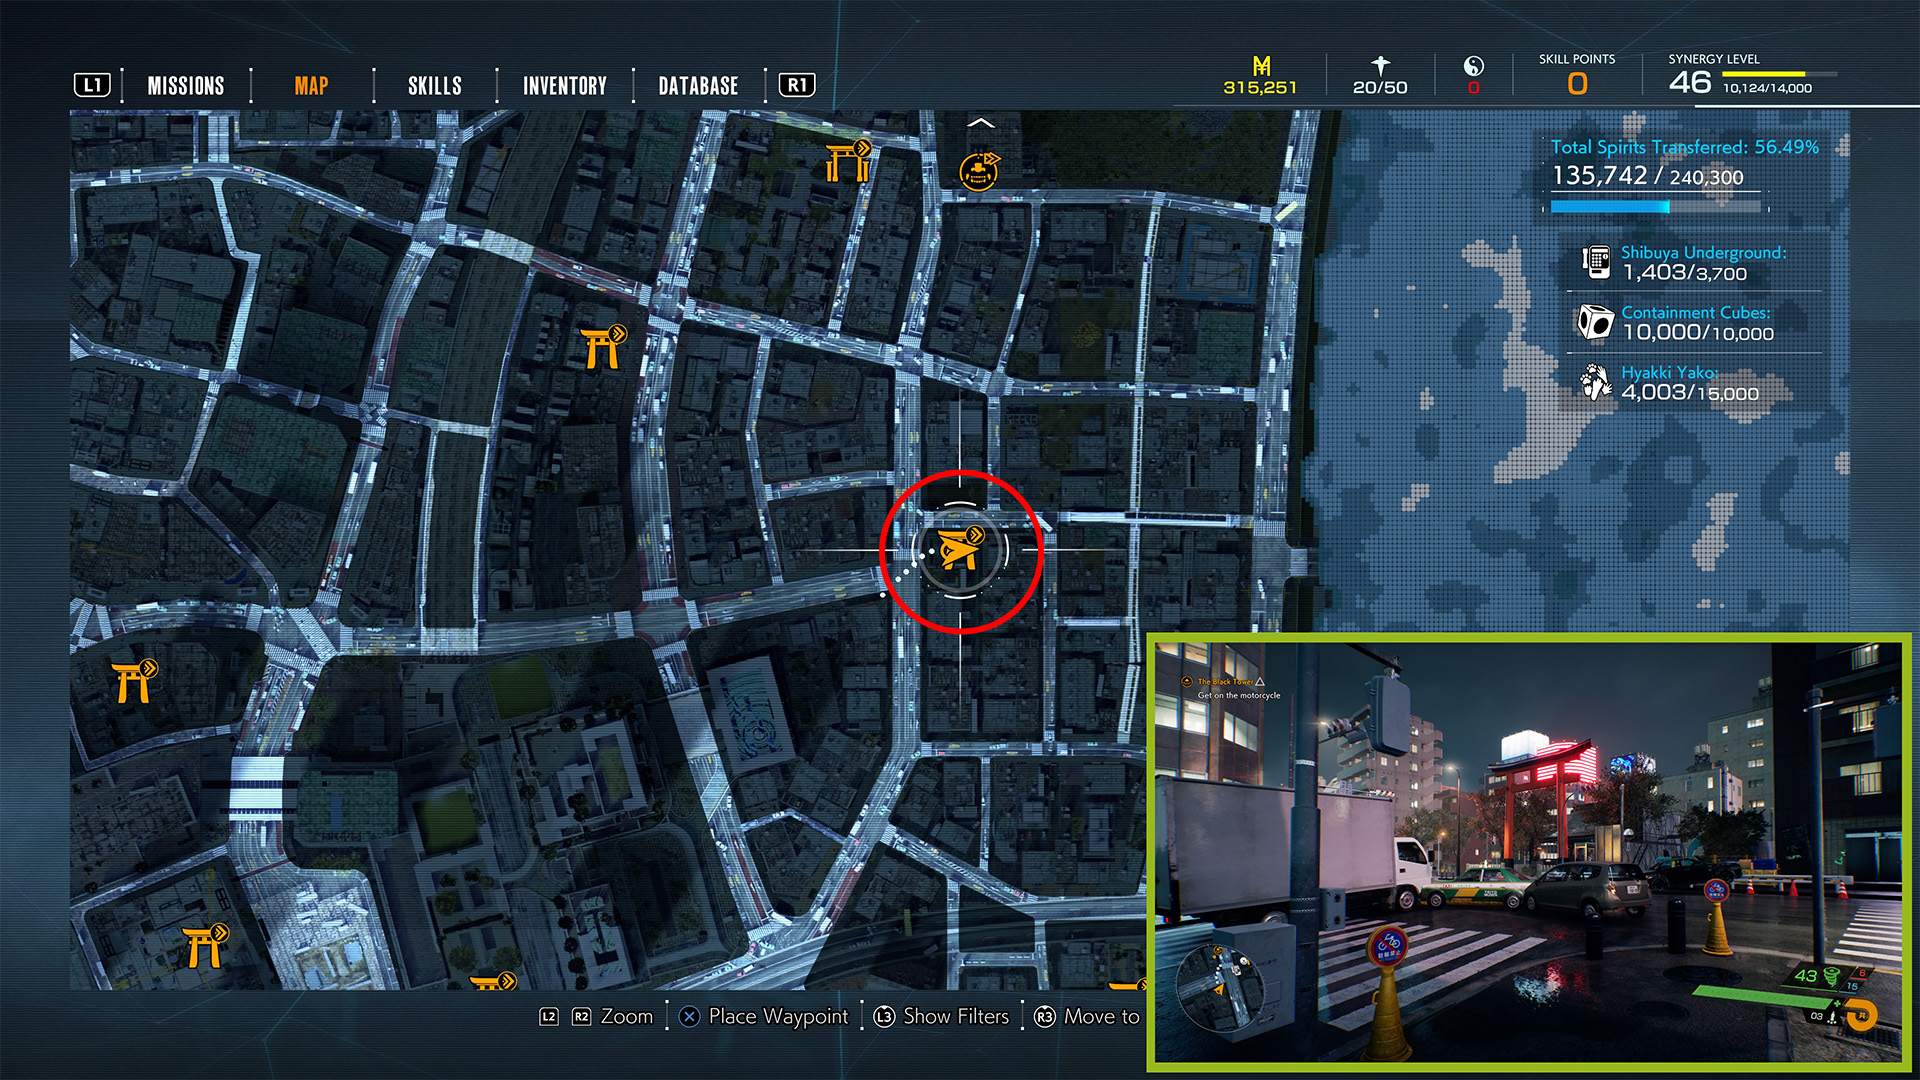
Regardless, Toyoi’s location is 145 meters south of Namihara. It is on a two-lane side street off of a major four-lane road going north-south from Namihara. The Torii Gate is behind a beige building with an optometry business on the ground floor and diagonally across the street from a grey structure with a Koban business in it. There is a green taxi parked near a payphone, as well.
Hatsuike Shrine
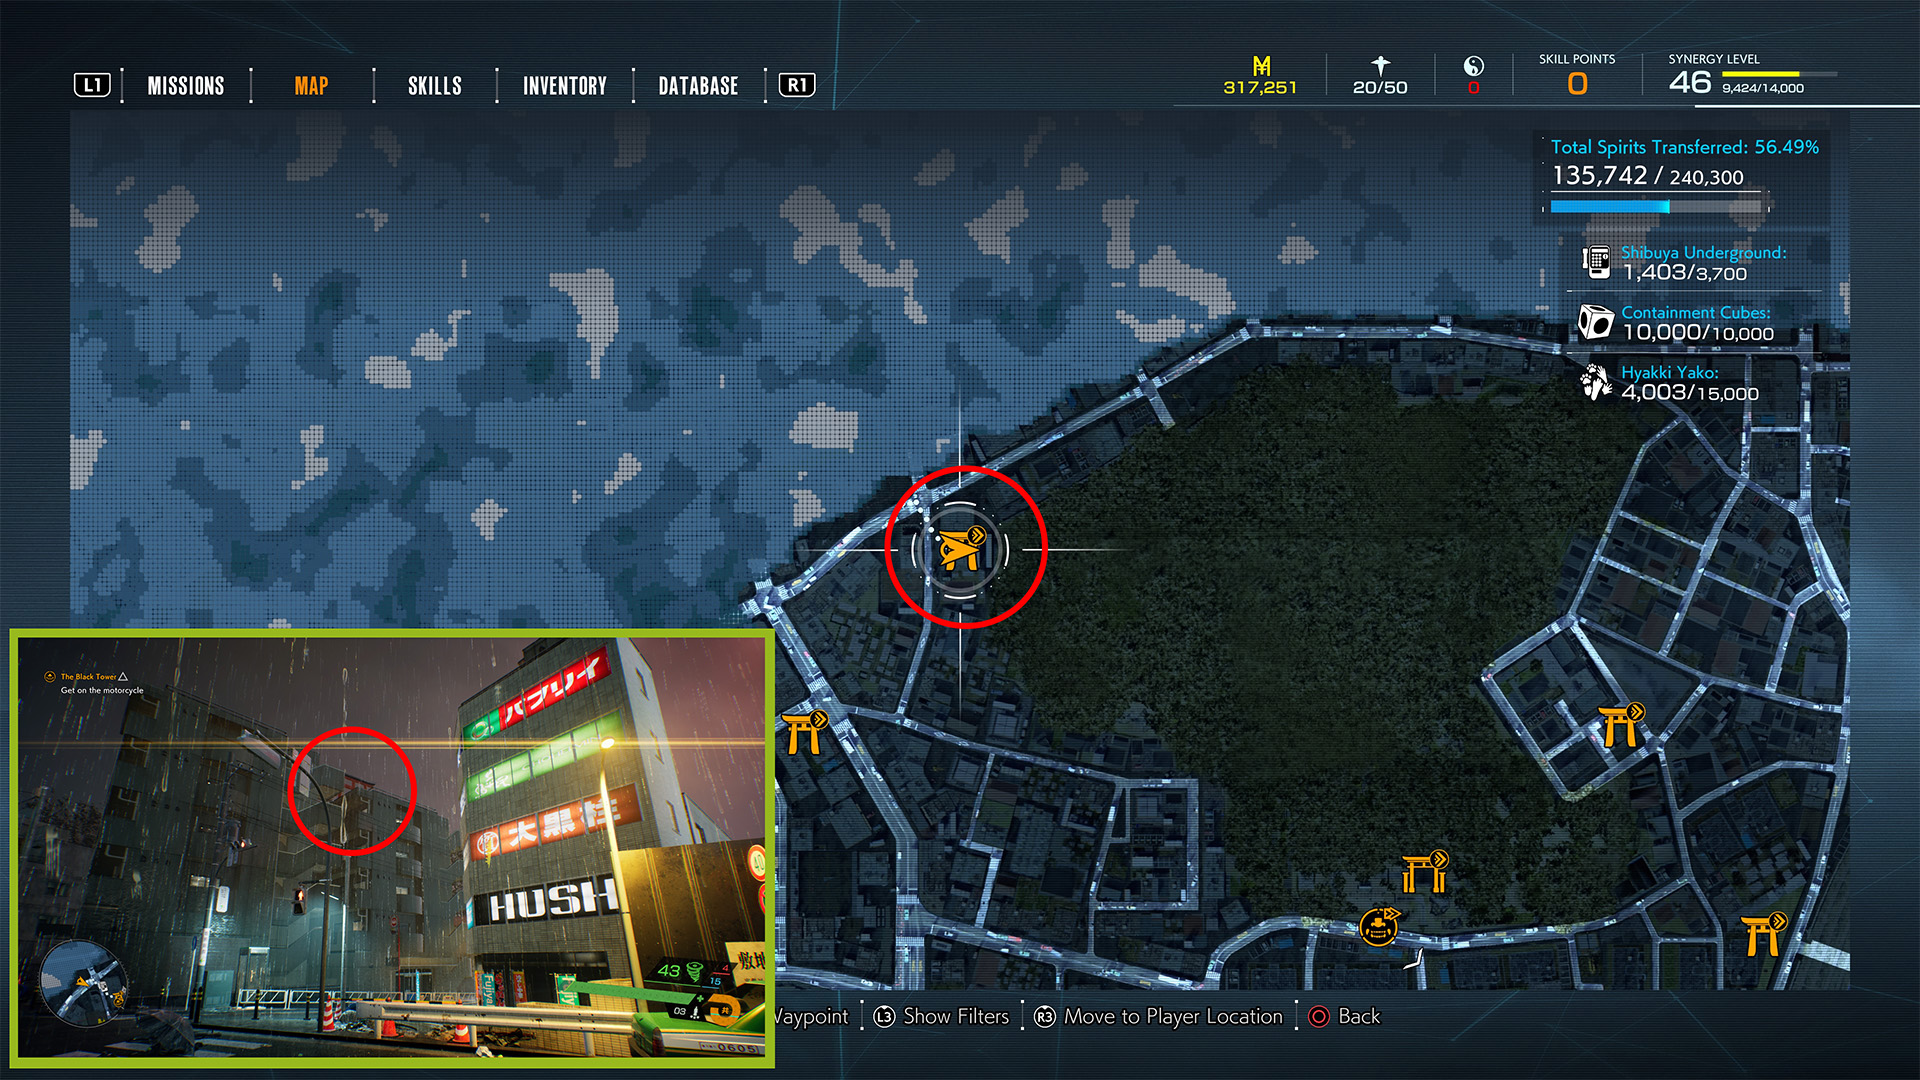
- Reward: Gust Beads (2).
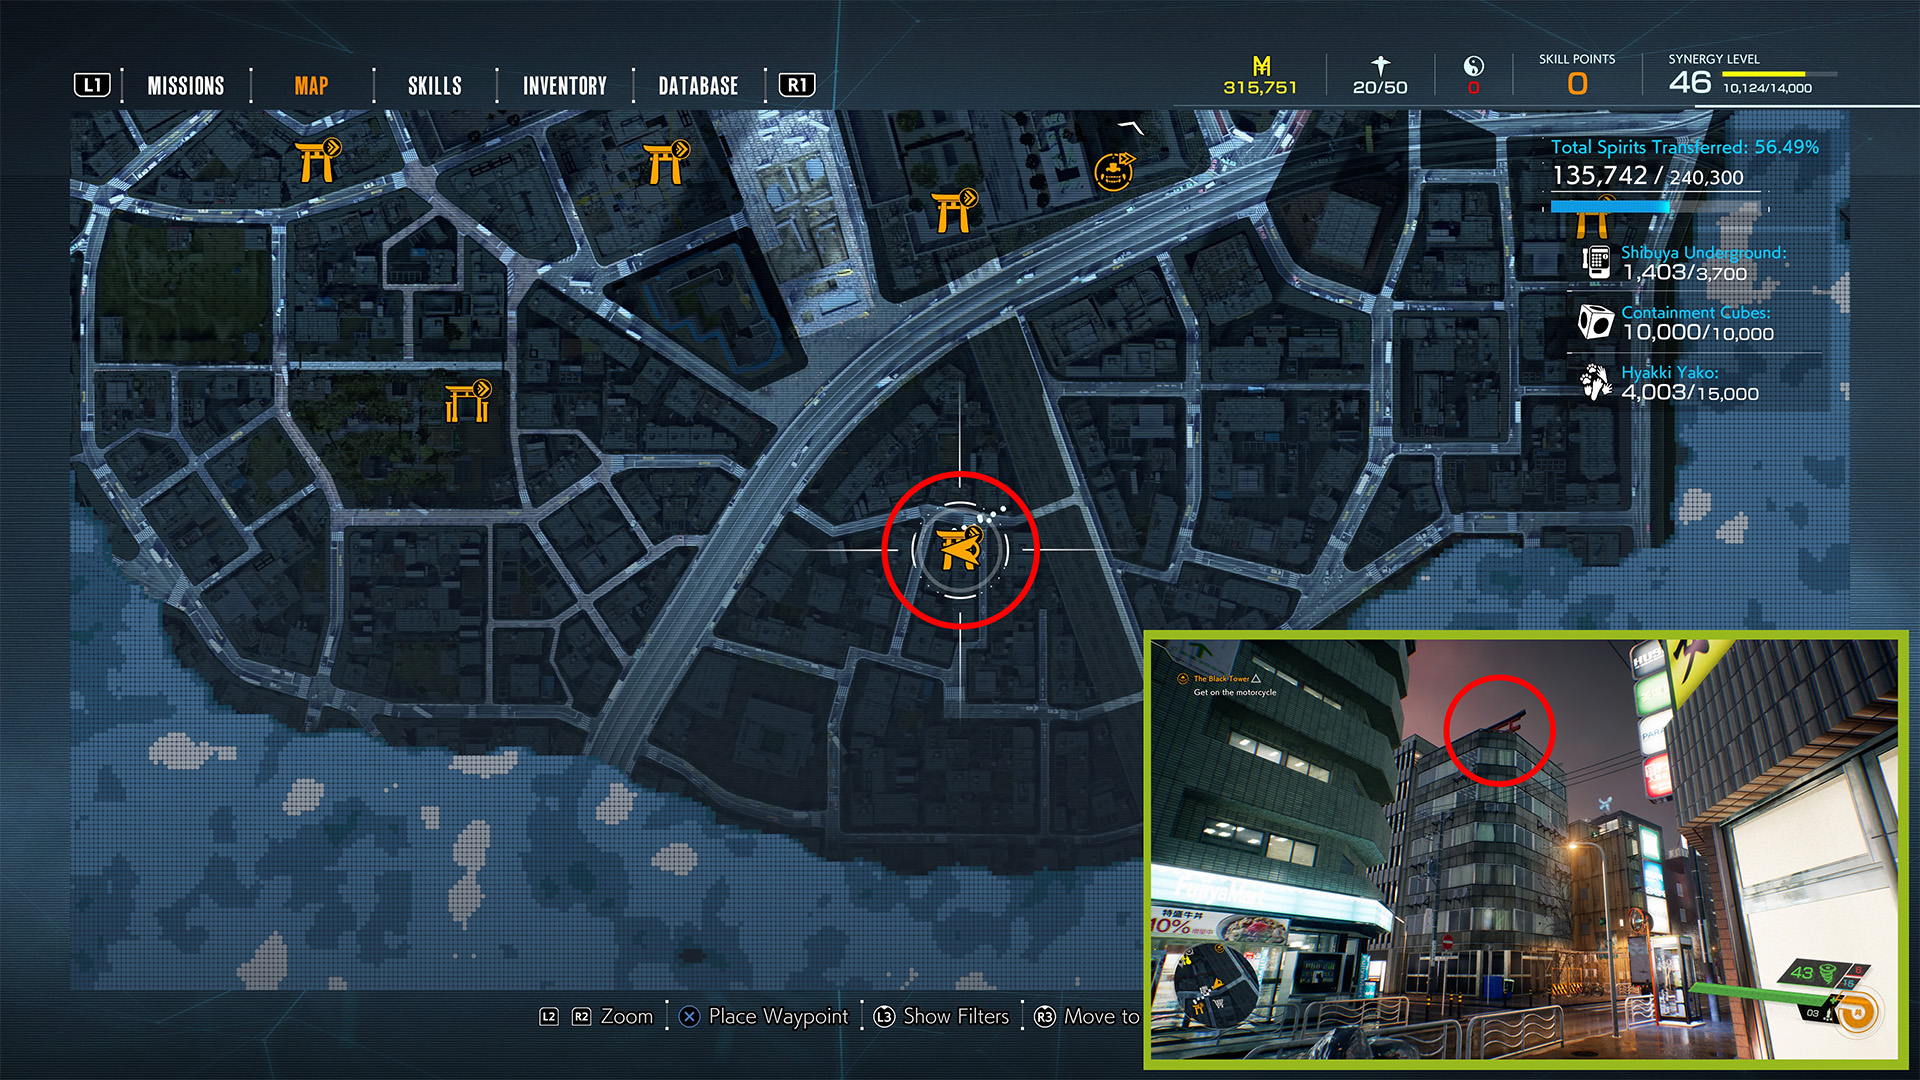
Hatsuike Shrine is 100 meters northeast of Namihara, on the roof of a grey-brick apartment building across from a gas station to the northwest. There is a beige-brick building across the street west of it with four digital signs for Fujiya Mart and Hush, among others. There is also a construction site with a yellow crane just to the northwest of the Torii Gate location.
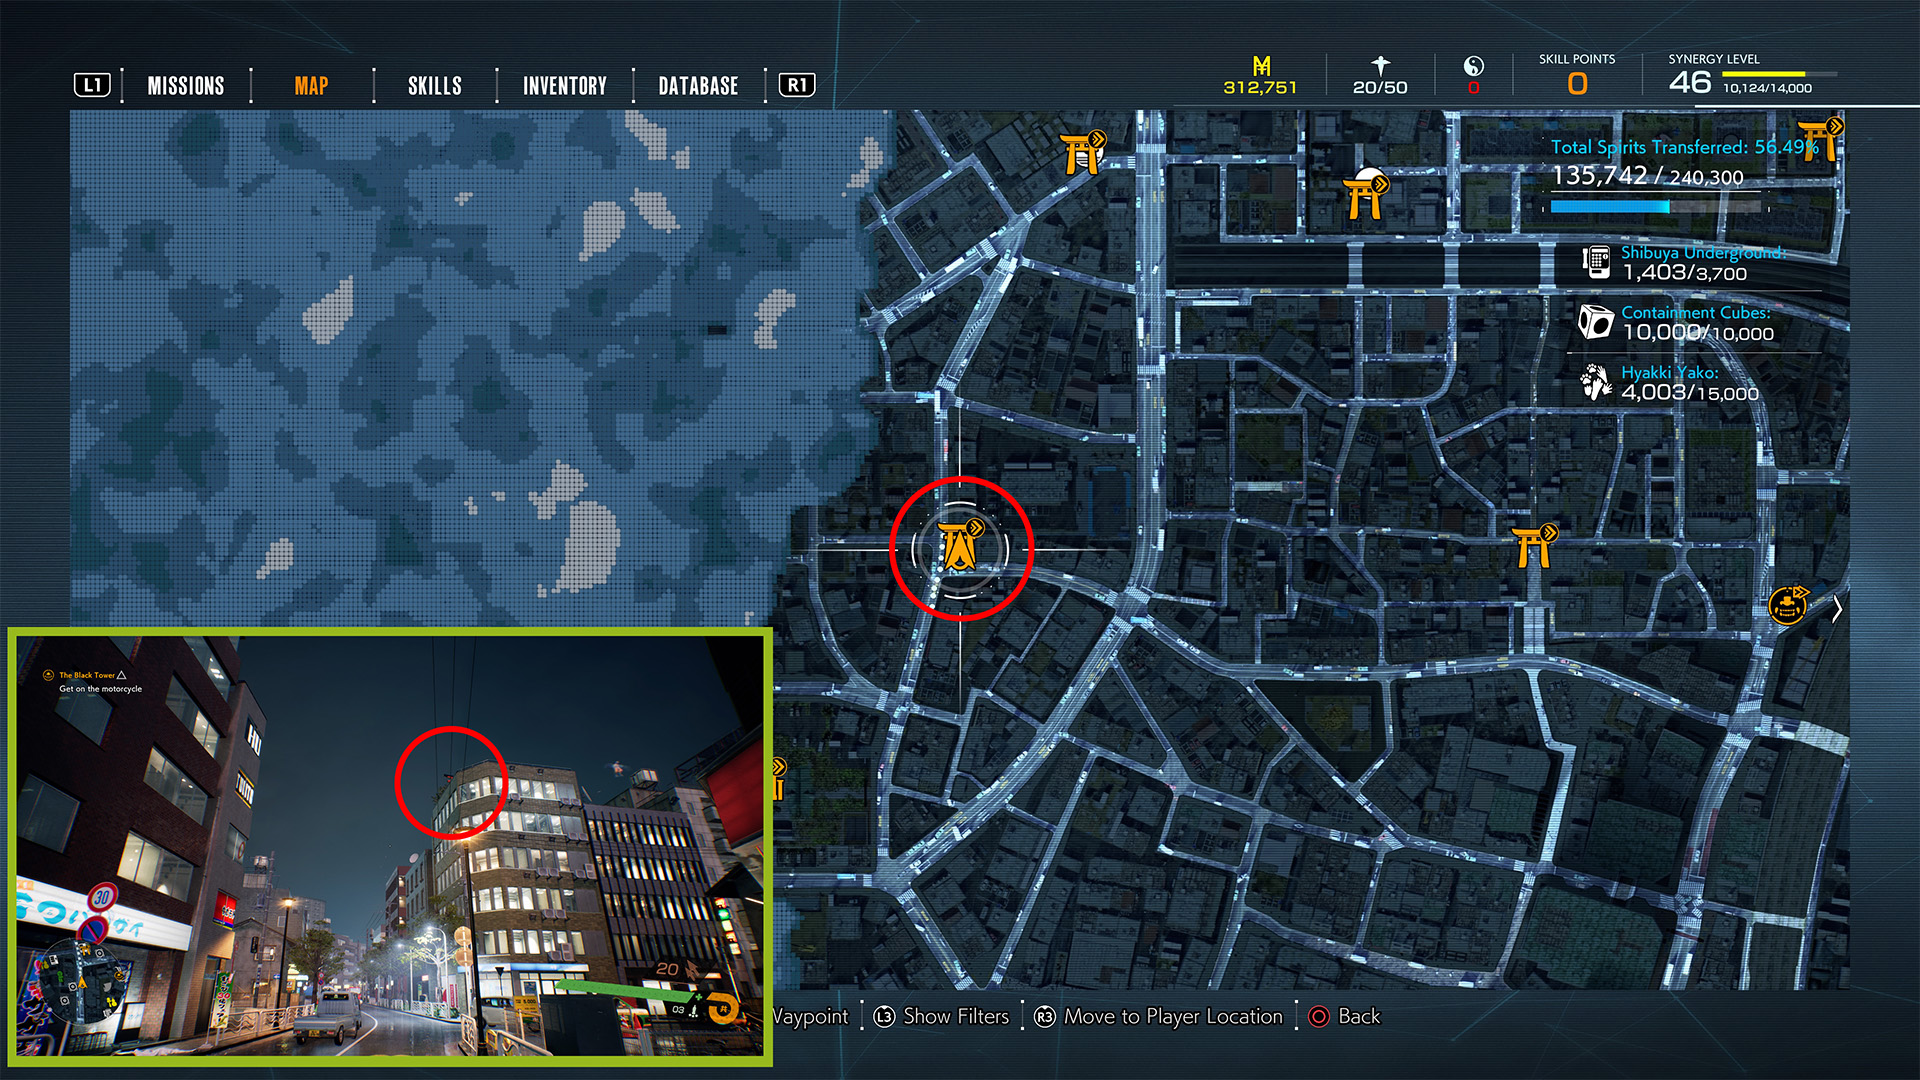
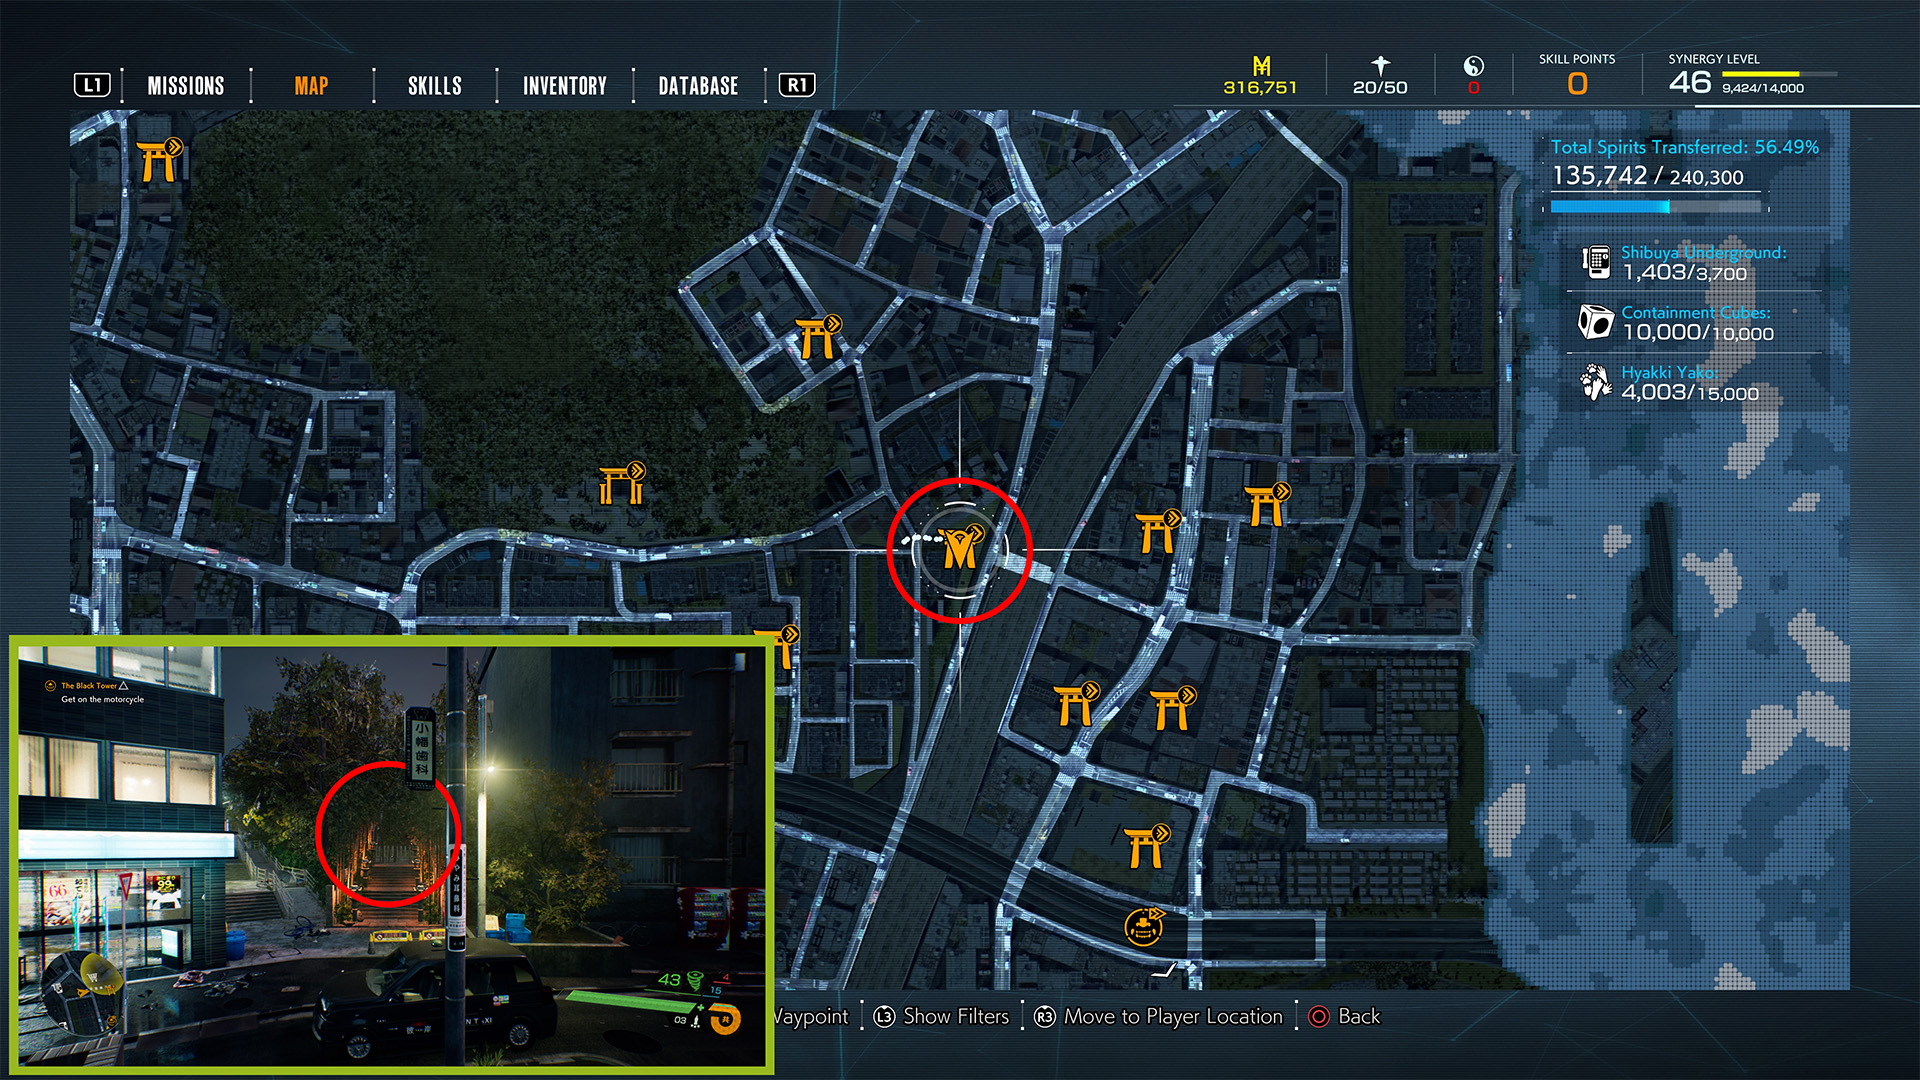
Chishima Shrine
![]()
- Reward: Prosperity Beads.
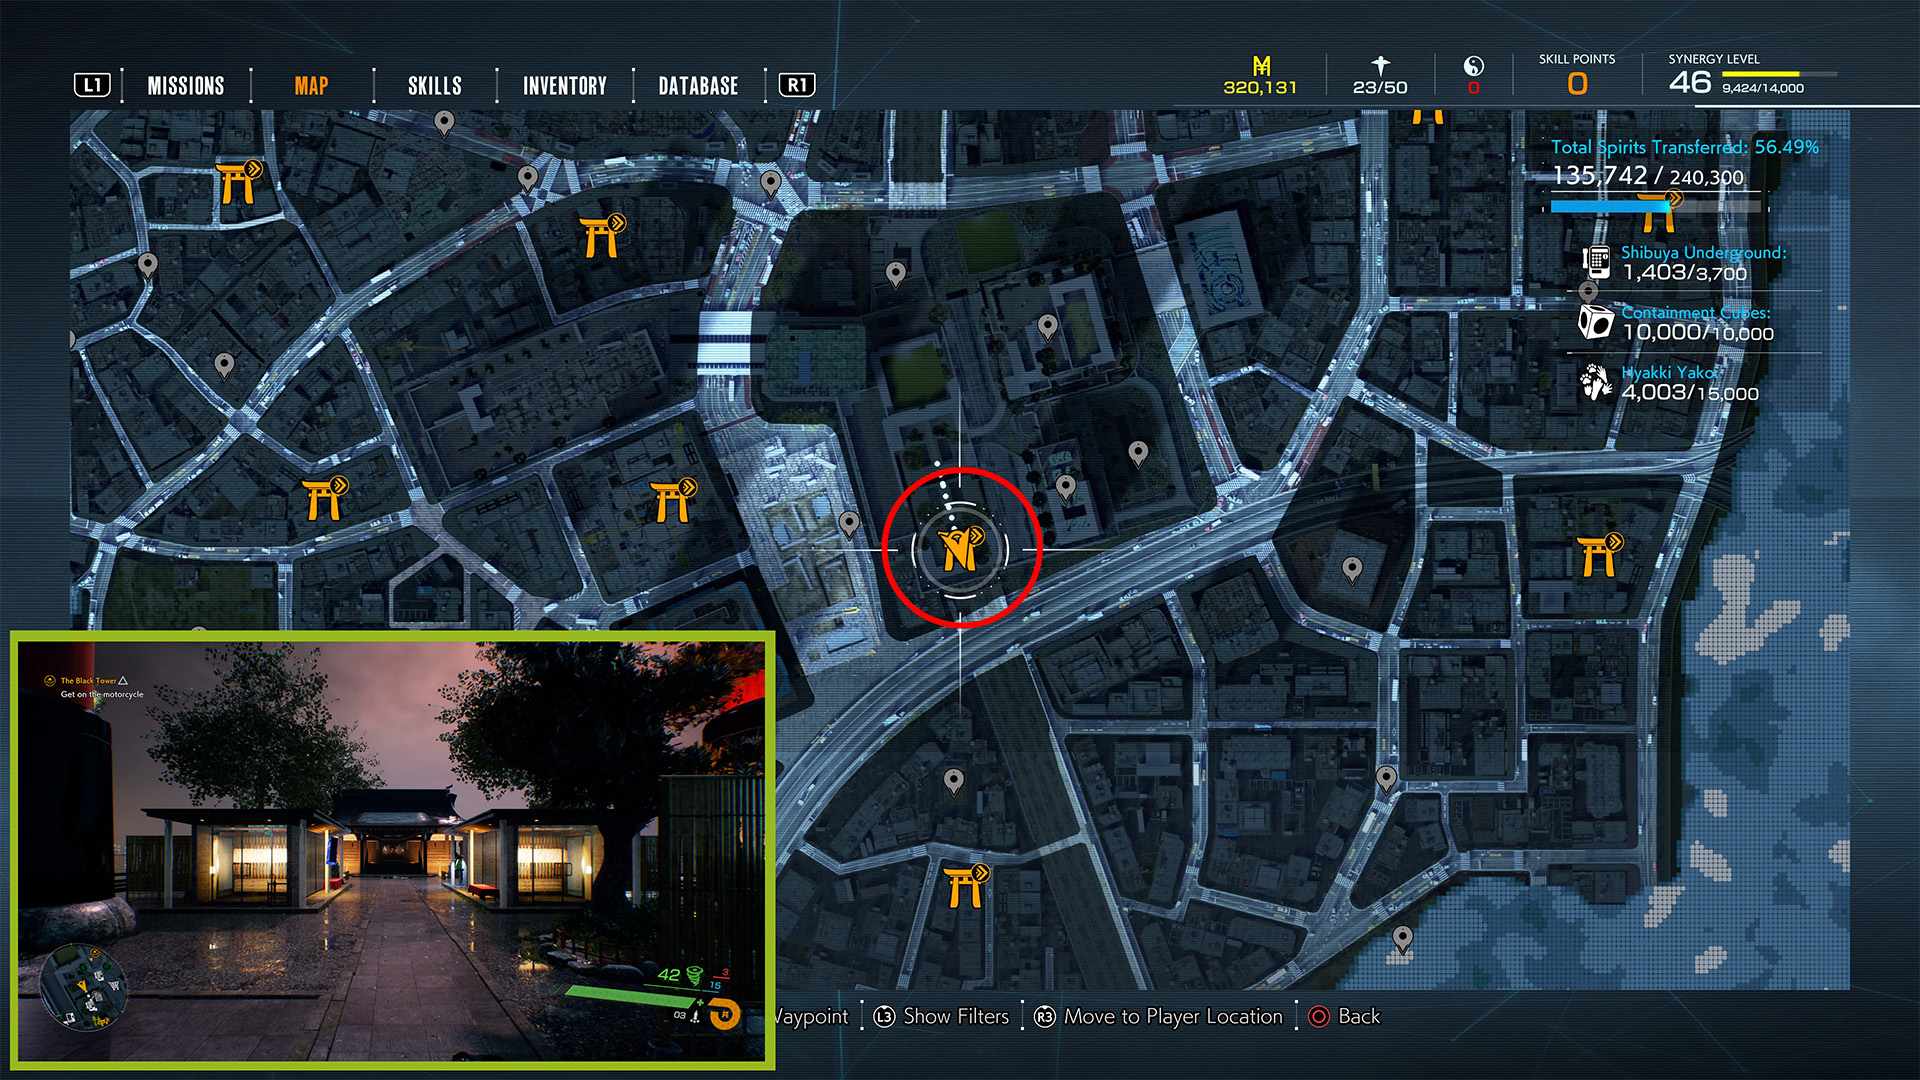
Chishima Shrine becomes available starting Chapter 4 and checking the payphone during the Giants mission. Its location is 110 meters northeast of Kirigaoka Shrine at a four-way intersection of small streets in a neighborhood. Chishima Torii Gate is across the street west/southwest of a park and near a bicycle parking area.
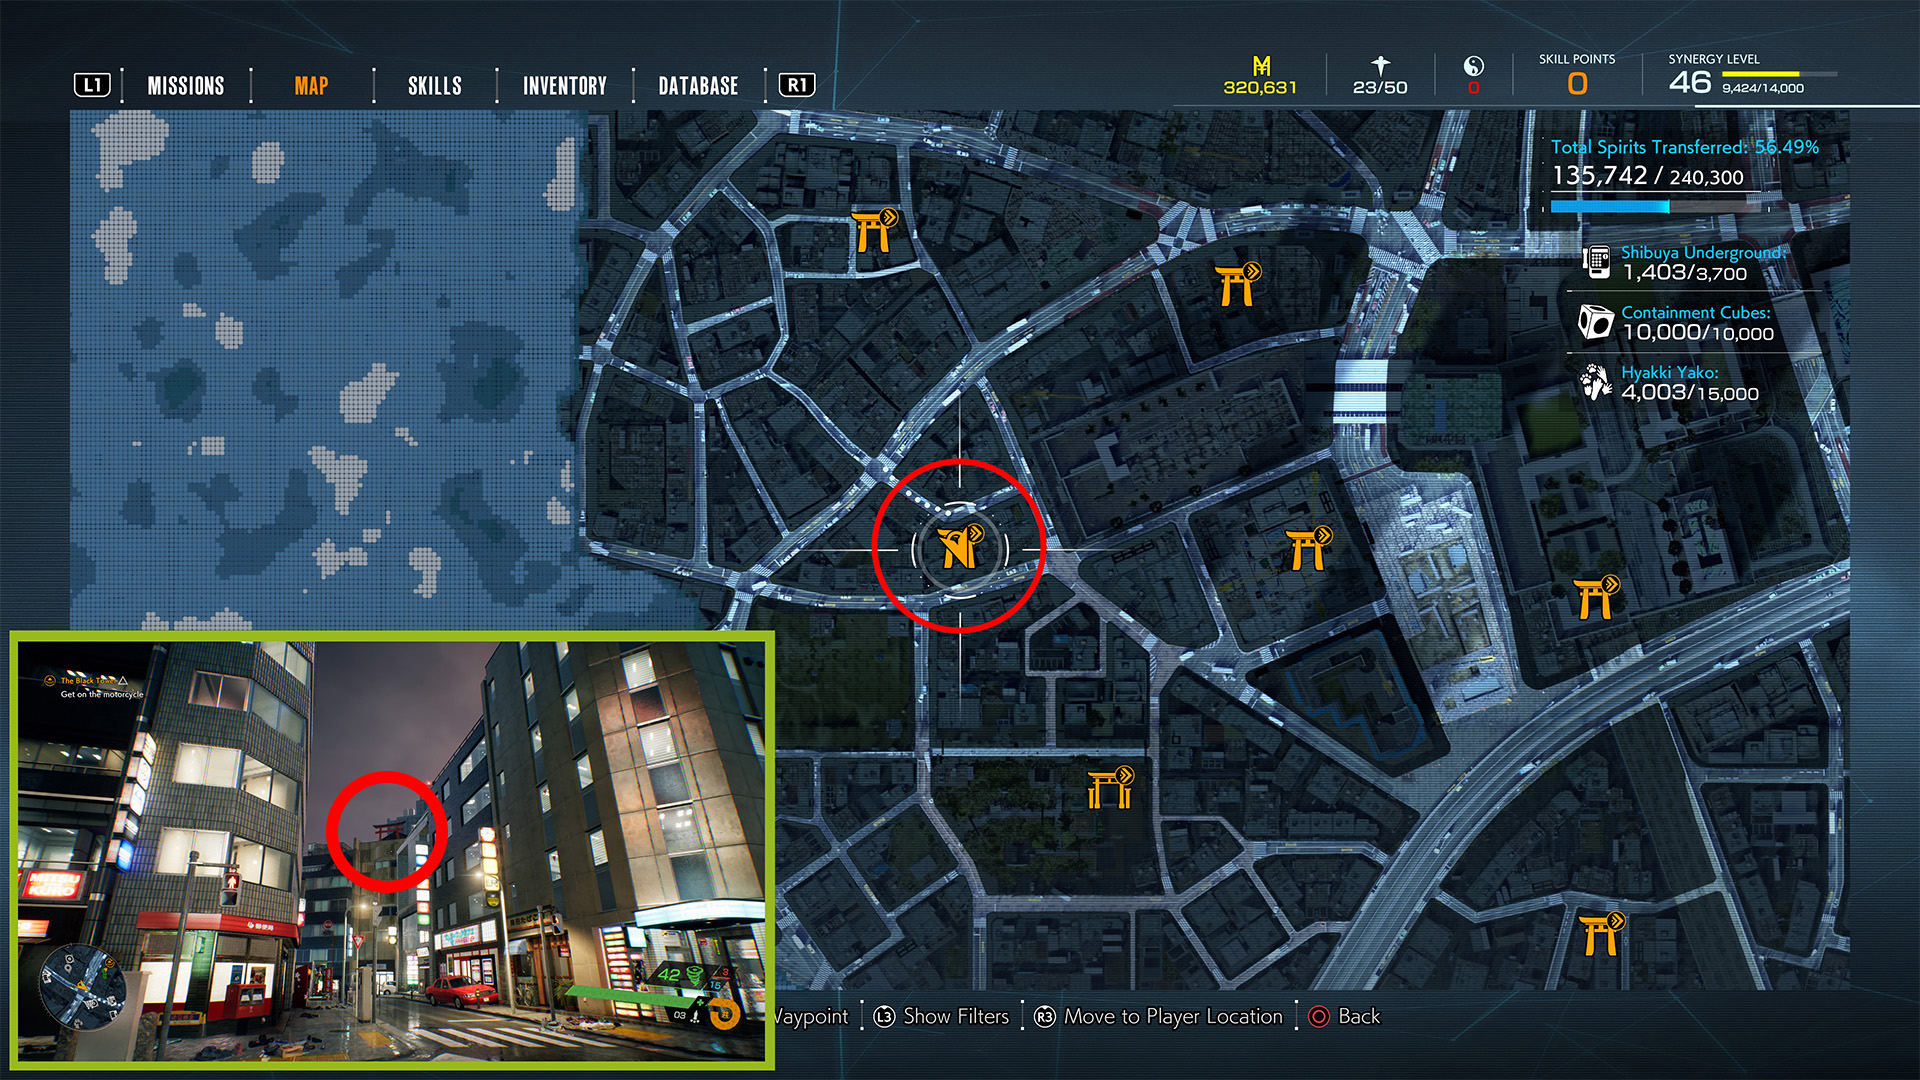
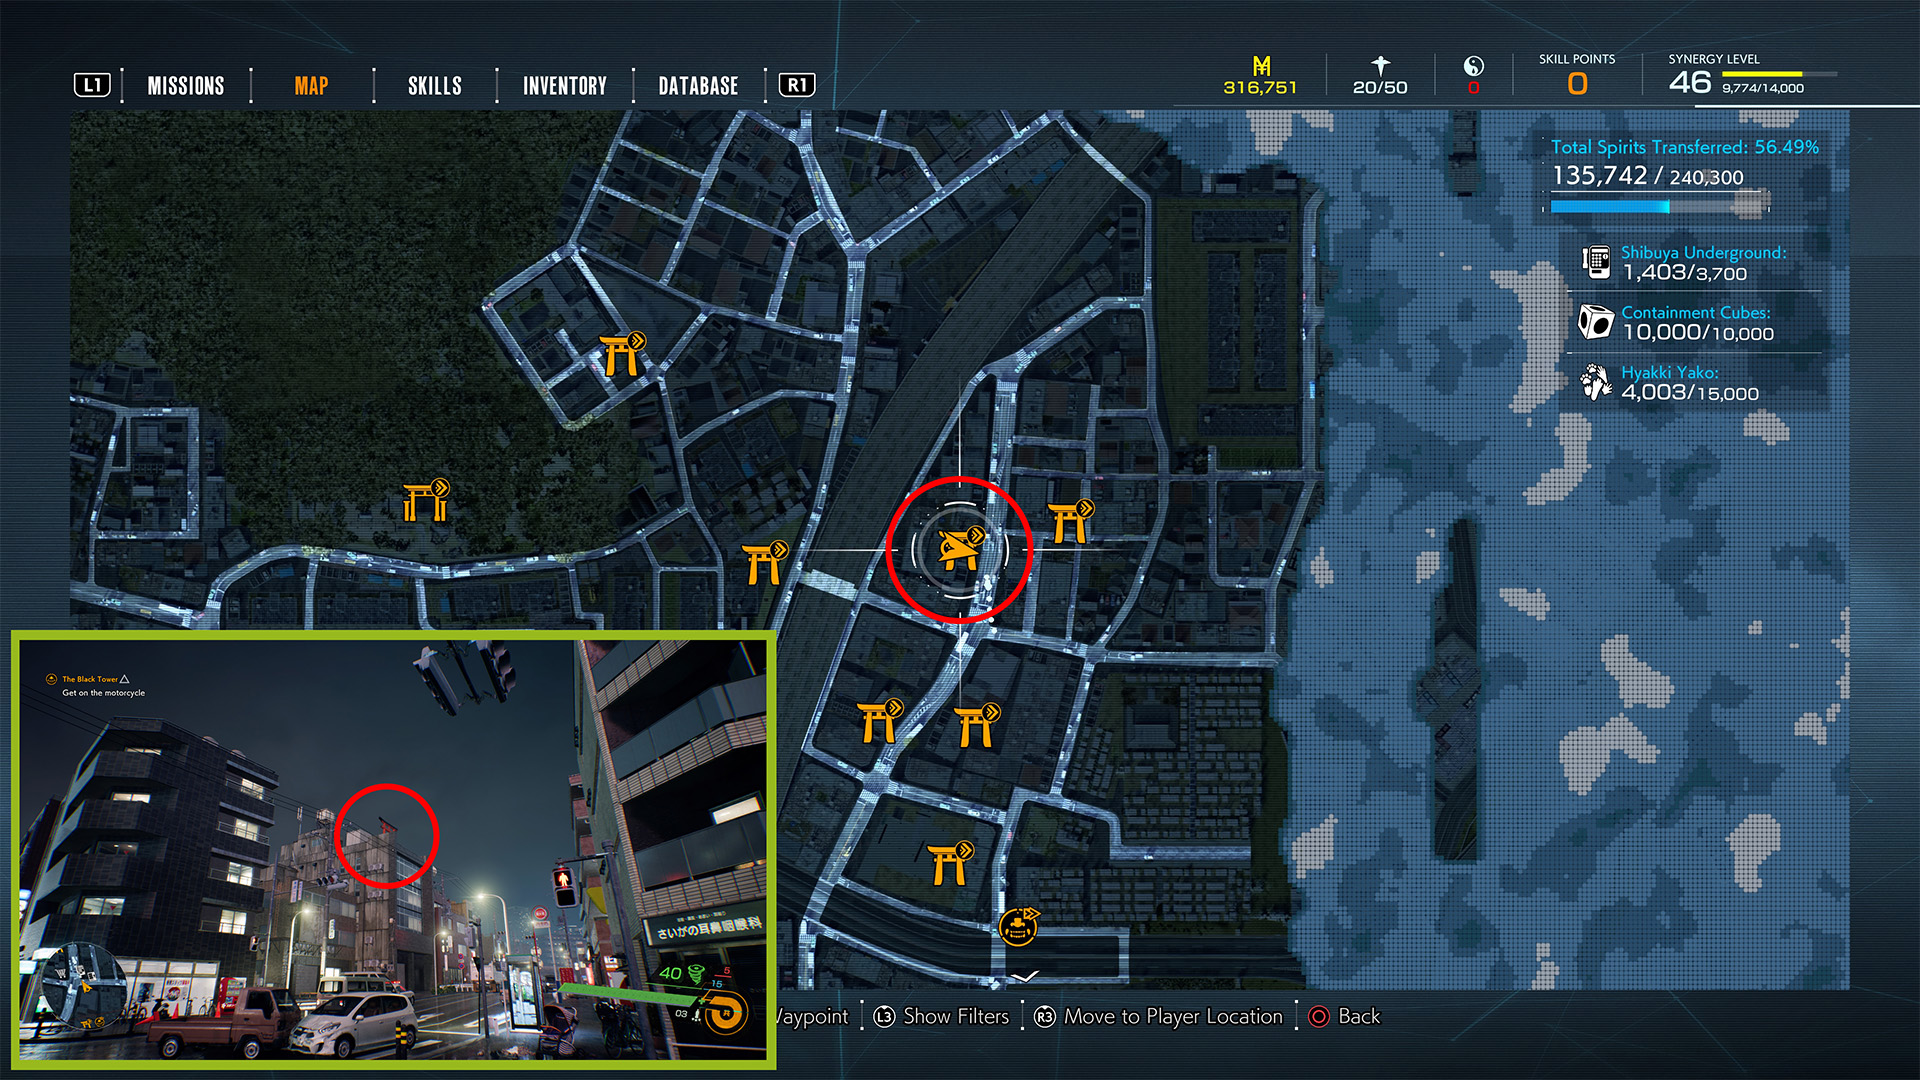
Noto Shrine
- Reward: Incognito Beads.
Noto Shrine becomes available at the beginning of Chapter 4 alongside Chishima, but it is best left for now since cleansing it provides a path to the rest of the Torii Gates in Ghostwire: Tokyo; you don’t have to go back north for Chishima later.
Noto Torii Gate is about 110 meters south/southeast of Chishima, on a small road cutting through a neighborhood. It is between a Fujiya Mart convenience store and a five-story apartment complex; there is a black SUV parked in the street and another five-story apartment complex across the street. Two yellow “no parking” signs are near the SUV and three red flags by the steps to the Shrine.
Hirajuku Building Rooftop Torii Gate
- Reward: Nourishment Beads.
Hirajuku Building Rooftop Torri Gate is around 85 meters due east of Chishima, across the railroad track overpass. As the name suggests, it is on a rooftop of a dark-brick building. There is a white dump truck and police car on the street in front of it; this Torii Gate is across from a Tulitorbucks, and there is a gas station about 45 meters south/southeast of the building.
Shiratsuki Shrine

- Reward: Sleuth Beads.
Shiratsuki Shrine is only 50 meters northeast of Hirajuku. Go to the edge of the Hirajuku building facing northeast, and look down to see this Torii Gate across the street behind the Tulitorbucks and some corruption.
Saihama Building Rooftop Torii Gate
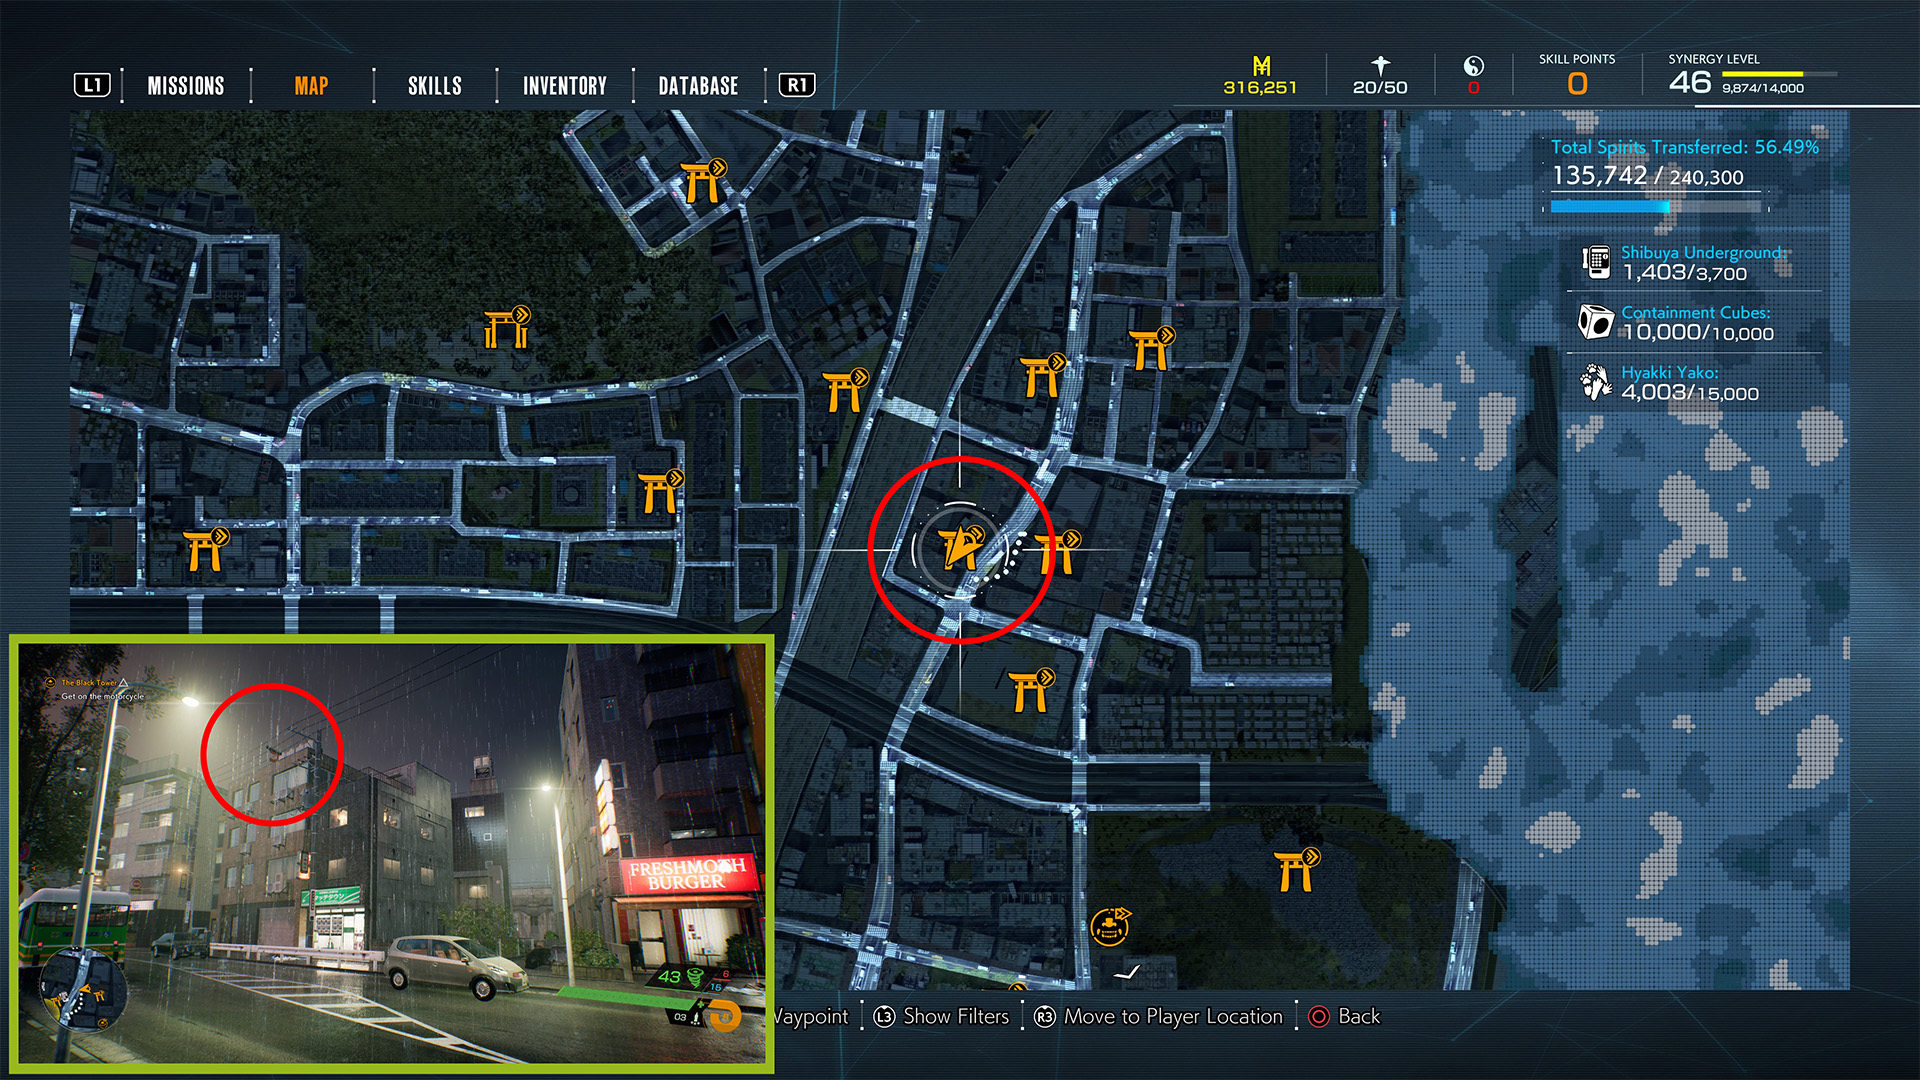
- Reward: Spirit Perception Beads (2).
Saihama Building Rooftop Torii Gate is 123 meters southwest of Shiratsuki Shrine. Again, as the name suggests, this one is on the rooftop of a four-story dark- and beige-brick building.
There is a storefront with a green sign on the first story and a payphone (not a phonebooth) in front of the store. A green bus and black car are parked in front of the building, and it is adjacent to a Freshmoth Burger restaurant.
Momokane Building Rooftop Torii Gate
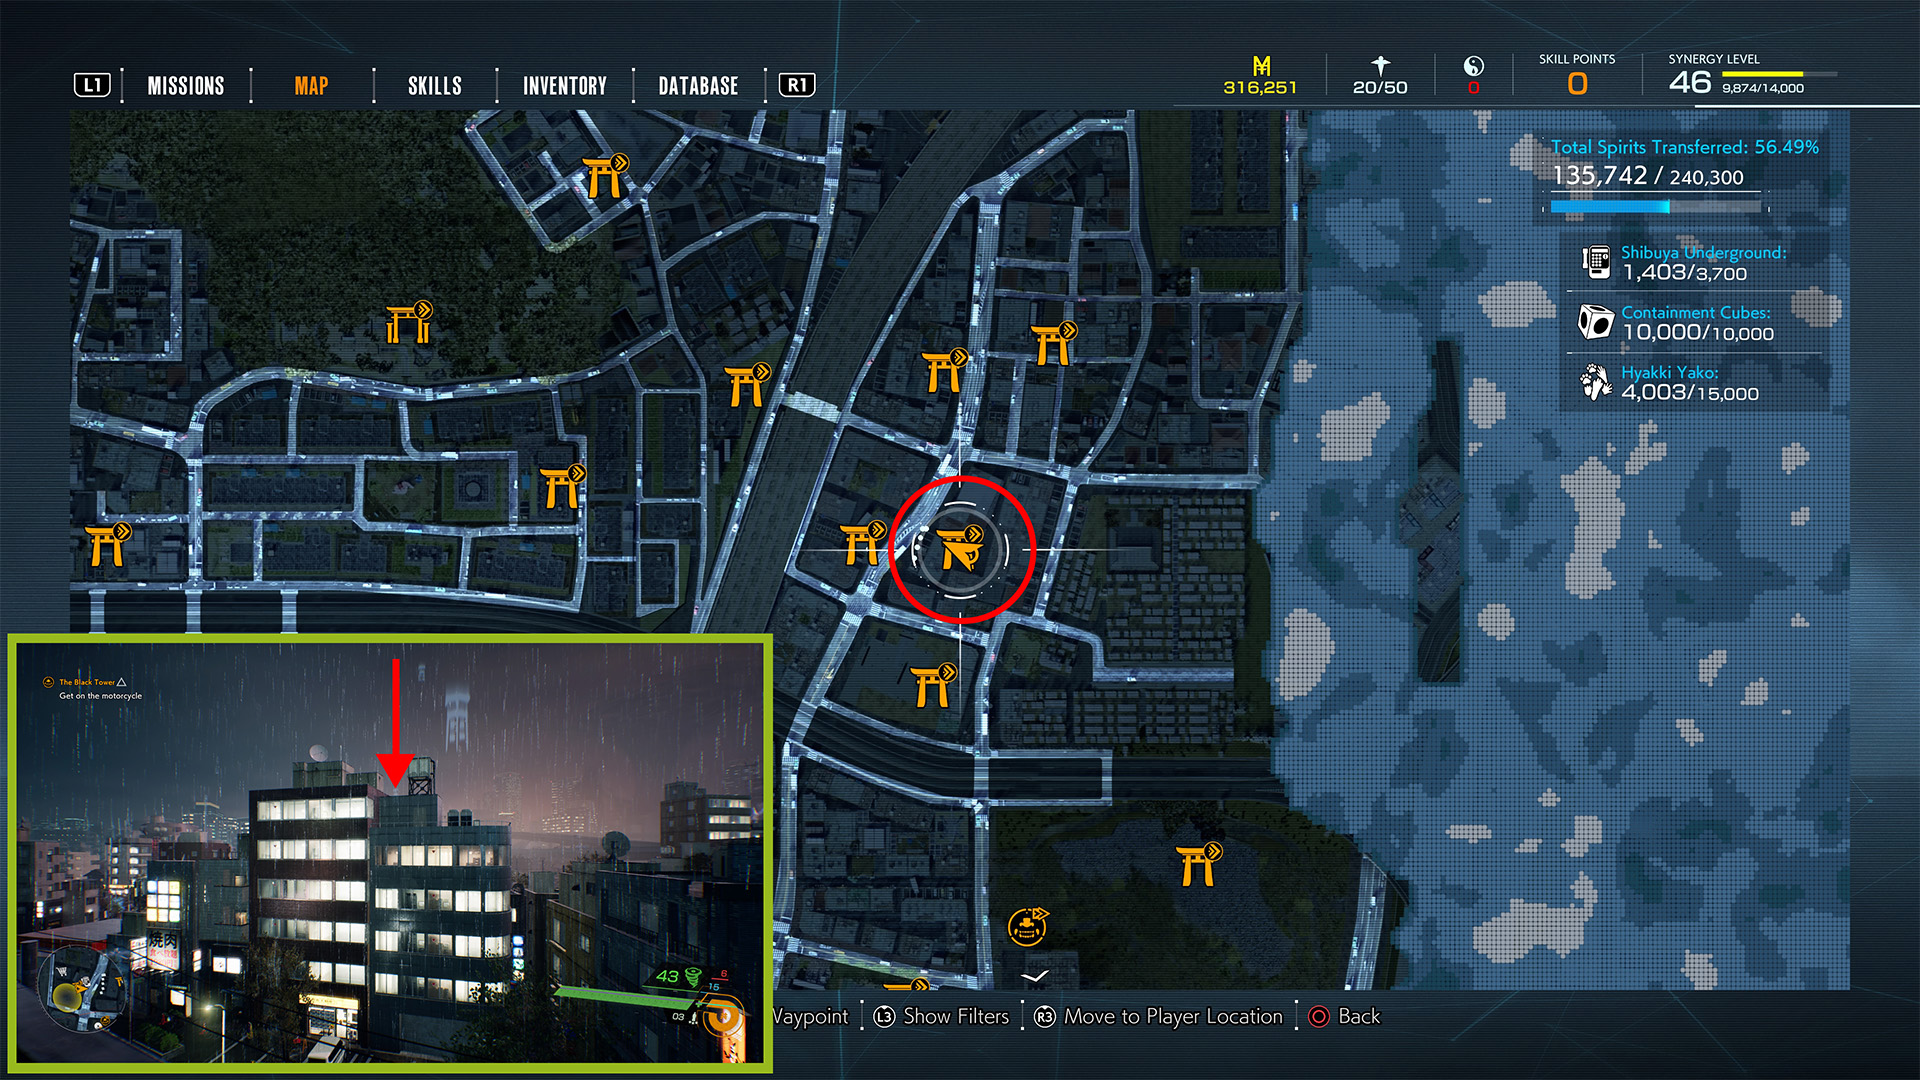
- Reward: Talisman Beads.
Momokane Building Rooftop Torii Gate is 40 meters east of Saihama Torii Gate. Go to the edge of the Saihama rooftop facing east, and you’ll see a six-story red-brick building with a satellite dish and two spirits on top (it is to the right of a gas station below). The Shrine itself is on a slightly shorter building directly behind the red-brick building.
Tatsui Shrine
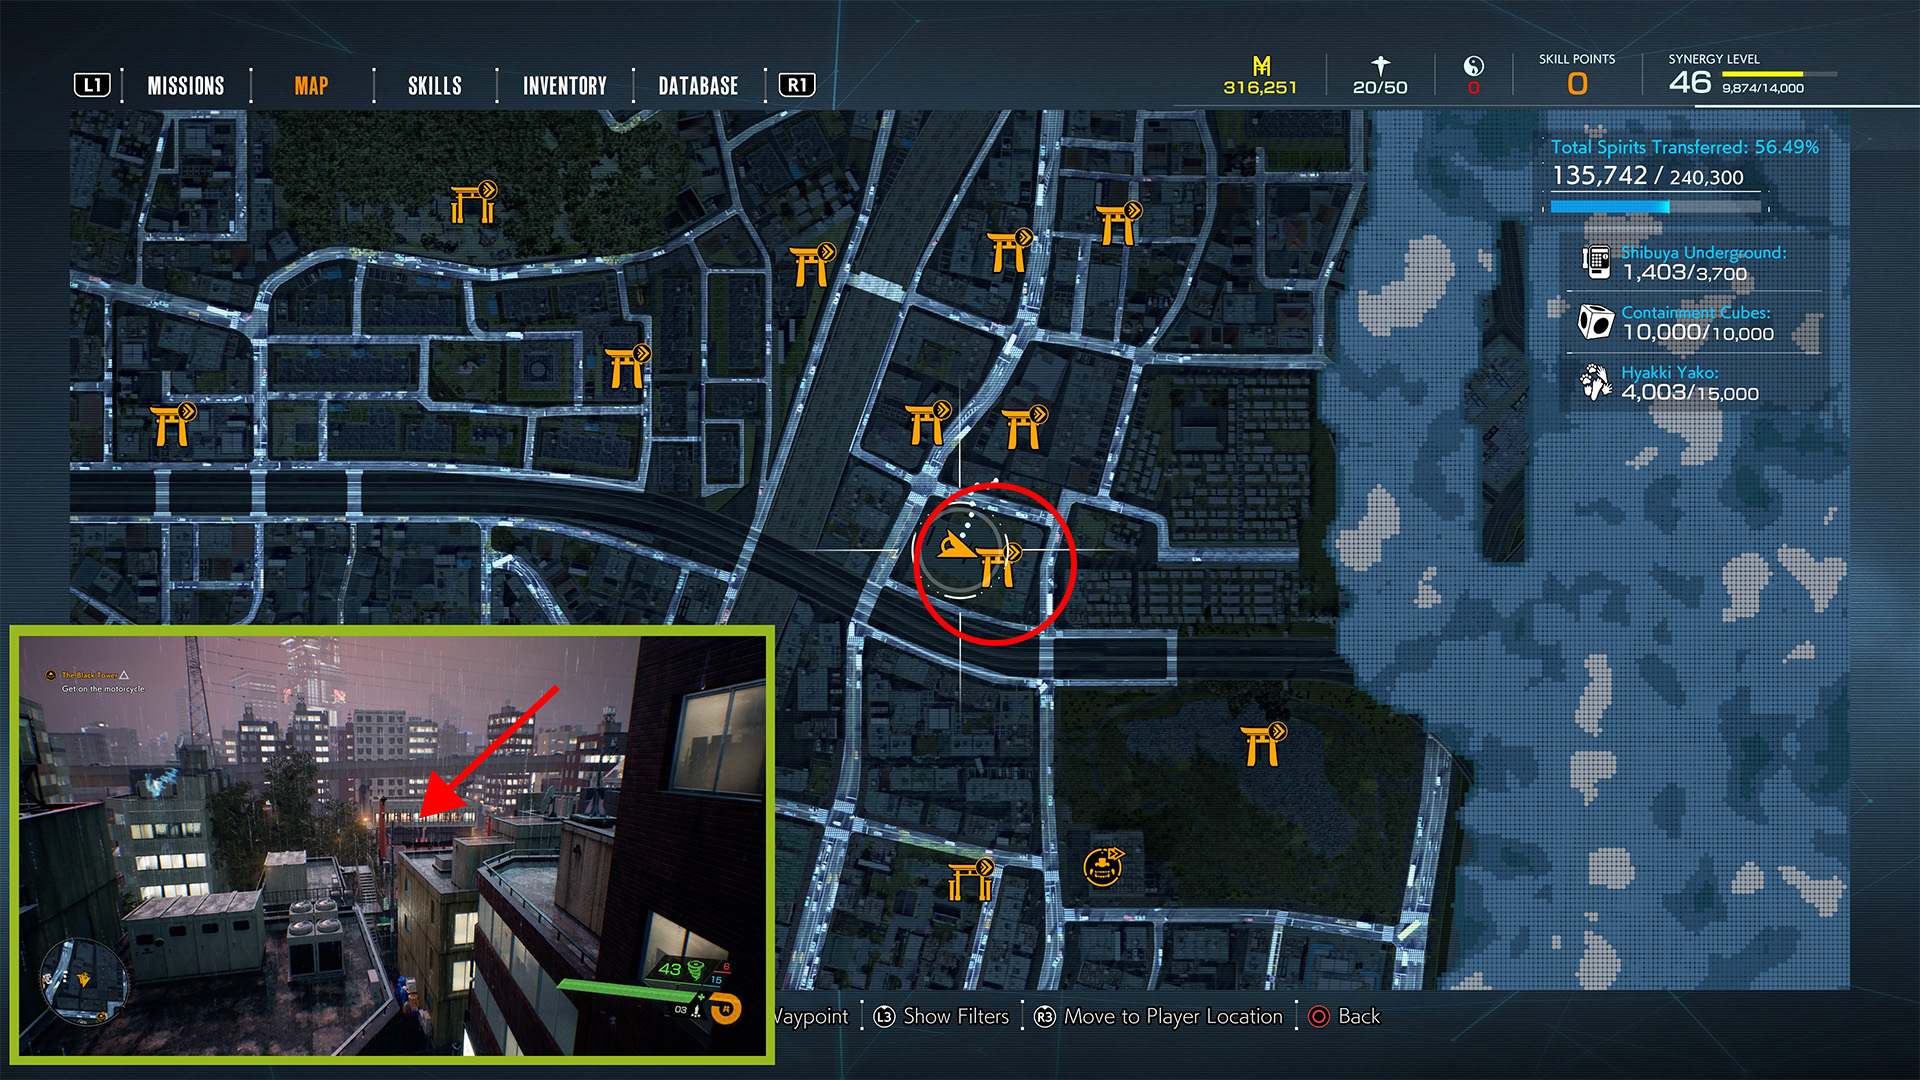
- Reward: Nourishment Beads (2).
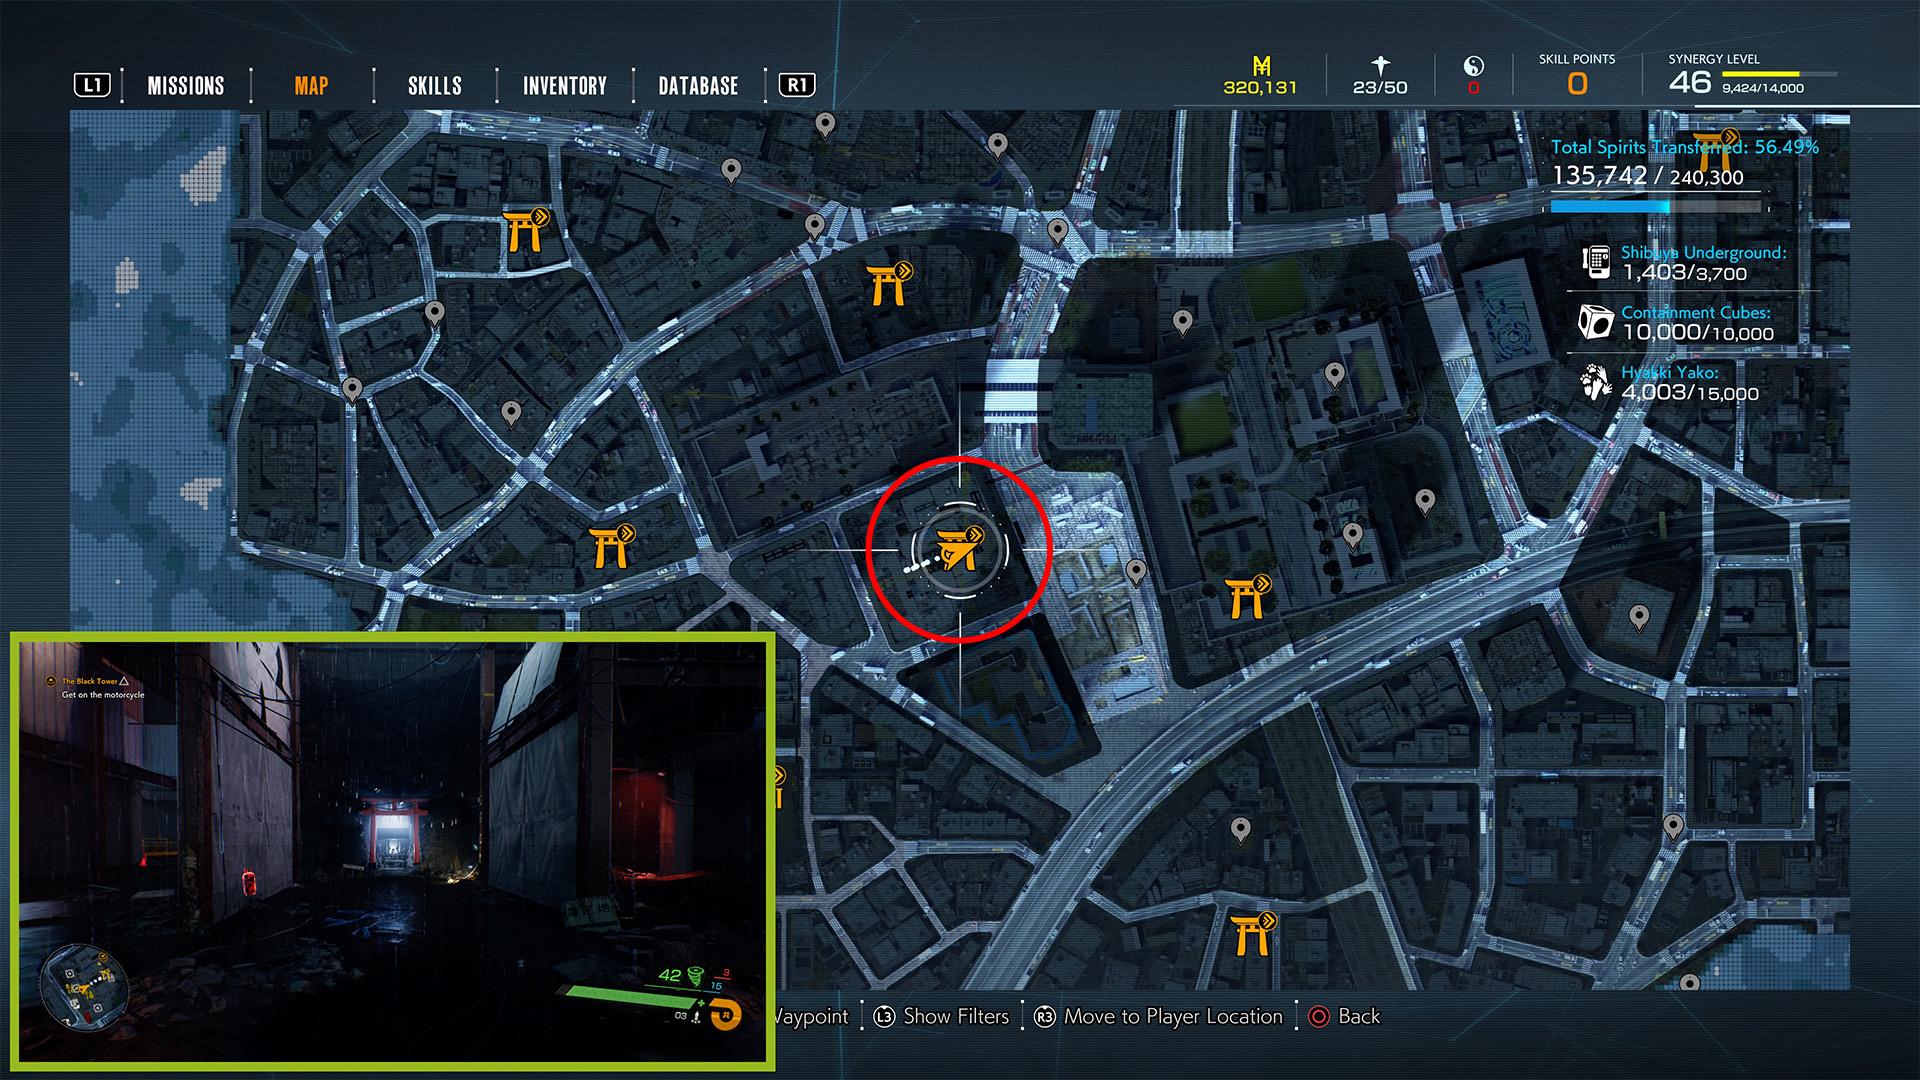
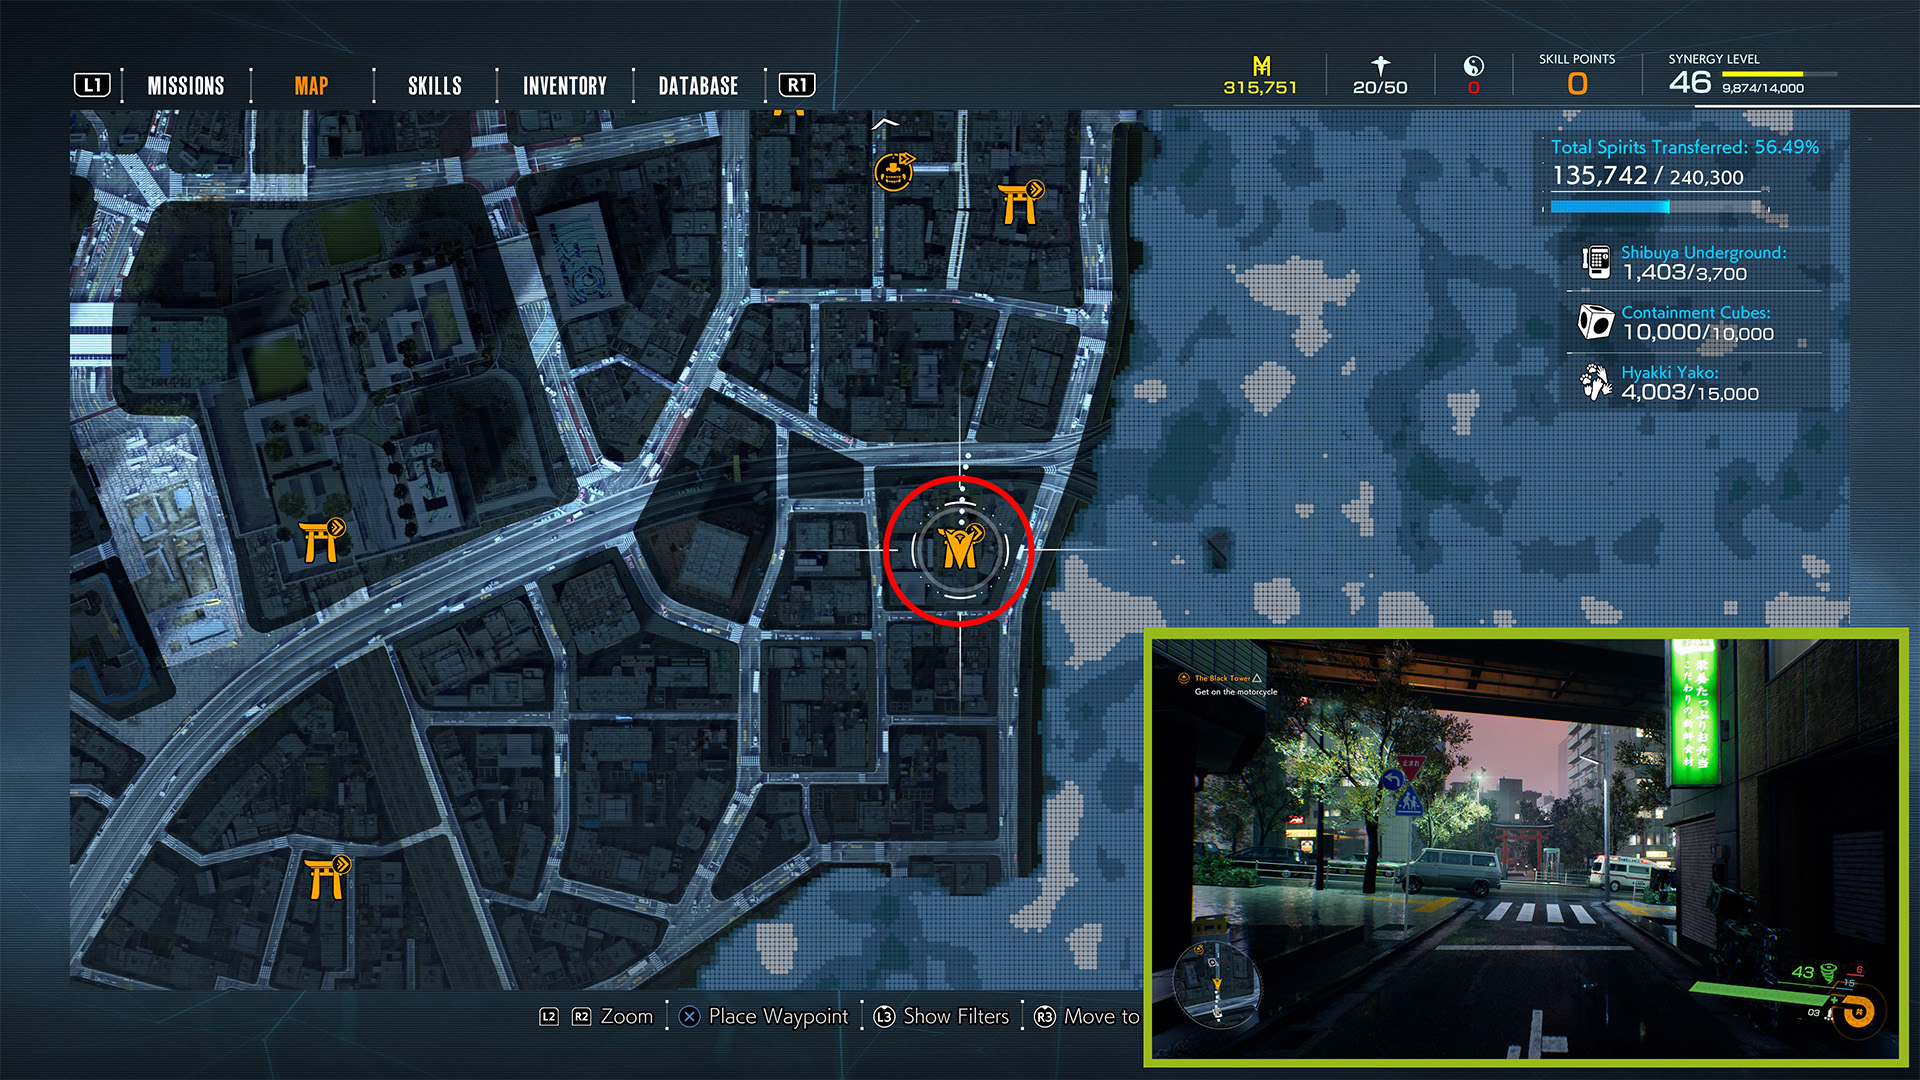
Tatsui Shrine is your objective in Chapter 4’s Giants mission, but you must cleanse Momokane Shrine Torii Gate before you can reach it. Tatsui is 62 meters south of Momokane, on ground level. It’s a larger area with a Torii Gate glowing blue, so it’s hard to miss. Plus, there’s an objective marker …
Kappagaike Torii Gate
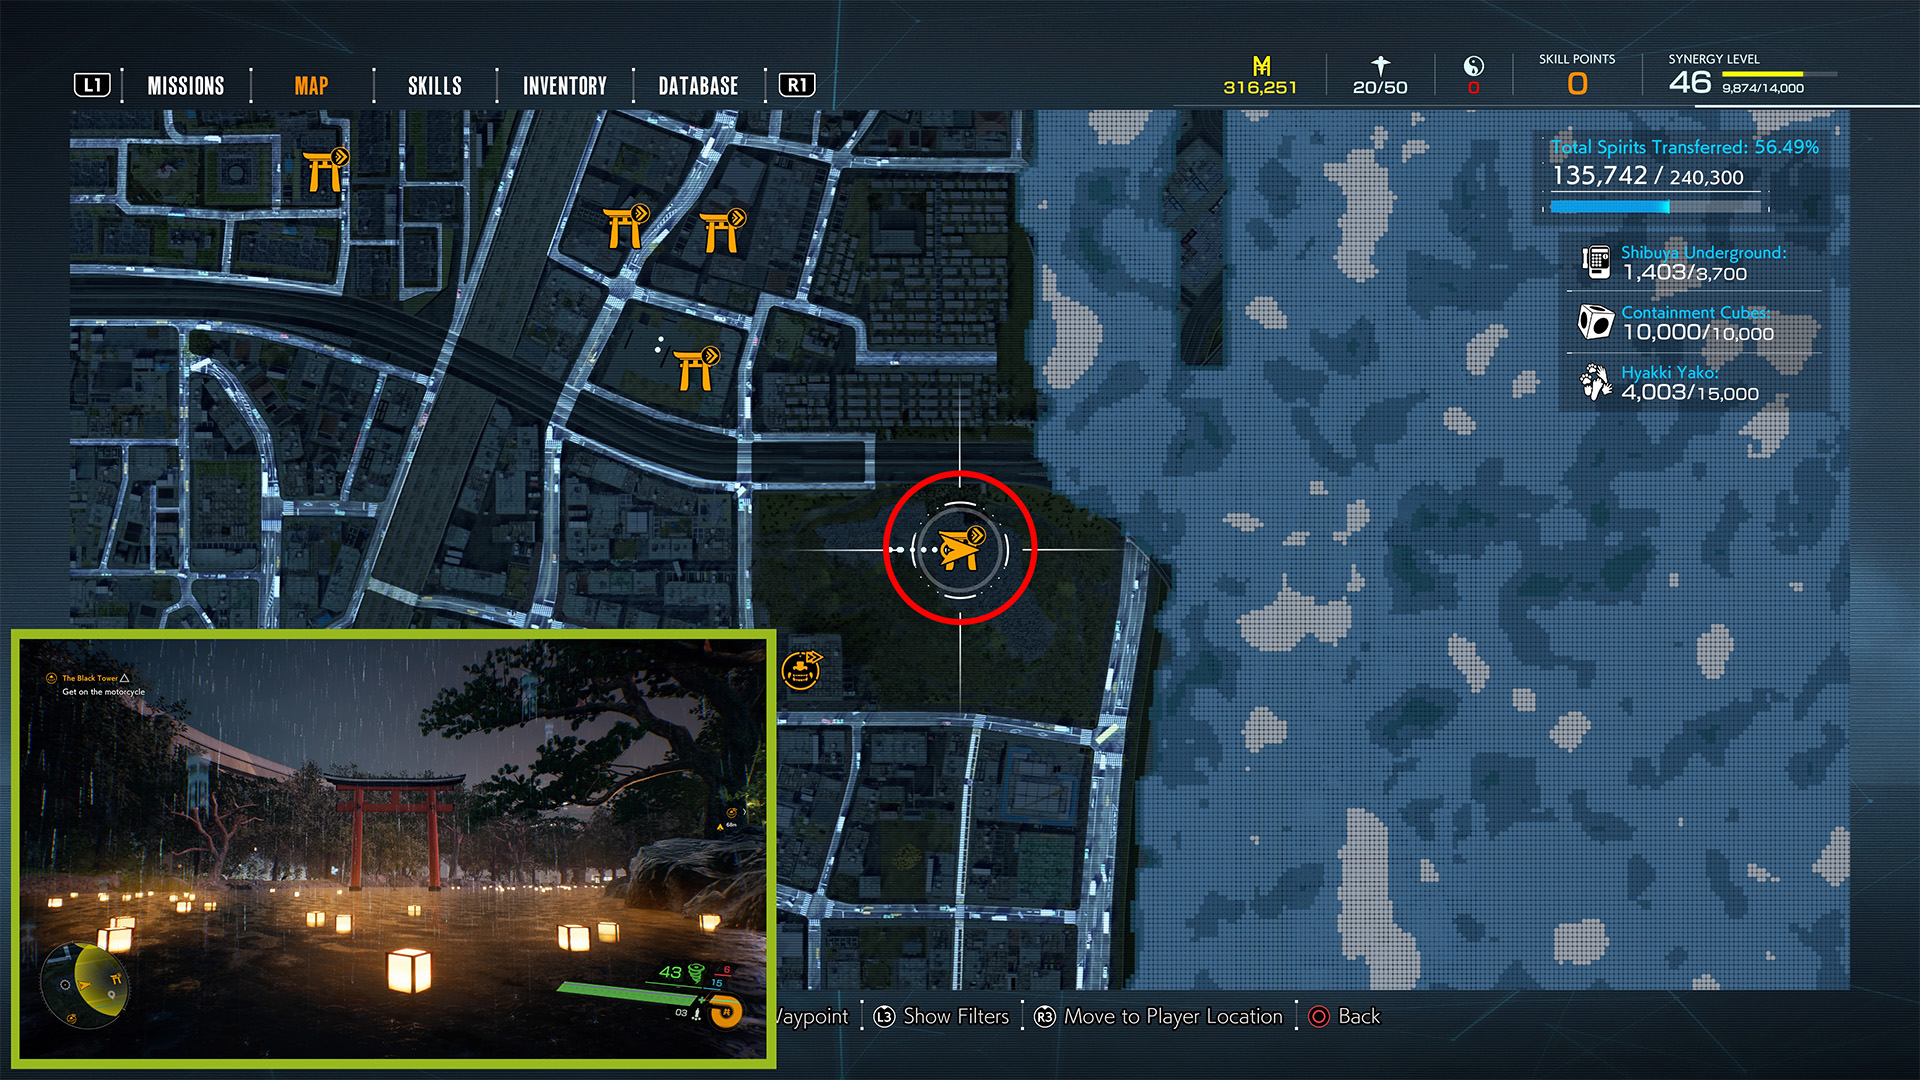
- Reward: Aqua Beads (3).
Kappagaike Torii Gate becomes available after cleansing Tatsui Shrine. It is 142 meters southeast of that Shrine in a park lake, south of the major highway running east-west. It is alongside the Kappagaike Landmark.
Onten Shrine

- Reward: Sleuth Beads (3).
Onten Shrine can be cleansed after Tatsui Shrine, but it’s best left until after cleansing Kappagaike Torii Gate, since it’s on the way to the final few Torii Gates in Ghostwire: Tokyo.
Onten is roughly 146 meters southwest of Kappagaike in a massive city block composed of stores and apartment buildings. This is another Shrine that requires you to cleanse three smaller Torii Gates, the primary of which is on the roof of a set of shops with a Freshmoth Burger joint and Terry’s restaurant.
Mikubo Shrine
- Reward: Flame Beads (2).
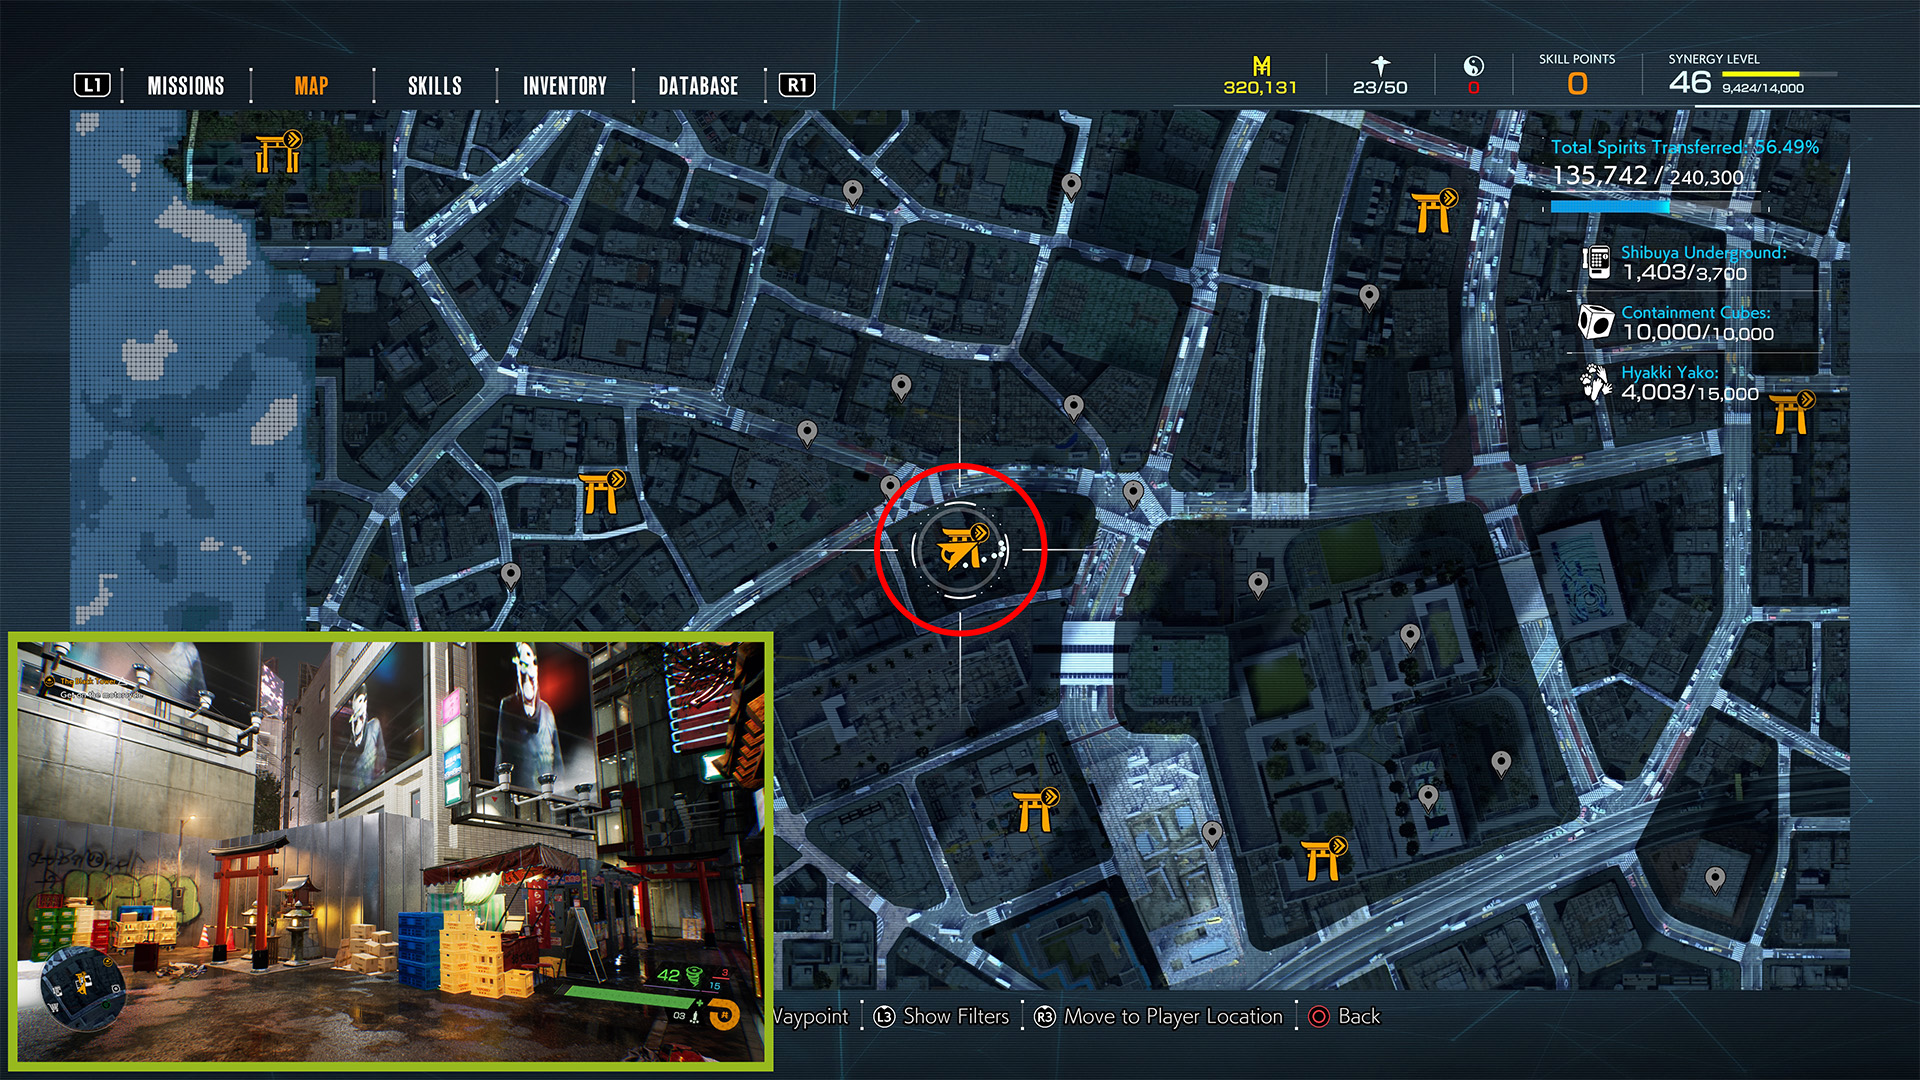
Mikubo Shrine is 140 meters southwest of Onten in Drunkard’s Alley. Because of how the fog sits in this area, you’ll need to enter Drunkard’s Alley from the north, just south of the major highway overpass. There is a white van parked at the front of the alley.
When you enter, defeat the enemies here (there are two XYZ that can spawn six other enemies). Once you do that, follow the path left through the alleyway to find this Shrine tucked behind a Torii Gate in a dead end.
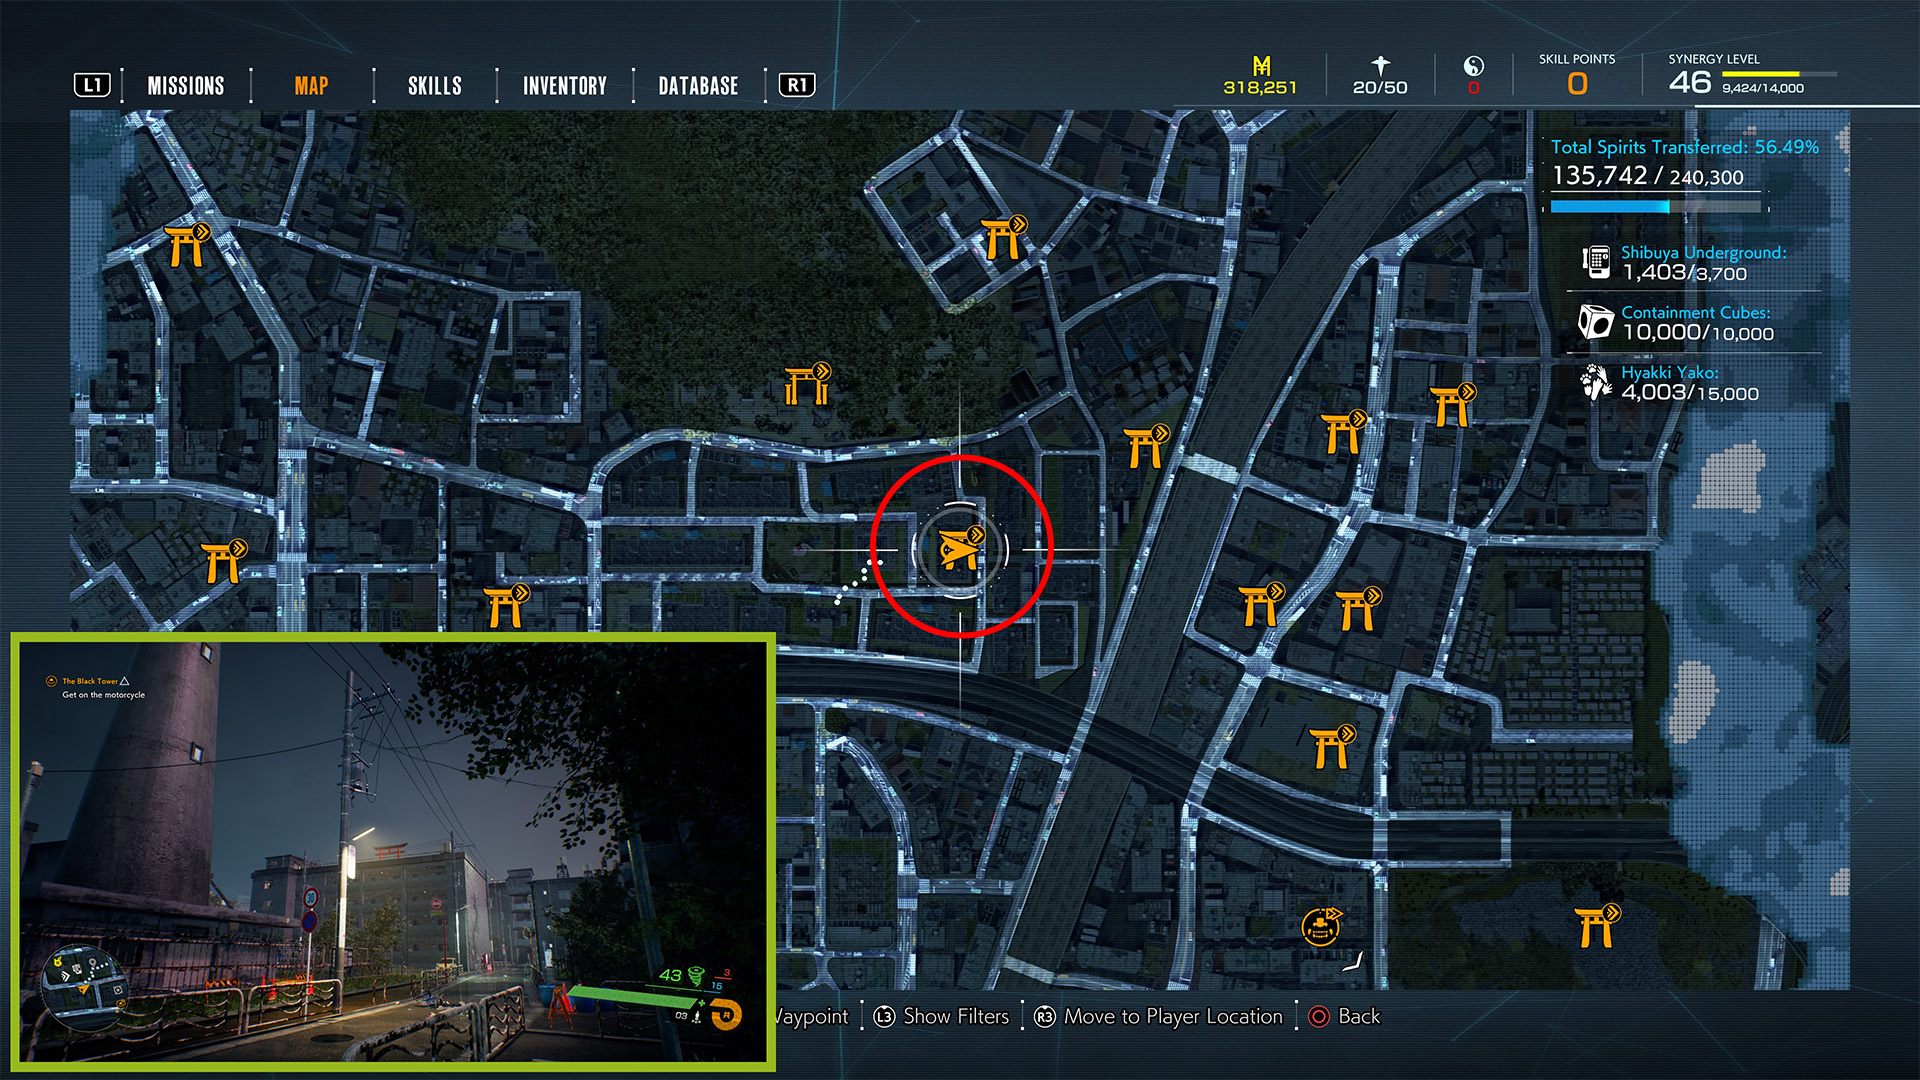
Shimokusa Shrine
![]()
- Reward: Talisman Beads (2).
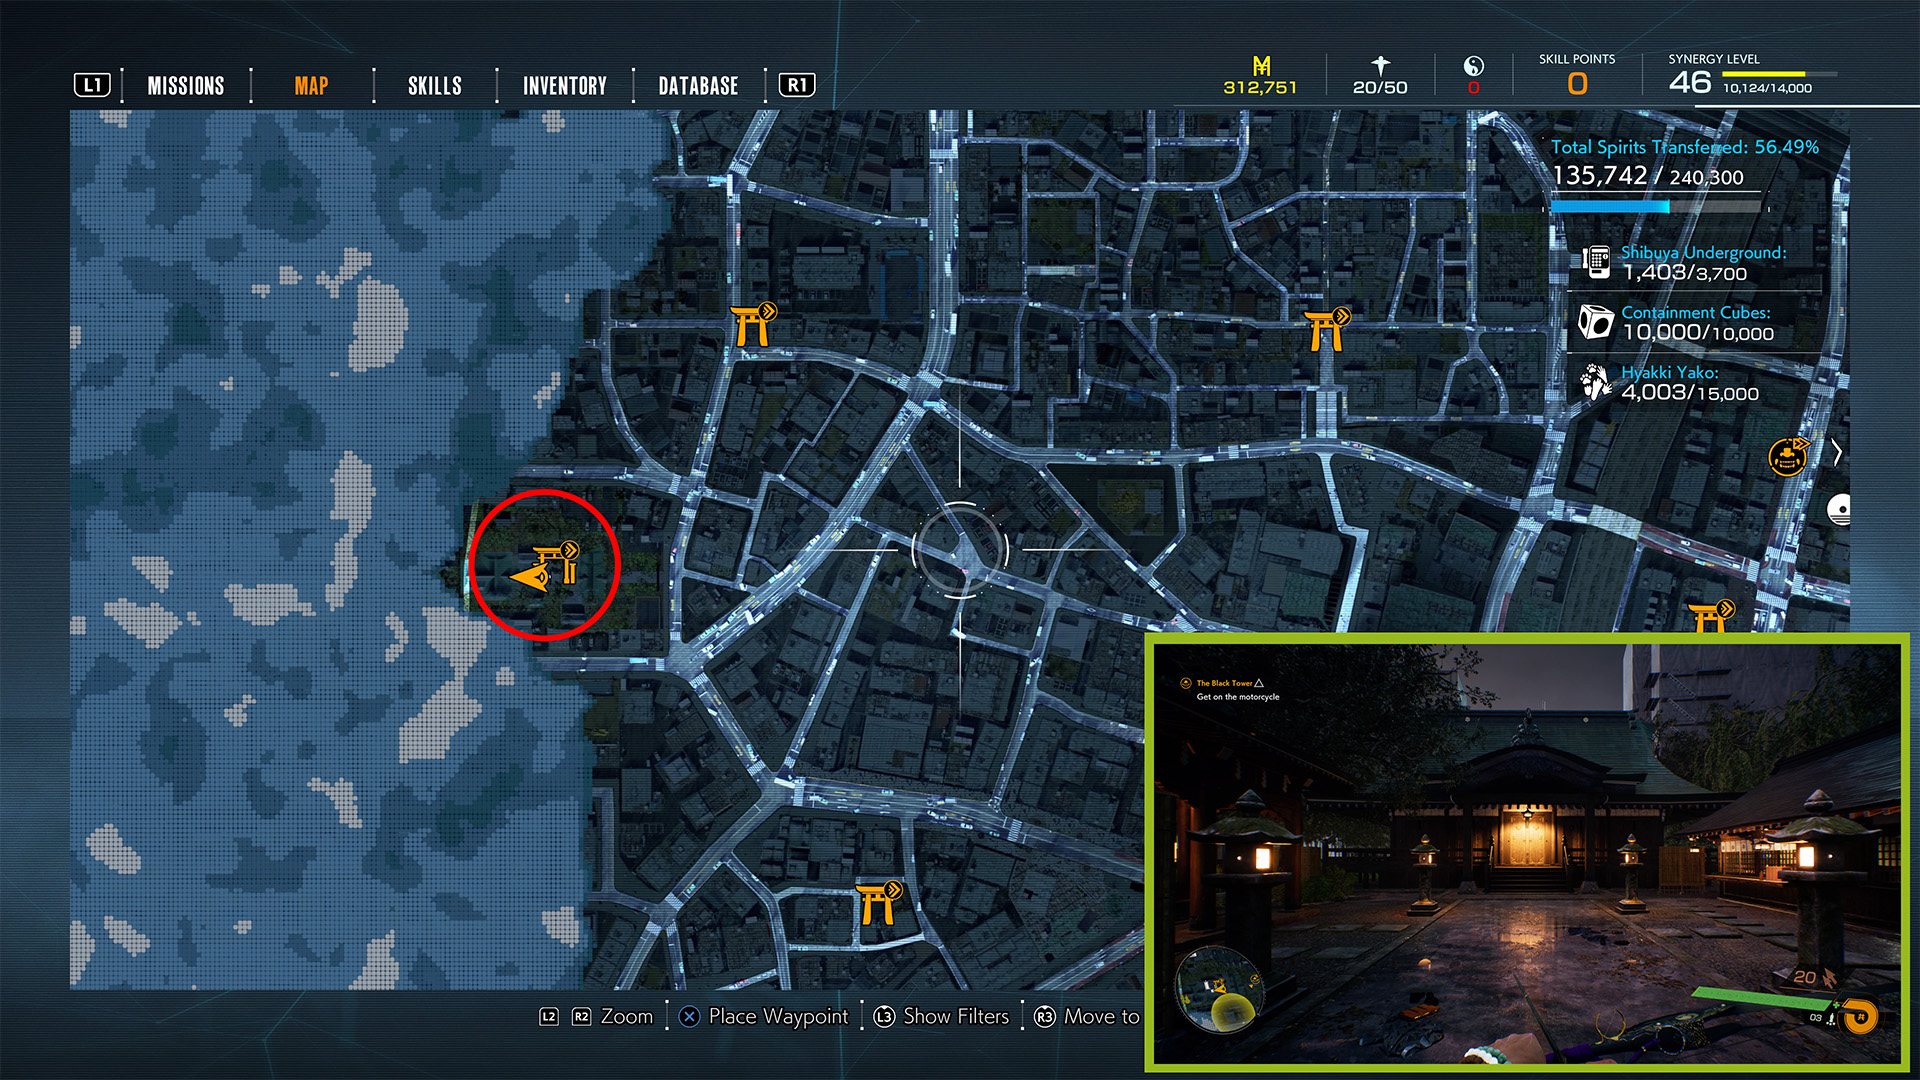
Because of the fog, you’ll need to approach Shimokusa from Kappagaika Torii Gate by hugging the four-lane roadway that runs along the eastern edge of the Kappagaika Park. The Shimokusa Shrine itself is about 290 meters south of the Park,
The entrance off of the road is on the western side, across from a green bus. It is marked by an short, orange Yebisu Bank sign around 20 red, vertical banners. You’ll see the glowing Torii Gate at the top of a small set of stairs.
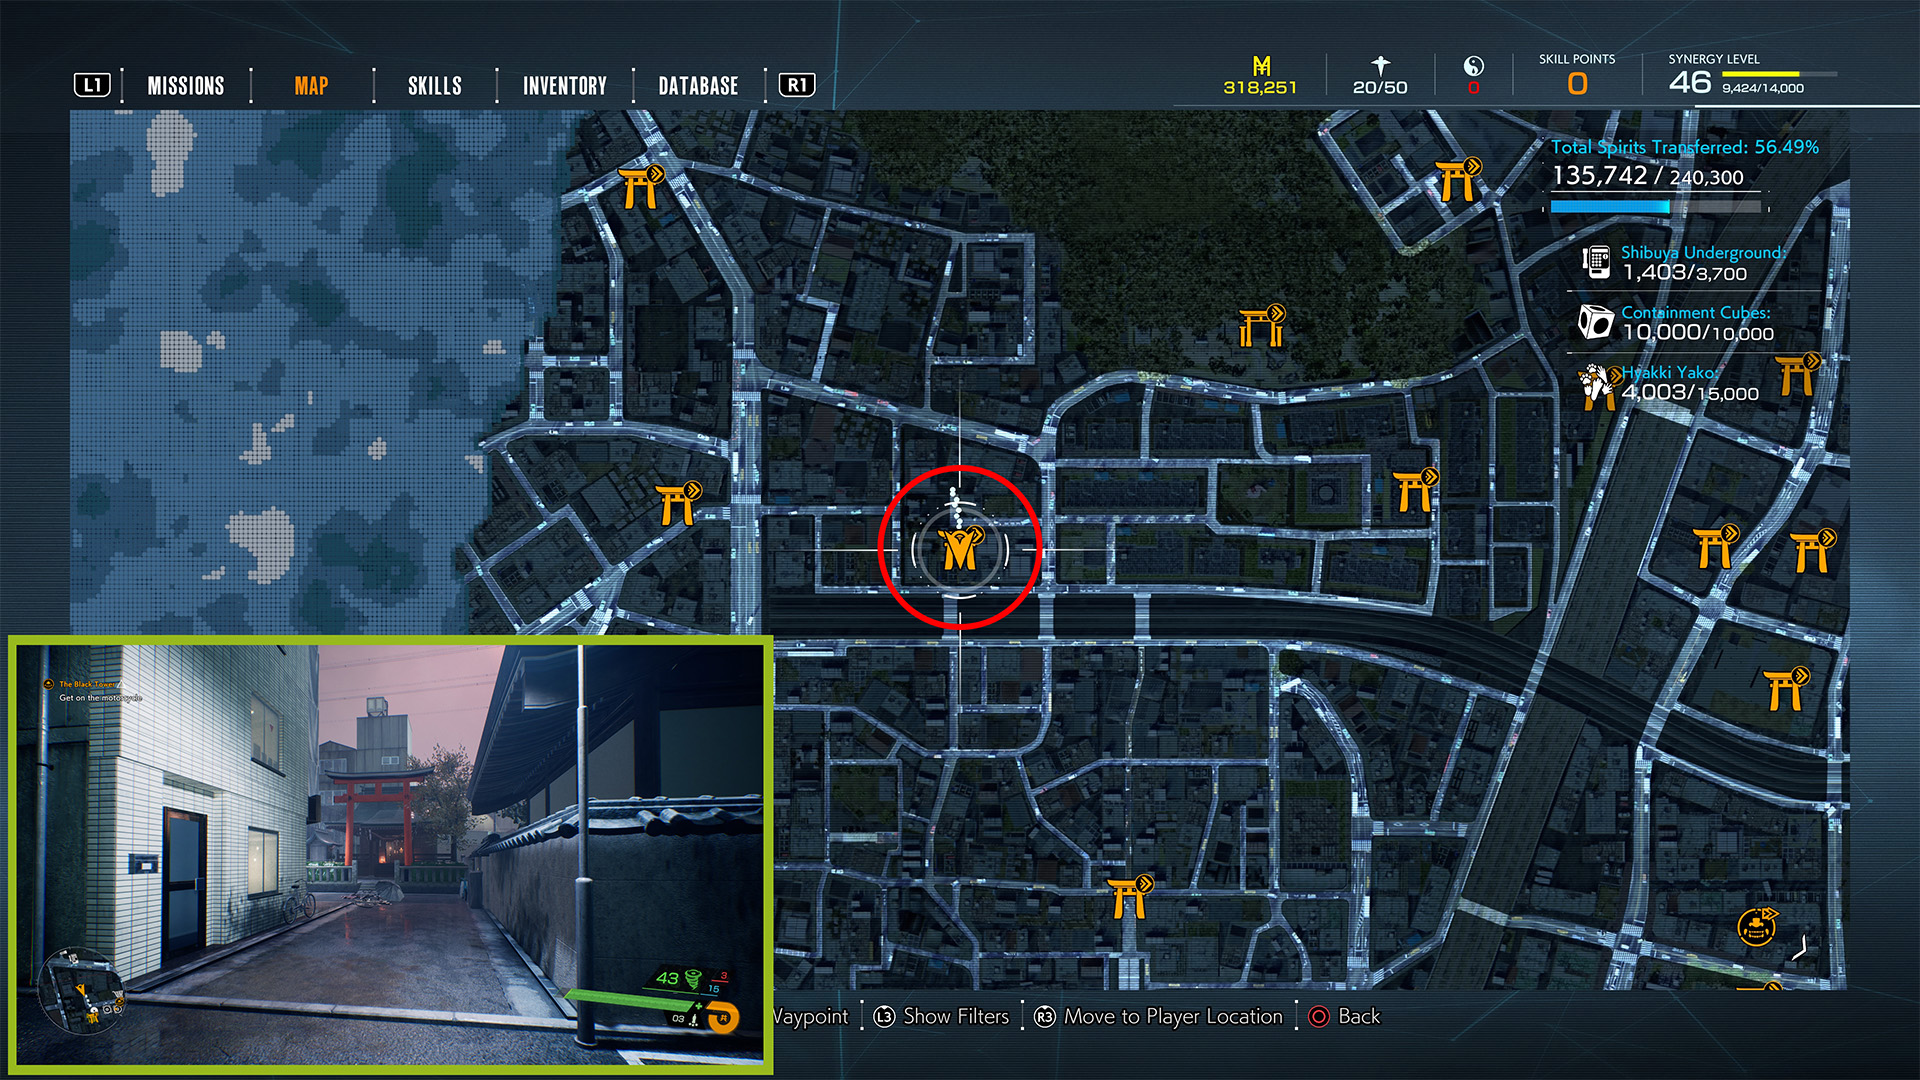
Kamio Shrine
- Reward: Gust Beads (3).
Kamio Shrine is roughly 160 meters due south of Shimokusa (leave Sakano Shrine for last). When you get near the location, you’ll find it just beyond a tall overpass; there is a payphone booth and an ambulance smashed into the back of a sedan in front of the Torii Gate, which is wedged between two high-rise apartment buildings.
Akitsu Shrine
- Reward: Flame Beads (3).
Akitsu Shrine is a bit “out of the way” at 320 meters southwest of Kamio Shrine Torii Gate, but if you’ve foregone following KK’s lead during Chapter 4’s Giants mission, you’ll need to go back north to Sakano from Kamio anyway, so it’s good to get this out of the way.
The Torii Gate glows purple on top of a six-story corner building with yellow scaffolding, a bike rack, and a white delivery truck out front. It is across the street from a Fujiya Mart and a payphone booth.
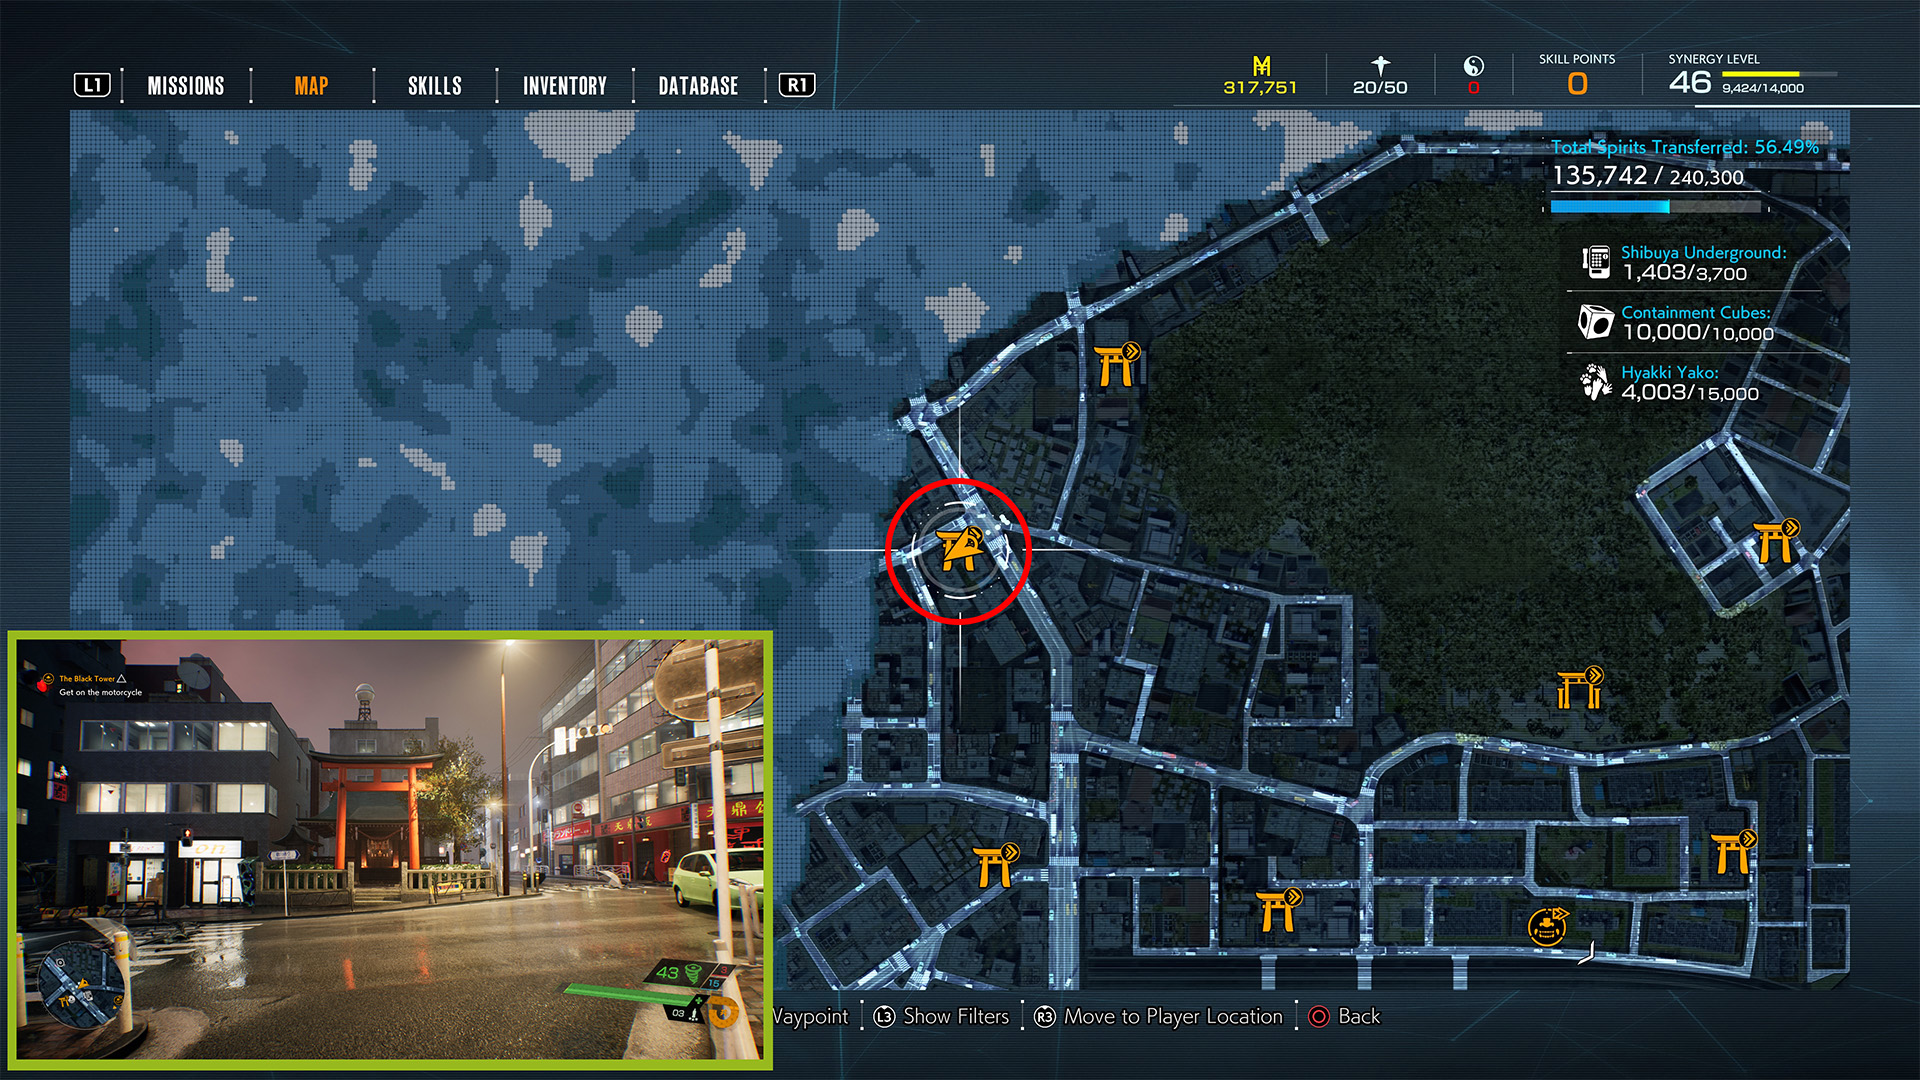
Sakano Shrine
- Reward: Nourishment Beads (3).
Now fast travel back to Shimokusa Shrine, and go 111 meters northwest; because of the fog, you’ll have to go a bit south/southwest before you can turn up north.
When you reach the Sakano Shrine area, you’ll find the large Torii Gate at a crosswalk near a payphone booth. It’s on a large intersection with a green taxi crashed into a white moving van; it’s diagonally east of a nine-story beige building with a large, red Mitsukuro sign.
And those are all of the Torii Gate Shrine locations in Ghostwire: Tokyo. You now have two trophies/achievements for finding them all, as well as access to all of Tokyo to find Relics, Investigation Notes, and other collectibles.


Published: Mar 24, 2022 04:15 pm