
Continuing in its long trend of remaking and remastering Final Fantasy games of the past, Square Enix recently gave us a remastered version of Final Fantasy XII: The Zodiac Age for the PlayStation 4. While many of the differences chalk up to visual and loading time improvements, there have been a few new things added to the game. With that come a few new exploits and tricks!
The auto save feature, coupled with Trial Mode, enables “infinite grinding” of resources in the game’s secondary play mode. In this guide, I’ll break down everything you need to know about Trial Mode, auto saving, and methods for grinding gil to your heart’s content.
The Three Pillars of Infinite Gil Grinding in FF12: TZA
Trial Mode
Trial Mode made its debut in the Japanese version of Final Fantasy XII: International Zodiac Job System. In this game mode, you bring your team from the core game with you to fight through 100 continuous battles that gradually increase in difficulty.
In International Zodiac Job System, you were unable to bring items and gear that you acquired in Trial Mode to the core game. But in The Zodiac Age, you’re able to do that. This change is what enables the little trick that I’m about to show you.
Auto Saves
Auto save is a new feature in Final Fantasy XII: The Zodiac Age which automatically saves your progress at certain points through the core game and Trial Mode. The auto save file is the topmost file when you go to load your game. You can also identify this file as the one with the down-facing arrow at the top-left corner of its icon.
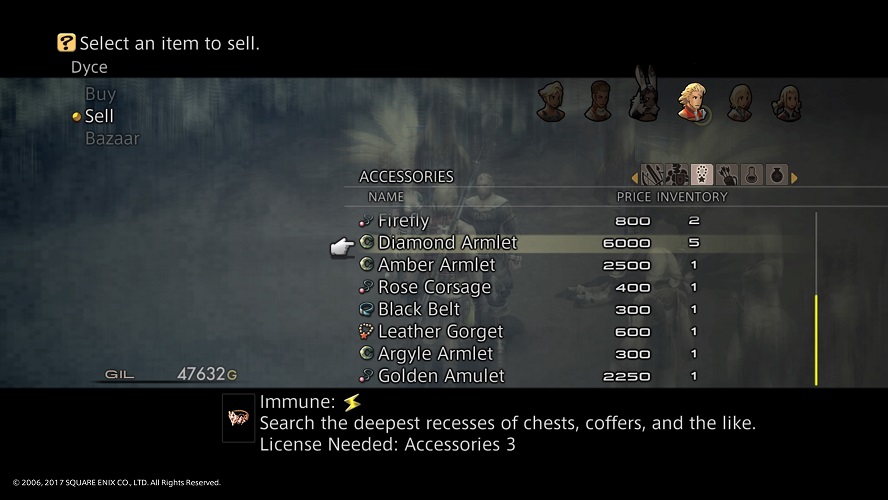
Diamond Armlets
In the first stage of Trial Mode, you fight a group of level 1 Dire Rats. Also in this stage are two chests on opposite sides of the upper level of the sewer area. One chest contains a potion and the other contains a Diamond Armlet. This is the item that we’re going to be grinding to generate gil.
The Diamond Armlet grants immunity to thunder attacks and increases the rewards you receive when opening chests, coffers, and more. You need an Accessories License 3 to equip it, and the Diamond Armlet sells in shops for 6000 gil.
Step-by-Step Guide to Grinding Gil in FF12: TZA
First and foremost, you need to turn attack gambits off for at least one of your party members. This is because defeating all of the Dire Rats in Stage 1 of Trial Mode will cause you to instantly proceed to Stage 2. If you didn’t get the Diamond Armlet, then you don’t get another chance.
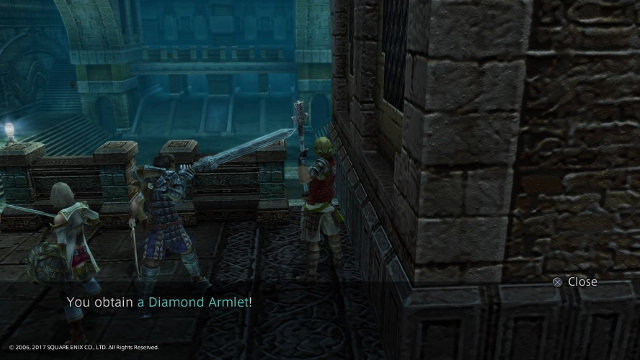
Load into Trial Mode from the main menu and head into Stage 1. When the battle begins, go past the Dire Rats and go up the staircase in front of you. Then, turn left and up another flight of stairs to get to the upper level. You’ll see a treasure chest. Inside is the Diamond Armlet.
After you get the Diamond Armlet, kill all of the Dire Rats. The game will then proceed to Stage 2. Press the Options button on your controller and pause the game. Press the Square button and you’ll return to the main screen.

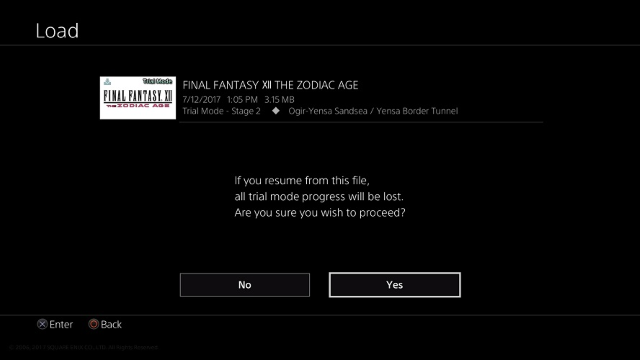
From the main menu, load your game and go back to the core game (not Trial Mode). Doing this, you’ll see that there’s an auto save for your Trial Mode run. Load that file and you’ll get a warning that states that your Trial Mode progress will be lost. That’s what we want to happen, so proceed.
Now in the core game, check your inventory and you’ll see that you have a Diamond Armlet. Save your game and then head back to the main menu. Go back into Trial Mode, load the save file from your core game (not the auto save file from Trial Mode), and you should be back on Stage 1.
Repeat this process until you have all of the gil you need, as each Diamond Armlet nets you 6000. The process is a little brainless and obviously repetitive, but it’s one of the simplest ways to grind gil in the entire game.
—
Has this method helped you? Do you know any better methods of grinding gil in Final Fantasy XII: The Zodiac Age? Let me know in the comments below! And be sure to check out some of our other Final Fantasy XII: The Zodiac Age guides for more help with this remastered FF experience:
- Final Fantasy XII: The Zodiac Age Tips to Live By
- Final Fantasy XII: The Zodiac Age Job Classes Guide
- FFXII: The Zodiac Age Hunt Club and Trophy Rare Game Guide
- FFXII: The Zodiac Age — How to Get the Seitengrat
- FFXII: The Zodiac Age Guide – How to Get the Zodiac Spear


Published: Jul 20, 2017 07:13 am