Millicent’s questline in Elden Ring will take you across the Lands Between as she searches for someone important to her. You won’t be finishing this quest until very, very late in a playthrough, as two of the later areas aren’t accessible until after you complete Leyndell, Royal Capital the first time. Even then, you probably aren’t equipped to take on the challenges the Millicent questline asks of you.
If you want to complete Millicent’s quest, be prepared for some of the most challenging fights in Elden Ring and the Souls series as a whole. Overcoming these obstacles rewards huge volumes of Runes for leveling up stats and access to some of the best weapons and best spells in the game. Millicent’s is also a heartwrenching tale of finding purpose and defying one’s birthright.
How to Find Millicent & Complete Her Questline in Elden Ring
You start Millicent’s quest far to the east of Limgrave, to the east of the great Swamp of Aeonia. Following the path around the southern edge of the Swamp leads to a path that goes through a small castle gate called Sellia Gateway.
The closest point of reference is the Southern Aeonia Swamp Bank Site of Grace. Beyond and to the right of the gate is a shack on a small hill. Here’s where the Millicent quest starts in earnest.
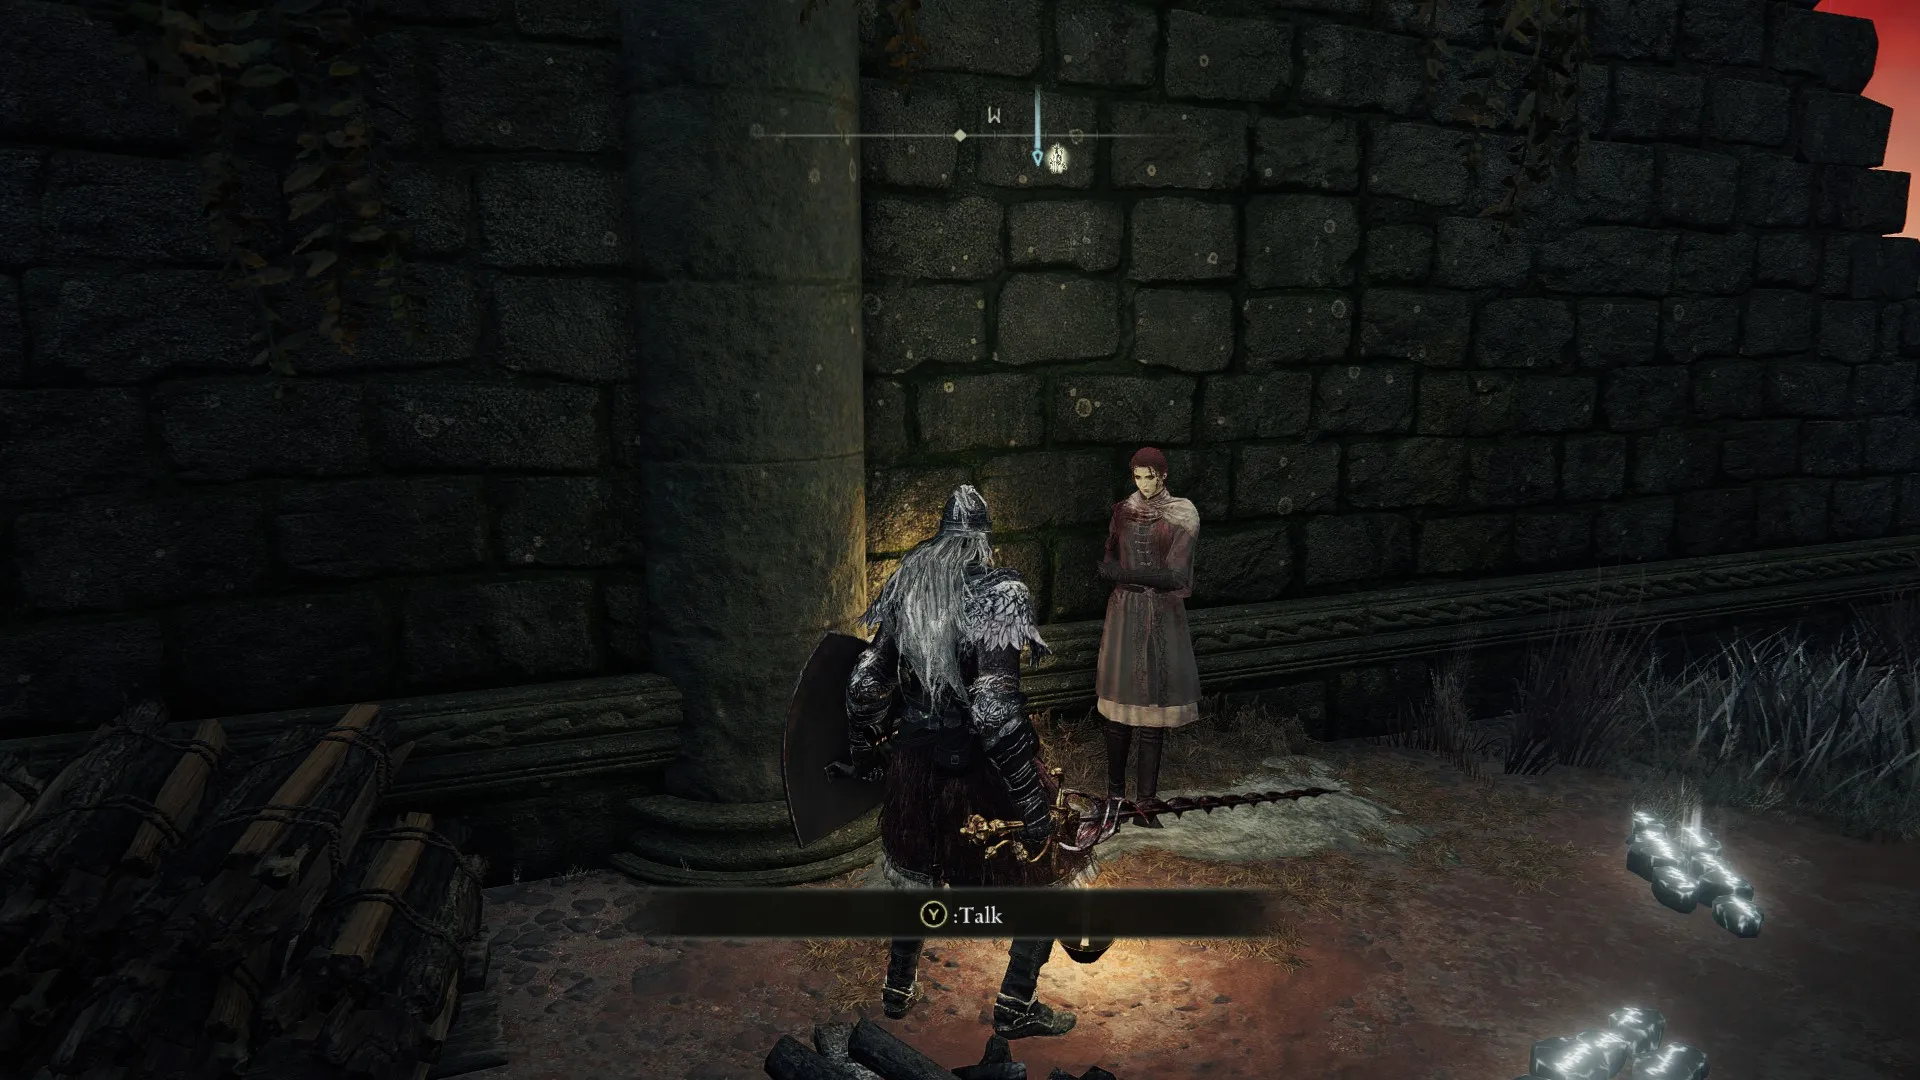
Millicent Quest Step 1: Speak to Gowry in His Shack
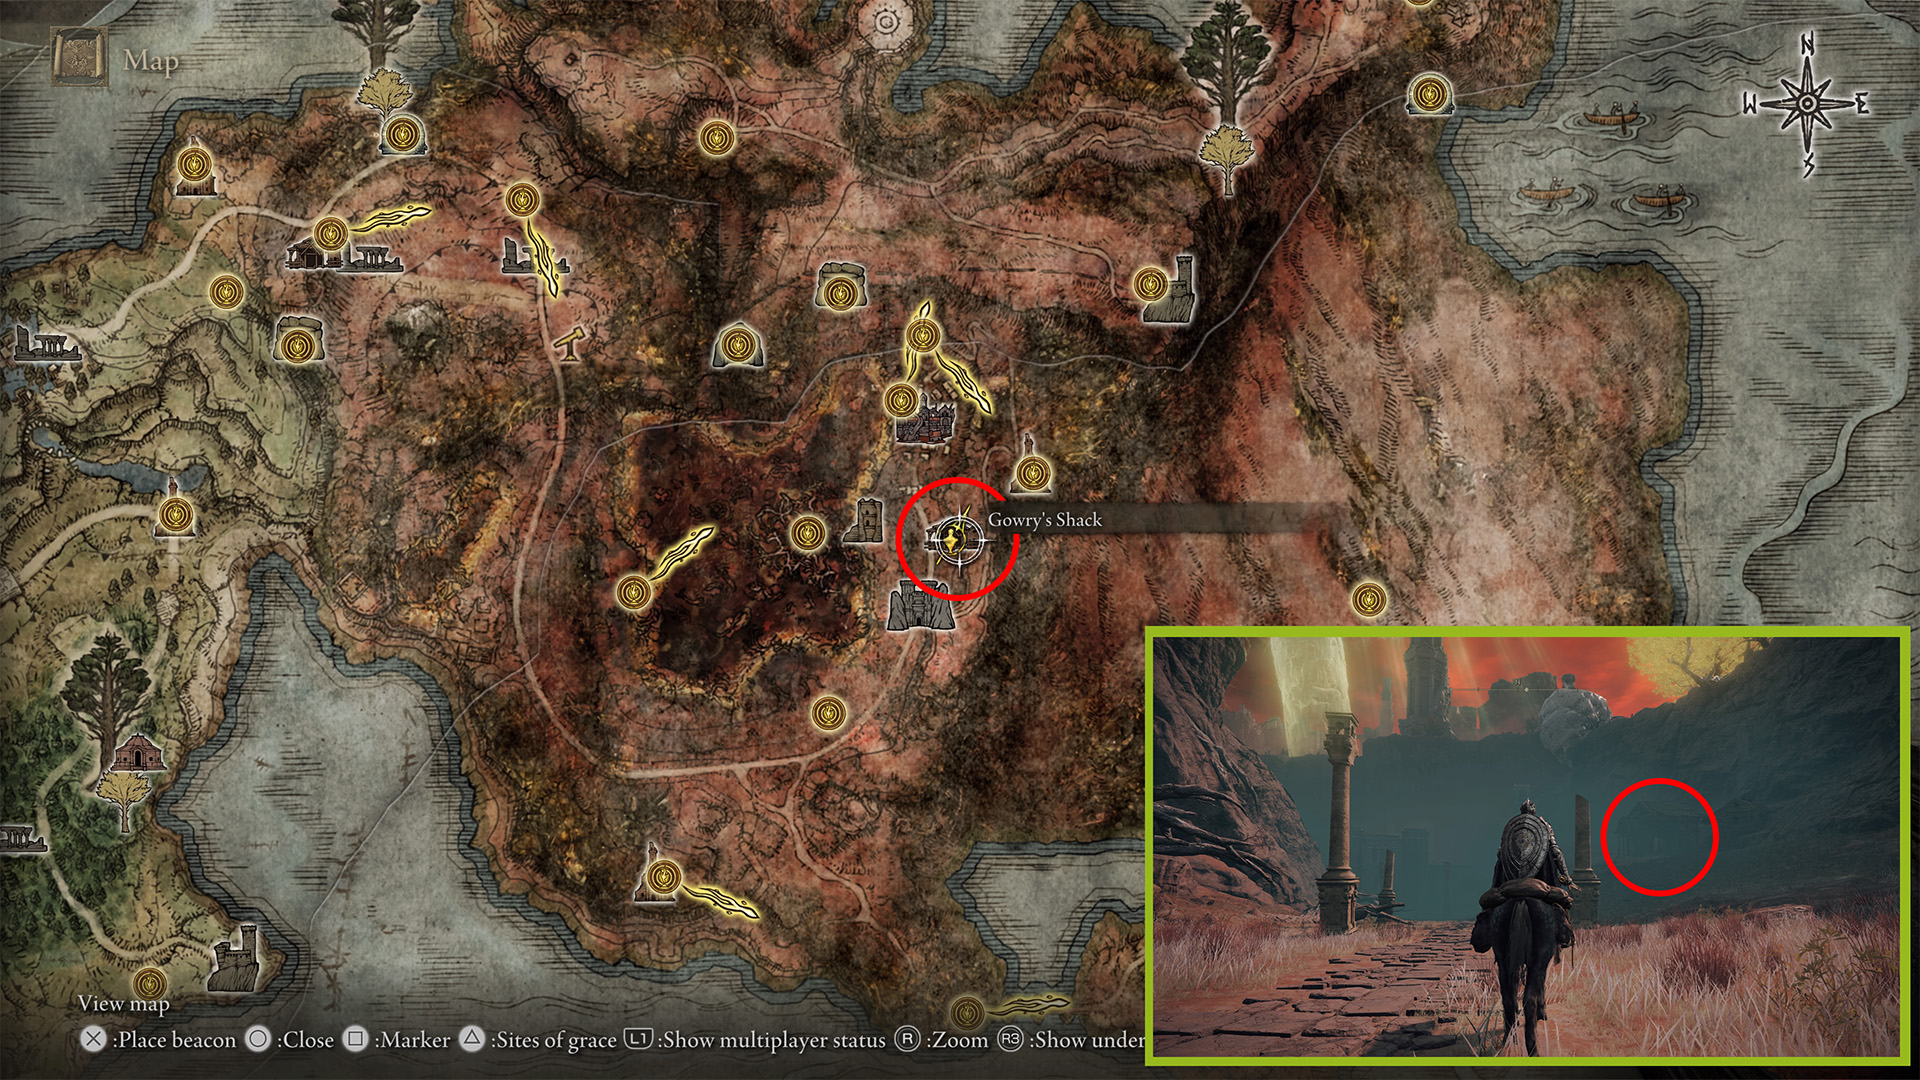
There is indeed a shack with a red-robed man sitting in it near the shining message. This is Gowry, and he’ll mention that Millicent is beyond Sellia, Town of Sorcery at the Church of the Plague, just to the northeast.
He’ll also tell you that Millicent is afflicted with the curse of rot (Scarlet Rot), and that he has a way to heal Millicent but needs the Unalloyed Golden Needle first.
Millicent Quest Step 2: Defeat Commander O’Neil & Claim the Unalloyed Golden Needle
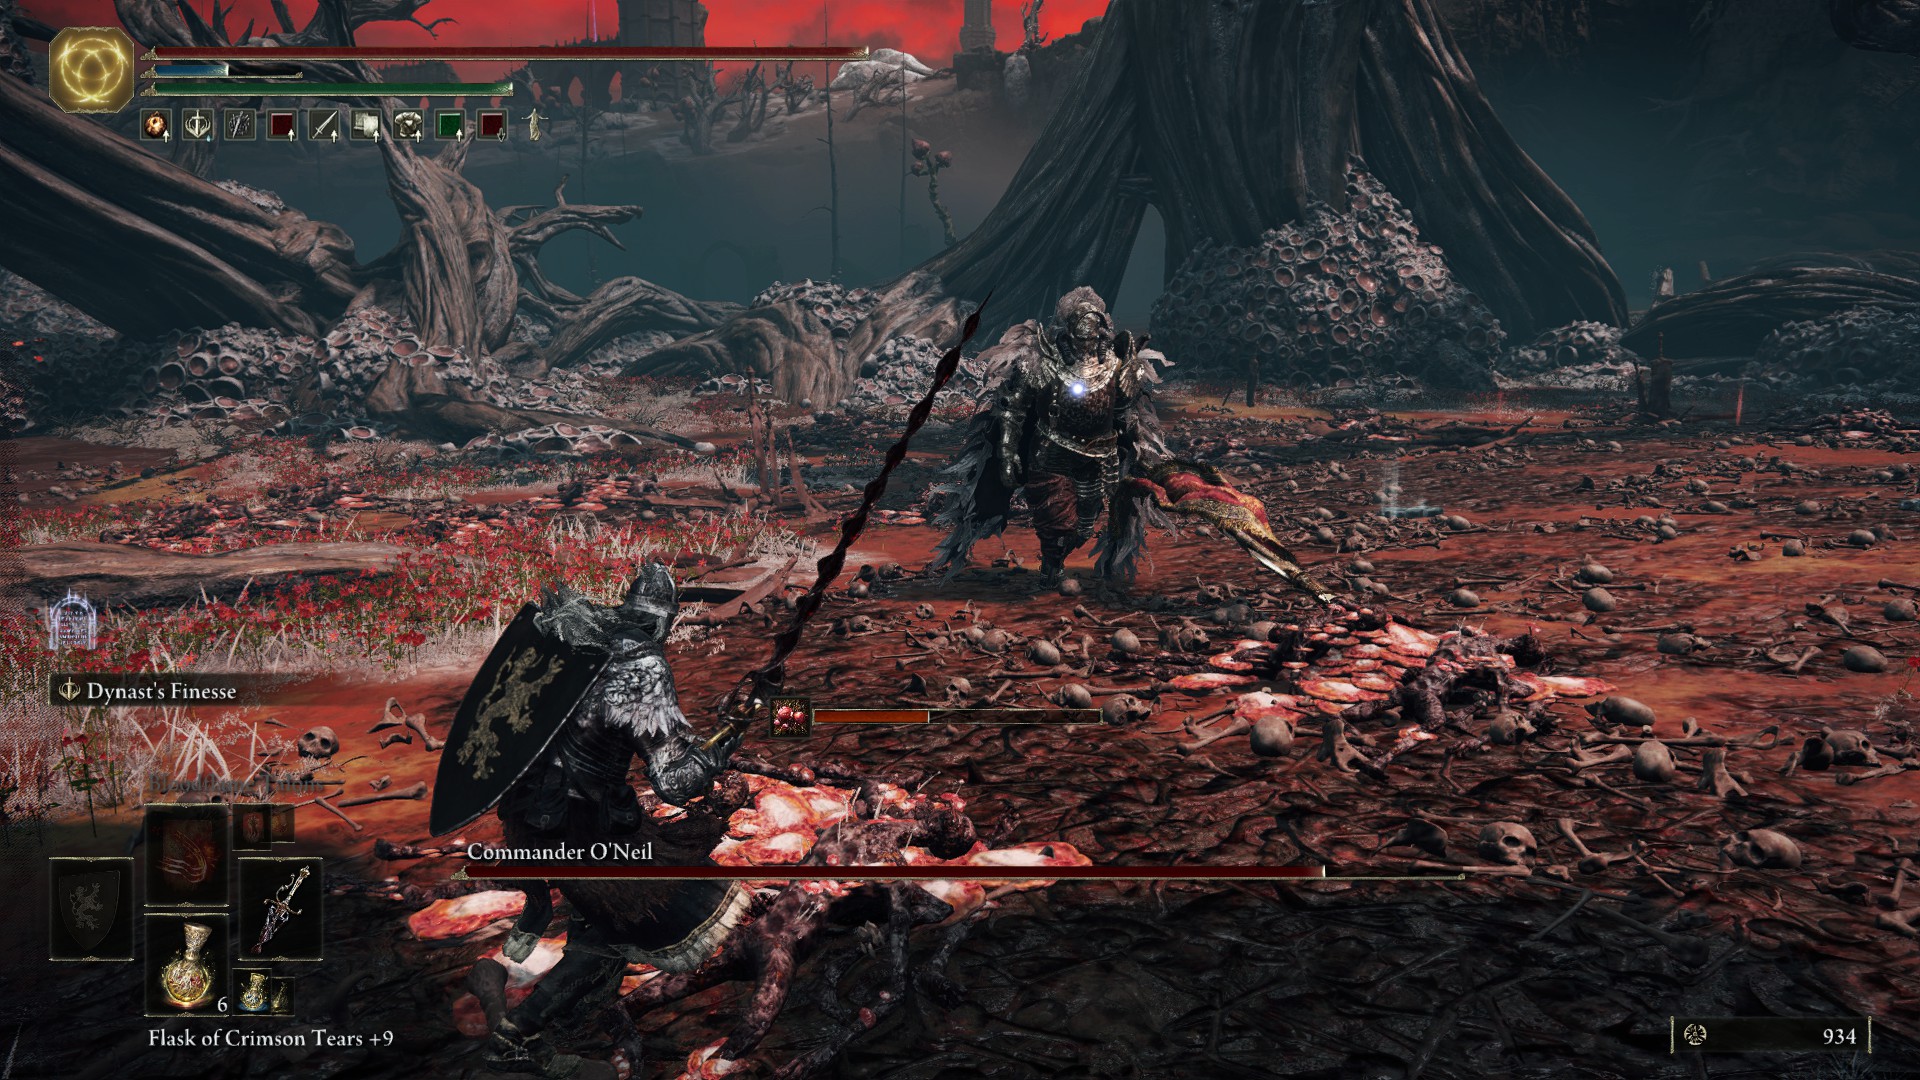
Commander O’Neil can be found on the far eastern side of Aeonia Swamp on a large piece of land with towering, tangled trees. He can be a tough fight, as he hits hard and summons mobs to aid him. When defeated, he drops the Unalloyed Golden Needle and his weapon, a halberd called the Commander’s Standard.
Millicent Quest Step 3: Return to Gowry with the Needle
With the Unalloyed Gold Needle in hand, head back to Gowry’s Shack, and speak to him. He’ll thank you for finding the Needle, then lament its broken state. He’ll ask for some time to repair it.
Warp to a nearby Site of Grace or quit and reload the game, then speak to Gowry again. He’ll give you the repaired Needle and send you to the city of Sellia with its secret in tow: you must light three signal fires to break the seals of the doors blocking your path to Millicent at the Church of the Plague.
Millicent Quest Step 4: Light the Fires of Sellia

When you reach Sellia just north of Gowry’s Shack, you’ll notice three large towers rise above the rooftops. One is on the southwestern side of the city, another on the southeastern side, and the last on the northern side. At the top of each of these is a brazier you’ll need to light.
Start at the tower nearest the northern gate by the Illusion Tree with the Golden Seed. Use Torrent to jump across safely, then climb the ladder to the first brazier. Follow the rooftops to the east to the second tower, then, once that brazier is lit, head back west to the final tower. Lighting the last brazier will remove the seal leading north of the town.
There are other goodies to pick up in Sellia, as well, such as an Imbued Sword Key, the Night Comet spell, and the Double Slash Ash of War.
Millicent Quest Step 5: Meet Millicent at the Church of the Plague

Past the now opened gateway is a winding path north. Skeletons animate to attack you along the way, and magically summoned boulders roll down to try and crush you. Avoid them until you reach the Church of the Plague, where you can find Millicent sitting against the right-hand wall.
Speak to Millicent until you’re given the option to give her the Unalloyed Gold Needle. She’ll fall asleep. Rest at the nearby Site of Grace to wake her up, allowing you to speak with her again. Millicent will thank you for the Needle and say she’s looking for something.
Millicent Quest Step 6: Return to Gowry’s Shack
Make a quick detour to Gowry’s Shack to find him missing, with Millicent standing there instead. Speak to Millicent, then be on your way. You won’t see her again for a little while.
Millicent Quest Step 7: Head to the Shaded Castle North of the Altus Plateau
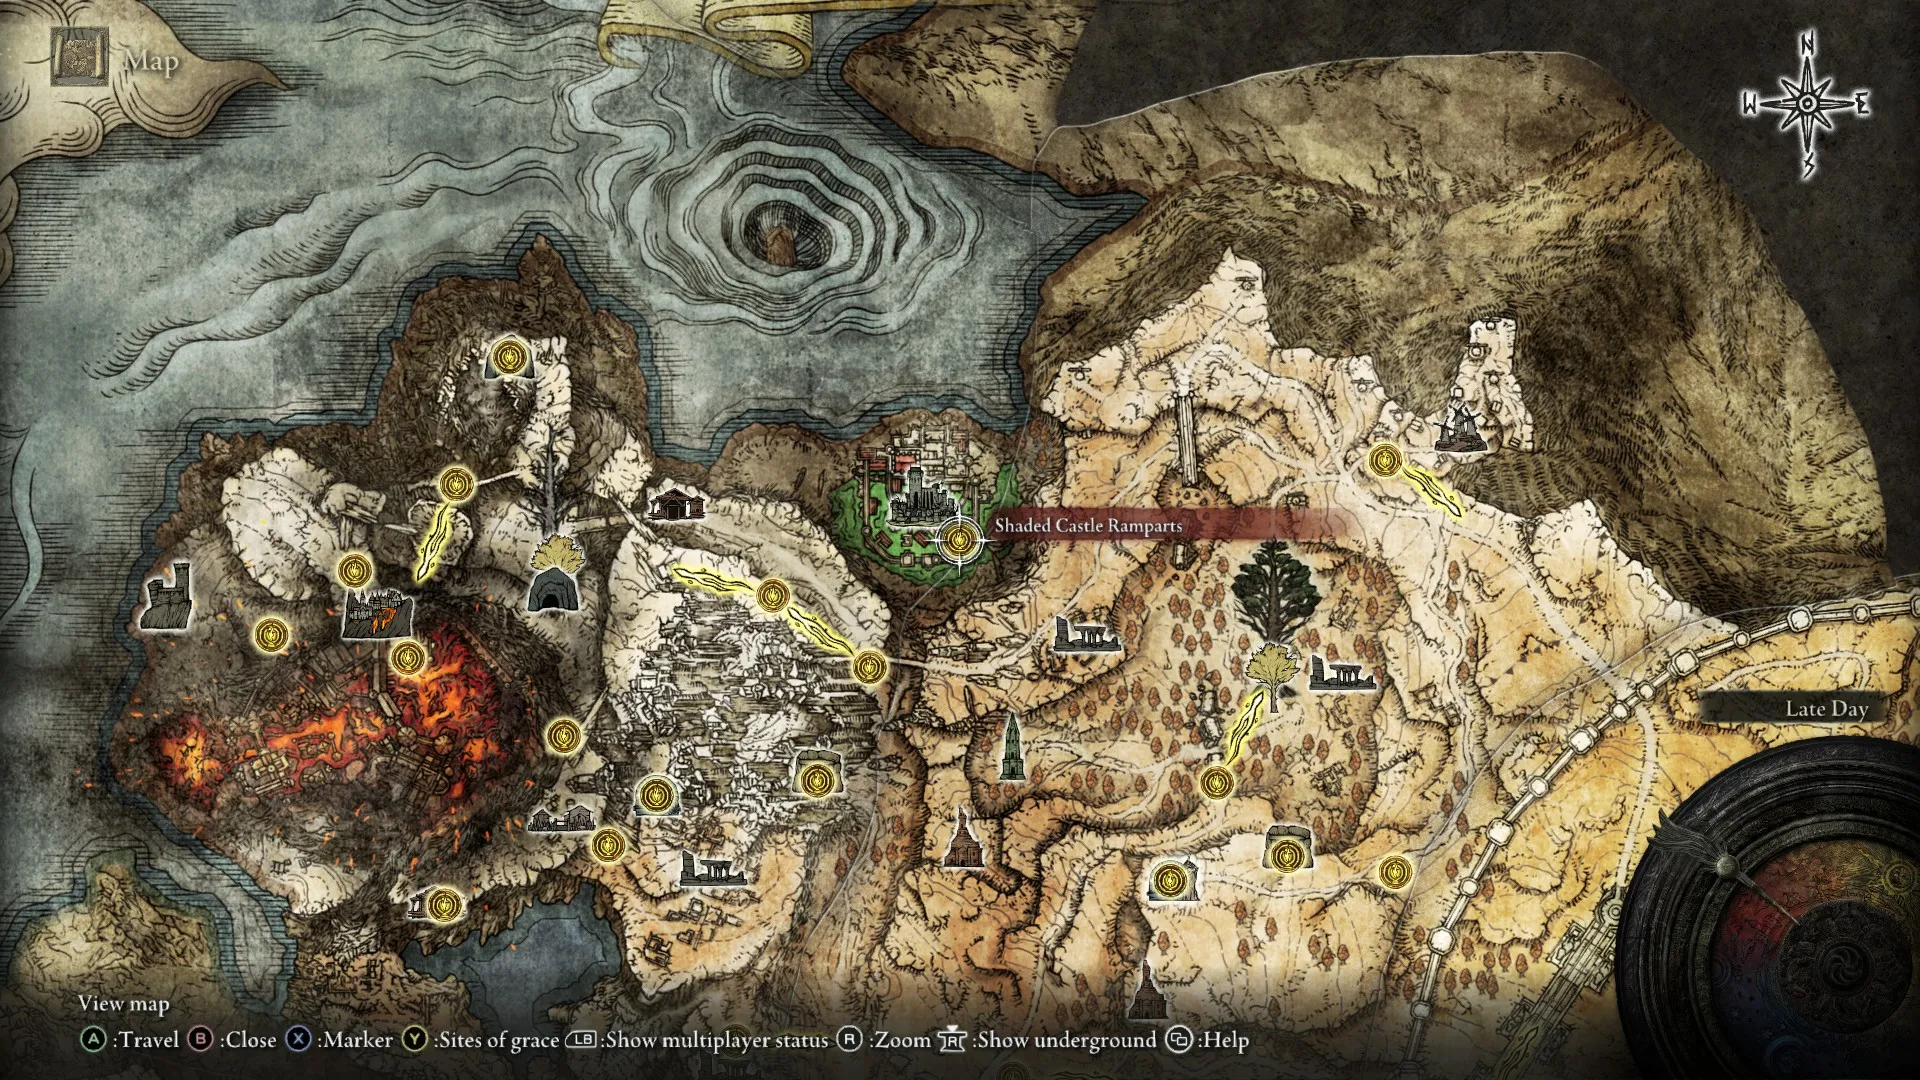
Your next stop is the Shaded Castle in the Altus Plateau. Starting from the Grand Lift of Rold, follow the ravine path north until you reach a castle in a Miyazaki-Special poison swamp.
Go to the castle wall’s eastern edge to find a way onto the ramparts. There is a Site of Grace not far from the entrance point. From the Grace, follow the ramparts westward, all the way around until you meet a set of Cleanrot Knights. One guards a bridge, the other guards a doorway.
Millicent Quest Step 8: Claim the Valkyrie’s Prosthesis & Give It to Millicent
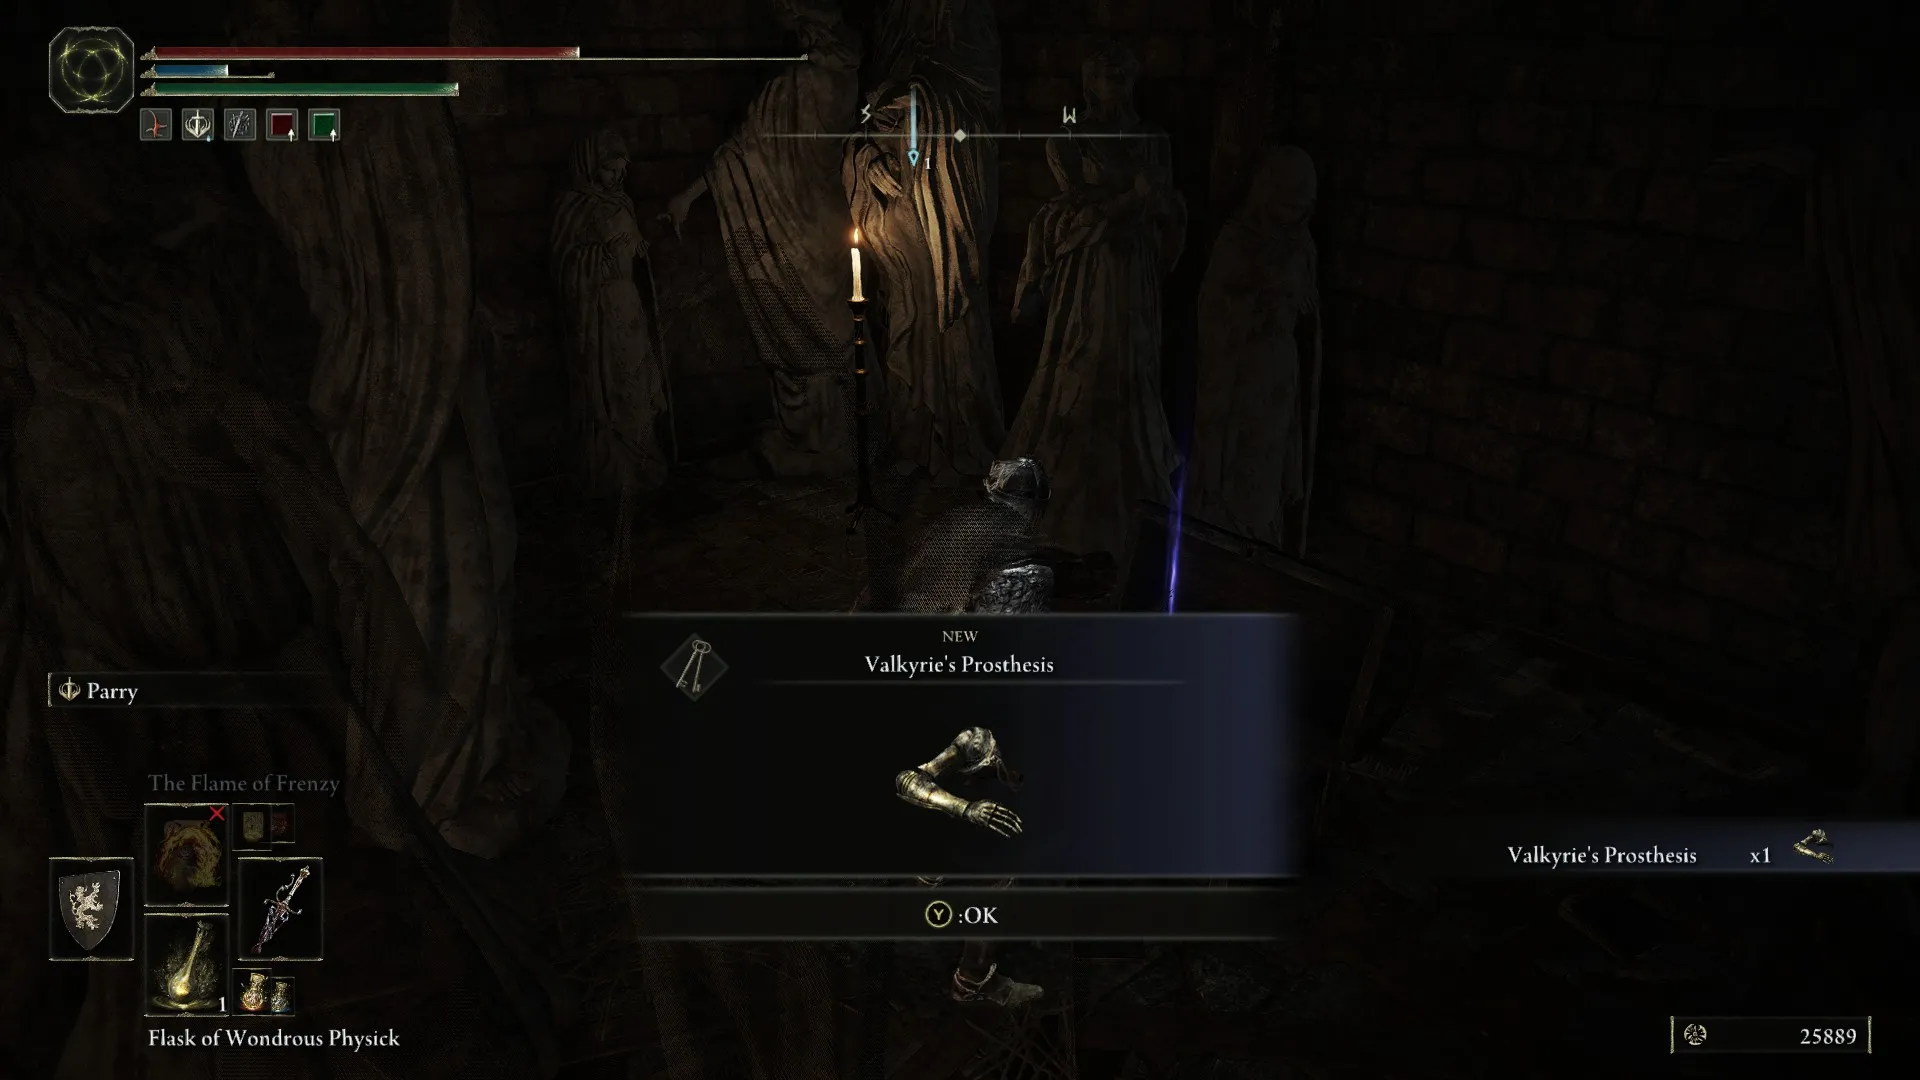
The room behind the second Cleanrot Knight has a single treasure chest. Inside is the Valkyrie’s Prosthesis, a golden metal arm designed for swordmaster. Head now to the Erdtree Gazing Hill Site of Grace near the Grand Lift of Dectus.
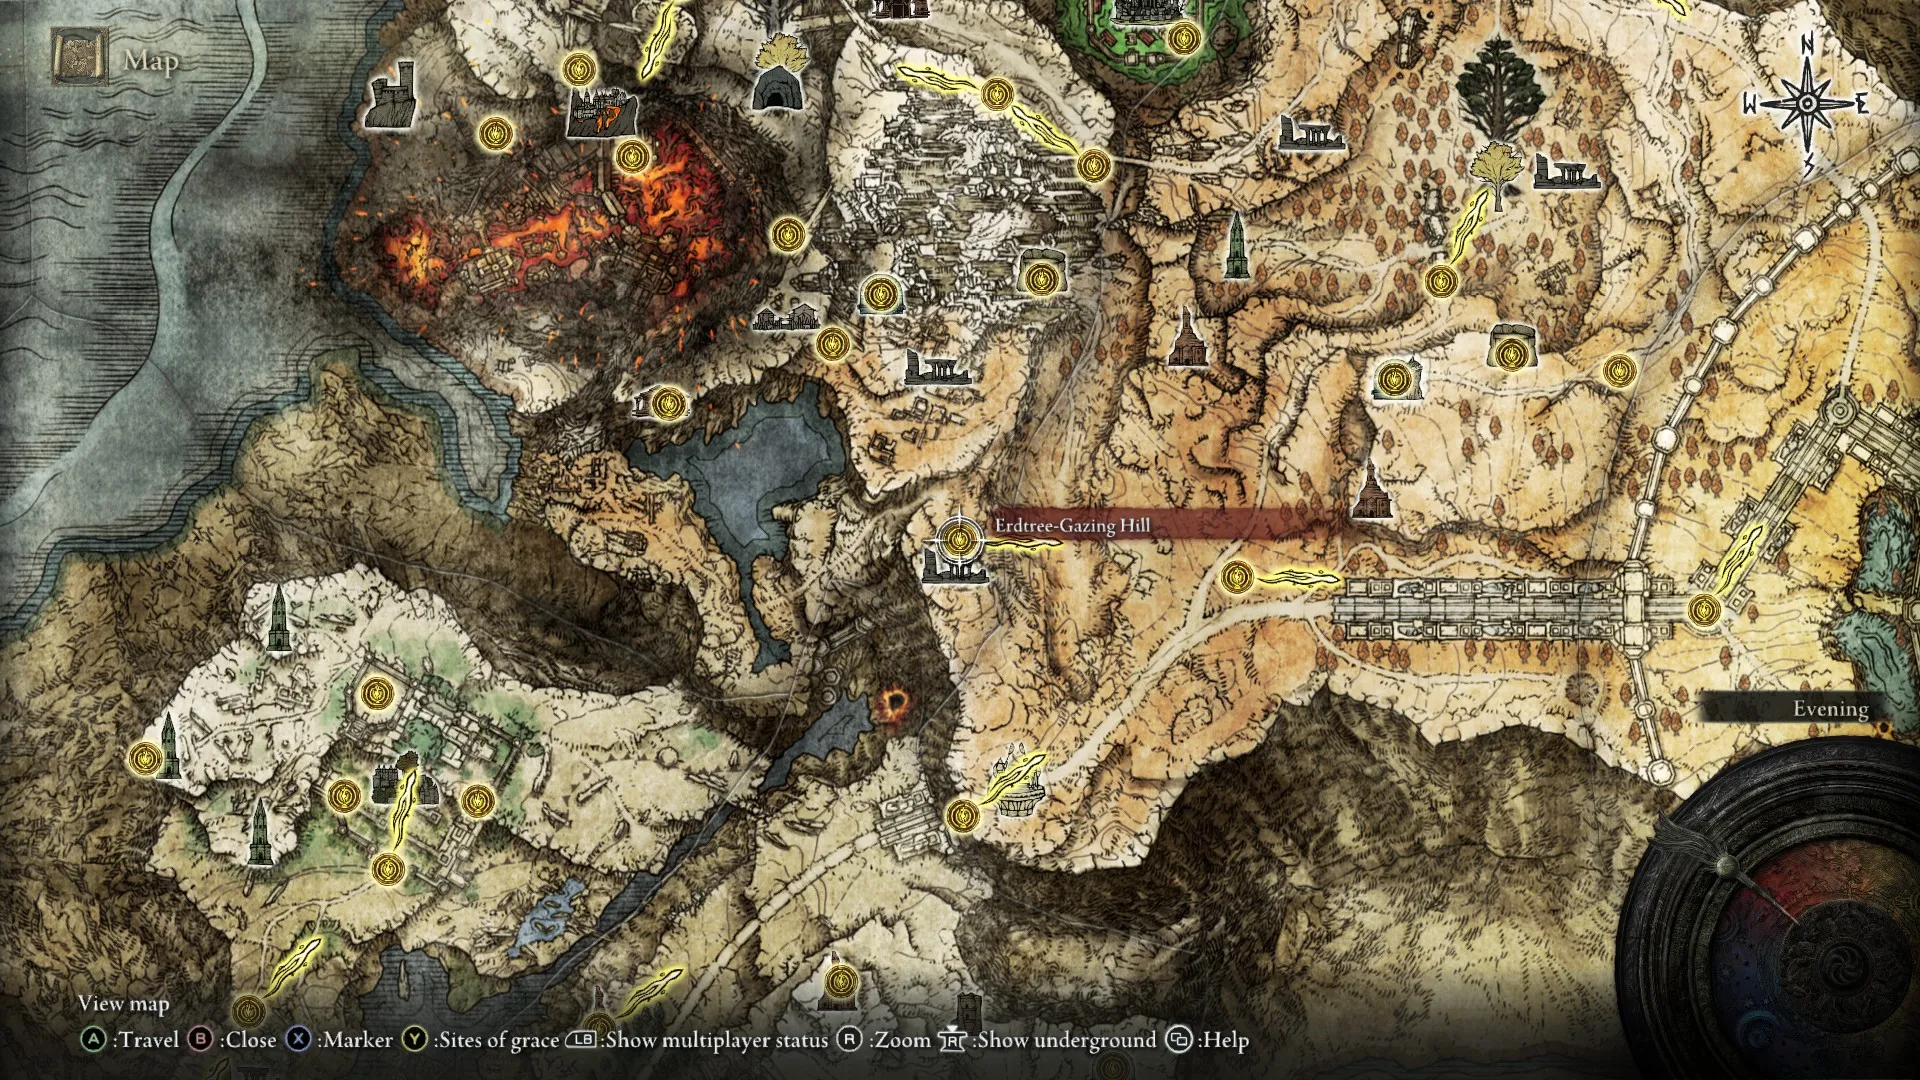
Millicent stands just to the north of the Grace. Speak to Millicent until you get the option to give her the Prosthesis. Do so.
Millicent Quest Step 9: Head to the Windmill Village Far to the North & Defeat the Godskin Apostle

To the east of the Shaded Castle is the Windmill Village. At its peak is a Godskin Apostle boss fight. Make it through the tough fight, then sit at the Site of Grace that appears with the boss’ demise. Millicent will appear nearby. Speak to her again. She’ll mention more about her quest, then be on her way.
Millicent Quest Step 10: Meet Millicent Near the Ancient Snow Valley Ruins in the Mountaintops of the Giants
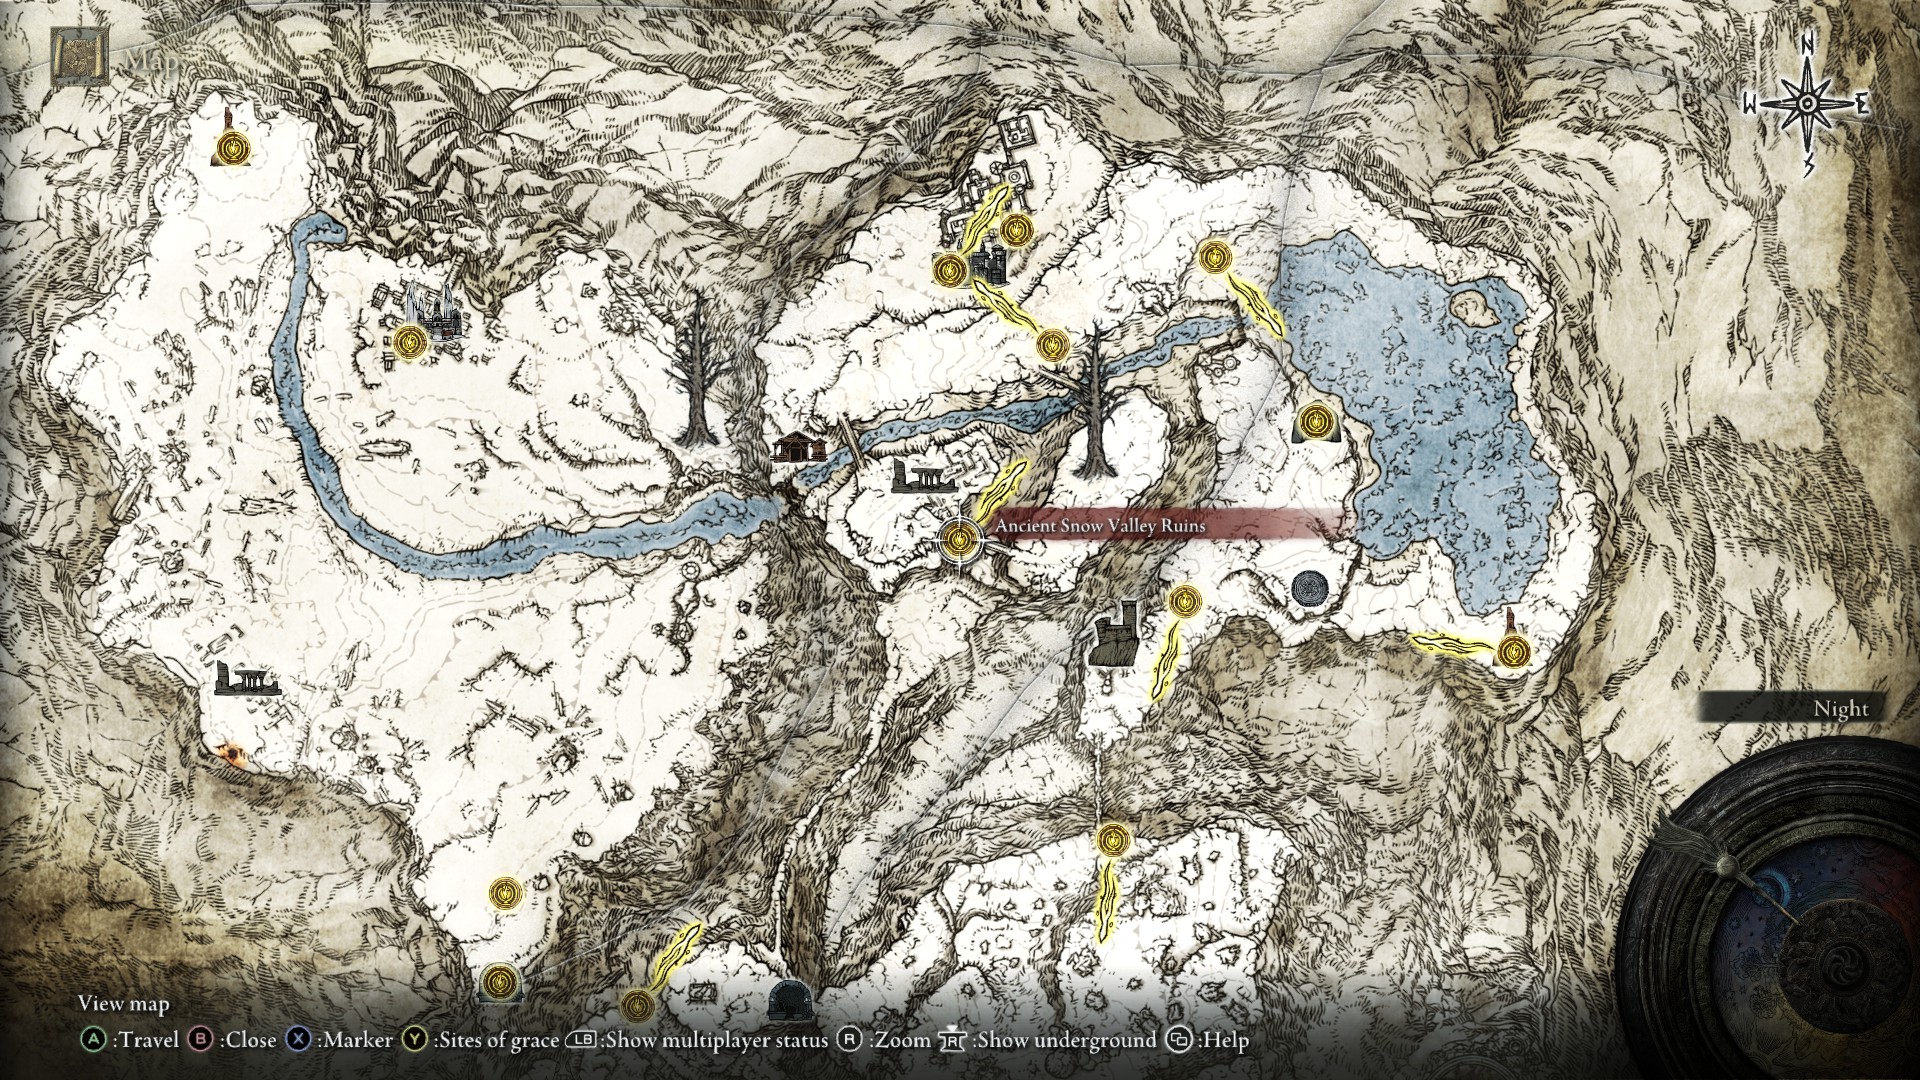
You won’t see Millicent again until you’ve defeated Morgott, the Omen King in Leyndell, and gained the Rold Medallion from Melina. Take the Grand Lift of Rold up to the Mountaintops and head north, past the Zamor Ruins and across the great chain bridge. Near a Site of Grace beneath another large, though more traditional, bridge stands Millicent.
Millicent will mention that she’s looking for a way to the Haligtree where Malenia resides. That is your next destination.
Millicent Quest Step 11: Gather the Two Halves of the Haligtree Secret Medallion & Ride the Grand Lift of Rold
With the Right and Left halves of the Haligtree Secret Medallion, retrieved from Castle Sol and the Village of the Alburnaurics, respectively return to the Grand Lift of Rold and select Use Hidden Medallion to ride the lift to the Path to the Haligtree.
Millicent Quest Step 12: Pass Across the Consecrated Snowfield & Through Ordina, Liturgical Town
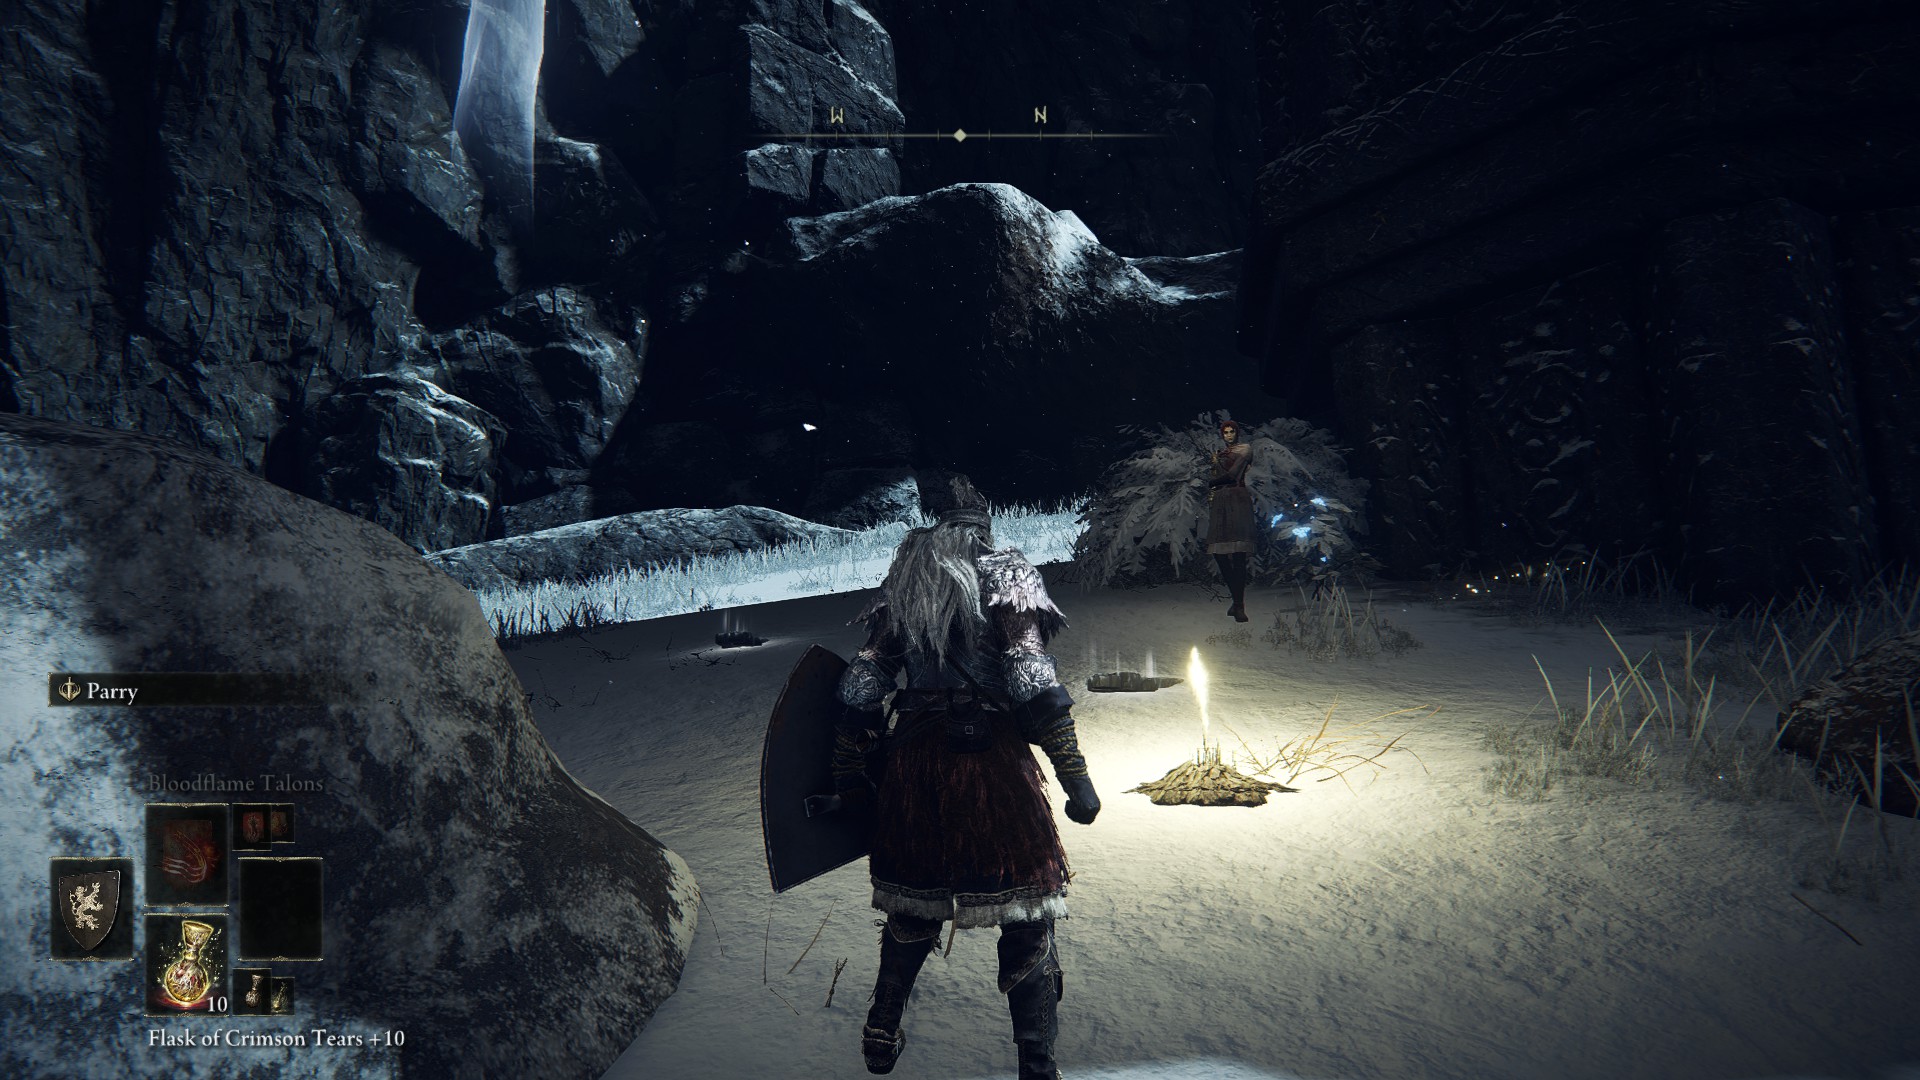
At the top of the Grand Lift, via the Secret Haligree Medallion, you’ll pass through the Path to the Haligree dungeon. It’s not extensive, though the enemies there are far stronger than most others in Elden Ring.
Out of the Path is the Consecrated Snowfield, a vast waste caught in a blizzard. Head directly north of where you leave the Path to arrive at Ordina, Liturgical Town. At its top is another seal, not unlike the one in Sellia. The difference is you must enter an Evergaol at the northeast portion of the town to light the four braziers.
Also, you cannot use Torrent inside the evergaol, making this a much taller platforming task.
- First brazier location: From the Evergaol entrance, head south until you reach a broken wall just before the road. Jump up on the broken bits until you’re on the roof, and be mindful of the archers. Travel along the rooftops until you reach the ladder leading to the brazier.
- Second brazier location: Jump down and cross the street, then jump onto the railing on the other side. Walk across the railing until you can drop down into the alcove with the ladder. Climb up, and you’ll see the brazier in the open air.
- Third brazier location: Head north across the rooftops from the second brazier. You’ll need to cross the rooftops to the north while dodging the flurries of arrows coming your way. Kill the nearest archer to make your life easier, then climb up to the brazier.
- Fourth brazier location: Make your way down to street level near the Site of Grace. The brazier is sitting right near it. The issue is, there’s an invisible Black Knife Assassin that wanders this area, and it will backstab, regular stab, and smash you into the dirt given the chance. Beeline it to the brazier, activate it, and you’ll be thrust out of the Evergoal with the seal at the top of the town broken.
Millicent Quest Step 13: Make Your Way Down the Haligtree & Past Loretta
There’s only one way to go once you reach Miquella’s Haligtree: down. It’s a fairly linear path, and you’ll pass demi-human enemies, mages, and at least two Leonian Misbegotten mobs. Eventually, you’ll reach a large arena, but don’t go in just yet. Head to the left of the arena across the bridge and take the elevator up. It’s a shortcut to the first Site of Grace of the area, ensuring you don’t have to run the whole way every time you fight Loretta.
Defeat Loretta using similar strategies to Caria Manor’s version in Ranni’s questline, then take the next elevator down to Elphael, Brace of the Haligtree’s Prayer Room.
Millicent Quest Step 14: Speak With Millicent in the Prayer Room
The first Site of Grace in Elphael is the Prayer Room, and Millicent will be there provided you’ve followed her quest to this point. She’ll mention her possible relation to Malenia.
Millicent Quest Step 15: Seek the Rot Waterfall
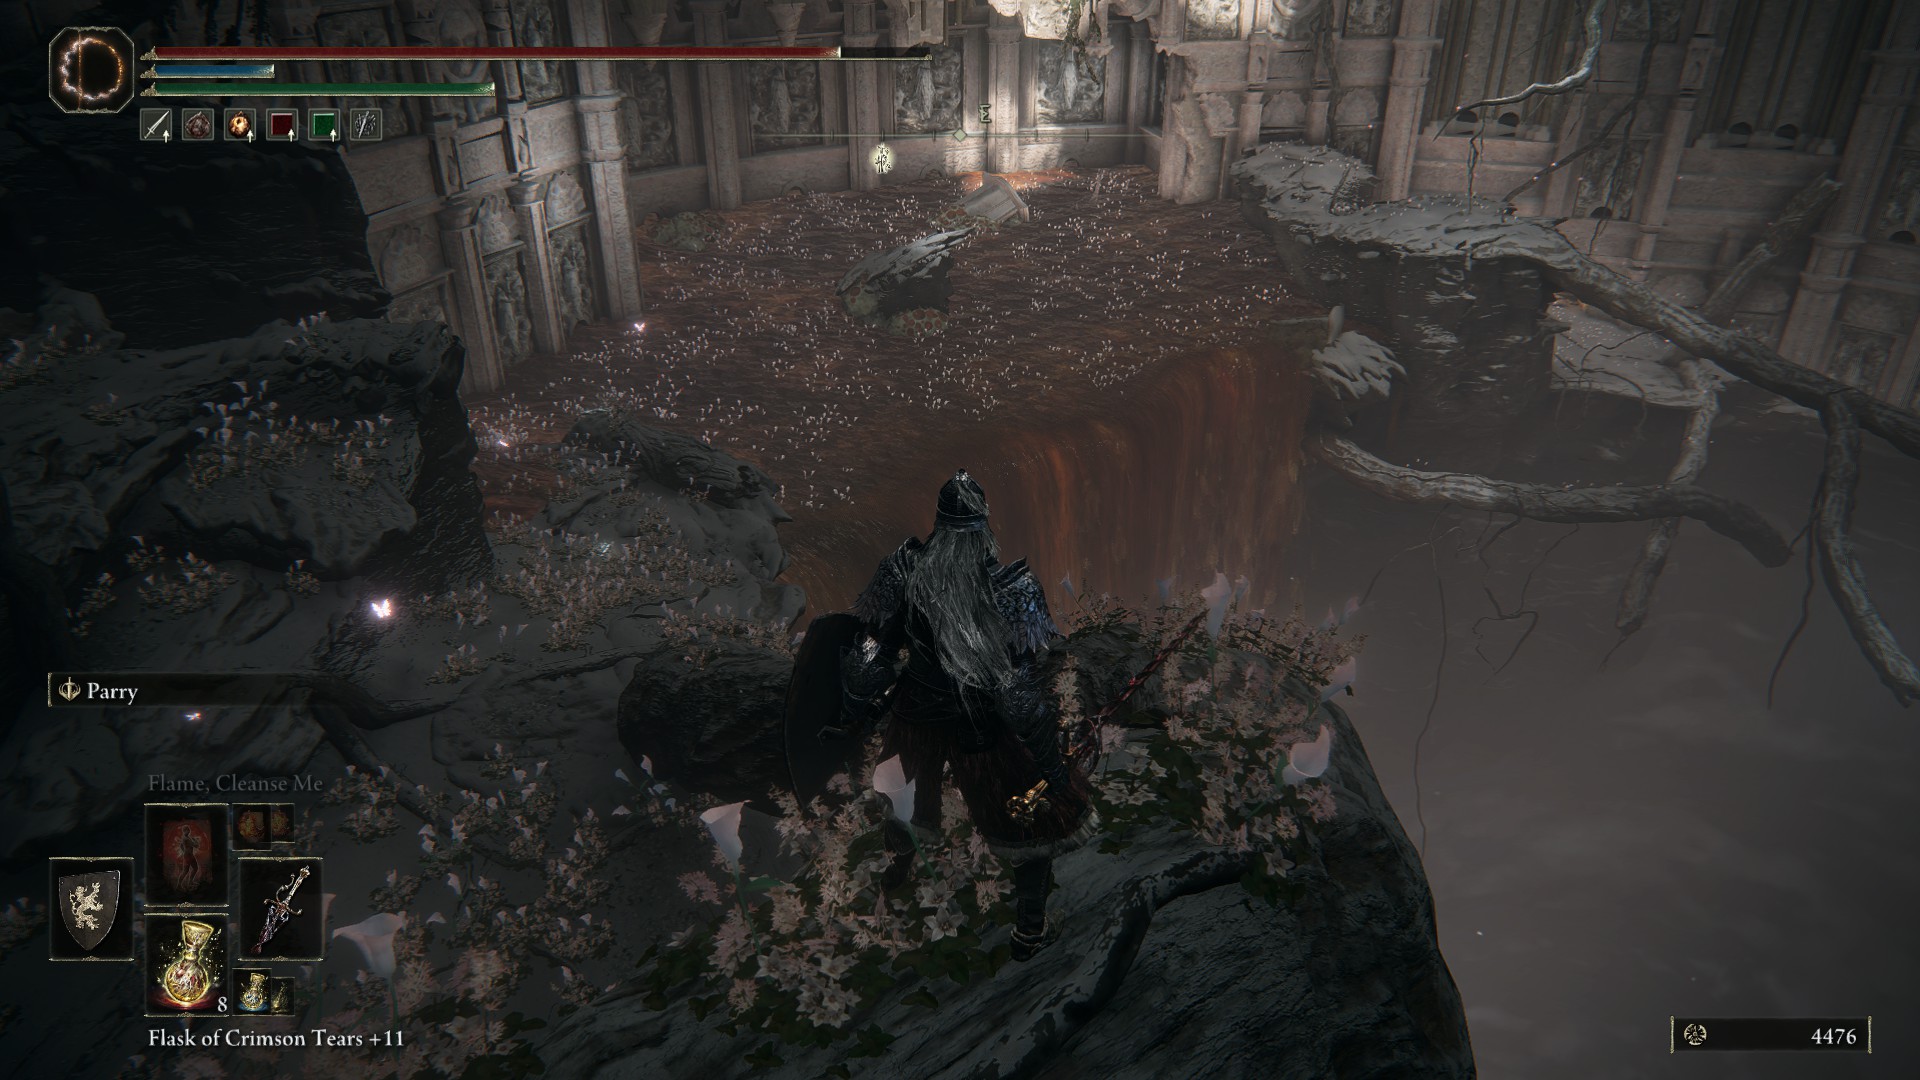
Progress through Elphael until you reach a large waterfall of Scarlet Rot ridden water. You’ll need to cross it.
Once done, you’ll see another pool of the stuff in the distance. Instead of heading directly into it, turn left and head down the ladder in the small chamber beyond. Pick up the Drainage Channel Site of Grace, then return to the hell world that is the massive pools of Scarlet Rot water. Go into the large pool by taking the branch near the Drainage Channel entrance to spawn an Ulcerated Tree Spirit boss. Kill it.
Millicent Quest Step 16: Assist or Challenge Millicent
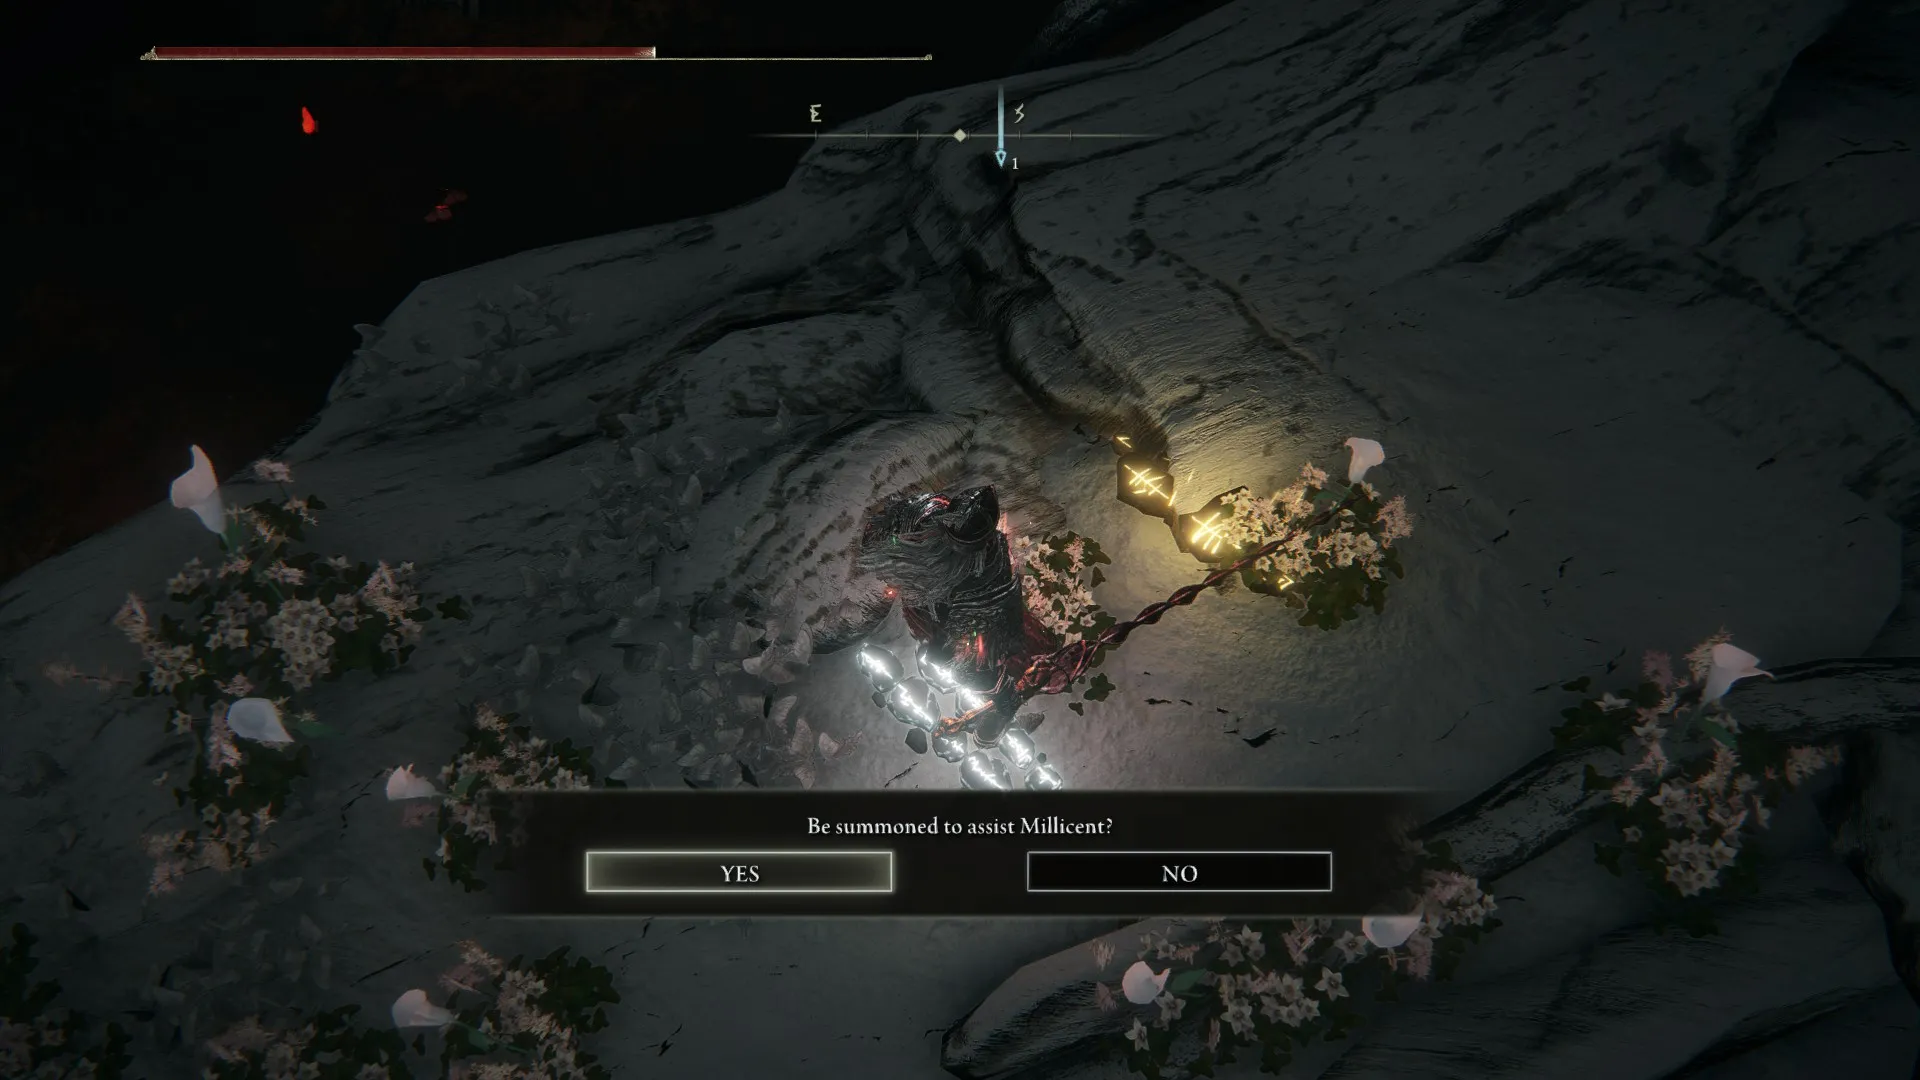
Head to the far shore of the Rot pool to see a pair of summoning signs, one red, one yellow. The red sign allows you to invade Millicent’s world, kill her, and claim Millicent’s Prosthetic, a Talisman that increases your Dexterity by five and causes successive attacks to deal more damage. Killing Millicent here ends her questline.
The yellow sign summons you into Millicent’s world as a cooperator, and you’re charged with helping her kill her four sisters. They all deal massive damage and will kill you and Millicent without much trouble. Stick close to her and do everything you can to take them down quickly. If you fail the fight by dying or by Millicent dying, you’ll be sent back to your world to try again. Succeed and receive the Rotten Winged Sword Insignia Talisman that significantly increases the damage of successive attacks.
Millicent Quest Step 17: Take the Needle from Millicent
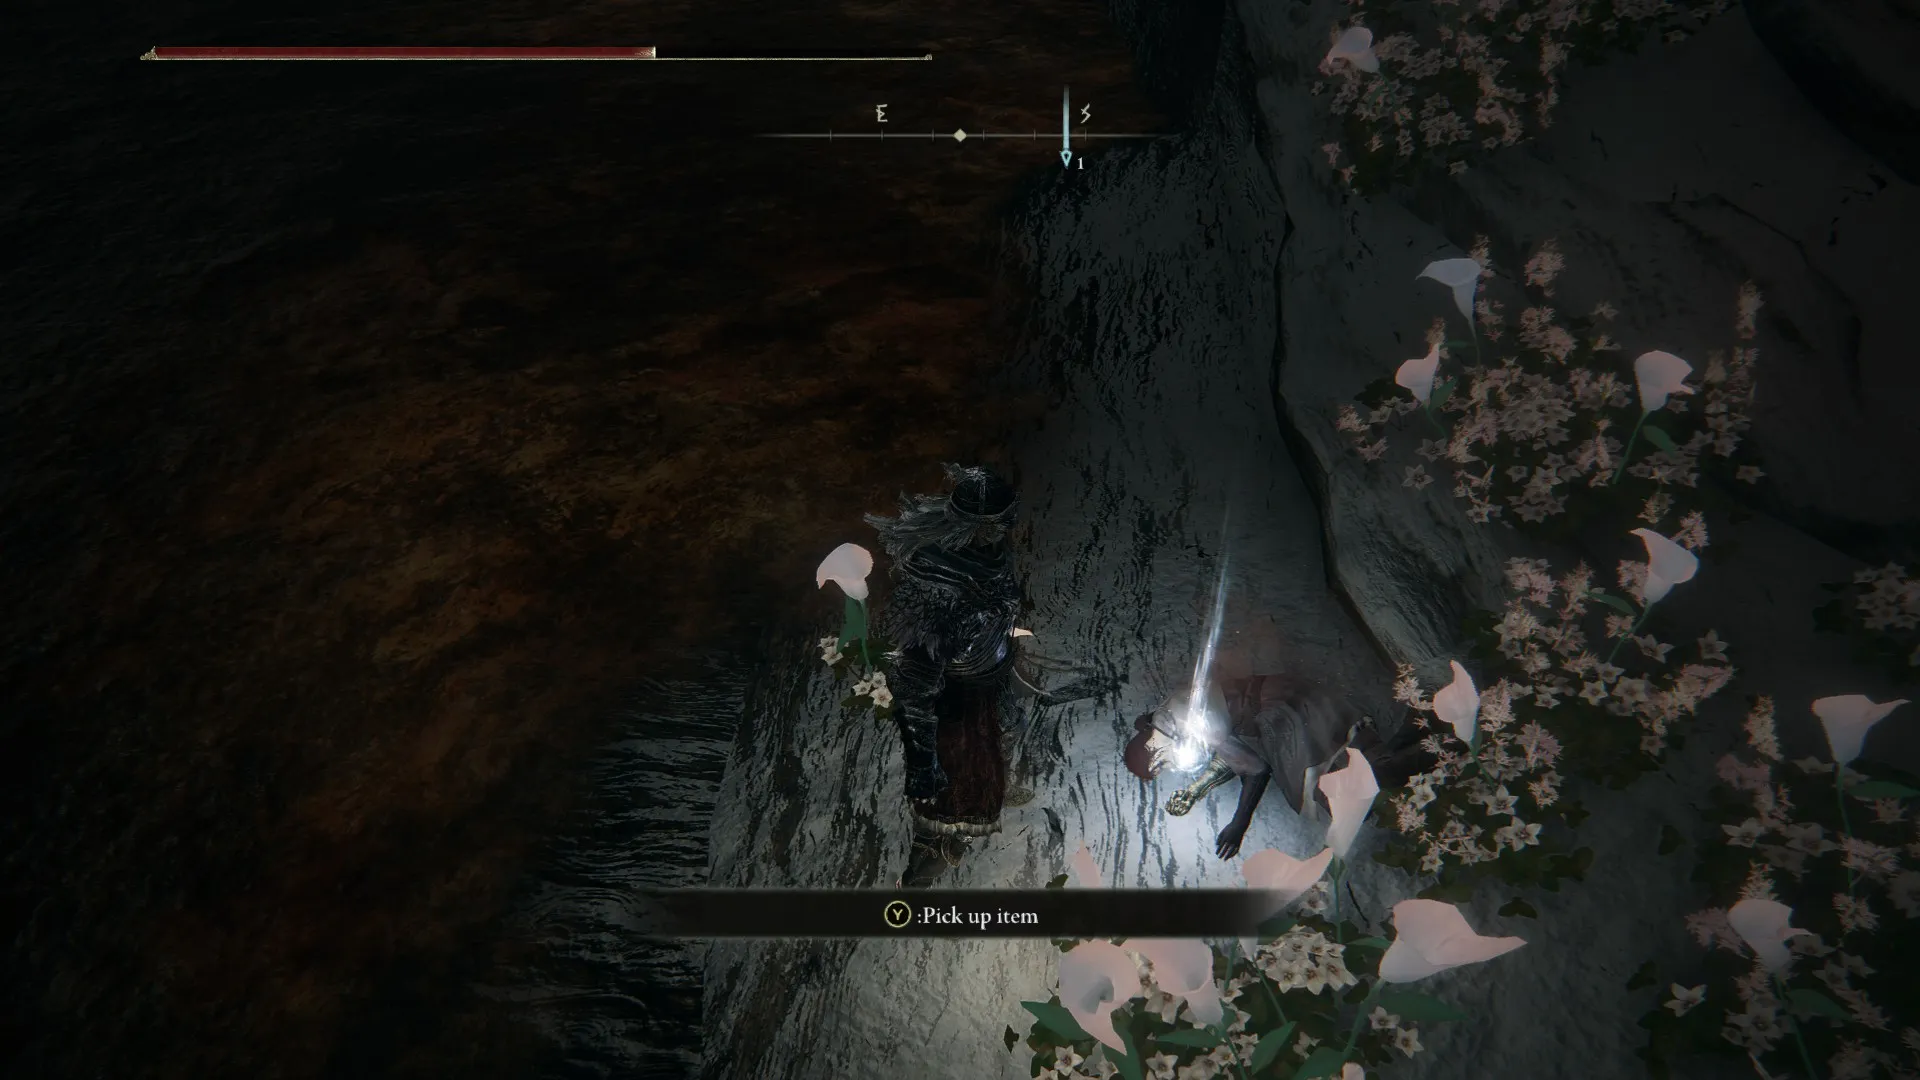
If you assisted Millicent, she’ll be further up the shoreline, suffering. She’ll say she removed the Unalloyed Gold Needle and will die soon. Reload the game or travel to a Site of Grace and return, and she will, indeed, be dead. Take the Needle from her corpse.
Millicent Quest Step 18: Defeat Malenia, Blade of Miquella, & Use the Needle on the Flower That Blooms

Malenia is one of, if not the, hardest bosses FromSoftware has ever produced. Defeat her by any means, then use the Unalloyed Gold Needle on the scarlet flower that blooms in her chamber once she’s dead. You’ll receive Miquella’s Needle, which you can only use in one location, farther to the east.
You’ll also get a Somber Ancient Dragon Smithing Stone.
Millicent Quest Step 19: Defeat Dragonlord Placidusax & Use the Needle on His Remains
This step is only necessary if you’ve followed Hyetta’s questline and have taken the Frenzied Flame within you. Using Miquella’s Needle after defeating Dragonlord Placidusax will allow you to purge that flame from your body. If you are going for any of the other endings, the Needle has no further use.
With that, you’ve completed Millicent’s questline in Elden Ring, conquered some of its toughest challenges, and been rewarded with some of its best gear. If you seek to kill all the other shardbearers, have a look at our guide on how to beat Mohg, Lord of Blood. And be sure to keep your eyes on our Elden Ring guides hub, as it’s still going strong.


Published: Mar 15, 2022 10:53 pm