
Welcome back fellow hunters! Flame here with another Solo Hunter’s Guide installment, in preparation for Monster Hunter Generations, soon to be arriving for the Nintendo 3DS this July 15th! This time we’re focusing on self-improvement, and how you can better yourself at hunting efficiently! This part took longer to annotate than expected, so strap in for the long haul and let’s get started!
*quest horn noise*…And we’re off!
In this part of the guide I want to focus on 3 skills about self-improvement that I find most rewarding out of solo hunting — what they are, and how to do so (click to jump to the section!):
As said in the introduction, “self-improvement can be a wonderful thing”. But what exactly is self-improvement, and how does one improve in the first place with solo hunting?
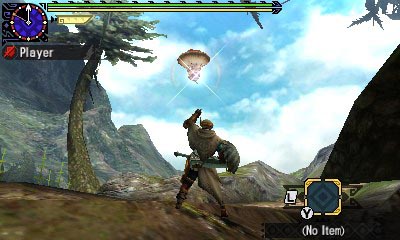
Does one just brute-force a few quests solo at the gathering hall? Well, that method of might work for some, but for many the first attempt can be overwhelming and even disheartening, such as this hunter trying to do a dual Nargacuga quest:
“NOPE-NOPE-NOPE-NOPE-NOPE.”
In actuality, self-improvement is simply this: “While the main goal is to win, it is far more important to learn from the monster, and to learn more about your own hunting skills.” This helps you cut down on quest time, be a better support for your team, and more as you learn what’s best to do during a hunt, one small step at a time as you solo hunt.
Wait, “a better support for your team”? You read that right–something you’ll learn from this section is that self-improvement is useful even to multiplayer-focused hunters–all 3 of these skills are essential for endgame hunting, as a one-two hit combo from a monster can spell a quest failure for the team.
So without further ado, let’s move on to the first skill to improve:
Skill to Improve #1: Monster Attacks and Patterns
“So, what is this?”
Well, you ever have that one attack that gets you every time in a fight? It’s frustrating, and you wish the monster would stop spamming it (and sometimes online it seems today is just not your day).
*enters zone* “Dammit, why me?!”
Each monster has its unique menagerie of attacks they like to perform, and some attacks are repeated over and over. This attack repetition is called a “pattern”, and some patterns can be predicted through various “cues” initiated prior to an attack.
For the above example from Monster Hunter 4 Ultimate, the monster Gravios uses his laser move at the hunter. In normal situations it’s a slow, readable pattern, so let’s take a look at that laser more carefully in a solo, non-sweeping “360 no-scope” setting:
Do you notice any cues to the straight Gravios laser? One cue is that Gravios rears back, and another cue is a small puff of fire appears in its mouth prior to lasering.
Also, the attack doesn’t end there–during the laser, notice how there’s also a puff of fire leaking out of its belly. This is a cue for the big fire fart cloud that appears shortly after the laser’s completion.
This means if one wants to avoid the straight Gravios laser, don’t stand right in front of him, and not too close to him either (unless a hunter wants some toasty flatulence coming in their direction).
“So how do I go about learning patterns?”
This is where solo hunting can help out a lot! Here’s one way to practice learning monster patterns: The No-Hit Challenge!
Steps for The No-Hit Challenge:
- Go entirely on your own (i.e. I recommend not taking the palico/shakalaka either), and try to withstand at least 10-15 minutes in the quest without getting hit by the monster. I suggest this length because some monsters have new attacks/patterns when they are enraged. As a word of caution, monsters can move faster and/or hit harder when enraged too.
- Choose a monster quest that matches the rank of the monster you’re trying to fight. This is important because monsters learn new moves/patterns for each rank (low/high/g-rank). There’s nothing more embarrassing than thinking you know a boss inside-out and then it carts you with an entirely new move in g-rank. Also, the frequency of attacks tends to increase per rank. A monster that previously stood still roaring in low rank will rush at you mercilessly in g-rank, so keep on your toes!
- Pick the same subspecies/variant monster. Experienced hunters can tell you that a Pink Rathian is a much different experience than a normal Rathian — subspecies can have new attacks, new status/elements, and even new weaknesses. Don’t assume that if you know one Rath, you know them all — that’s just what Pink Rathian want you to think.
- Make it simpler for yourself and choose an easier monster quest than the target if possible. For example, if you’re struggling against a G-rank naked quest against 2 Deviljhos, then choose a g-rank normal quest against 1 Deviljho. Self-improvement is all about starting small and working your way up — there’s little sense in tackling 2 brute wyverns when you can’t even deal with 1.
Optional: Think this is boring? For even more of a challenge, leave your armor at home and go entirely naked! Even the small raptor-like Gendrome can prove to be a scary endeavor when its short hop takes half your health.

This learning exercise might sound crazy and pointless, but hear me out–the key point of this learning solo experience is that all the attention is on you. This helps you learn patterns better than getting 360 no-scope’d out of the air by a stray Gravios laser, or combo’d left and right by two ferocious kitty wyverns to death.
Also most importantly, DON’T GIVE UP if you get hit, because if you cart twice you can always select “abandon quest” so you don’t lose your zenny and items on the third attempt. It’s going to be a scary experience, and it may take you many tries, but play it safe and take it slow. After all, there’s no rush since you’re fighting on your own.
Another tip is it might be beneficial to not attack and watch the monster’s movements when it does a different behavior, so you can observe the range and speed of the pattern. Since the goal is to learn the preferred patterns of a monster, watching might help you learn how to maneuver yourself before that pesky attack hits you again. (It also allows you to discover openings for attacks, but more on that later.)
On the flip side, something you’ll learn from practicing this method unfortunately is that not all attacks have cues. For example, several monsters will perform an “instant charge” and steamroll the hunter without batting an eye, and this can leave the player in a very frustrating situation.

“In case you’re wondering, I got hit by its instant charge.
Yes, it hit me with its charge before it charged.”~CantaPerMe, a renown solo speedrunner on YouTube
This is where the second self-improvement skill comes in handy:
Skill to Improve #2: Hunter Evading and Positioning
From the previous learning exercise, you probably already tried these two actions a bunch without even realizing it.
Let me define the terms first:
Evading is — you guessed it — when you avoid a monster’s attack via a dash, a roll, a running dive, or even a jumping motion from pressing the selected command in a given situation.
Evading tends to use a bit of stamina (it varies upon the type of evasive maneuver), and depending on your weapon and armor skills it has a certain amount of “invincibility frames” (AKA “i-frames”) where a monster’s attack will pass through you with no damage. However, if the monster’s attack frames exceed your i-frames, the attack will still connect, so be aware of lingering attacks (more on this later).
Evading allows a hunter to avoid all sorts of troubling monster behavior, from bites to roars to even lasers from a giant world-eating Dalamadur (another CantaPerMe MH4U clip incoming):
As you can see, evading requires a certain amount of precision. If Anna rolled too early, the laser would still go through and damage her — the same goes for rolling too late.
Furthermore, to reiterate what I said earlier, lingering attacks will still connect if they exceed your i-frames. For example, monsters like Gravios have a longer roar, so even if you do a frame-perfect roll at the start, your hunter will still clap their hands over their ears at the end. This happens because Gravios’s longer roar exceeded the shorter roll in terms of duration. Make sense?
By extension, positioning goes beyond taking advantage of i-frames like evasion does. Positioning is when a hunter seeks a spot to where the monster’s attack can’t reach them. This skill requires a lot of knowledge on monster patterns in order to be consistently successful, and is one of the hardest but most rewarding aspects of self-improvement.
Learning where to stand can take quite a few tries…
To clarify, good positioning uses a combination of evasive maneuvers and moving around to avoid an attack, but with a different mindset compared to strictly evading. Instead of avoiding a move that will damage you if you stand still, you’re trying to find a place where if you stand, the move won’t hit you at all.
A good solo hunter will take priority on positioning, and use evading as a last resort, because positioning lets you capitalize on an opening as the monster completes their attack animation, or it lets you move around to find a better one. On the other hand, evading is for when you know you can’t avoid a hit, or you want to be sure that the one-shot move won’t connect upon landing.
For an example on positioning, here’s YouTuber OrigamiTim with a tutorial on how to handle Rajang, a monster known for a small repetitive list of attack patterns:
Do you see how OrigamiTim utilizes Rajang’s patterns to know where to stand and deal damage? To contrast this with CantaPerMe’s earlier evasion clip: instead of trying to roll through Rajang’s laser, OrigamiTim runs to a spot where he knows he won’t be in range of the laser, and capitalizes with a greatsword charge attack.
Note that this works best in a solo situation, because the attack targets OrigamiTim, and not his friend on the other side of the zone. This allows OrigamiTim to position himself to land a full-powered hit as well as be ready for the next attack Rajang decides to unleash.
“But Flame, then how does positioning help a team?”
A fair question to ask, because in team play, you don’t know who the monster is going to target next. Rajang might decide to throw the boulder at your partner for a change; suddenly you’re flying through the sky with a mouthful of rock because your friend was at a slight angle behind you and the projectile just so happened to nick you passing by…not a fun time. But this is where positioning plays a role with a big assumption: assume every time the monster faces you, it’s going to attack you.
Remember how I said the second self-improvement skill will help against attacks with no tells? Positioning is key! Take for example CantaPerMe’s instant charge frustration from earlier, now with positioning in mind:
In this situation, Yian Garuga finishes up a fireball attack, and then instantly charges forward — yet Anna somehow manages to avoid the charge.
How did that happen? Note where the hunter stands. She’s standing in that perfect sweet spot that lets her avoid the charge from hitting her. This is how positioning helps in a fight where a monster has a no-cue attack — you simply stand or move to a place where you know the attack won’t reach you.
Now you might be asking another question — why in both clips of fighting Yian Garuga does CantaPerMe target the monster’s head? Wouldn’t it be safer to just stand behind it since Yian Garuga can instant charge forward?
This question’s answer relates to the third and final self-improvement skill I will go over, known as:
Skill to Improve #3: Monster Weakness and Hitzones
Now that you have the skills of pattern recognition, positioning, and evading, what’s there left to improve? Like a dance of the hokey pokey, you have mastered the step in and the step out — even the shake it all about.
But even then, something can go wrong:
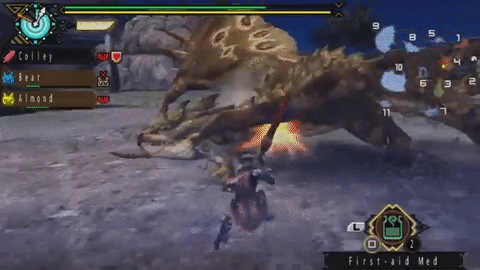
“I know your tricks! Okay, you may not remember me, but I remember you quite well!”
~cscolley, another entertaining solo hunter on YouTube
How strange–hunter Colley here managed to land a level 3 greatsword charge. The attack should have landed with a solid slam, and then he could roll to avoid Rathian’s tail swipe attack. Instead, Colley went flying.
“Then what happened?”
Short answer: Due to the hardness of the hitzone, his weapon type, and sharpness, Colley bounced off the wing.
Long answer: There’s a lot of jargon in that short answer. Let me do my best first to explain the most important phrase: “hardness of the hitzone”.
Hitzone Hardness: So in the Monster Hunter series, there are parts of a monster called hitzones. This means that depending on the part (wing, head, horns, etc.) where you attack the monster, it deals a different amount of damage.
For a difficult monster in which you wish to tackle more effectively, I implore you to look up its hitzone data (usually found in a table or chart). The Monster Hunter Wikia and Kiranico MH3U/Kiranico MH4U are two informative sites to look at first, then some Google searching will hopefully help you find the rest.
For example, let’s take a look at Rathian’s Monster Hunter Portable 3rd hitzone chart from this particular game Colley’s clip is from (as found on the Monster Hunter Wikia):
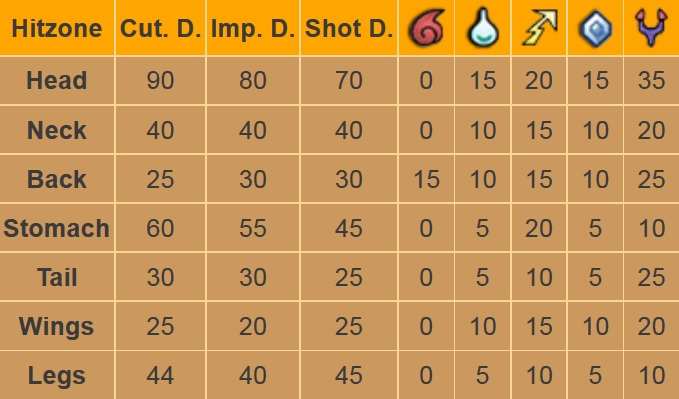
Now here’s a lot of information to take in, so let’s break it up into pieces:
First, the columns are divided based on the damage multiplier (highlighted in red below) from two categories: the weapon attack type of cutting/impact/shot, and the monster’s elemental weaknesses of fire/water/thunder/ice/dragon.
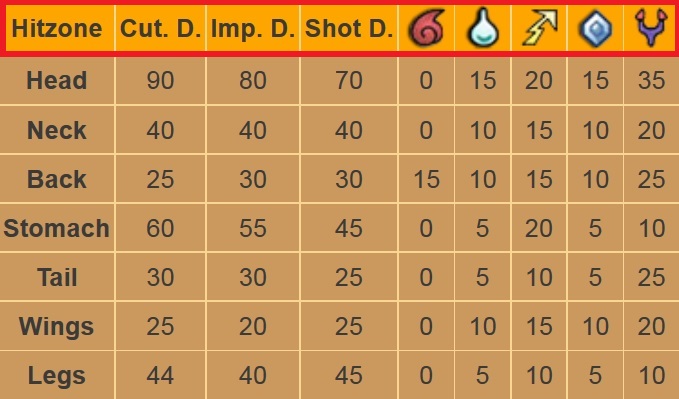
Weapons tend to be straightforward with attack types, also known as “raw” damage — a move that can slice off monster tails is cutting damage, a move that can KO monsters is impact damage, and a move that can hit monsters from afar is shot damage. In addition, weapons can have multiple attack types. For example, a bowgun is primarily a shot-type weapon but with Slicing S bullets it can also deal cutting damage.
In Rathian’s case, she appears weakest to cutting damage for most hitzones other than her back.

The weapon attack-type damage, AKA raw damage, highlighted in red
Also, weapons can also have one or more elements, or be strictly non-elemental and only deal their respective weapon attack-type damage. For example, one pair of dual blades can have thunder/dragon blades, and another pair can just be raw cutting damage.
Again, to connect this knowledge to the example clip — Rathian appears to be weakest to the dragon element, and strongest/most resistant to fire element.

The elemental-type damage (fire/water/thunder/ice/dragon respectively), highlighted in red
A general rule of thumb is to focus on the raw damage a weapon has more than the element, because the weapon’s raw damage is part of an attack deals more damage than its element to a monster. That’s not to say that elemental weapons are bad (far from it), but in the case of a weapon having 50 attack and 300 element vs 300 attack and 50 element, the latter is usually your best choice.
For a game-specific, in-depth analysis on weapon to element effectiveness, I highly recommend looking at this MH4U post on r/monsterhunter to learn more!
However, there are exceptions to this rule. Some weapon types are more effective for elemental damage (such as light bowguns) and some are more effective for raw damage (such as greatswords).
Furthermore, some monsters are resistant to raw damage but very susceptible to elemental damage, such as Chameleos who is very weak to fire element, so the rule of thumb is a guideline, not an overall decree.
Also, a short digression from the hitzone topic: Something that I won’t cover in this self-improvement section too much are status attacks.
Status is another category for weapons (such as poison, blast, sleep, KO, etc.), and an important note is status is not affected by hitzones. Instead, status application depends on a increasing threshold that differs per monster (the duration/damage differs too).
The values and effectiveness of status significantly change per game (for example 3rd gen’s overpowered “slime” status is now called “blast” in 4th gen), so I recommend doing a bit of Googling to learn more about status damage for the game you’re hunting. I will possibly cover a bit about status in a later installment towards building armor sets and weapons, but otherwise it’s a topic I won’t delve too far into due to the fixed amount of application wherever you hit the monster.
Okay, now returning back to the hitzone table topic:
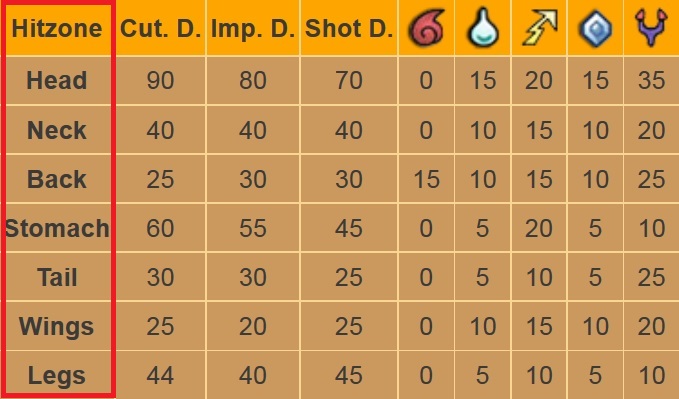
First the columns, now the rows. The rows of the table are divided by the hitzone on the monster. Hitzones can range from general regions like a monster’s back to more specific areas like a back-fin, so wording can get confusing (e.g. “does ‘claw’ mean the wing claws or the feet claws?”), so be sure to know which part the row’s referring to in the table.
Also, some monsters’ hitzone damage can change once you break a part, so having a table for before/after the part break might help you judge which hitzone is better to focus attacking on. Furthermore, monsters of different species and subspecies may have different weaknesses and hitzones, as mentioned prior in Skill to Improve #1’s No-Hit Challenge.
Thankfully for MHP3rd Rathian, her hitzones are divided into clear parts that we can visualize, along with no special change when her parts break. This means we can just look at this table for her hitzones:
 MHP3rd Rathian: Head, Neck, Back, Stomach, Tail, Wings, and Legs
Now that we understand the chart more–let’s go back to explaining Colley’s misfortune in regards to hitzone hardness:
In Colley’s case, he is using a non-elemental greatsword, and the GS is a weapon that deals cutting damage. Thus, let’s aim our attention at the “Cut. D.” column of the table:
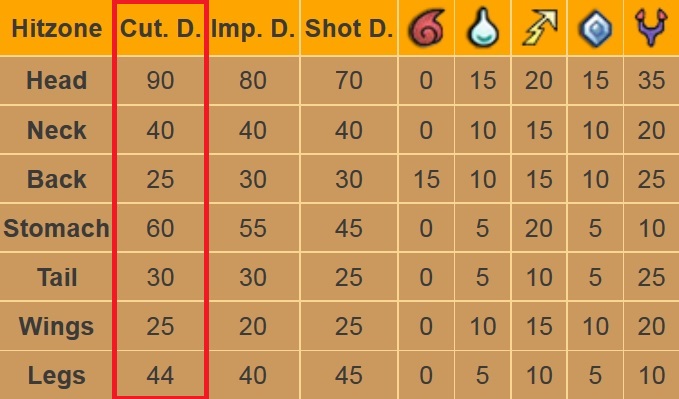
Now let’s see, one of the hardest zones for cutting damage are…Rathian’s back and wings. Which part did hunter Colley hit again?
The wing! Now it’s beginning to make sense.
So this is what we know — Colley’s greatsword slam hit a “hard” spot on Rathian, which caused him to recoil backward. This recoil animation is called bouncing, and you can’t cancel out of it, which makes you open for punishment like Colley eating a Rathian tail swipe. Instead, Colley should focus aiming for a softer hitzone, such as the Rathian’s head.
Another aside: as mentioned in the short answer, the formula for what makes an attack bounce on a monster depends on hardness of the hitzone, weapon-type multipliers, and also the sharpness of the weapon. I mainly wished to cover the importance of hitzones and monster weakness for this self-improvement section, but if you wish to read more about the mathematical aspects of bouncing, please see this subreddit post on the “Bouncing Formula”.
Now after the long explanation about hitzones through an example, we come to the important skeptical question:
“The hunter bounced–so what? Why do hitzones matter?”
You probably know this better than I do: Not all hard hitzones cause bouncing, and there are skills/weapon attacks that negate the bouncing animation…so why does bouncing matter? Why do hitzones matter so much?
Here are some common answers:
- When your attack bounces on a monster, the attack uses double the amount of sharpness than a normal hit. In other words, bouncing too much on a monster causes your sharpness to wear down faster.
- Bouncing means you’re hitting hitzones that do minimal damage to the monster, so you’re wasting time and sharpness when you could be hitting something softer. Therefore, skills and weapons that negate the bouncing animation such as the skill “Mind’s Eye” teach bad habits of managing damage per second (DPS) efficiently.
Both are solid responses, but there’s a bit of a bias in these answers. They are both focused on the blademaster’s perspective of hunting. For melee weapons, they all have a sharpness meter which determines an additional attack (and bounce) factor based on color.
But what about ranged players? Ranged-based hunters like bowguns and bows are rarely going to run up and smack the monster with their gun or arrow. Do hitzones really matter for them?
You bet they do: gunners have it even harder than melee hunters due to limited carrying capacity for ammo. They can carry a max amount of a bullet type (or for bows, a limited amount of coatings), and a max amount of combines to make more. However, once all that’s used, it’s gone. Thus, a ranged hunter must make every shot count.
Against large damage sponges like this Ukanlos in the above clip, focusing on soft, weak hitzones allows this heavy bowgun user to stunlock the beast, and maximize the damage each bullet inflicts.
Once the powerful special ammo is spent, then all they have is normal level 1 bullets and non-coated arrows, which dramatically decreases their attack output.
To put it into scale, imagine I’m in MH4U using a powerful normal-type heavy bowgun with Normal Up and Attack Up XL skills, and I load the clip with level 2 normal shot ammo. Within 4-5 shots, I will kill a small minion monster, such as an Ioprey. Then I load up the bowgun with level 1 normal shot ammo. Now it takes 10-12 shots to kill the minion. For this small case study alone, it takes at least double the amount of ammunition to deal the same amount of damage. And this is assuming I’m using a normal shot-type weapon and armor set!
“…A small minion monster, such as an Ioprey”
Imagine if I was an elemental light bowgun user, and I have a Fire Attack+3 armor set using Flame S ammo. Then I run out of Flame S–now all I can use is infinite normal level 1 bullets. Since I have no armor skills that boost normal bullets, my damage output is even worse. Now I might as well be shooting spitballs at a minion monster, let alone a full-blown Ukanlos.
In addition to running out of ammunition during a quest, it’s also costly to a hunter’s overall inventory to waste so many materials on a failed hunt. Sure, they can buy most bullets and coatings at the shop, but this takes a lot of zenny. Also, the materials to combine to make more ammo needs to be gathered or farmed–another expensive cost to be had: time.
Time is also the universal enemy for the solo hunter of blademasters and gunners, because in the online halls, monsters are scaled for multiple players. As one hunter, you alone have to deal enough damage to pass — as much as 2 or more hunters fighting together.
Without targeting soft hitzones for the most DPS possible, it’s extremely difficult to succeed against the larger monsters — not because of patterns or evading, but rather the time limit the quest has. Like a gunner’s ammo or a blademaster’s sharpness, time is also a precious commodity a hunter must use efficiently. (I will come back to this topic again in the next installment in regards to resource management.)
Now to bring it all together…
Well met, fine hunter! After all of the pattern learning, evading/positioning, and hitzone analyzing, you finally have a grasp over the 3 skills I find most rewarding out of solo hunting. I congratulate you on your efforts, and I hope you realize now that self-improvement is both a challenging and beneficial experience as a late-game hunter. Maybe it will give you an edge over the competition when Monster Hunter Generations rolls around, eh?
As a reward for your efforts, have a look at one of my favorite solo hunting videos that combines all 3 skills into an amazing 6+ minute quest:
As a fun final challenge for this section–try to analyze how this hunter used all 3 skills to slay Shagaru Magala!
Self-improvement is the largest and most important piece of the “Solo Hunter’s Guide” puzzle, and it’s been quite the journey. That being said, we’re not done yet! I’m proud of your progress — improving on these skills will help you understand the usefulness of the next part of the guide:
The next Solo Hunter’s Guide will cover tips about resource management!
See you then, and happy hunting!

~FlameKurosei
For more game-specific guides on Monster Hunter, check out the various Monster Hunter 4 Ultimate Guides for more tips and tricks on how to be a better hunter, here on GameSkinny!
[Images retrieved from Capcom, Imgur (Gif1/Gif2), Gfycat, the Monster Hunter Wikia, Reddit, Tumblr, YouTube (Video1, Video2, Video3), and Yuri Araujo]


Published: Jul 3, 2016 06:17 pm