
Zombies In Spaceland, which is perhaps the best Call Of Duty zombie mode yet, just got a whole new map and cast of characters with the Absolution DLC.
It’s now available for PS4, though sadly the Xbox One crowd will have to wait a bit for Absolution. But if you follow our guide, you’ll be ahead of the curve and ready to rock when it arrives!
So what’s the new retro zombie theme this time around? Its a black and white ’50s creature feature with none other than Elvira herself making an appearance, in addition to Seth Green as a cast member.
Much like the base Zombies In Spaceland for Infinite Warfare, there’s Easter eggs galore to be discovered if you put in the time and effort with Attack Of The Radioactive Thing! Let’s get started.
CoD: Attack Of The Radioactive Thing Easter Egg Guide
There are quite a few steps to make it all the way through this complicated Easter Egg, and it can take more than an hour. The end goal here is to build a zombie part by part, arm a nuke, and eventually unlock a boss to blow up.
First you have to switch from black-and-white mode to full color. Leave the spawn area and open the door at the power station to activate glorious color mode.
Head back to the building with the red bricks along the bottom and the tri-color pennants hanging from the top. On the back side look near the door to find the seismic wave generator blueprint.
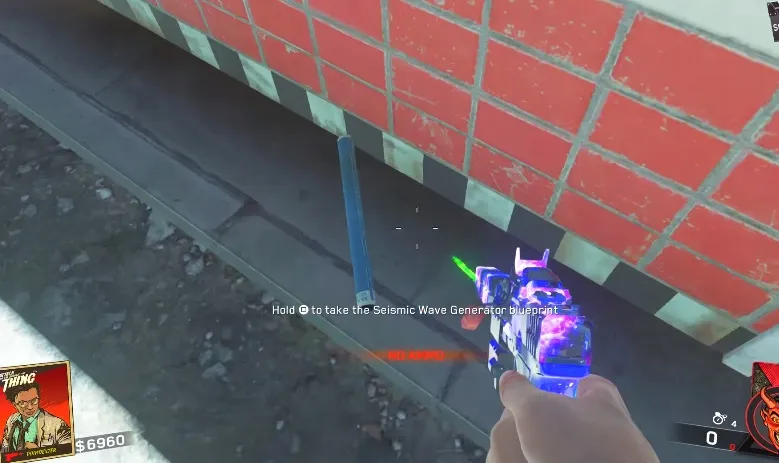 Seismic Wave Generator Blueprint
Head inside the door and place the blueprint on the table, then go right back to where you were outside and grab the first piece just a few feet over from where the blueprints were located at the edge of the building.
Add the first part to the build table, then run to the other side of the building and go towards the swing set. The second part is across from the swings on the ground next to the Port-A-Potty.
Drop that part off, then go towards the front of the building to grab the third and final piece sitting on the red bench. Drop it off and grab the finished product.
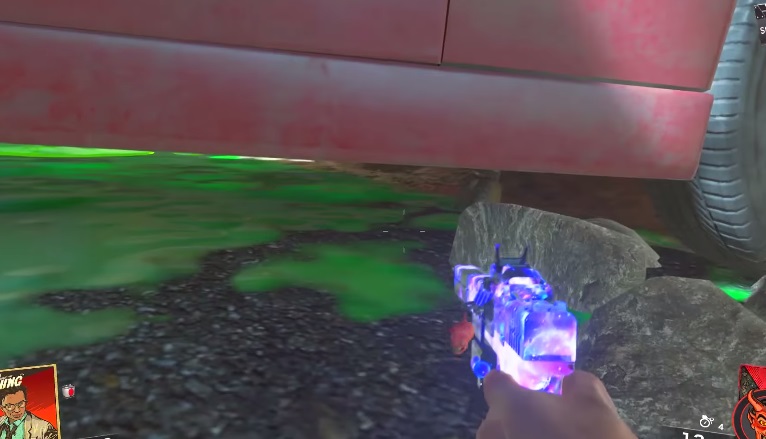
After completing the build, head over to the beach (you’ll have to spend $1,250 to unlock the wood pallet door blocking access) and look for a zombie arm sticking up out of the sand. Grab the switch in the hand.
 Grabbing the Power Switch
Place the seismic wave generator you built earlier onto the ground where the power switch was found. After waiting a bit, the device will eventually excavate the arm, which is the first zombie part you need.
Place the power switch on the power box outside the plant, then head inside the movie studio building and talk to Elvira.
Hoof it all the way back to the building where you built the seismic device and you’ll see the wall opposite the build table now has an open safe.
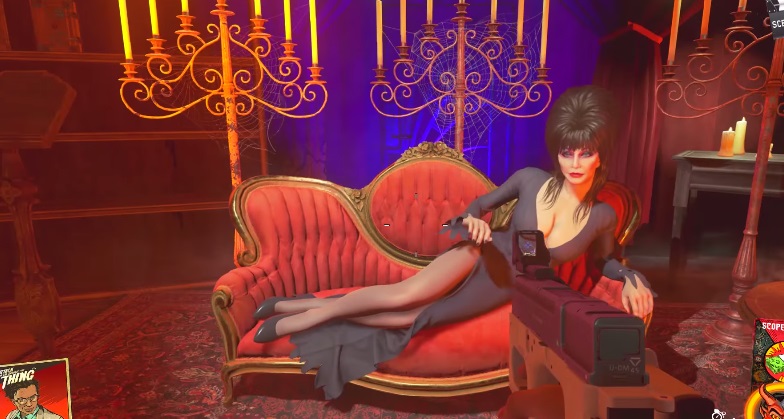 Well, hello there!
Grab the book inside the safe and return to Elvira to get the test tube component. We’ve got to fill the tube by melee killing zombies with a specific weapon.
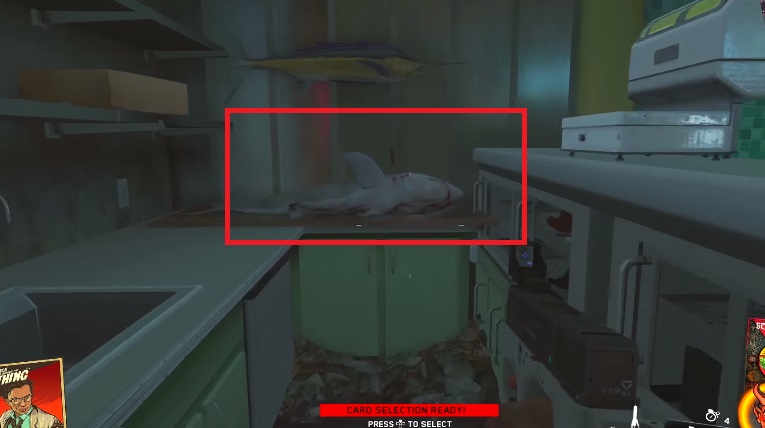
Go up the ramp by the power station and unlock the door there. Head through the building (this is the back side of the Beachside Market) and look for a shark lying on the counter behind the cash register. What’s he doing there? Who cares — just grab the knife sticking out of the shark’s side.
For most enemies at this point in the game, its a one-hit kill weapon. Get melee kills until the vial fills up and then take it back to Elvira, who will get up and follow you.
 A shark’s loss is your gain…
When she gets up, grab the mirror she drops on the couch, as you’ll need this to animate your zombie later. Now go outside to the blue circle floating in the air by the cars so Elvira will open the Pack-A-Punch.
There’s an important part to remember here depending on where you are killing enemies: if you kill a green mist soldier zombie with the shark cleaver, he will drop a leg component you need, so pick it up! Keep track of where the soldier zombies are located, because the leg will stay where it originally dropped and it won’t respawn if you keep killing more of those enemies.
After using the Pack-A-Punch, hit the orange button on the blue wall to change the portal destination, then leave through the portal to grab the zombie head sitting on the counter next to the fan inside the RV.
Head back towards Elvira’s movie studio. Look for a tree that can be seen through the open gate. Before doing anything to the tree, look down at the left side of the open gate on the ground to find a component you’ll need much later.
Now you need to blow up the tree with an explosive grenade, which can be done by cooking the grenade so it’s almost ready to go off and then chucking it up towards the leaves.
 Blow up this tree!
Run down beneath the tree and grab the leg that falls after the tree catches fire (if you don’t see fire, you didn’t do it right and have to try again). Note that this part can actually be done anytime after you talk to Elvira and get the vial.
If you didn’t kill any of the soldier zombies yet, now is the time to do so to grab the second zombie leg.
Travel to the pool and grab the crowbar in the room located up the stairs from the Bombstoppers machine. Head over to the RV park area and enter the bathroom building. Smash the one intact mirror on the wall and grab the piece that falls into the sink.
Go outside back into the RV park area and look for a large metal fire pit. Inside the pit through the thick metal grating you can see the second zombie arm component.
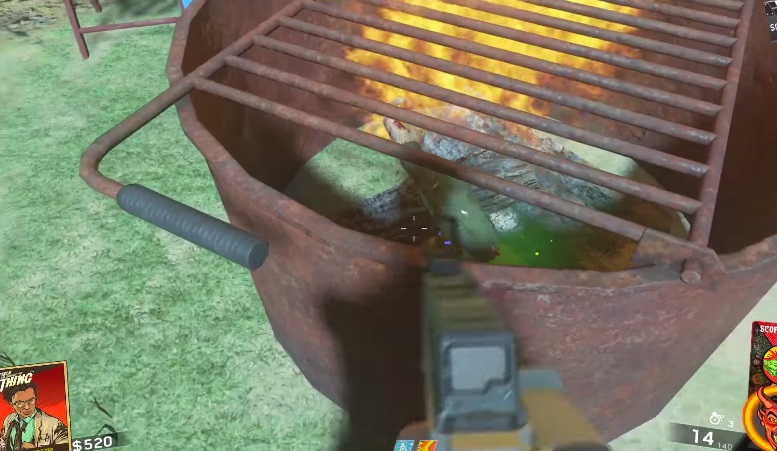 Grilled zombie arm!
Head over to the side of the gas station and look for a stack of boxes on a green hand cart. Grab the control box part sitting on top of the boxes, then return to the same building where you found the shark knife (the Market).
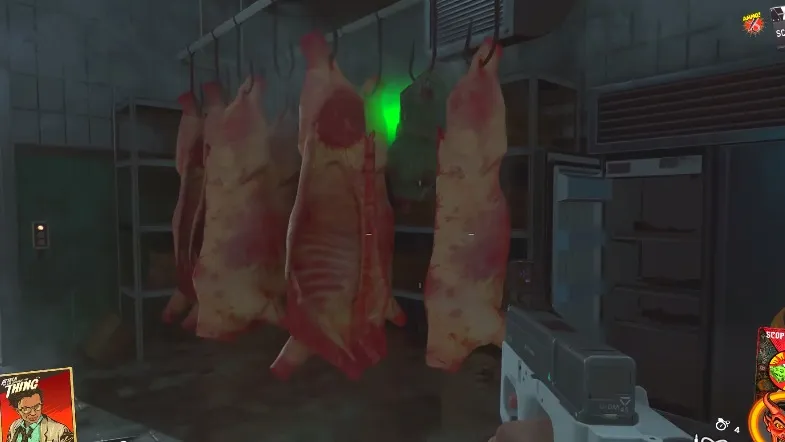
Install the control box next to the freezer room door, then press the green freezer button on the other side of the wall (opening the freezer costs $750). Quickly leave the room or you will lose all your health as the freezer turns on.
Wait for the cold air to stop blasting, then go back in the freezer and smash the pig carcasses with the crowbar, then grab the zombie torso hanging in the middle.
 Zombie Torso
Head to the front of the Beachside Market building and smash the mirror on the passenger side of the classic white car sitting outside, then grab the mirror off the ground.
Return to that first building where you built the seismic device and go inside the room where the wall safe was located. Look on the desk and pick up the punch card that’s now sitting there.
Go back through the white CDC tunnel into the original spawn area and place the zombie parts on the gurney against the wall. Set a mirror piece on the table covered in cups to the left of the gurney, the second mirror on the green MRE box to the left, and the final piece on the back side of the room.
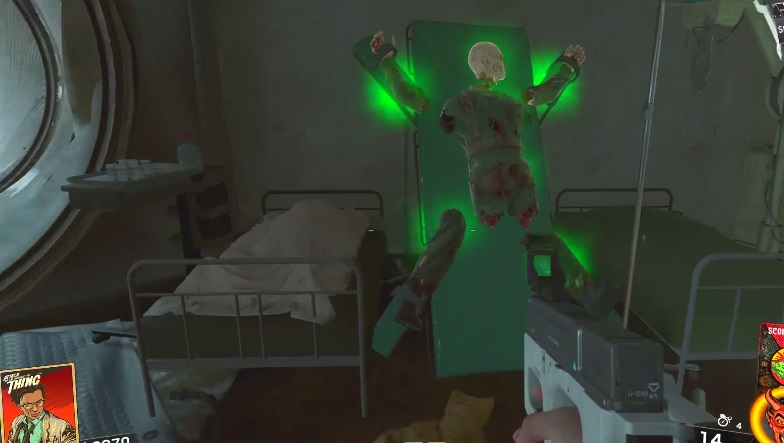 Bringing back the dead!
Turn on the laser by interacting with the old timey computer device on the desk across from the gurney. This one’s a little tricky. What you need to do is press Square (or X) when the light is under the same numbered dot as the number above.
So for instance if the number is 4, press the button when the fourth dot is lit as the lights move from left to right. Repeat this process until you hit every number that appears on the screen. The specific number combo will be random, but make sure you remember what your combo is because you’ll need to know it later.
When you get it right, the laser turns on and re-animates the zombie. Now we’re going to return to the number input machine and do the same code… backwards.
 Entering the laser code
After all that work to return the zombie to life, now the laser is going to blow him up. Pick up the key that drops where the zombie was strapped to the gurney.
Head over to Ramon’s and open the red garage door using the zombie key. Inside you will find a non-functioning nuclear bomb. Of course we’re going to collect pieces to make it work again, because we’re nuts and the world is filled with zombies.
Remember that component you picked up by the fence before blowing up the tree? That was actually the first bomb part. Run over towards the middle of the map (by the crashed bus and white truck), where there’s red vehicle that crashed into some rocks on the side of the road. The next part is underneath the car.
 Finding the second bomb part
Now for the final part, go over towards the beach and look for the wood bridge. Underneath the wood bridge in the joint near the rock you can find the third piece. Bring all three parts back to the bomb and put it together.
We’re not done yet though, because there’s even more random components to find! Return to the beach and go up towards the picnic observation area with the benches. Grab the big blue number inputter piece sitting on top of one of the benches.
Head to the back of the market again and grab the next piece that looks like an alien bong sitting on the couch. While you are there, look underneath the edge of a desk to find a blue number combo you will need later (this number can change between playthroughs).
The final piece is on a bench in the RV park area and looks like some glass gauges.
 Totally not an alien water pipe. Nope, not at all. That’s a “valve.”
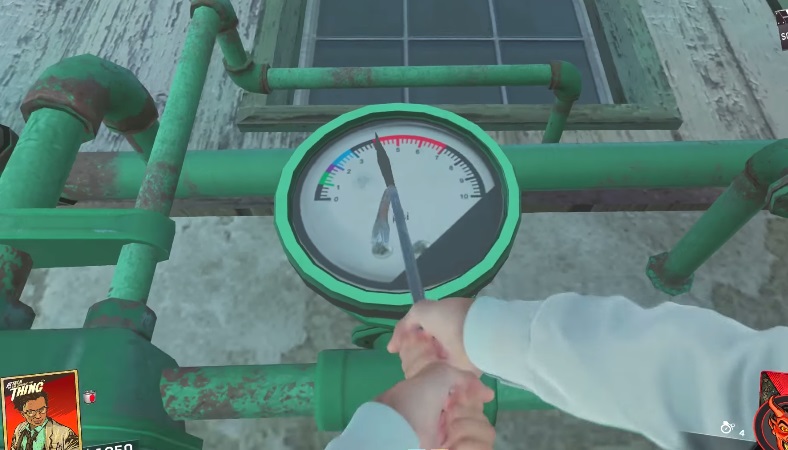
Return to the garage with the nuke and place the pieces on the workbench. Now we’re going to go hit some valves with the crowbar based on the number combo you found under the desk earlier.
You can do the valves in any order so long as the number combo is correct, and they are located in the crowbar room by the pool, the power station shack, behind the gas station, and on the side of the Snack Shack.
To input the code, smack the valve while its on the first number in the sequence. So if your number was 5187, at the first valve you’d hit with the crowbar when the arrow is pointing at 5, then hit the second valve in the series when it’s at the 1, and so on.
 Hitting the valve
After the code is entered in all four valves, return to the back room of the Market and grab the paper in the opened safe on the floor. The paper has… yet another annoying code on it, woo-hoo! Memorize or write down the code, because you are going to have to use it at the very end of this hunt when the number isn’t readily available.
Next, we’re running to another four locations to discover a code. The numbers are discovered by finding a code scribbled on certain surfaces around the map. Don’t head to these locations yet though, just make note of where they are.
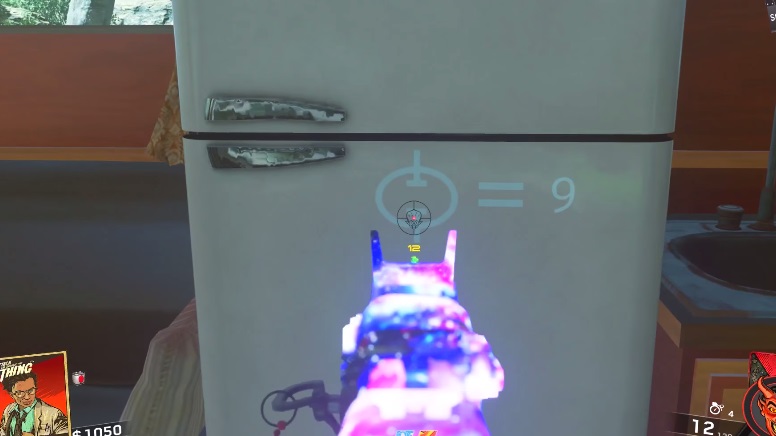
Look at the door with the handicapped symbol right outside the room with the bomb, underneath the main concrete bridge, on the green section of wall next to the fridge in the back of the Market, and on the fridge in the same RV that had the zombie head.
Head over to Elvira’s studio and look for the series of TV screens covered in colored bars. Toggle the color of the game using the console there and change the game to a red tint.
Now go to all four locations previously listed and check to see if any of them have the “does not equal” sign (the equals sign with a slash through it). Make note of that number, because you can now discard it while trying to figure out the code.
Go back to the studio and switch to green, then return to all four locations and look for the next “does not equal” number. Repeat the process with the blue tint and make note of the “does not equal” number.
That will leave just one number that didn’t have the “does not equal” sign. Return the colors to normal at the studio and go to the one location that wasn’t marked to find the number code you need.
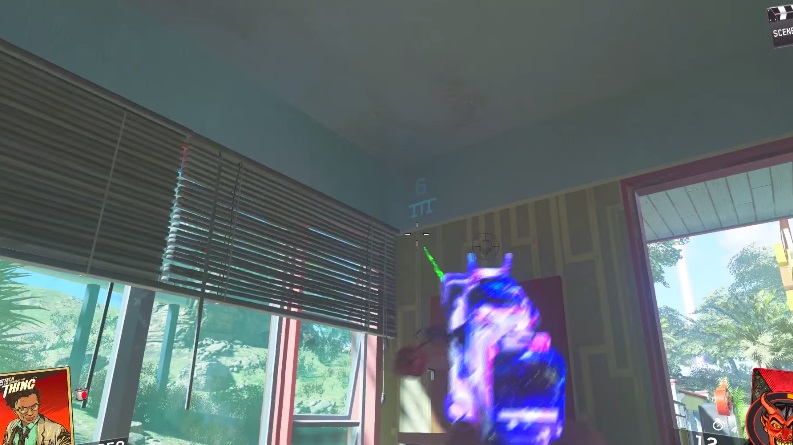
Next, go to the front office of the hotel and look for a number up in the corner on the wall.
Return to the studio and go to the other side of the wall of television screens and look up. Inside the glass is a math equation, letting you know the answer is your two numbers multiplied together.
Yeah, math. Multiply the circle number you got by the number you found inside the motel and make note of the total. Now turn around and look at the TV set next to Elvira’s couch. A series of “greater than,” “equals to,” and “lesser than” numbers will be shown with corresponding colors. Take note of which color matches your multiplied number.
So for instance if your number was 85 and the “less than 87” entry was blue, you know you need to go set the world tint to blue. You will probably have a different number and color combo, however. Go change the color tint again to match your color. Of course we’re going off on another annoying jaunt across the map, this time to find six chalk boards.
 Chalk Board
The chalk boards are located outside the start spawn location, outside Elvira’s studio, on the beach near the water, inside the RV park, at the gas station, and behind the Market. The numbers listed there are going to tell you how to make a chemical to use the nuke.
Before we can make the chemical, we’re going to place some batteries at different locations — you should already have these batteries just from them dropping as you kill zombies.
If you don’t have them already, complete some waves and pick up the batteries as they fall. Set the batteries in the radios found at the motel office and power station. Listen to the broadcast to be told which chemical you have to make.
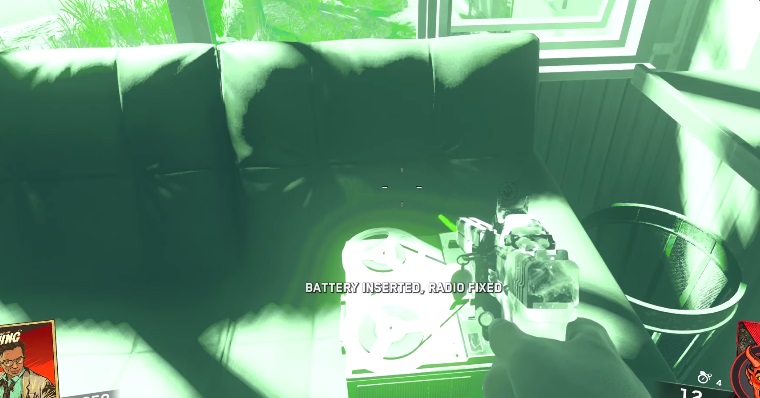 Inserting the battery in the motel radio
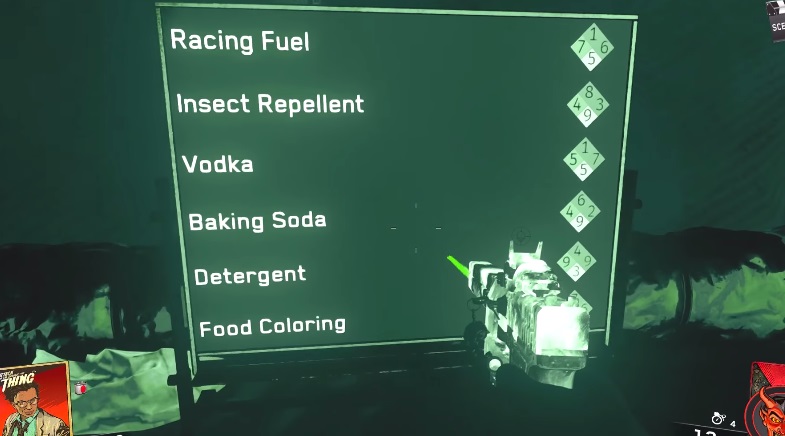
Here’s a full list of chemicals to make and how they are concocted. When you make your chemical, you have to input a code. Remember those chalk boards you looked at before? They tell you the code… sort of.
What you need to do is add together the two top left numbers next to each of the base chemicals, and then add those numbers together. Finally, subtract out your O number (the one found by changing the colors until you cleared out the three “does not equal” numbers) to get your final code.
For instance, if the radio told you to make Hexamine, which is made by combining glass cleaner and formaldehyde, you would add up the top two left diamond numbers for glass cleaner and formaldehyde found on the chalk boards, then add those two numbers together, and finally subtract your O number to get your code.
Take your base components and add them together at the chemistry set in the nuke room, and then enter your code. Yes, this is all ludicrously over complicated nonsense for a game about shooting zombies.
Put your final chemical in the nuke to activate the teleporter that takes you to the end of this Easter egg hunt (finally). After teleporting to the boss fight, push the nuke down to beach — while dodging fireballs being flung by the radioactive monster.
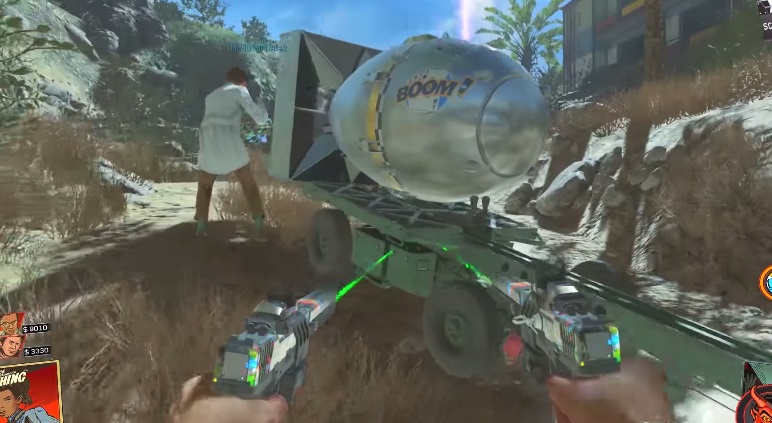 Pushing the nuke
Wait for the radioactive monster to eat the nuke, then head over to laser cannons and use them to strike the vulnerable spot on the monster’s chest until he stops attacking.
Run back to the nuke launcher and hold Square (or X) on the area where the nuke used to be to activate the radiation that will start spreading. Run all the way back up the bridge to the point where you first teleported and fend off the zombies until the monster starts firing off laser beams.
When the lasers appear, return to the beach (by jumping over or ducking under the laser traps) and activate the nuke launcher again to be teleported inside the monster’s stomach.
Now you’ve got to enter a code in the nuke. Which one? The one you got from the piece of paper in the safe after smacking the valves with the crowbar. If you didn’t write this down, you’re out of luck, because there’s no way to access it from this area. After each member of your team enters the code, it’s game over for the radioactive monster!
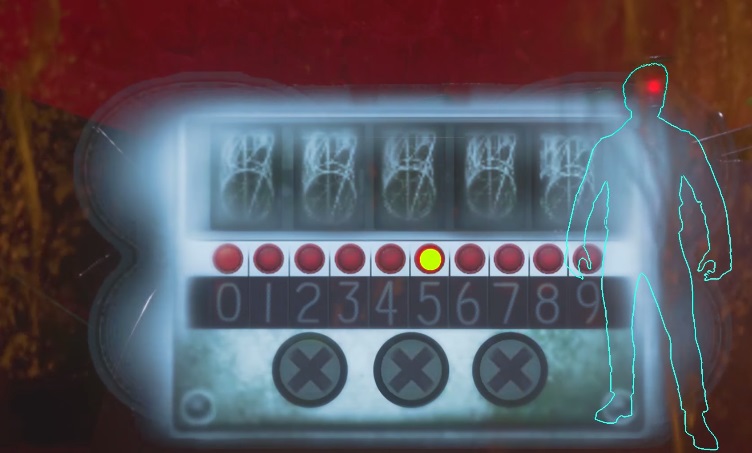 Entering the nuke code
This was the quickest and most efficient way we found to complete the Attack Of The Radioactive Thing Easter egg hunt we’ve found so far, but of course you can grab the parts in different orders. Let us know if you managed to complete it any other way!
Need help with the rest of the Zombies In Spaceland mode? Check out our other Infinite Warfare guides here:
- Zombies in Spaceland Survival Guide
- Easter Eggs Guide: Recruiting David Hasselhoff
- Easter Eggs Guide: Pack-A-Punch
- Zombies guide: Unlocking the Shredder
- Souvenir Coin Combos


Published: Jul 10, 2017 08:29 pm