Rubble and Ruin is Sniper Elite 5‘s penultimate mission, and it’s the last one in the campaign to have collectibles. Though you’re almost done, that does mean Mission 8 is once again packed with things to find: personal letters, stone eagles, classified documents, and workbenches. As usual, we’ll also show you where to find the other two starting locations for the map, which will make things like completing the kill challenge easier.
There’s a bit more zigzagging around the map this time around. Unlike some other levels, such as Secret Weapons and Liberation, Rubble and Ruin isn’t exactly designed for (mostly) free movement from east to west or north to south. There’s well, a lot of rubble and ruin in the way, which creates a more corridor-like labyrinth for most of the level.
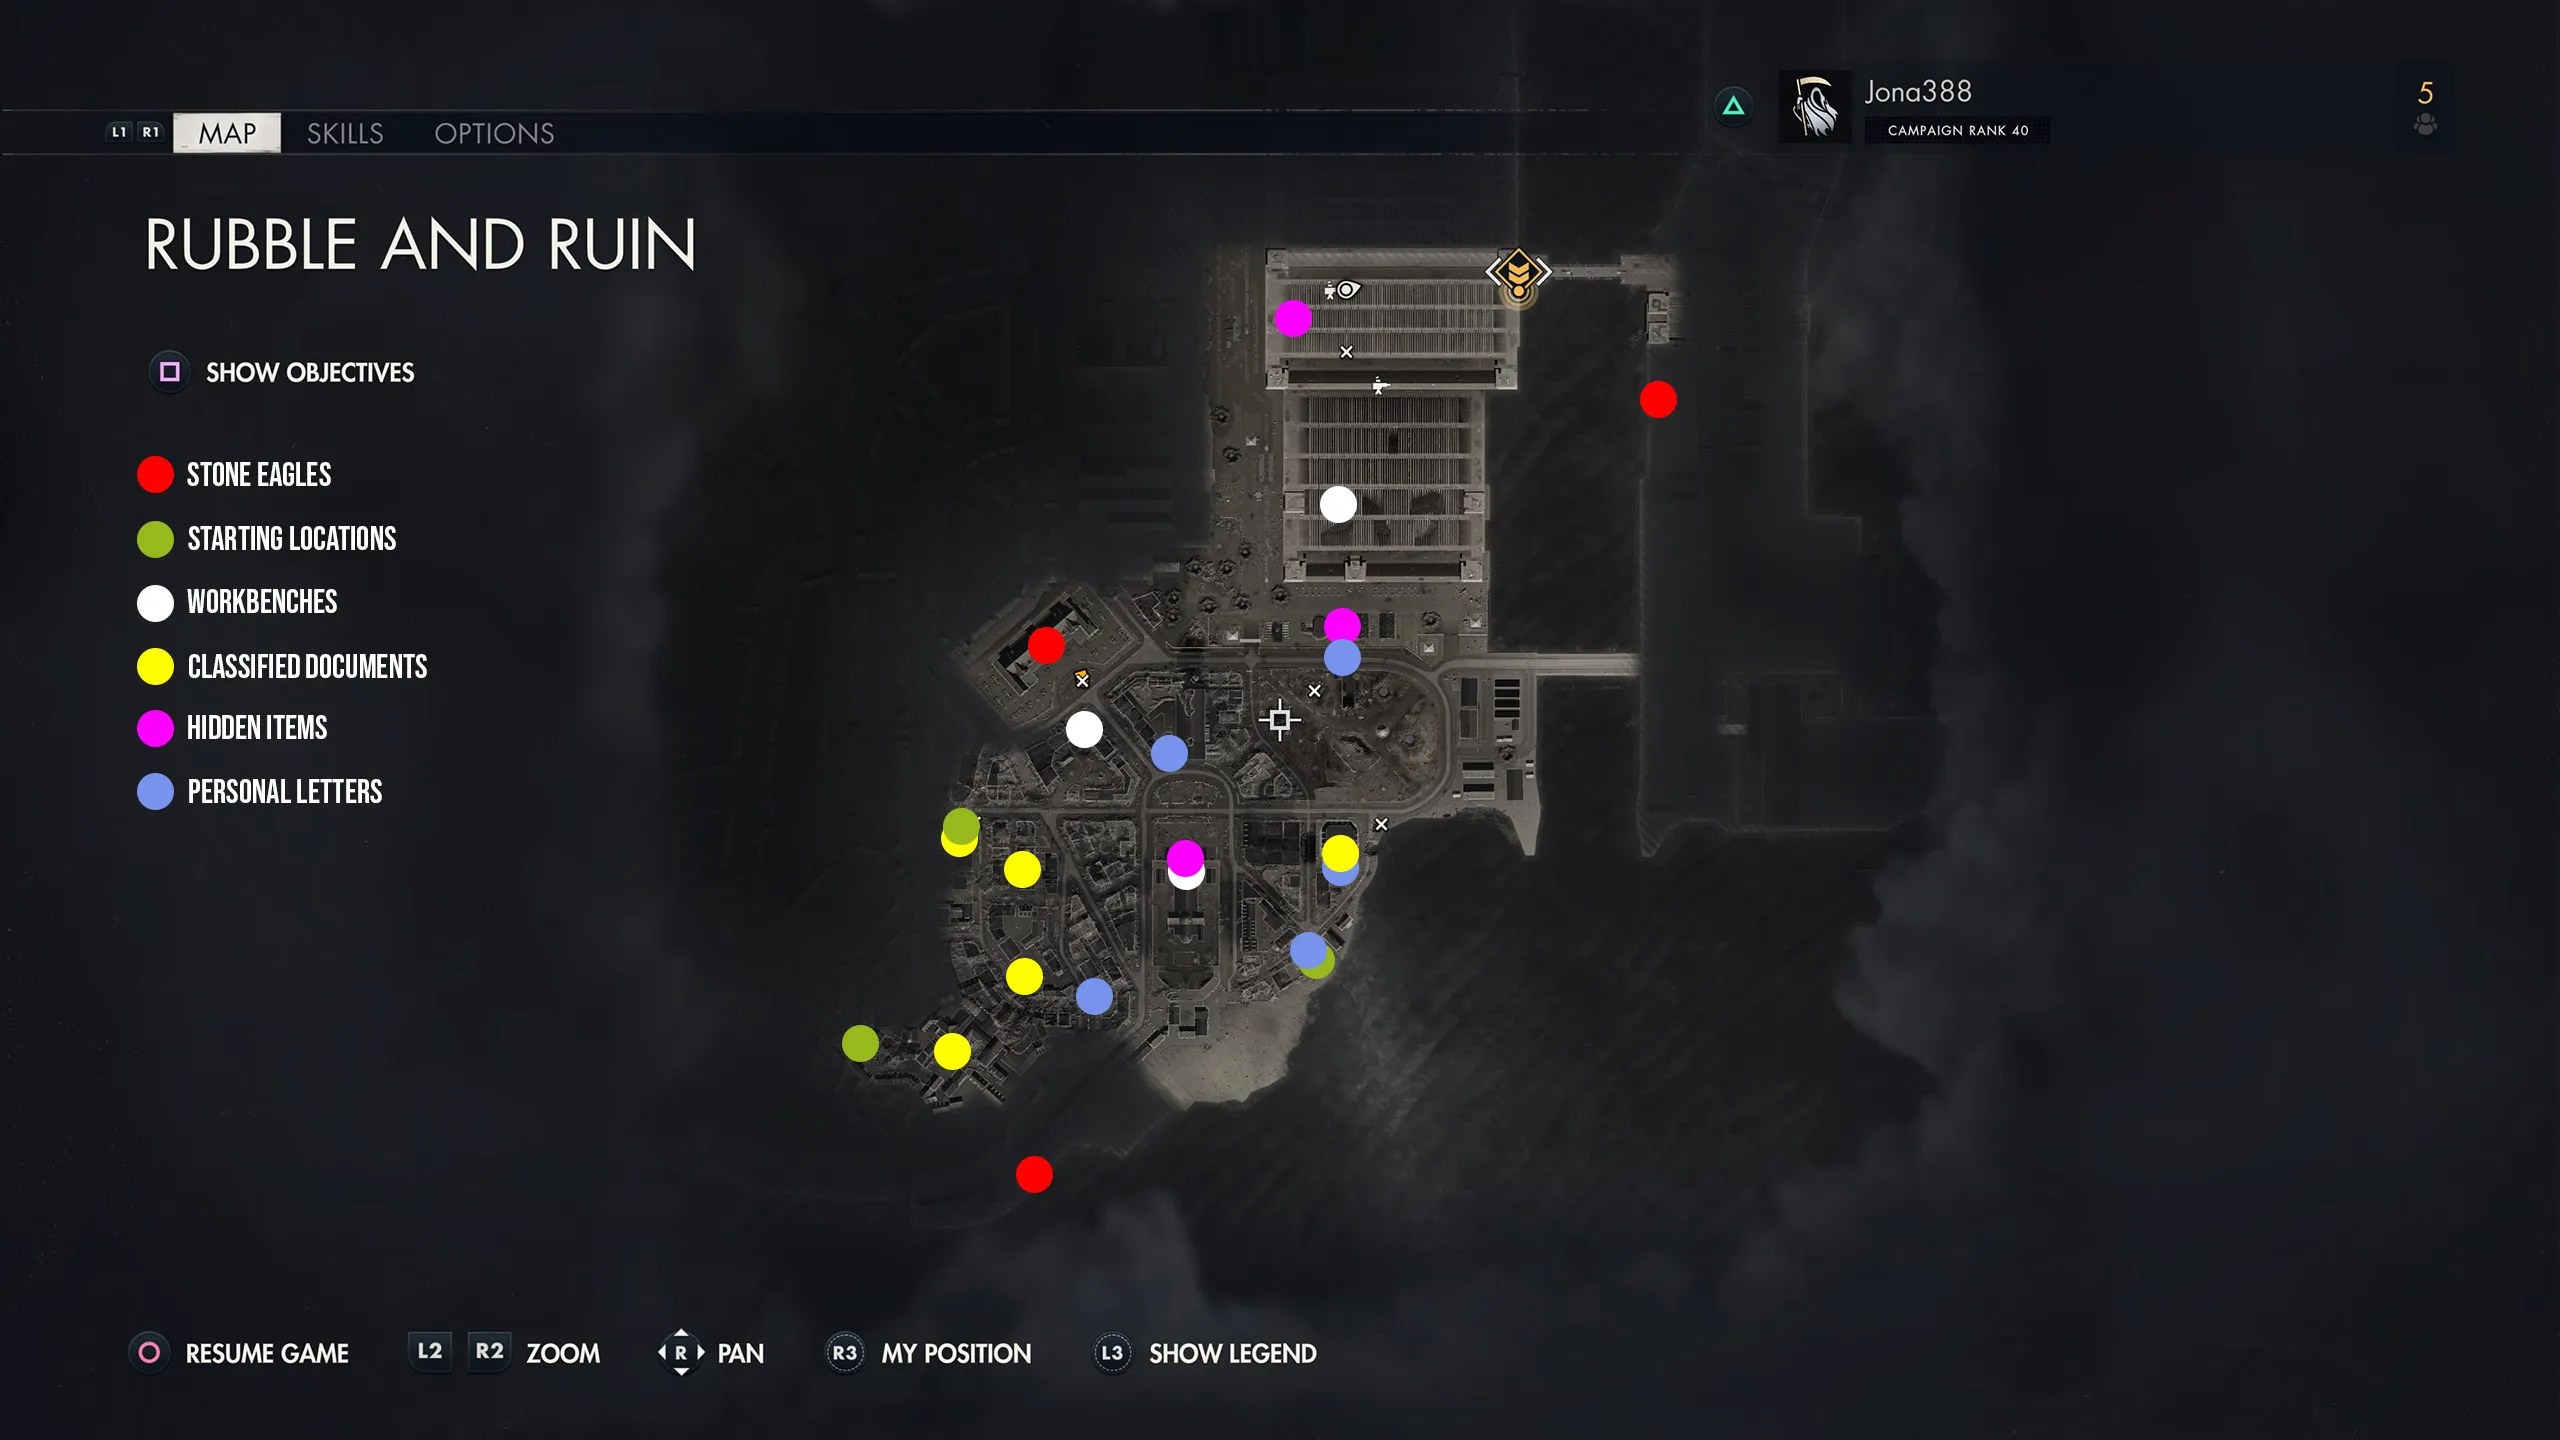
Rubble and Ruin Collectibles and Starting Locations
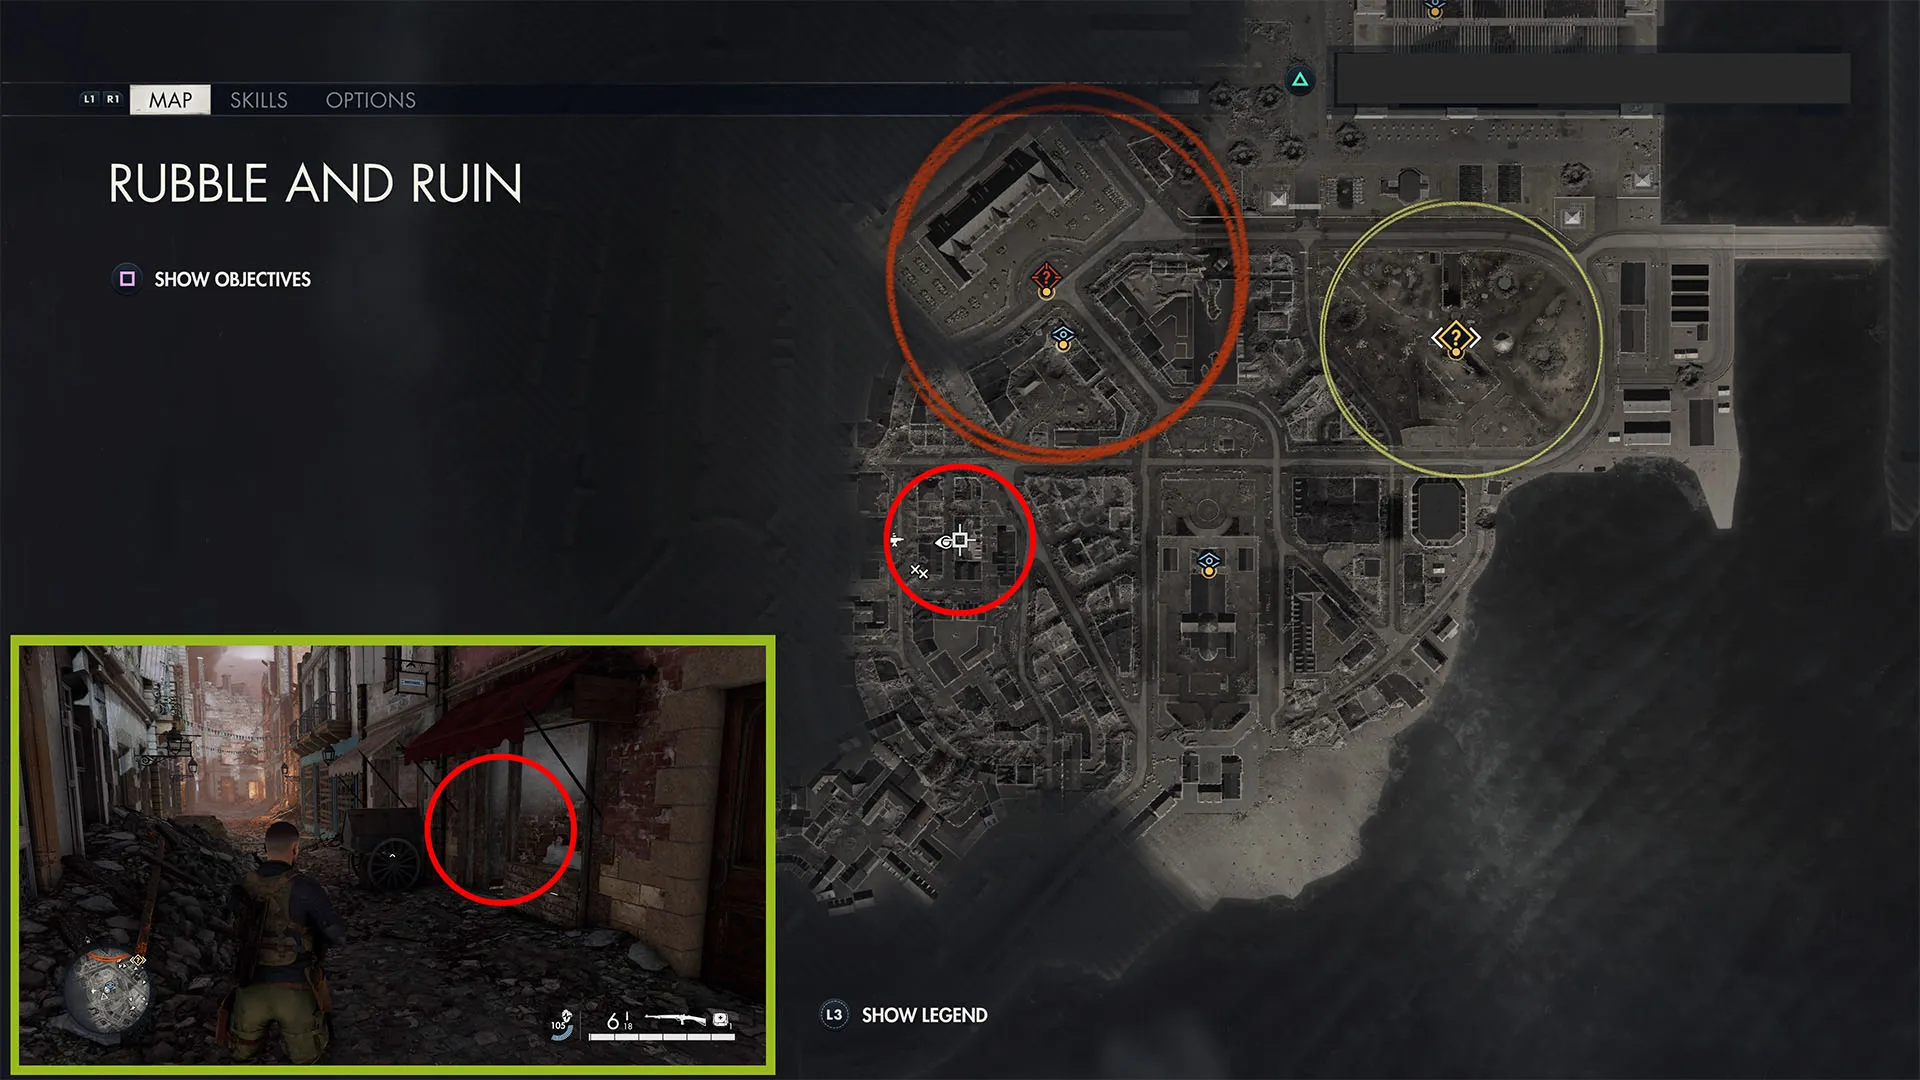
Secure Radio Lines (Classified Document 1)
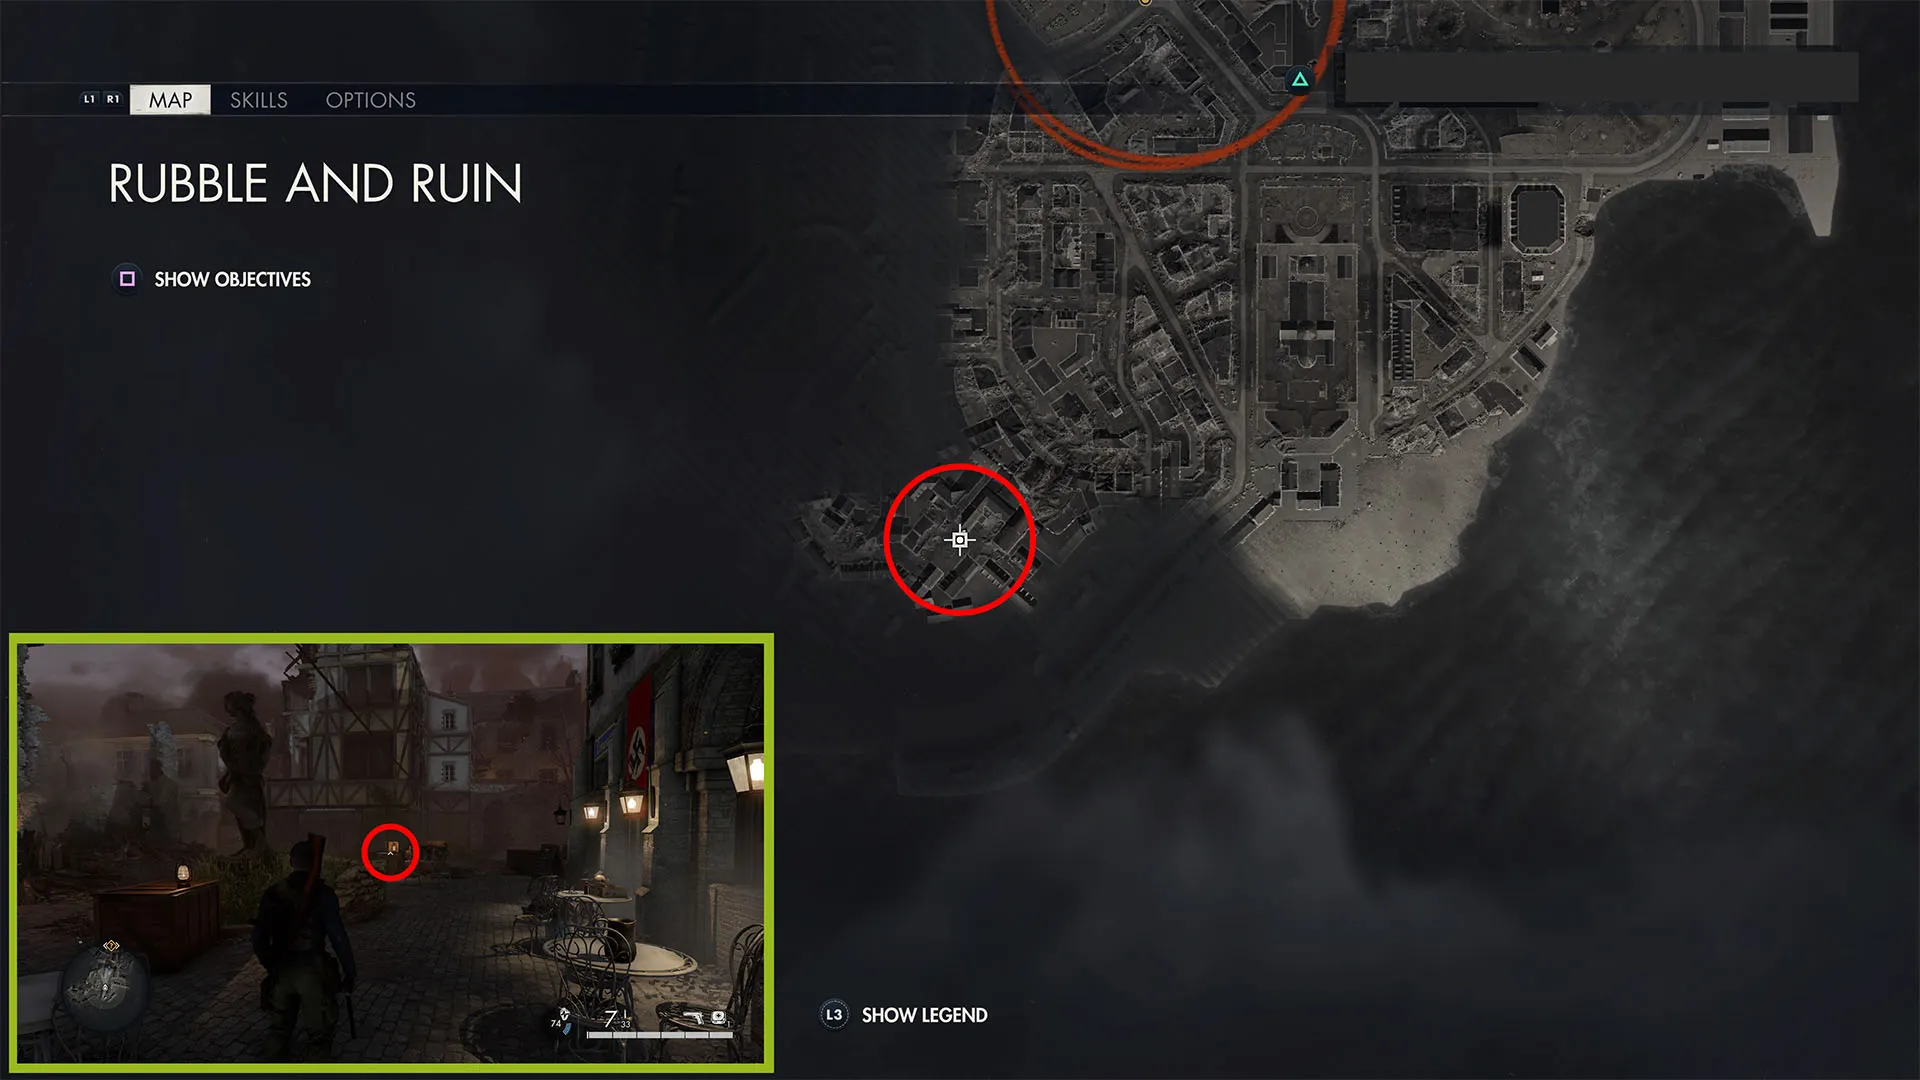
Start the level and follow the path to the small square with the statue and four Nazis. This classified document is next to a lantern on the stack of crates just north (on the other side) of the statue.
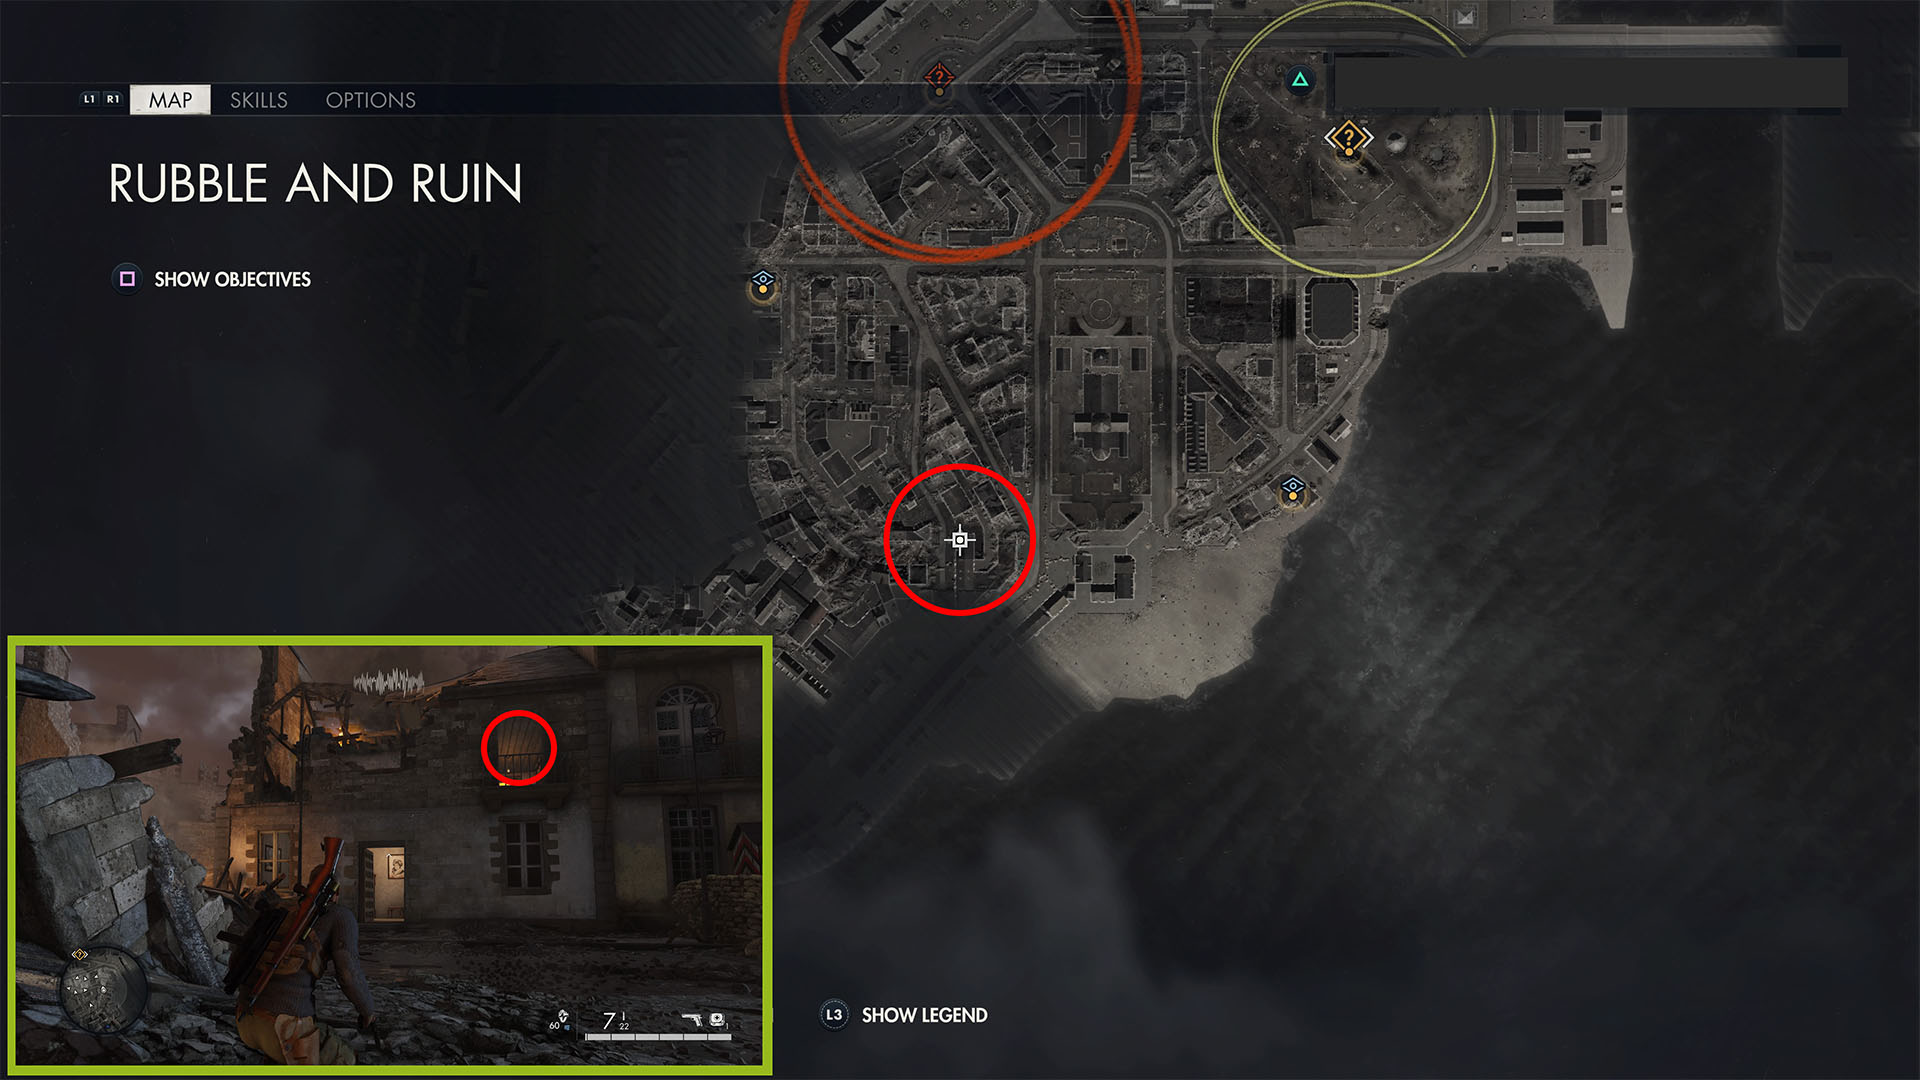
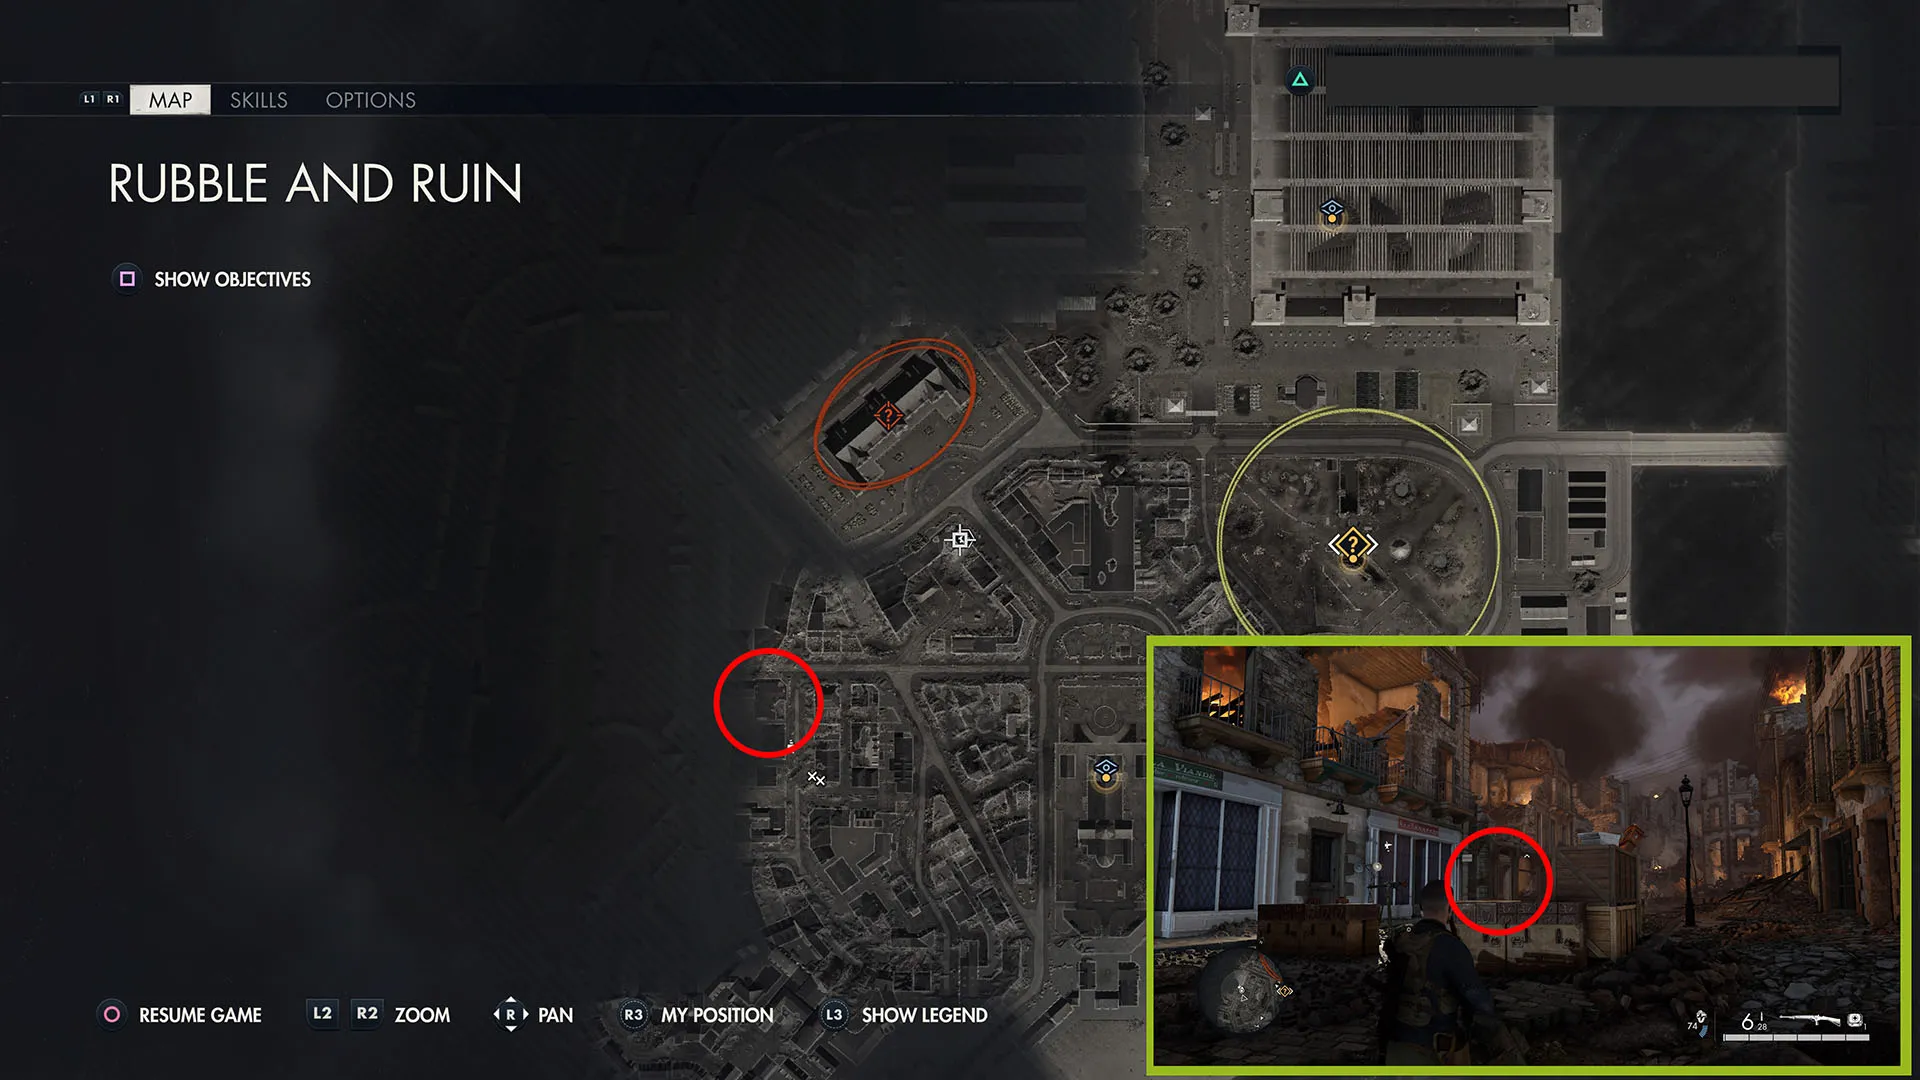
Broken Resistance (Classified Document 2)

Continue up through the ruined building and through the room with the resistance fighter. Go through the barricade, then look down to the street below. You’ll see a bar/cafe with two soldiers. This classified document is on the crate between them.
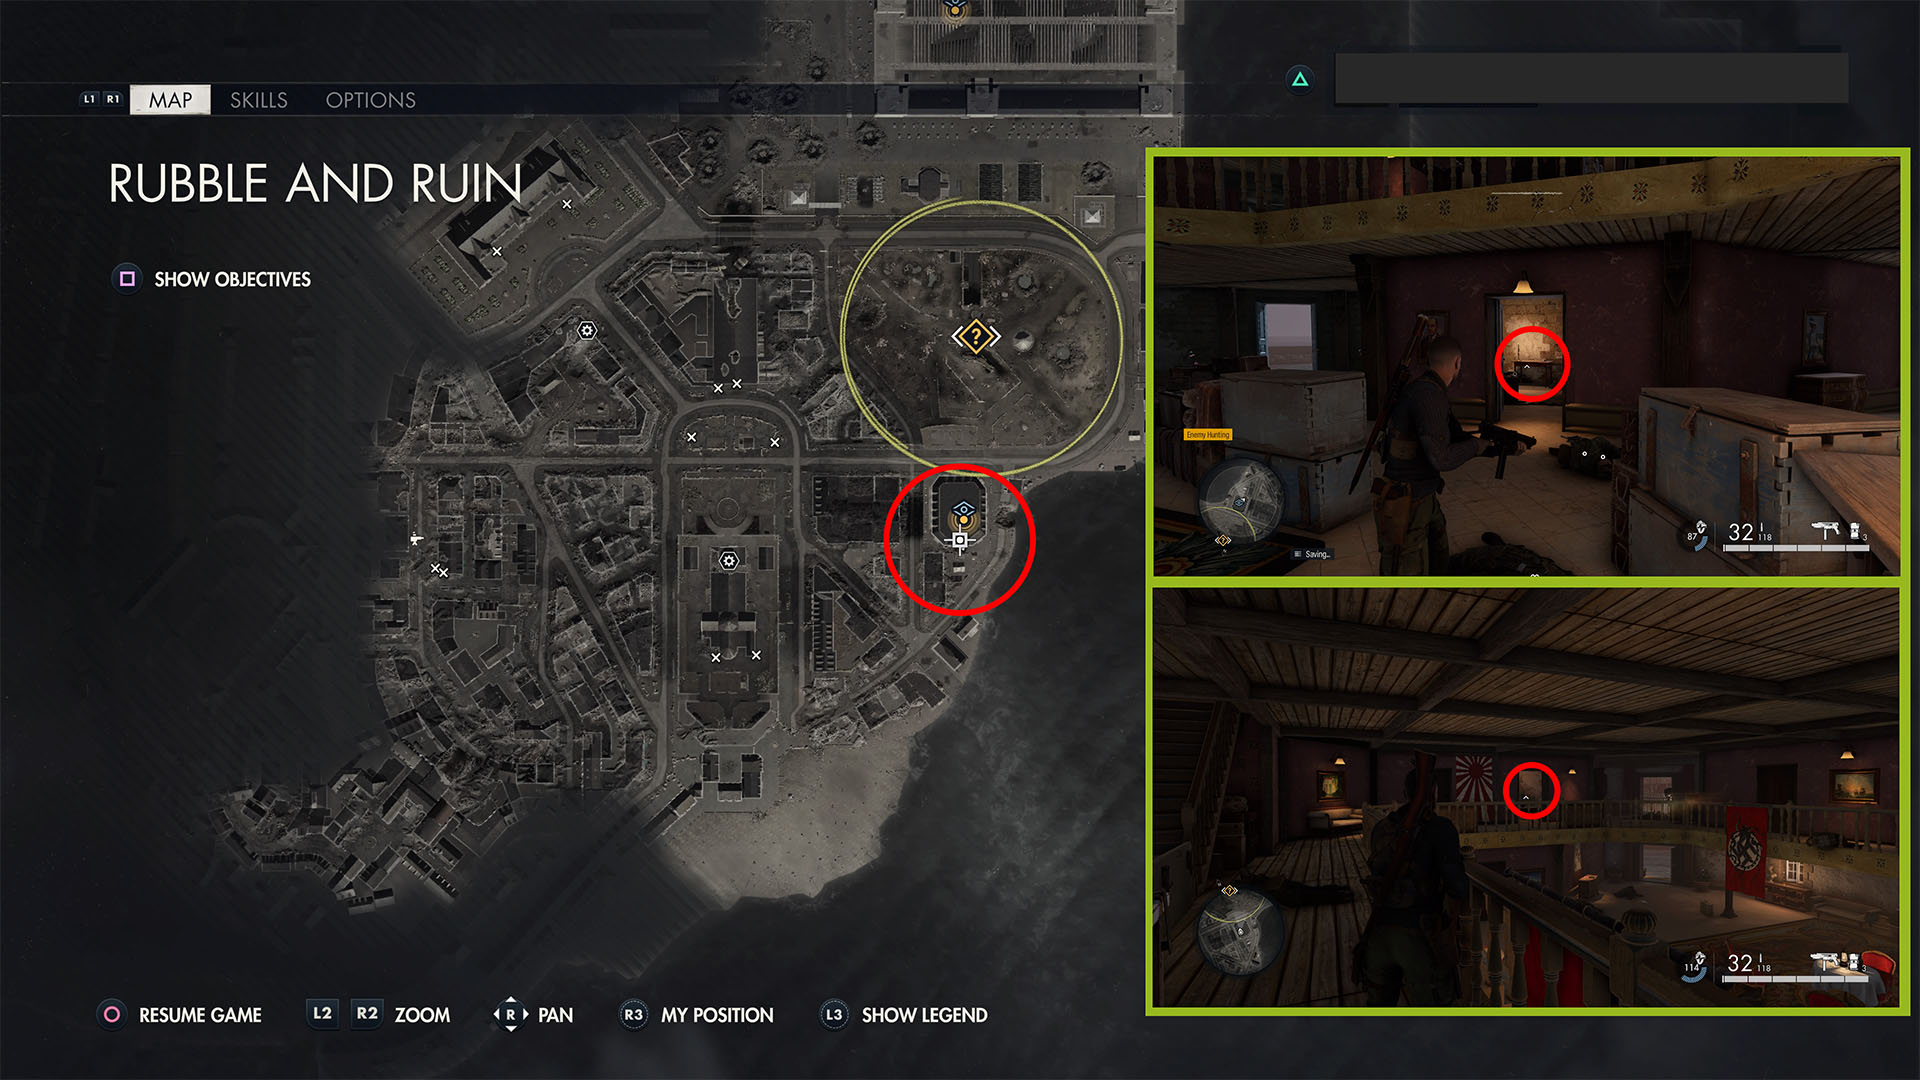
Your Man Talked! (Personal Letter 1)
After picking up the intel above, turn around, and follow the street left. Crawl through the rubble, and go around the back of the white, shelled building ahead of you (the front door will not be open as it is in the screenshot).
Climb up the ladder, then go downstairs to get the building key on the wall. Go back upstairs and open the locked door to pick this up off of a desk across from the generator.
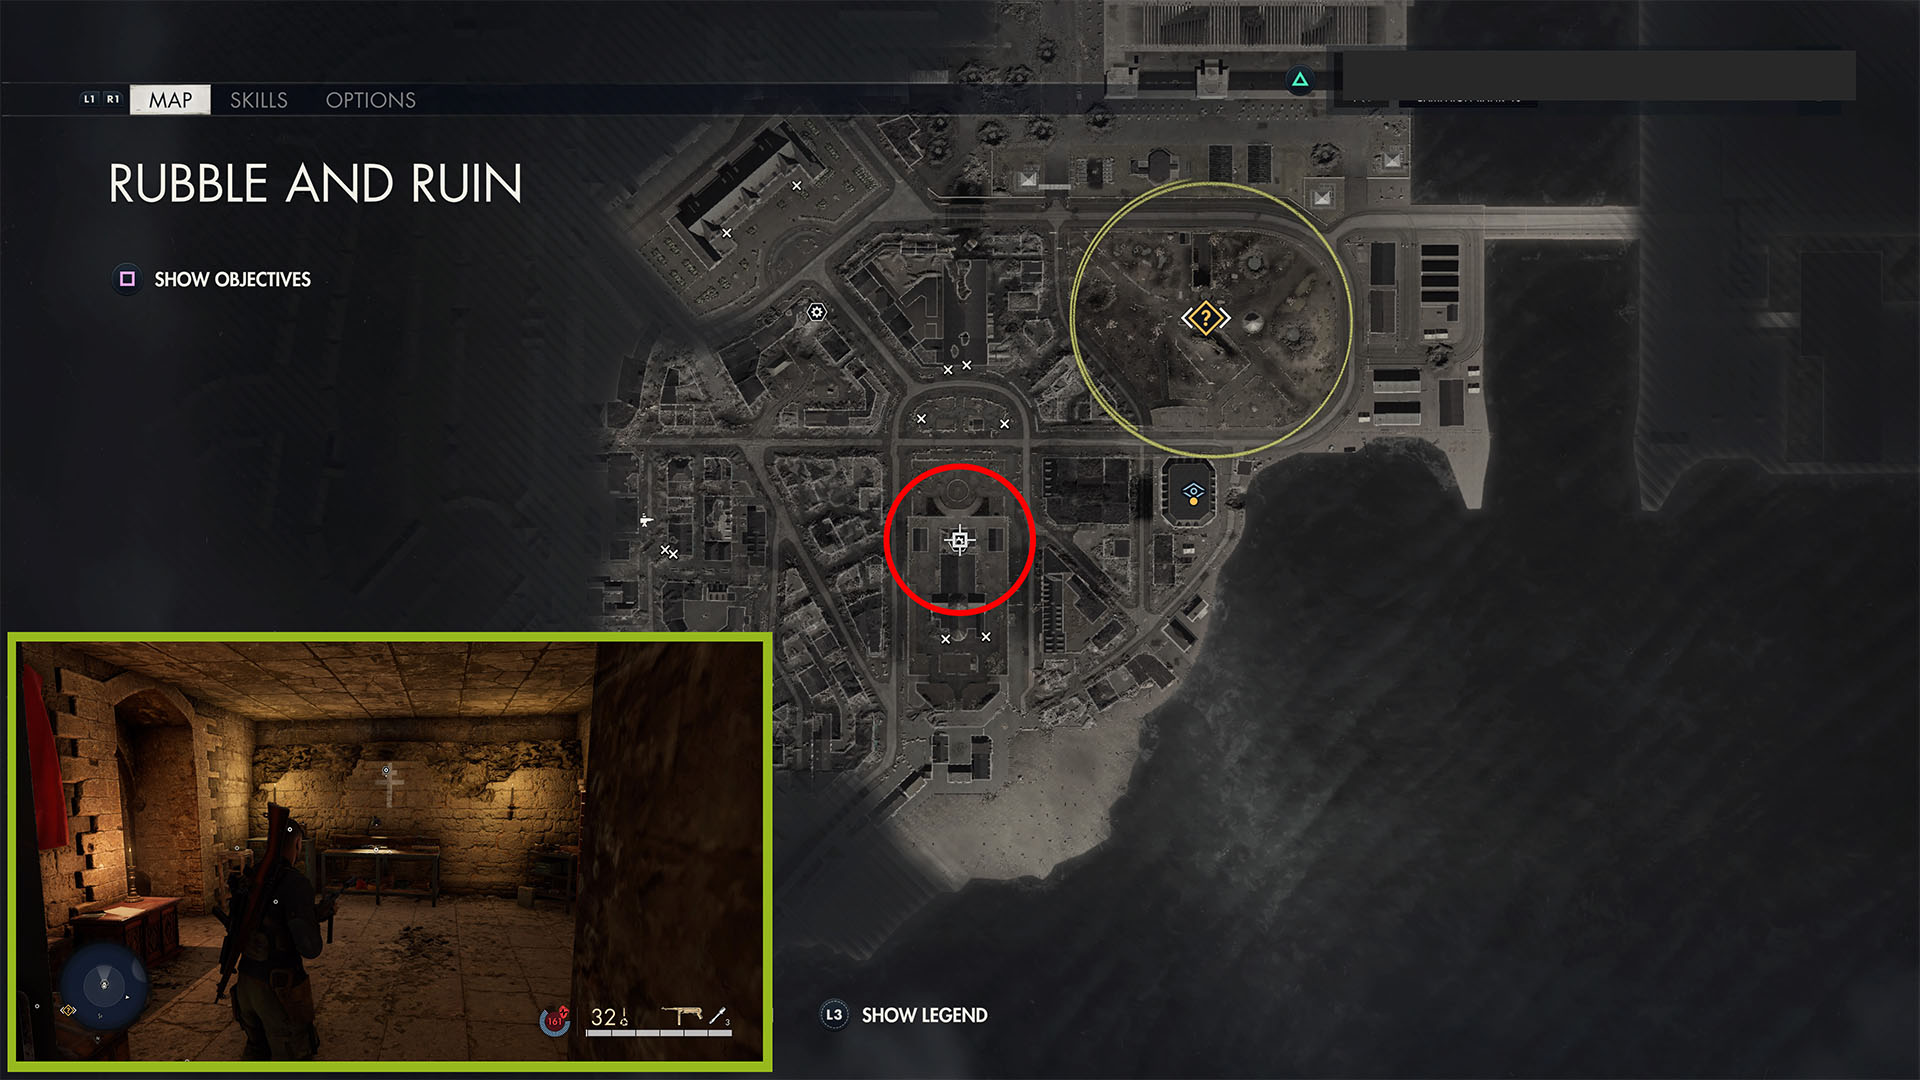
Resistance Report (Classified Document 3)
Continue northwest. You should have a marker for an interrogation at a bookstore. If so, go there and into the basement to find this piece of intel behind a locked cell door (you can pick up the key from an officer nearby or use a satchel charge).
If you don’t have the marker, continue north up the street in front of the house and past the fueling area with the truck and spotlight. Take the steps on the left past the barricade, car, and tall grass down. Go right between the red and blue buildings on the right, then the first opening on the right to drop down to the basement with the cell behind you.
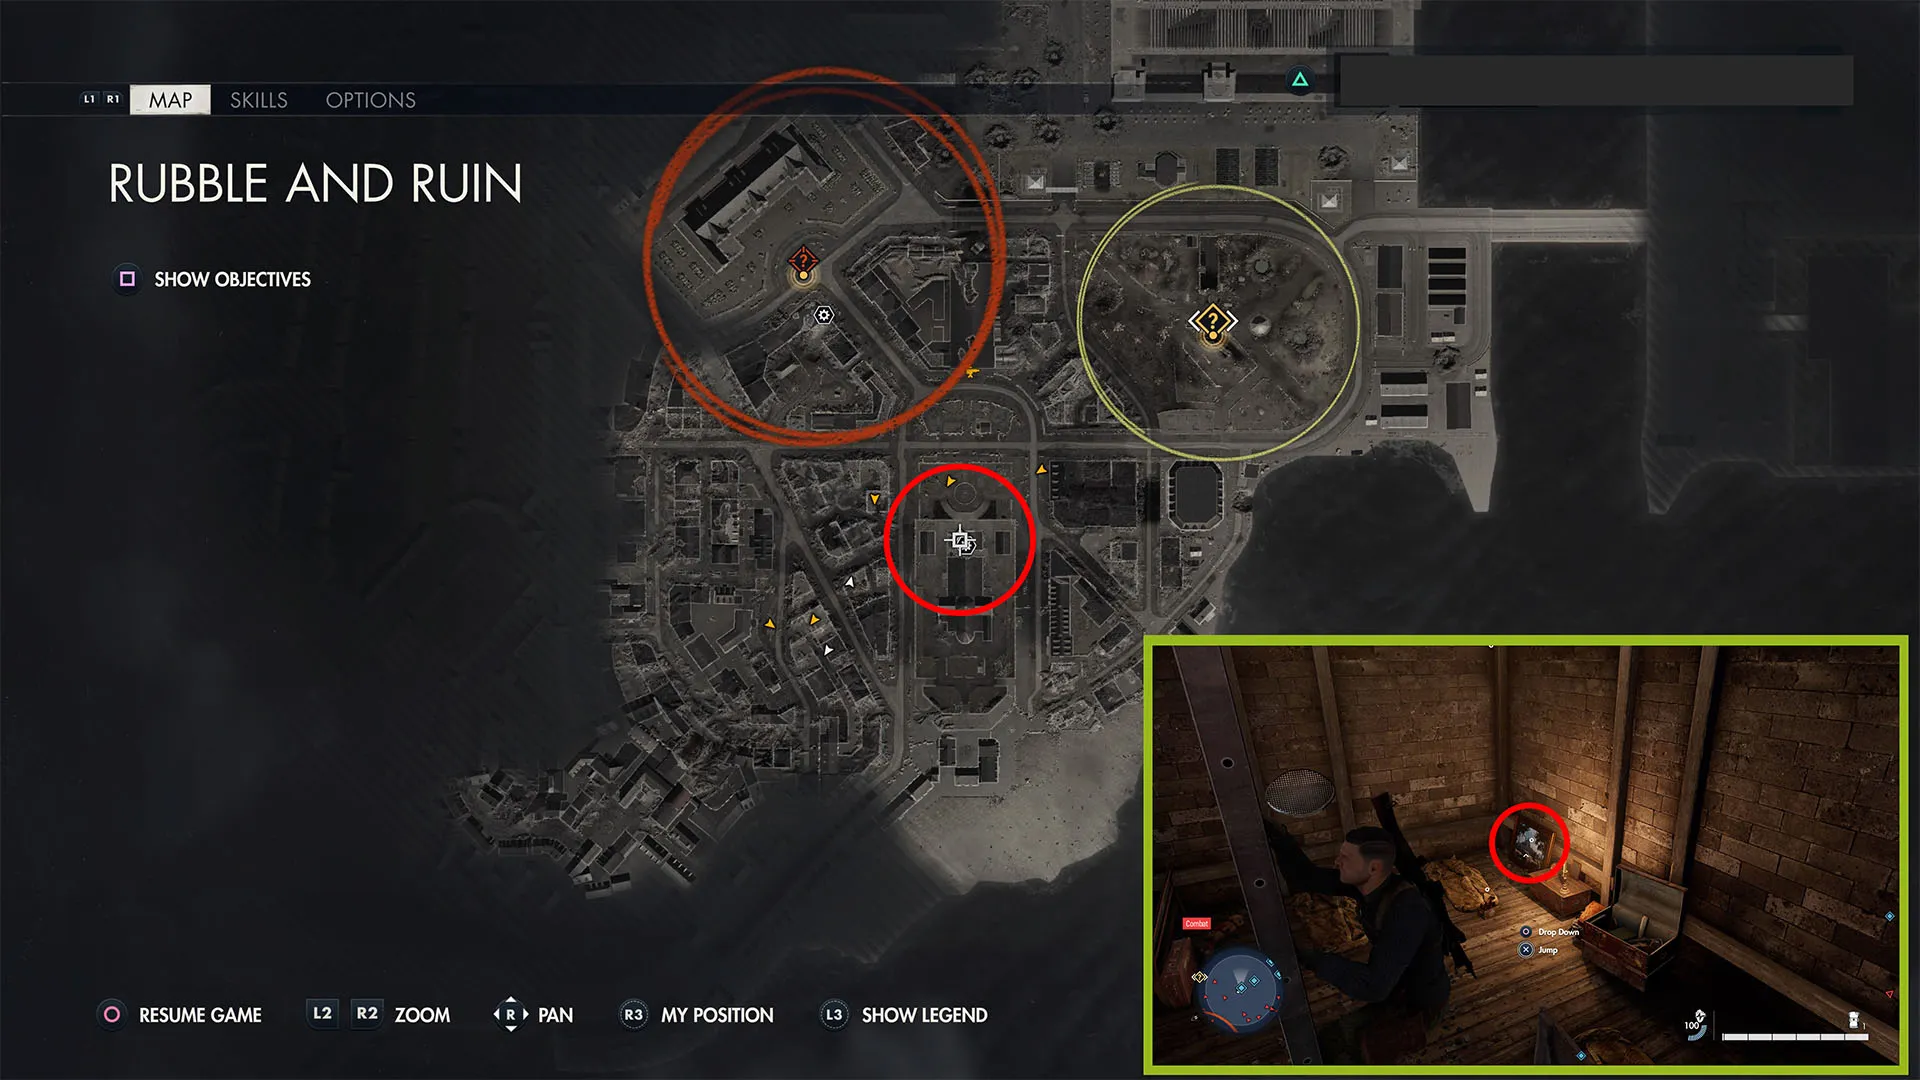
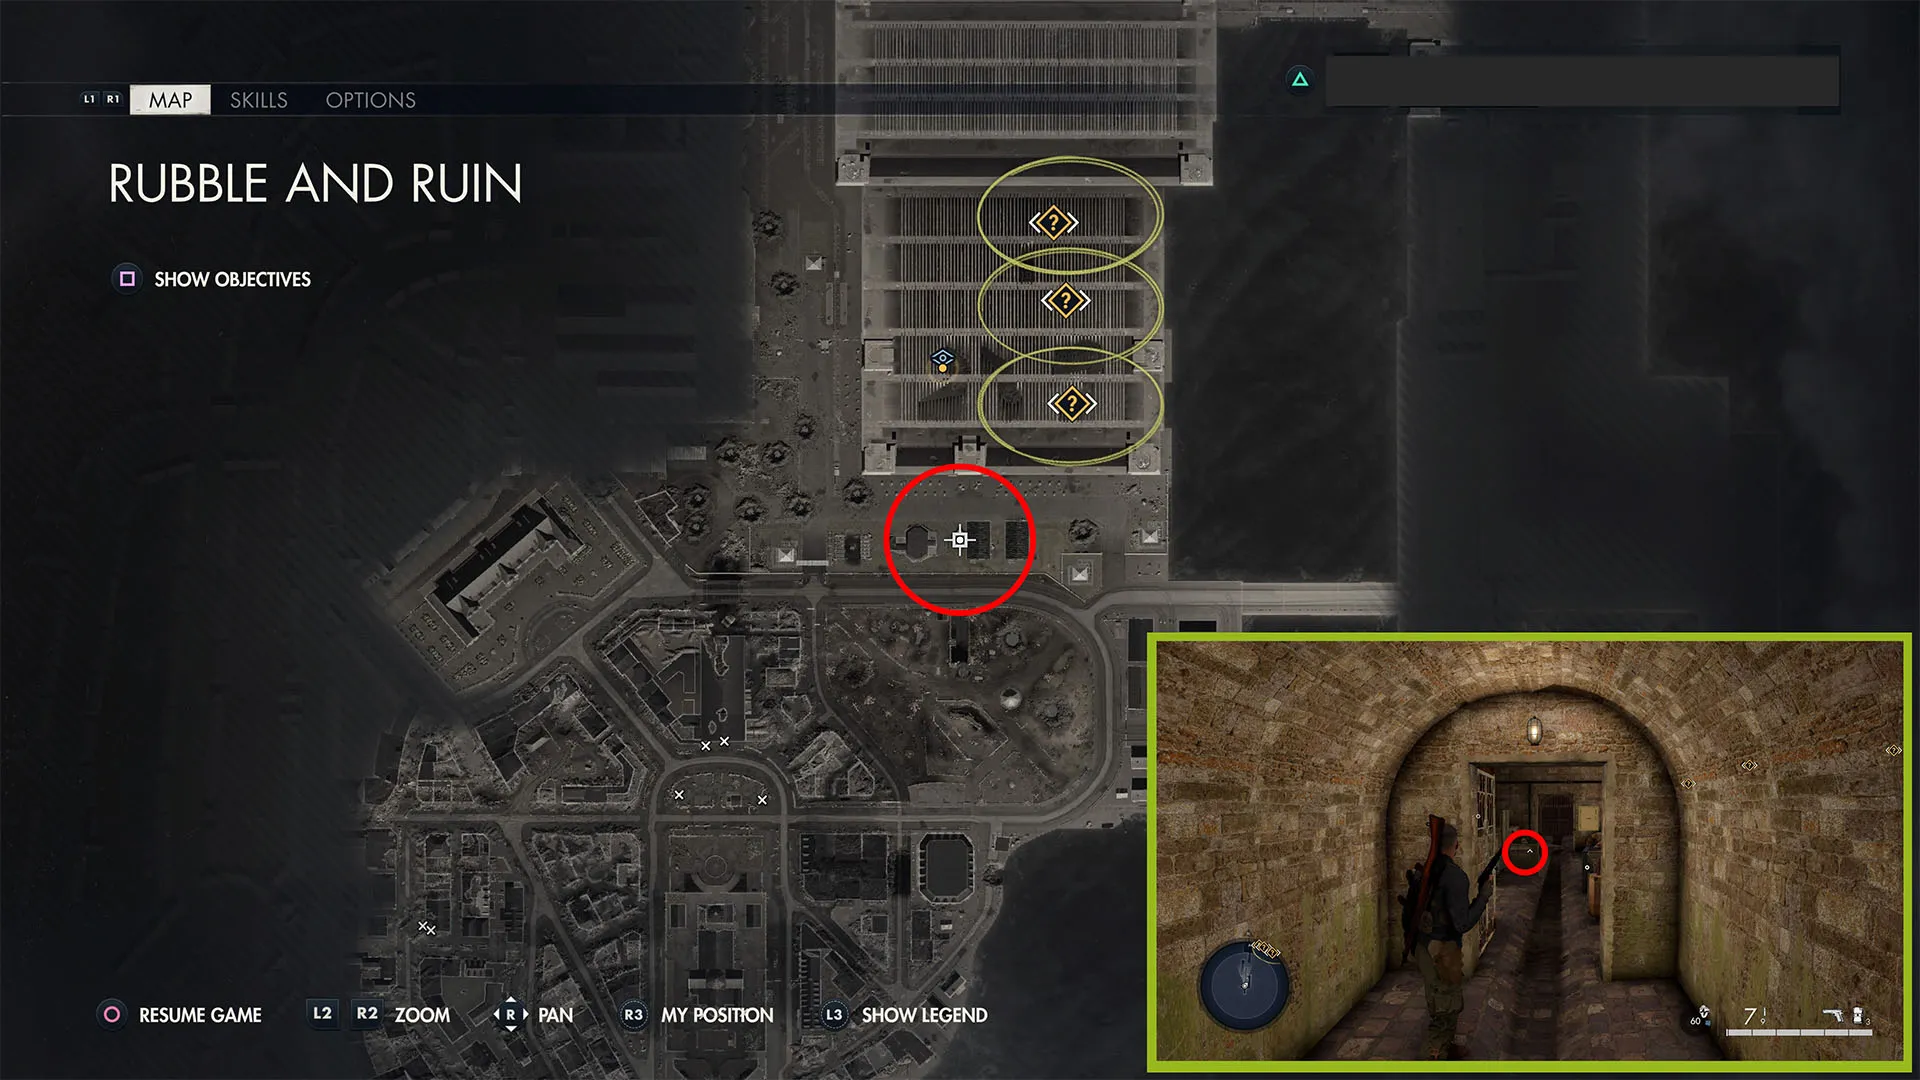
Cafe Starting Location and Priority Pick Up (Classified Document 4)
Go back to the MG42 emplacement west of the last piece of intel and go inside the Metro Du Cafe on the left side of the road behind it. Take the stairs up, then climb up. Open the door at the end of the path to secure the starting location. Climb up the desk just inside the door to the right to reach the attic. This classified document is on the floor ahead of you.
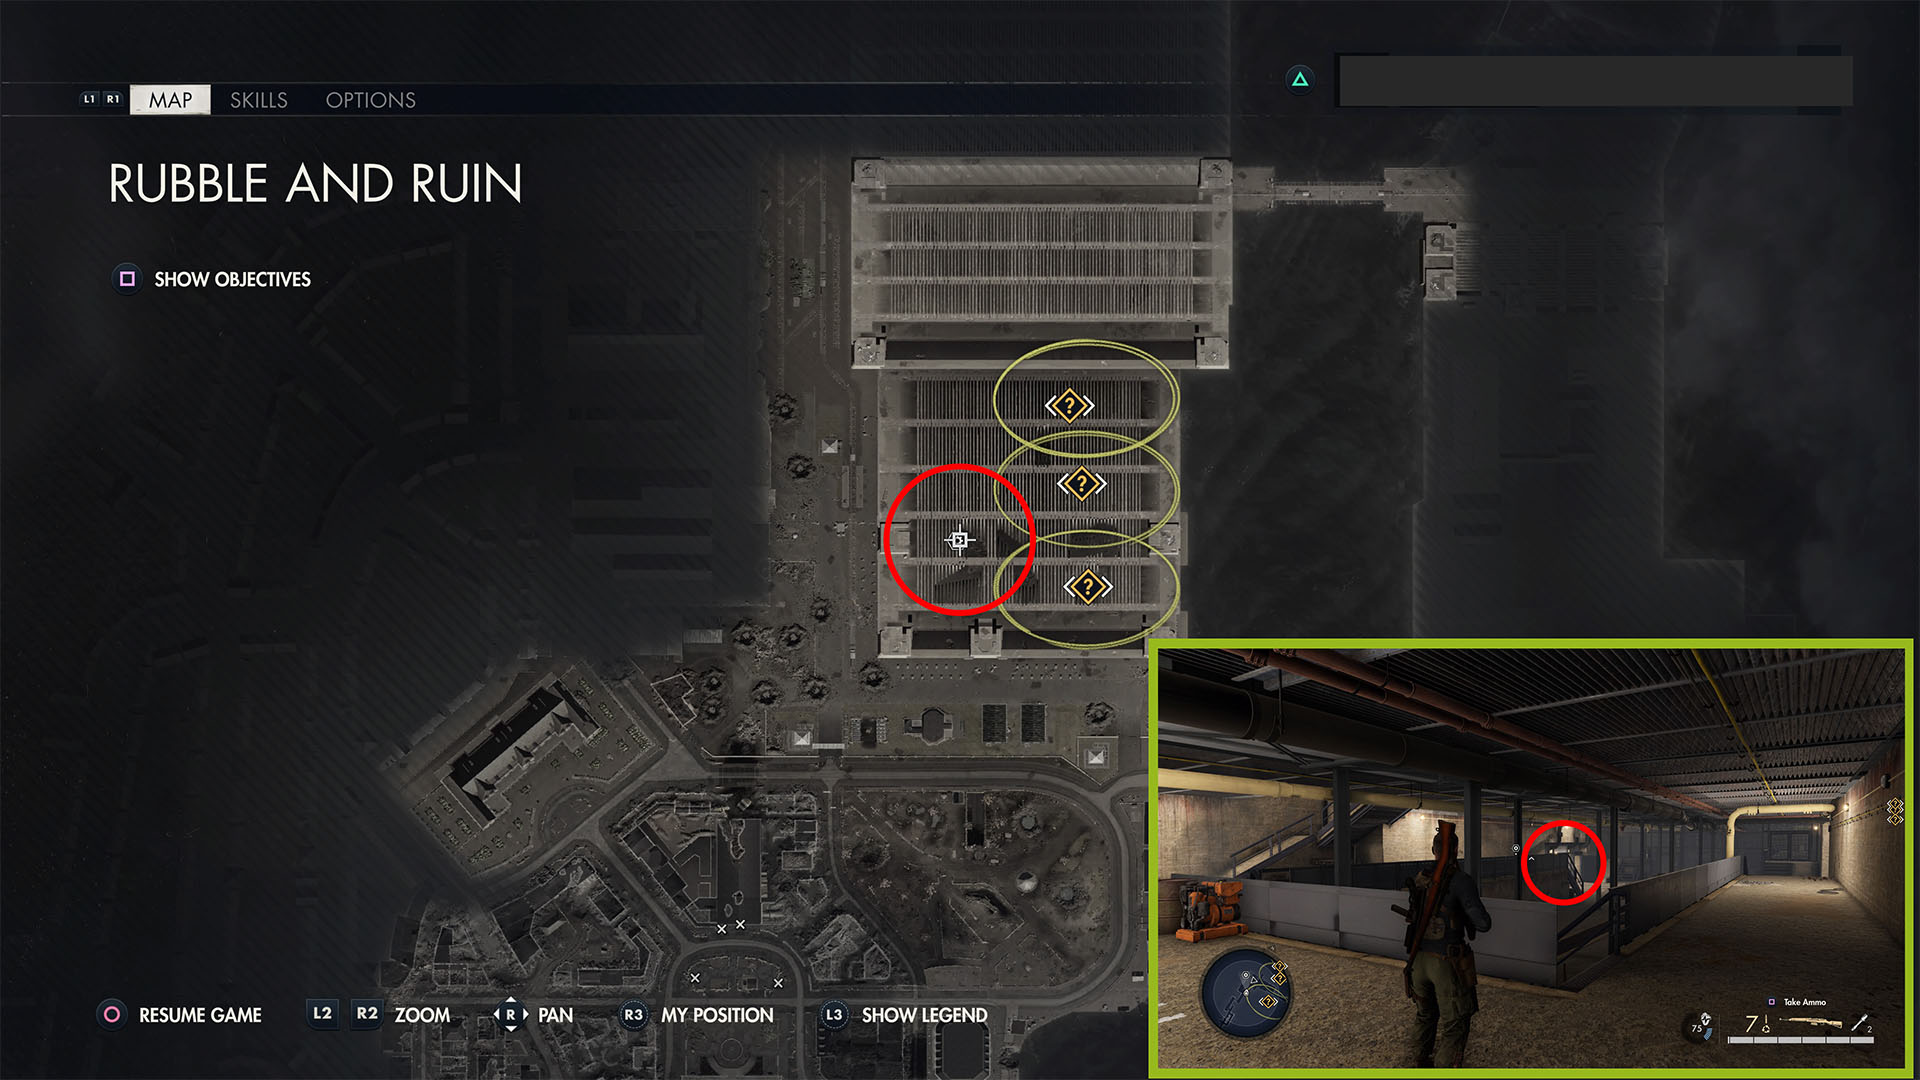
SMG Workbench

Head northeast through the ruins toward the town hall for your kill target (Yoshikawa). There should be a blue icon on your map indicating a resistance cache in the northeast corner of the building block just south/southwest of the town hall. There is a generator inside and a ramp leading up. Take that, then climb the hanging floor section. The workbench is at the top.
Stone Eagle 1

Look toward the town hall (northwest) and above the main entrance for this stone eagle perched above the central eave window.
He’s Not the Sharpest (Personal Letter 2)

From the workbench, go to the bombed-out theater just north of the church; it’s in the middle of the building block across the street (east) from the workbench, with a glider crashed into it. Go to the southern side and upstairs to find this in a locked crate (use a crowbar) near an MG42 emplacement on the balcony looking toward the church.
Pistol Workbench
This workbench is in the church crypt. You can enter the crypt by way of the door in the northwestern corner of the main hall (there is a satchel charge on the scaffolding nearby and the crypt key at the top of the tower in a crate); through the door underneath the main steps on the northern side; or the weak wall on the northeastern side.
An “Original” Adolf (Hidden Item 1)
Climb up the scaffolding next to the crypt door and up into the hole in the wall. Then climb the ladder up one floor and jump off. The painting is leaning against the wall near the sleeping bags.
It’s Not Over Yet (Personal Letter 3) and Flagship Fuel Risks (Classified Document 5)
Head east two blocks to the Hotel Sue la Mer; there should be a blue marker for Moller’s safe in the hotel if you’ve followed this guide to this point. If not, it’s the octagonal building across the road (south) from the sewer entrance objective. It has “HOTEL” written on it in large, red letters facing the sewer. Pick up the personal letter from the downstairs office (southern side), then open the safe in the upstairs room to the right of the Rising Sun flag.
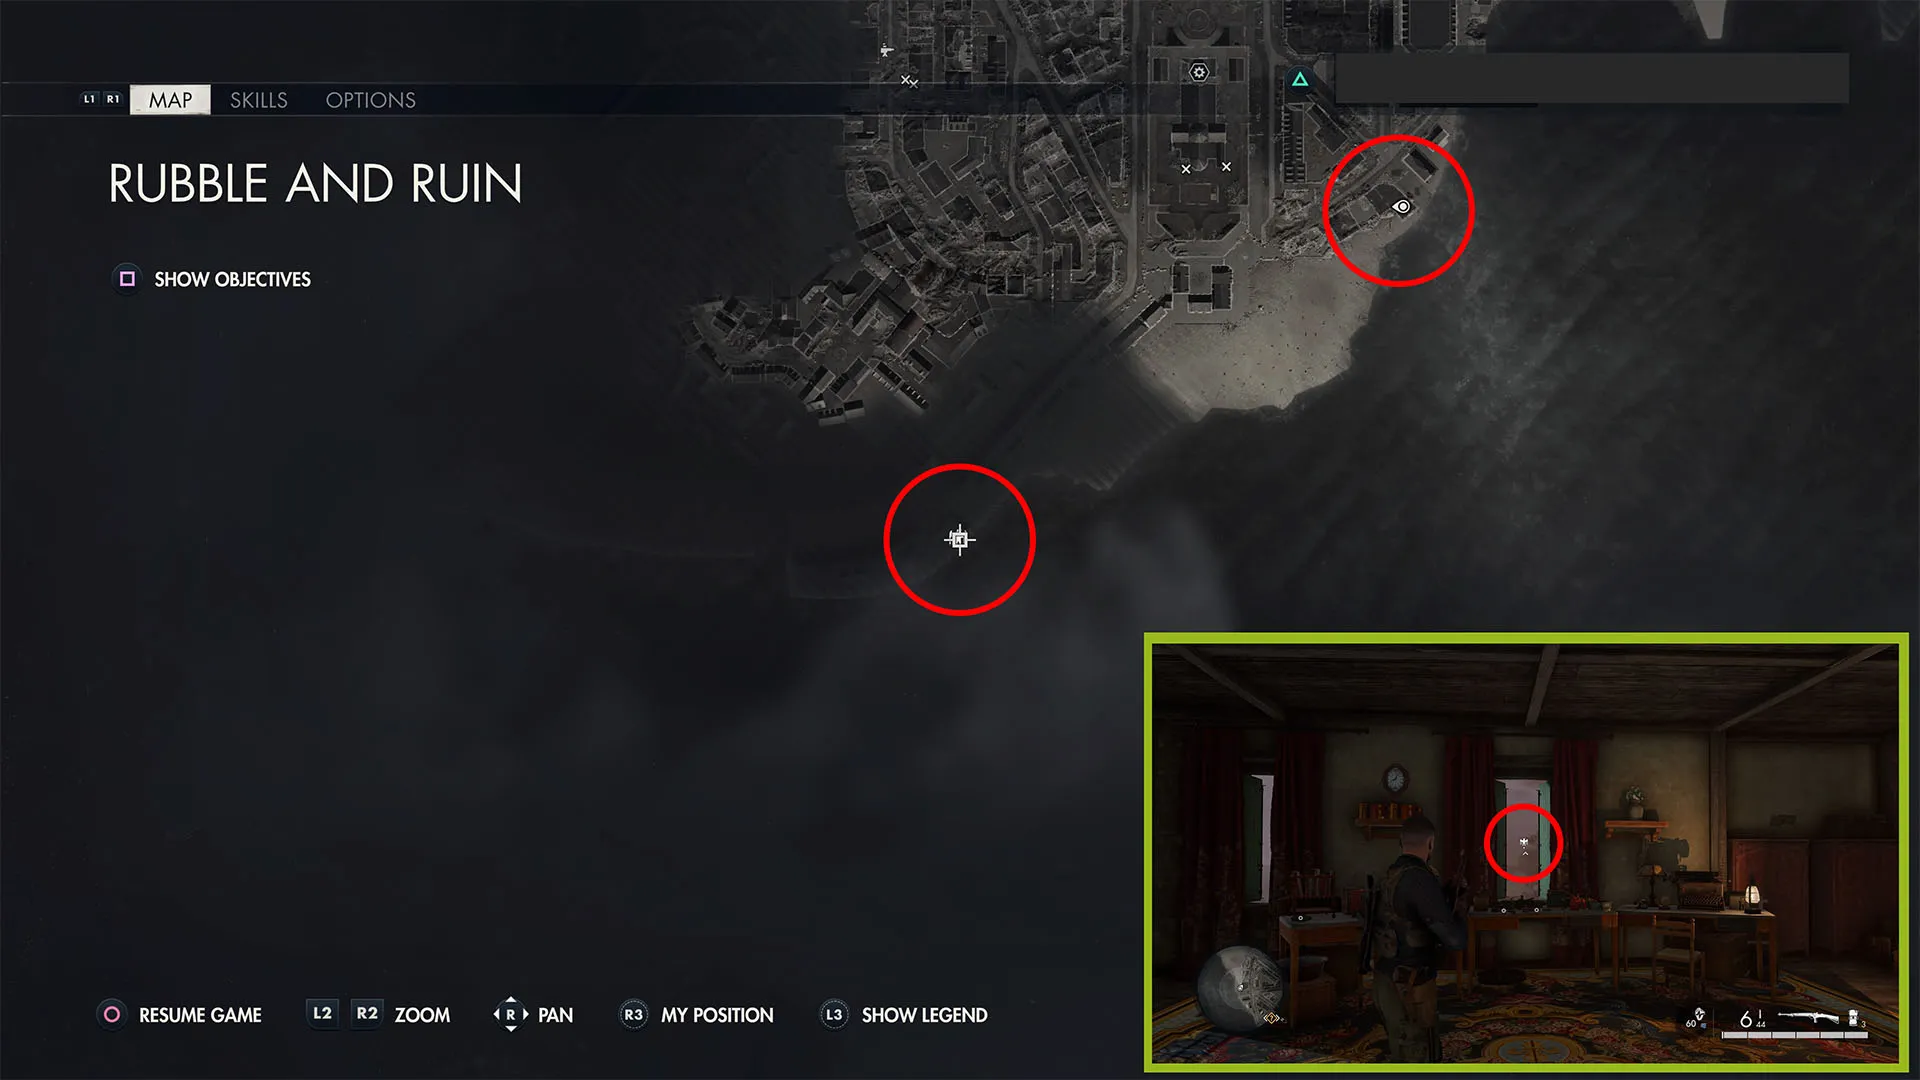
Seaview Offices Starting Location and Moller is Moving (Personal Letter 4)

Take the road west of the hotel and head south. The road will terminate at a red and white brick building with green shutters and a sandbag barricade out front. Go through the archway to the left of the entrance, then right through a hole in the wall to find the personal letter on a desk with a typewriter. Then go upstairs and open the door at the top to secure the starting location.
Stone Eagle 2
Once you’ve opened the door to secure the starting location, go through the next door (by the resistance flag) into a communications room/armory. Look through the first window on the right to the building at the very end of the beach. The stone eagle is perched on the roof.
Stone Eagle 3
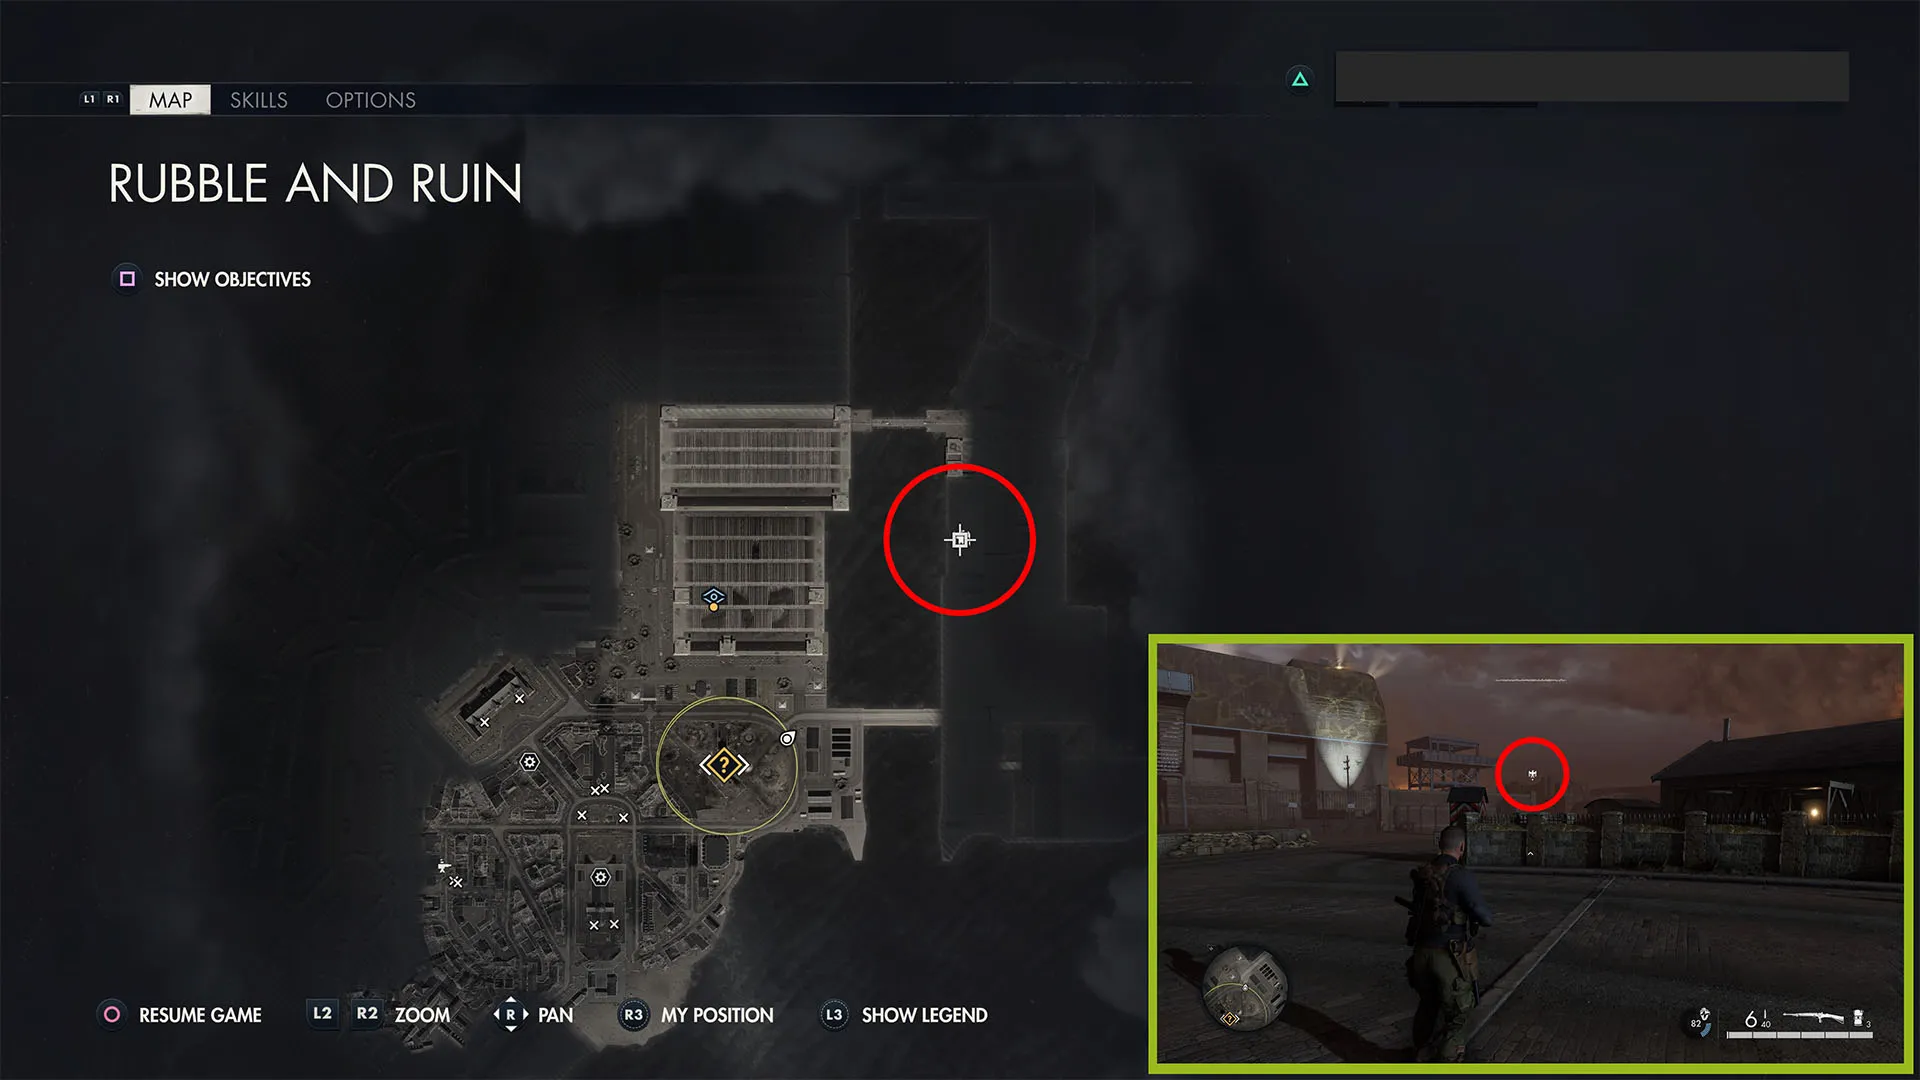
Go to the road just northeast of the sewer entrance objective. There will be a checkpoint off the road and two towers on the left side. Look past the second tower to a refinery building off the map for the stone eagle to the left of two tall tanks.
Clean Out the Sewer (Personal Letter 5)
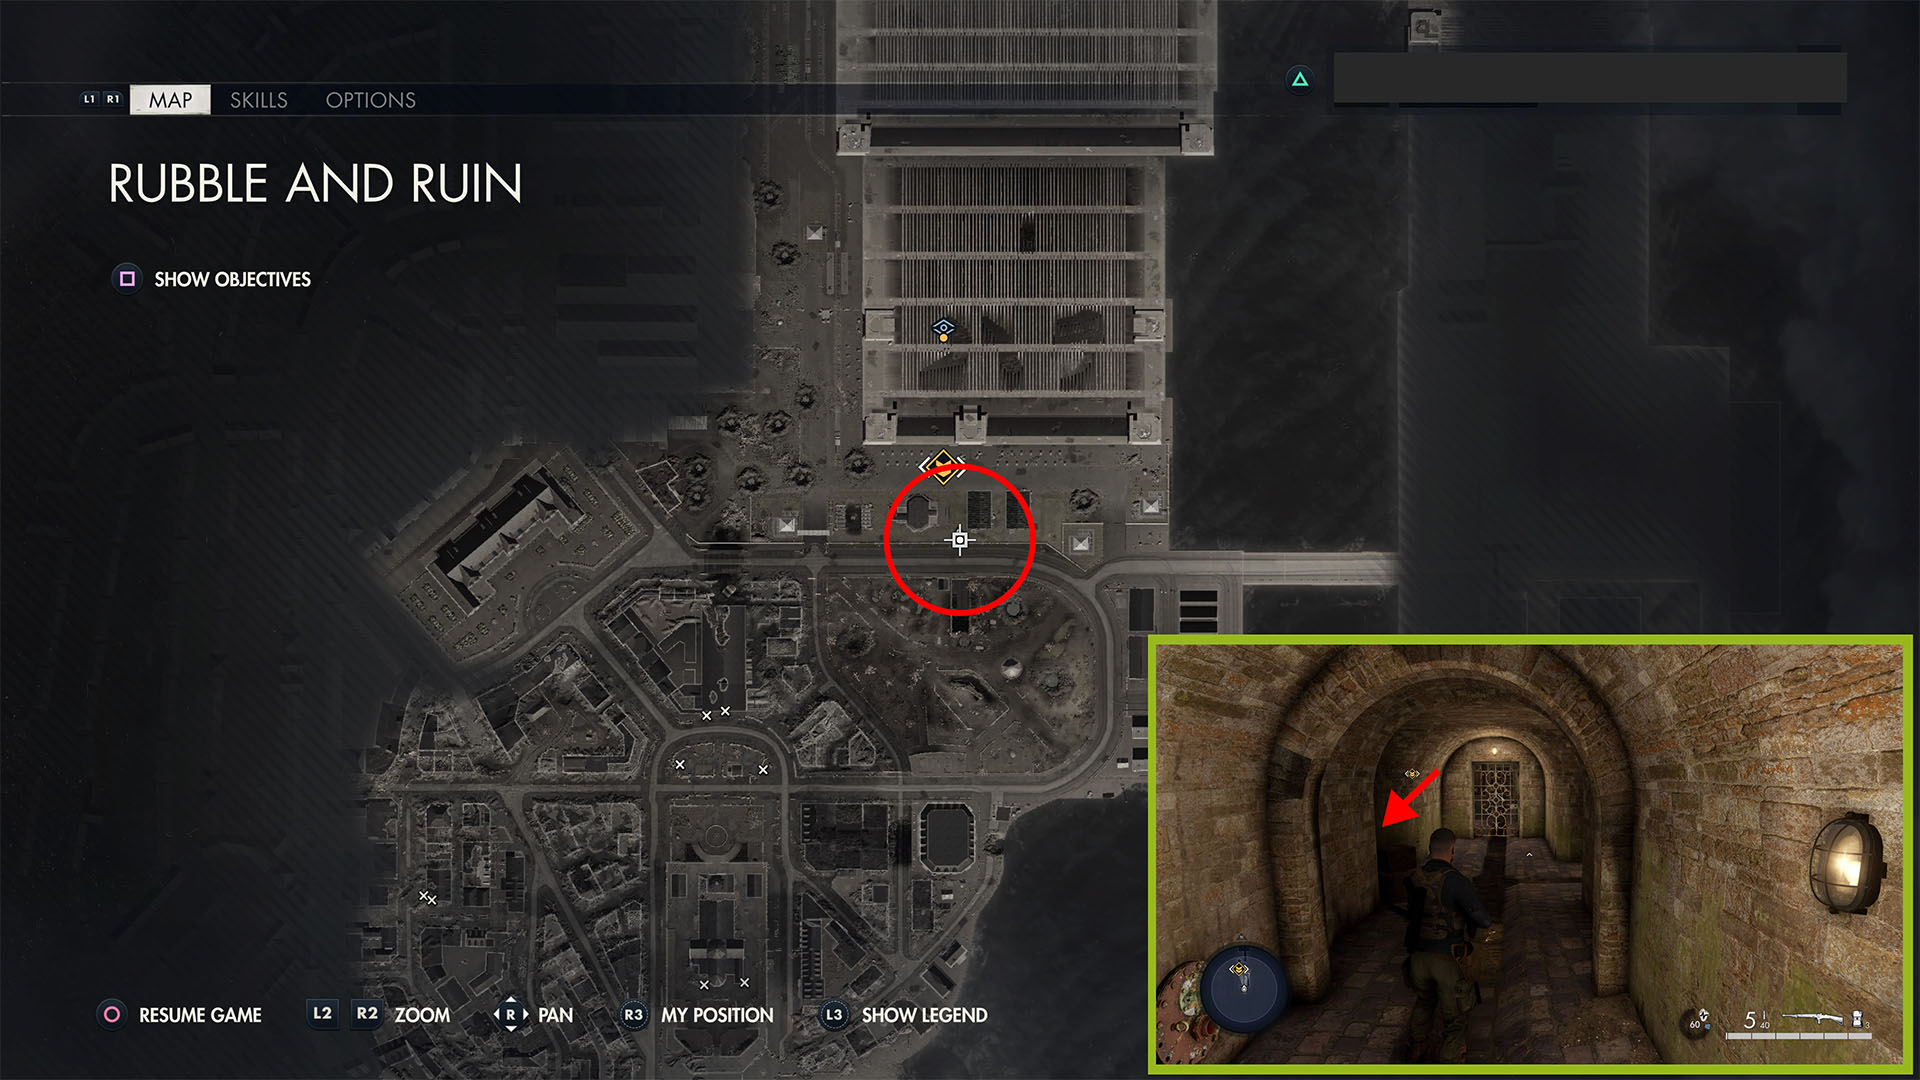
Enter the sewer, and look behind the crates on the left side as soon as you spawn into the area.
Stolen Tonto (Hidden Item 2)
If you have a satchel charge, blow open the door by the personal letter above. Then look in the crowbar crate on the left side for this hidden item. If you don’t have a satchel charge, follow the path around until you (quickly) find a room with a safe on the left side. Open the safe for the Sewer Pump Room Key.
Rifle Workbench
From the room with the safe, follow the corridor around, up some stairs, and through a green door (there’s a generator here in front of you). Go along the left side and down the ramp/stairs. Just after, on the left, is a small armory. The key is on one of the soldiers nearby.
I-400 V2 Hangar (Hidden Item 3)

Destroy the three U-boats and enter the classified U-boat pen by way of the second-story catwalk. Turn left on the catwalk inside the pen, go into the room at the end/far western corner (Funkraum 84). Then go right through a smaller room and into Kontrollraum 78. This hidden item is on four desks pushed together in the center of the room.
And that’s where to find all of the collectibles in Rubble and Ruin, Sniper Elite 5‘s eighth mission. There’s only one thing left to do: take out Moller. If you purchased the season pass or the Kill Hitler DLC separately, there are still more stone eagles, workbenches, documents, letters, and items to pick up. For guides to all other levels, like the Kill Hitler DLC, and how to complete all of the kill challenges for each mission, head over here to our SE5 tips page.


Published: May 27, 2022 06:28 pm